Product Manual
Page 2
TABLE OF CONTENTS Important Safety Information 3 Safety Precautions 3 Grounding Instructions 4 Operating Instructions 5 Features of Your Wine Cooler 5 The Controls of Your Wine Cooler 6 Setting the Temperature 6 Wine Storage 7 Shelf Instructions 7 Installation Instructions 8 Tools You Will Need 8 Preparing the Enclosure 8 Care and Cleaning 9 Helpful Hints 9 How to Clean the Inside 9 How to Clean the Outside 9 Trouble Shooting 10 Before Your Call For Service 10 Warranty 11 1
TABLE OF CONTENTS Important Safety Information 3 Safety Precautions 3 Grounding Instructions 4 Operating Instructions 5 Features of Your Wine Cooler 5 The Controls of Your Wine Cooler 6 Setting the Temperature 6 Wine Storage 7 Shelf Instructions 7 Installation Instructions 8 Tools You Will Need 8 Preparing the Enclosure 8 Care and Cleaning 9 Helpful Hints 9 How to Clean the Inside 9 How to Clean the Outside 9 Trouble Shooting 10 Before Your Call For Service 10 Warranty 11 1
Product Manual
Page 3
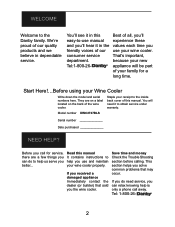
... need service, you better... Model number DWC2727BLS Serial number Date purchased NEED HELP? Staple your wine cooler properly. Read this manual. This section helps you use manual and you the wine cooler. Save time and money Check the Trouble Shooting section before calling. We're proud of our consumer service department. If you do to help you solve common problems that sold you 'll hear it to the Danby family...
... need service, you better... Model number DWC2727BLS Serial number Date purchased NEED HELP? Staple your wine cooler properly. Read this manual. This section helps you use manual and you the wine cooler. Save time and money Check the Trouble Shooting section before calling. We're proud of our consumer service department. If you do to help you solve common problems that sold you 'll hear it to the Danby family...
Product Manual
Page 4
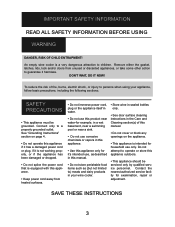
... not immerse power cord, plug or the appliance itself in water. • Do not use this appliance outdoors. • This appliance should be grounded. DON'T WAIT, DO IT NOW! To reduce the risk of fire, burns, electric shock, or injury to persons when using your wine cooler. • Store wine in sealed bottles only. • See door surface cleaning instructions in the...
... not immerse power cord, plug or the appliance itself in water. • Do not use this appliance outdoors. • This appliance should be grounded. DON'T WAIT, DO IT NOW! To reduce the risk of fire, burns, electric shock, or injury to persons when using your wine cooler. • Store wine in sealed bottles only. • See door surface cleaning instructions in the...

Product Manual
Page 5
... or service technician install an outlet near the appliance. 4 This appliance is equipped with a power cord having a grounding wire with this appliance. IMPORTANT SAFETY INFORMATION GROUNDING INSTRUCTIONS WARNING This appliance must be grounded. For best operation, plug this appliance. The plug must be plugged into its own electrical outlet to prevent flickering of lights, blowing of fuse or tripping of circuit...
... or service technician install an outlet near the appliance. 4 This appliance is equipped with a power cord having a grounding wire with this appliance. IMPORTANT SAFETY INFORMATION GROUNDING INSTRUCTIONS WARNING This appliance must be grounded. For best operation, plug this appliance. The plug must be plugged into its own electrical outlet to prevent flickering of lights, blowing of fuse or tripping of circuit...
Product Manual
Page 6
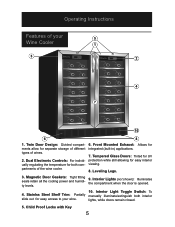
the compartment when the door is opened. lights, while doors remain closed. 5. Dual Electronic Controls: For individ- ually regulating the temperature for both interior slide out for separate storage of different types of the wine cooler. 6. Front Mounted Exhaust: Allows for easy interior viewing. 8. Leveling Legs. 3. Magnetic Door Gaskets: Tight fitting 9. Interior Lights (not shown): Illuminates seals retain all the cooling power and humidi- Tempered...
the compartment when the door is opened. lights, while doors remain closed. 5. Dual Electronic Controls: For individ- ually regulating the temperature for both interior slide out for separate storage of different types of the wine cooler. 6. Front Mounted Exhaust: Allows for easy interior viewing. 8. Leveling Legs. 3. Magnetic Door Gaskets: Tight fitting 9. Interior Lights (not shown): Illuminates seals retain all the cooling power and humidi- Tempered...
Product Manual
Page 7
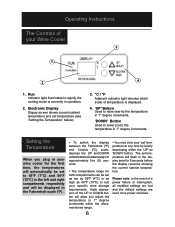
... your Wine Cooler 3 1 2 4 1. Each depression of temperature is currently in the display area for both compartments can be displayed in 1° degree increments within the aforementioned range. • You may view your 'set temperature will flash in operation. 2. Please note: In the event of your specific wine storage requirements. The set ' temperature at any time by briefly depressing either the 'UP' or 'DOWN' button. Operating Instructions The Controls of a power...
... your Wine Cooler 3 1 2 4 1. Each depression of temperature is currently in the display area for both compartments can be displayed in 1° degree increments within the aforementioned range. • You may view your 'set temperature will flash in operation. 2. Please note: In the event of your specific wine storage requirements. The set ' temperature at any time by briefly depressing either the 'UP' or 'DOWN' button. Operating Instructions The Controls of a power...
Product Manual
Page 8
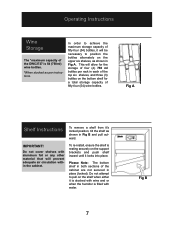
...of fifty-four (54) wine bottles. Operating Instructions Wine Storage The *maximum capacity of the DWC2727 is filled with water. 7 Fig B Please Note: The bottom shelf in Fig A. In order to pull on the shelf when either it 's locked position, tilt the shelf as per rack in each of the top... achieve the maximum storage capacity of fifty-four (54) bottles, it locks into place. To re-install, ensure the shelf is resting securely on the bottom shelf for the storage of four (4) 750 ml bottles per instructions. IMPORTANT! This will allow for a total storage capacity of the ...
...of fifty-four (54) wine bottles. Operating Instructions Wine Storage The *maximum capacity of the DWC2727 is filled with water. 7 Fig B Please Note: The bottom shelf in Fig A. In order to pull on the shelf when either it 's locked position, tilt the shelf as per rack in each of the top... achieve the maximum storage capacity of fifty-four (54) bottles, it locks into place. To re-install, ensure the shelf is resting securely on the bottom shelf for the storage of four (4) 750 ml bottles per instructions. IMPORTANT! This will allow for a total storage capacity of the ...
Product Manual
Page 9
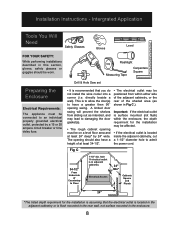
... door gasket(s). • The rough cabinet opening should be positioned from within the enclosure, the depth requirment for the installation is assuming that you do not install the wine cooler into a corner (i.e. This is recommended that the electrical outlet is located in the adjacent cabinetry or is located inside...From Underside of at least 24" deep* by a 15 or 20 ampere circuit breaker or time delay fuse. • It is to allow the door(s) to admit the power cord. Important: If the electrical outlet is surface mounted (not flush) within either side of the adjacent ...
... door gasket(s). • The rough cabinet opening should be positioned from within the enclosure, the depth requirment for the installation is assuming that you do not install the wine cooler into a corner (i.e. This is recommended that the electrical outlet is located in the adjacent cabinetry or is located inside...From Underside of at least 24" deep* by a 15 or 20 ampere circuit breaker or time delay fuse. • It is to allow the door(s) to admit the power cord. Important: If the electrical outlet is surface mounted (not flush) within either side of the adjacent ...
Product Manual
Page 10
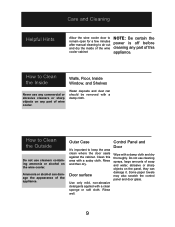
... the control panel and door glass. 9 Door surface Use only mild, non-abrasive detergents applied with a damp cloth and dry thoroughly. Care and Cleaning Helpful Hints Allow the wine cooler door to remain open for a few minutes after manual cleaning to air out and dry the inside of the wine cooler cabinet NOTE: Be certain the power is off before cleaning any part of wine cooler.
... the control panel and door glass. 9 Door surface Use only mild, non-abrasive detergents applied with a damp cloth and dry thoroughly. Care and Cleaning Helpful Hints Allow the wine cooler door to remain open for a few minutes after manual cleaning to air out and dry the inside of the wine cooler cabinet NOTE: Be certain the power is off before cleaning any part of wine cooler.
Product Manual
Page 11
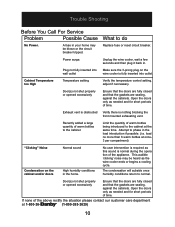
.... Cabinet Temperature too High Temperature setting Verify the temperature control setting. Recently added a large quantity of warm bottles to the cabinet Limit the quantity of the above rectify the situation please contact our customer care department at once3 per compartment) "Clicking" Noise Condensation on the wine cooler is nothing blocking the front mounted exhausting vent. Trouble Shooting Before You Call For Service Problem Possible...
.... Cabinet Temperature too High Temperature setting Verify the temperature control setting. Recently added a large quantity of warm bottles to the cabinet Limit the quantity of the above rectify the situation please contact our customer care department at once3 per compartment) "Clicking" Noise Condensation on the wine cooler is nothing blocking the front mounted exhausting vent. Trouble Shooting Before You Call For Service Problem Possible...


