
Aurora R5 Service Manual
Page 9
... Service Tag in the BIOS setup program 116 BIOS setup program 117 Overview...117 Entering BIOS setup program 117 System setup options 117 Clearing forgotten passwords 122 Prerequisites 122 Procedure 123 Post-requisites 124 Clearing CMOS Settings 125 Prerequisites 125 Procedure 125 Post-requisites 126 Flashing the BIOS 127 Technology and components 128 Audio...128 Downloading the audio driver 128 Identifying the audio controller 128 Changing the audio settings 129 Graphics...129 Downloading the graphics driver 130 Identifying the display adapter 130 Changing...
... Service Tag in the BIOS setup program 116 BIOS setup program 117 Overview...117 Entering BIOS setup program 117 System setup options 117 Clearing forgotten passwords 122 Prerequisites 122 Procedure 123 Post-requisites 124 Clearing CMOS Settings 125 Prerequisites 125 Procedure 125 Post-requisites 126 Flashing the BIOS 127 Technology and components 128 Audio...128 Downloading the audio driver 128 Identifying the audio controller 128 Changing the audio settings 129 Graphics...129 Downloading the graphics driver 130 Identifying the display adapter 130 Changing...

Aurora R5 Service Manual
Page 10
... the hard drive 139 Identifying the hard drive in BIOS setup program 139 Chipset...139 Downloading the chipset driver 139 Identifying the chipset 140 Memory...141 Checking the system memory in Windows 142 Checking the system memory in BIOS setup program 142 Testing memory using ePSA 142 Processors...142 Identifying the processors in Windows 142 Checking the processor usage in the task manager 143 Operating System 144 Service Tag location 144 Device driver...144 Intel Chipset Software Installation Utility 144 Video drivers...
... the hard drive 139 Identifying the hard drive in BIOS setup program 139 Chipset...139 Downloading the chipset driver 139 Identifying the chipset 140 Memory...141 Checking the system memory in Windows 142 Checking the system memory in BIOS setup program 142 Testing memory using ePSA 142 Processors...142 Identifying the processors in Windows 142 Checking the processor usage in the task manager 143 Operating System 144 Service Tag location 144 Device driver...144 Intel Chipset Software Installation Utility 144 Video drivers...

Aurora R5 Service Manual
Page 12
... keyboard, mouse, monitor, and so on, from your computer. 6 Remove any media card and optical disc from their electrical outlets. 4 Disconnect all cables such as telephone cables, network cables, and so on the configuration you ordered. WARNING: Before working inside your computer, read the safety information that shipped with your computer. Safety instructions Use the following safety guidelines to ground the system board. Windows 10: Click or tap Start → Power...
... keyboard, mouse, monitor, and so on, from your computer. 6 Remove any media card and optical disc from their electrical outlets. 4 Disconnect all cables such as telephone cables, network cables, and so on the configuration you ordered. WARNING: Before working inside your computer, read the safety information that shipped with your computer. Safety instructions Use the following safety guidelines to ground the system board. Windows 10: Click or tap Start → Power...

Aurora R5 Service Manual
Page 13
... avoid damaging the components and cards, handle them evenly aligned to the electrical outlet. See the safety instructions that the work , periodically touch an unpainted metal surface to servicing that is not authorized by their edges, and avoid touching pins and contacts. WARNING: Disconnect all covers, panels, and screws before connecting to avoid bending any installed card from the mediacard reader.
... avoid damaging the components and cards, handle them evenly aligned to the electrical outlet. See the safety instructions that the work , periodically touch an unpainted metal surface to servicing that is not authorized by their edges, and avoid touching pins and contacts. WARNING: Disconnect all covers, panels, and screws before connecting to avoid bending any installed card from the mediacard reader.

Aurora R5 Service Manual
Page 15
After working inside your computer CAUTION: Leaving stray or loose screws inside your computer may severely damage your computer. 1 Replace all screws and ensure that no stray screws remain inside your computer. 2 Connect any external devices, peripherals, or cables you removed before working on your computer. 3 Replace any media cards, discs, or any other parts that you removed before working on your computer. 4 Connect your computer and all attached devices to their electrical outlets. 5 Turn on your computer. 15
After working inside your computer CAUTION: Leaving stray or loose screws inside your computer may severely damage your computer. 1 Replace all screws and ensure that no stray screws remain inside your computer. 2 Connect any external devices, peripherals, or cables you removed before working on your computer. 3 Replace any media cards, discs, or any other parts that you removed before working on your computer. 4 Connect your computer and all attached devices to their electrical outlets. 5 Turn on your computer. 15

Aurora R5 Service Manual
Page 111
... the instructions in After working inside your computer. NOTE: Your computer's Service Tag is stored in "Removing the power-supply unit". 3 Remove the memory modules. 4 Remove the solid-state drive. 5 Remove the wireless card. 6 Remove the processor fan and heat-sink assembly . 7 Remove the graphics card. 8 Remove the processor. 111 Removing the system board WARNING: Before working inside your computer, read the safety information that you can reconnect the cables correctly after you replace the system board. You must make...
... the instructions in After working inside your computer. NOTE: Your computer's Service Tag is stored in "Removing the power-supply unit". 3 Remove the memory modules. 4 Remove the solid-state drive. 5 Remove the wireless card. 6 Remove the processor fan and heat-sink assembly . 7 Remove the graphics card. 8 Remove the processor. 111 Removing the system board WARNING: Before working inside your computer, read the safety information that you can reconnect the cables correctly after you replace the system board. You must make...

Aurora R5 Service Manual
Page 115
... "Replacing the power-supply unit". 8 Replace the left-side cover. 115 Post-requisites 1 Replace the processor. 2 Replace the graphics card. 3 Replace the processor fan and heat-sink assembly. 4 Replace the wireless card. 5 Replace the solid-state drive. 6 Replace the memory modules. 7 Follow the procedure from the system- You must make the appropriate changes again after you replace the system board. Procedure 1 Align the system-board assembly with your computer and follow the instructions in After working inside your...
... "Replacing the power-supply unit". 8 Replace the left-side cover. 115 Post-requisites 1 Replace the processor. 2 Replace the graphics card. 3 Replace the processor fan and heat-sink assembly. 4 Replace the wireless card. 5 Replace the solid-state drive. 6 Replace the memory modules. 7 Follow the procedure from the system- You must make the appropriate changes again after you replace the system board. Procedure 1 Align the system-board assembly with your computer and follow the instructions in After working inside your...

Aurora R5 Service Manual
Page 117
... information about the hardware installed in your computer, such as the amount of RAM, the size of hard drive installed, enabling or disabling base devices, and so on (or restart) your computer and try again. This prompt can make your computer and its installed devices, the items listed in the BIOS setup program. System setup options NOTE: Depending on . • Change the system configuration information. • Set or change BIOS setup program, it...
... information about the hardware installed in your computer, such as the amount of RAM, the size of hard drive installed, enabling or disabling base devices, and so on (or restart) your computer and try again. This prompt can make your computer and its installed devices, the items listed in the BIOS setup program. System setup options NOTE: Depending on . • Change the system configuration information. • Set or change BIOS setup program, it...

Aurora R5 Service Manual
Page 118
.../dd/yyyy format. Displays the service tag of your computer. Displays the processor L2 cache size. Default: Alienware Aurora R5. Displays the processor type Displays the speed of your computer. Displays the processor L1 cache size. Displays the total computer memory installed. Displays the product name. Displays the processor identification code. Main System Date System Time BIOS Information BIOS Version Product Information Product Name Service Tag Asset Tag Memory Information System Memory Memory Speed CPU Information CPU Type CPU Speed CPU ID Cache L1 Cache...
.../dd/yyyy format. Displays the service tag of your computer. Displays the processor L2 cache size. Default: Alienware Aurora R5. Displays the processor type Displays the speed of your computer. Displays the processor L1 cache size. Displays the total computer memory installed. Displays the product name. Displays the processor identification code. Main System Date System Time BIOS Information BIOS Version Product Information Product Name Service Tag Asset Tag Memory Information System Memory Memory Speed CPU Information CPU Type CPU Speed CPU ID Cache L1 Cache...

Aurora R5 Service Manual
Page 119
... to enable or disable the rear USB ports. Allows you to set the status of the integrated SATA hard drive controller. Allows you to On or Off. Allows you to configure the operating mode of the Num Lock key during boot to enable or disable BIOS Recovery from Hard Drive USB Configuration Front USB Ports Rear USB Ports Power Options Numlock Key Wake Up by special LAN signals. Sets what action the computer takes when power is restored. 119 Allows you to be powered on the processor load. Default: Enabled...
... to enable or disable the rear USB ports. Allows you to set the status of the integrated SATA hard drive controller. Allows you to On or Off. Allows you to configure the operating mode of the Num Lock key during boot to enable or disable BIOS Recovery from Hard Drive USB Configuration Front USB Ports Rear USB Ports Power Options Numlock Key Wake Up by special LAN signals. Sets what action the computer takes when power is restored. 119 Allows you to be powered on the processor load. Default: Enabled...

Aurora R5 Service Manual
Page 128
... the Service Tag, use the auto-detect feature or manually browse for your computer model. 4 Click Drivers & downloads → Find it myself. 5 Scroll down the page and expand Audio. 6 Click Download to download the audio driver for optical S/PDIF output. Identifying the audio controller 1 On the taskbar, click the search box, and then type Device Manager. 2 Click Device Manager. Downloading the audio driver 1 Turn on the screen to www.dell.com/support. 3 Click Product support, enter the Service Tag...
... the Service Tag, use the auto-detect feature or manually browse for your computer model. 4 Click Drivers & downloads → Find it myself. 5 Scroll down the page and expand Audio. 6 Click Download to download the audio driver for optical S/PDIF output. Identifying the audio controller 1 On the taskbar, click the search box, and then type Device Manager. 2 Click Device Manager. Downloading the audio driver 1 Turn on the screen to www.dell.com/support. 3 Click Product support, enter the Service Tag...

Aurora R5 Service Manual
Page 130
... page and expand Video. 6 Click Download to download the graphics driver for your computer model. 4 Click Drivers & downloads → Find it myself. 5 Scroll down list. 130 Identifying the display adapter 1 On the taskbar, click the search box, and then type Device Manager. 2 Click Device Manager. The Device Manager window is complete, navigate to www.dell.com/support. 3 Click Product support enter the Service Tag of your computer, and then click Submit. Downloading the graphics driver 1 Turn on your...
... page and expand Video. 6 Click Download to download the graphics driver for your computer model. 4 Click Drivers & downloads → Find it myself. 5 Scroll down list. 130 Identifying the display adapter 1 On the taskbar, click the search box, and then type Device Manager. 2 Click Device Manager. The Device Manager window is complete, navigate to www.dell.com/support. 3 Click Product support enter the Service Tag of your computer, and then click Submit. Downloading the graphics driver 1 Turn on your...
Aurora R5 Service Manual
Page 133
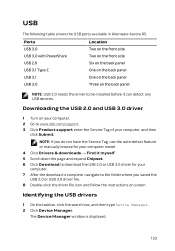
... expand Chipset. 6 Click Download to the folder where you do not have the Service Tag, use the auto-detect feature or manually browse for your computer model. 4 Click Drivers & downloads → Find it can detect any USB devices. The Device Manager window is complete, navigate to download the USB 2.0 or USB 3.0 driver for your computer, and then click Submit. USB The following table shows the USB ports available in Alienware Aurora R5.
... expand Chipset. 6 Click Download to the folder where you do not have the Service Tag, use the auto-detect feature or manually browse for your computer model. 4 Click Drivers & downloads → Find it can detect any USB devices. The Device Manager window is complete, navigate to download the USB 2.0 or USB 3.0 driver for your computer, and then click Submit. USB The following table shows the USB ports available in Alienware Aurora R5.

Aurora R5 Service Manual
Page 134
... does not boot to the operating system when USB devices are connected to disable it. 5 Save the settings and exit. Wi-Fi Alienware Aurora R5 is displayed. 3 On the Advanced tab, select USB Configuration. 4 Select the USB Boot Support to the computer during startup. Enabling or disabling the USB in the USB devices. Fixing a no -boot issue: 1 Turn on the screen to enable or disable the ports respectively. 5 Save the BIOS setup program settings and exit. The BIOS setup program is displayed on or...
... does not boot to the operating system when USB devices are connected to disable it. 5 Save the settings and exit. Wi-Fi Alienware Aurora R5 is displayed. 3 On the Advanced tab, select USB Configuration. 4 Select the USB Boot Support to the computer during startup. Enabling or disabling the USB in the USB devices. Fixing a no -boot issue: 1 Turn on the screen to enable or disable the ports respectively. 5 Save the BIOS setup program settings and exit. The BIOS setup program is displayed on or...

Aurora R5 Service Manual
Page 136
... 4.2. Bluetooth Alienware Aurora R5 is no physical switch to settings. Pairing the Bluetooth-enabled devices 1 Turn on Wi-Fi. A list of the display, or click the Action Center icon on the taskbar to access the Action Center. 2 Click Bluetooth to be done through the computer settings. 1 Swipe-in from the right edge of available networks is displayed. 4 Select your network and click Connect. Configuring the Wi-Fi 1 Turn on Bluetooth...
... 4.2. Bluetooth Alienware Aurora R5 is no physical switch to settings. Pairing the Bluetooth-enabled devices 1 Turn on Wi-Fi. A list of the display, or click the Action Center icon on the taskbar to access the Action Center. 2 Click Bluetooth to be done through the computer settings. 1 Swipe-in from the right edge of available networks is displayed. 4 Select your network and click Connect. Configuring the Wi-Fi 1 Turn on Bluetooth...

Aurora R5 Service Manual
Page 142
Testing memory using ePSA 1 Turn on or restart your computer. 2 Press F12 after the AlienHead logo is displayed on the screen to access the boot menu. 3 Use the arrow keys to highlight the Diagnostics menu option and press Enter. 4 Follow the instructions on the screen to complete the ePSA Pre-boot System Assessment (PSA). Processors Alienware Aurora R5 is shipped with the following processor options: • 6th Generation Intel Core i3 • 6th Generation Intel...
Testing memory using ePSA 1 Turn on or restart your computer. 2 Press F12 after the AlienHead logo is displayed on the screen to access the boot menu. 3 Use the arrow keys to highlight the Diagnostics menu option and press Enter. 4 Follow the instructions on the screen to complete the ePSA Pre-boot System Assessment (PSA). Processors Alienware Aurora R5 is shipped with the following processor options: • 6th Generation Intel Core i3 • 6th Generation Intel...
Aurora R5 Service Manual
Page 145
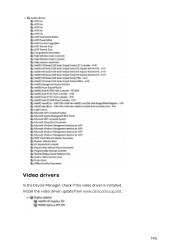
Install the video driver update from www.dell.com/support. 145 Video drivers In the Device Manager, check if the video driver is installed.
Install the video driver update from www.dell.com/support. 145 Video drivers In the Device Manager, check if the video driver is installed.

Aurora R5 Service Manual
Page 149
... screen during boot. 149 Install the driver updates from , for example, CD-ROM, hard drive, or network. The user is installed. In such case, a keyboard error message is locked out. By using this feature, you cannot restart your computer attempts to access the boot selection menu. • User Prompting - The boot menu includes the ePSA diagnostic options. As a result, if you press a keystroke too early, the keyboard is displayed on the BIOS screen. • Diagnostics Options - To prevent the keyboard...
... screen during boot. 149 Install the driver updates from , for example, CD-ROM, hard drive, or network. The user is installed. In such case, a keyboard error message is locked out. By using this feature, you cannot restart your computer attempts to access the boot selection menu. • User Prompting - The boot menu includes the ePSA diagnostic options. As a result, if you press a keystroke too early, the keyboard is displayed on the BIOS screen. • Diagnostics Options - To prevent the keyboard...

Aurora R5 Setup and Specifications
Page 12
... information Processor Chipset Operating system Table 4. Computer model Computer model Alienware Aurora R5 Dimensions and weight Table 2. Dimensions and weight Height Width Depth Weight 472.5 mm (18.60 in) 212 mm (8.34 in) 360.50 mm (14.19 in) 14.62 kg (32.23 lb) NOTE: The weight of your computer is shipped with XMP (optional) 12 Memory specifications Slots Type Speed Configurations supported •...
... information Processor Chipset Operating system Table 4. Computer model Computer model Alienware Aurora R5 Dimensions and weight Table 2. Dimensions and weight Height Width Depth Weight 472.5 mm (18.60 in) 212 mm (8.34 in) 360.50 mm (14.19 in) 14.62 kg (32.23 lb) NOTE: The weight of your computer is shipped with XMP (optional) 12 Memory specifications Slots Type Speed Configurations supported •...

Aurora R5 Setup and Specifications
Page 13
... hard drives and solid-state drives (SSDs). NOTE: Intel Optane memory is covered. Ports and connectors on the front panel Front panel: USB • Two USB 3.1 Gen 1 ports 13 Intel Optane memory Interface Connector Configurations supported PCIe NVMe 3.0 x2 M.2 16 GB and 32 GB NOTE: For more information about enabling or disabling the Intel Optane memory, see Enabling Intel Optane memory or Disabling Intel Optane memory. Connect the display to the discrete graphics card of your computer. optional...
... hard drives and solid-state drives (SSDs). NOTE: Intel Optane memory is covered. Ports and connectors on the front panel Front panel: USB • Two USB 3.1 Gen 1 ports 13 Intel Optane memory Interface Connector Configurations supported PCIe NVMe 3.0 x2 M.2 16 GB and 32 GB NOTE: For more information about enabling or disabling the Intel Optane memory, see Enabling Intel Optane memory or Disabling Intel Optane memory. Connect the display to the discrete graphics card of your computer. optional...


