Owner's Manual
Page 1
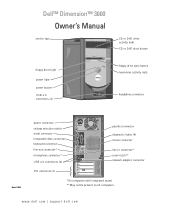
....dell.com | support.dell.com Dell™ Dimension™ 3000 Owner's Manual service tag CD or DVD drive activity light CD or DVD eject button floppy drive light power light power button USB 2.0 connectors (2) floppy drive eject button hard-drive activity light headphone connector Model DMC power connector voltage selection switch serial connector integrated video connector keyboard connector line-out connector* microphone connector* USB 2.0 connectors (4) parallel connector diagnostic lights (4) mouse connector line-in connector* cover latch** network adapter connector PCI card slots...
....dell.com | support.dell.com Dell™ Dimension™ 3000 Owner's Manual service tag CD or DVD drive activity light CD or DVD eject button floppy drive light power light power button USB 2.0 connectors (2) floppy drive eject button hard-drive activity light headphone connector Model DMC power connector voltage selection switch serial connector integrated video connector keyboard connector line-out connector* microphone connector* USB 2.0 connectors (4) parallel connector diagnostic lights (4) mouse connector line-in connector* cover latch** network adapter connector PCI card slots...
Owner's Manual
Page 8
... are located on the screen. 8 Finding Information Contact information, order status, warranty, and repair information • Downloads - What Are You Looking For? • Service Tag and Express Service Code • Microsoft Windows License Label • Latest drivers for my computer • Answers to technical service and support questions • Online discussions with other users and technical support • Documentation for my computer • How to use support.dell...
... are located on the screen. 8 Finding Information Contact information, order status, warranty, and repair information • Downloads - What Are You Looking For? • Service Tag and Express Service Code • Microsoft Windows License Label • Latest drivers for my computer • Answers to technical service and support questions • Online discussions with other users and technical support • Documentation for my computer • How to use support.dell...

Owner's Manual
Page 9
... it is turned on. 1 Complete the operating system setup if you purchased your printer. If you purchased a printer cable at the same time you have not already done so. 2 Install the printer driver if necessary. Connecting a USB Printer NOTE: You can connect USB devices while the computer is compatible with your printer. Setting Up and Using Your Computer 9 Setting Up and Using Your Computer Setting Up...
... it is turned on. 1 Complete the operating system setup if you purchased your printer. If you purchased a printer cable at the same time you have not already done so. 2 Install the printer driver if necessary. Connecting a USB Printer NOTE: You can connect USB devices while the computer is compatible with your printer. Setting Up and Using Your Computer 9 Setting Up and Using Your Computer Setting Up...

Owner's Manual
Page 11
... clicks into the network adapter connector on the computer. Setting Up a Home and Office Network Connecting to ensure that came with your computer. parallel connector on computer screws (2) connector on printer clips (2) notches (2) parallel printer cable 4 Turn on the printer and then turn on the computer. Setting Up and Using Your Computer 11 If the Add New Hardware Wizard window appears, click Cancel. 5 Install the printer driver if necessary.
... clicks into the network adapter connector on the computer. Setting Up a Home and Office Network Connecting to ensure that came with your computer. parallel connector on computer screws (2) connector on printer clips (2) notches (2) parallel printer cable 4 Turn on the printer and then turn on the computer. Setting Up and Using Your Computer 11 If the Add New Hardware Wizard window appears, click Cancel. 5 Install the printer driver if necessary.

Owner's Manual
Page 12
... the Start button, point to the Internet, you can access the Internet and use your telephone on the same line simultaneously. • Cable modem connections that provide high-speed Internet access through your local cable TV line. 12 Setting Up and Using Your Computer Connecting to guide you through a telephone line. To connect to All Programs→ Accessories→ Communications, and then click Network Setup Wizard. 2 On the welcome screen...
... the Start button, point to the Internet, you can access the Internet and use your telephone on the same line simultaneously. • Cable modem connections that provide high-speed Internet access through your local cable TV line. 12 Setting Up and Using Your Computer Connecting to guide you through a telephone line. To connect to All Programs→ Accessories→ Communications, and then click Network Setup Wizard. 2 On the welcome screen...
Owner's Manual
Page 14
... cannot write to make an exact copy of the window. NOTE: The types of CD or DVD drives offered by Dell may not read your source CD or DVD and click the Disc Copy button. NOTE: Most commercial DVDs have inserted your source CD or DVD and copy the data to erase, rewrite, or update data on the Sonic support website at www...
... cannot write to make an exact copy of the window. NOTE: The types of CD or DVD drives offered by Dell may not read your source CD or DVD and click the Disc Copy button. NOTE: Most commercial DVDs have inserted your source CD or DVD and copy the data to erase, rewrite, or update data on the Sonic support website at www...

Owner's Manual
Page 20
... WITH WINDOWS - 1 Click the Start button and click Control Panel. 2 Click Printers and Other Hardware. 3 Click Phone and Modem Options. 4 Click the Modems tab. 5 Click the COM port for the keyword spyware. For more information, go to support.dell.com and search for your program may require an upgrade) to open , click File. To remove and then reinstall the program: 1 Click the Start button, click Control Panel...
... WITH WINDOWS - 1 Click the Start button and click Control Panel. 2 Click Printers and Other Hardware. 3 Click Phone and Modem Options. 4 Click the Modems tab. 5 Click the COM port for the keyword spyware. For more information, go to support.dell.com and search for your program may require an upgrade) to open , click File. To remove and then reinstall the program: 1 Click the Start button, click Control Panel...

Owner's Manual
Page 25
... MOUSE CABLE - 1 Check the cable connector for bent or broken pins and for instructions on the setup diagram for your computer. 4 Start the computer. TE S T T H E M O U S E - Connect a properly working mouse to the computer, and try using the mouse. Solving Problems 25 To access the help file, see page 36). C L E A N T H E M O U S E - See the Dell Dimension Help file for damaged or frayed cables. RESTART THE COMPUTER - 1 Simultaneously press to display the Start menu. 2 Type u, press the keyboard arrow keys...
... MOUSE CABLE - 1 Check the cable connector for bent or broken pins and for instructions on the setup diagram for your computer. 4 Start the computer. TE S T T H E M O U S E - Connect a properly working mouse to the computer, and try using the mouse. Solving Problems 25 To access the help file, see page 36). C L E A N T H E M O U S E - See the Dell Dimension Help file for damaged or frayed cables. RESTART THE COMPUTER - 1 Simultaneously press to display the Start menu. 2 Type u, press the keyboard arrow keys...

Owner's Manual
Page 27
... is plugged into a power strip, ensure that the power strip is plugged into an electrical outlet and that the main power cable and front panel cable are : • Power, keyboard, and mouse extension cables • Too many devices on a power strip • Multiple power strips connected to the system board. The computer is receiving electrical power, but an internal power problem might be malfunctioning or incorrectly installed. • Remove and then reinstall the memory...
... is plugged into a power strip, ensure that the power strip is plugged into an electrical outlet and that the main power cable and front panel cable are : • Power, keyboard, and mouse extension cables • Too many devices on a power strip • Multiple power strips connected to the system board. The computer is receiving electrical power, but an internal power problem might be malfunctioning or incorrectly installed. • Remove and then reinstall the memory...

Owner's Manual
Page 33
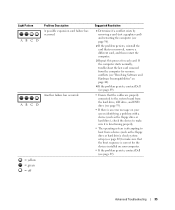
... or reinstalled all four lights display solid green. When the computer starts normally, the lights flash. ABCD Memory modules are detected, but a memory failure has occurred. = yellow = green = off Plug the computer into a working memory of the lights identify the problem. Advanced Troubleshooting 33 To help you troubleshoot a problem, your computer (see page 53). • If the problem persists, contact Dell (see page 48). button. The lights can be yellow...
... or reinstalled all four lights display solid green. When the computer starts normally, the lights flash. ABCD Memory modules are detected, but a memory failure has occurred. = yellow = green = off Plug the computer into a working memory of the lights identify the problem. Advanced Troubleshooting 33 To help you troubleshoot a problem, your computer (see page 53). • If the problem persists, contact Dell (see page 48). button. The lights can be yellow...
Owner's Manual
Page 35
... the system board from the hard drive, CD drive, and DVD drive (see page 53). • If there is correct for each card. Advanced Troubleshooting 35 If the computer starts normally, troubleshoot the last card removed from a device (such as the floppy drive or hard drive), check the device to make sure that the cables are properly connected to boot from the computer for resource conflicts (see "Resolving Software and Hardware Incompatibilities" on...
... the system board from the hard drive, CD drive, and DVD drive (see page 53). • If there is correct for each card. Advanced Troubleshooting 35 If the computer starts normally, troubleshoot the last card removed from a device (such as the floppy drive or hard drive), check the device to make sure that the cables are properly connected to boot from the computer for resource conflicts (see "Resolving Software and Hardware Incompatibilities" on...

Owner's Manual
Page 38
... Start button and click Control Panel. 2 Under Pick a Category, click Performance and Maintenance. 3 Click System. 4 In the System Properties window, click the Hardware tab. 5 Click Device Manager. 6 Scroll down the list to see if any device, identify whether the driver is next to reinstall the driver or install a new driver. Reinstalling Drivers NOTICE: The Dell Support website at support.dell.com provides approved drivers for Dell™ computers. Identifying Drivers If you : • Upgrade your operating...
... Start button and click Control Panel. 2 Under Pick a Category, click Performance and Maintenance. 3 Click System. 4 In the System Properties window, click the Hardware tab. 5 Click Device Manager. 6 Scroll down the list to see if any device, identify whether the driver is next to reinstall the driver or install a new driver. Reinstalling Drivers NOTICE: The Dell Support website at support.dell.com provides approved drivers for Dell™ computers. Identifying Drivers If you : • Upgrade your operating...
Owner's Manual
Page 39
... Device Driver Rollback does not resolve the problem, then use Windows XP Device Driver Rollback to replace the driver with the previously installed version. 1 Click the Start button and click Control Panel. 2 Under Pick a Category, click Performance and Maintenance. 3 Click System. 4 In the System Properties window, click the Hardware tab. 5 Click Device Manager. 6 Right-click the device for which you are installing the driver. 6 Click the Driver tab and click Update Driver. 7 Click Install from a list or specific location...
... Device Driver Rollback does not resolve the problem, then use Windows XP Device Driver Rollback to replace the driver with the previously installed version. 1 Click the Start button and click Control Panel. 2 Under Pick a Category, click Performance and Maintenance. 3 Click System. 4 In the System Properties window, click the Hardware tab. 5 Click Device Manager. 6 Right-click the device for which you are installing the driver. 6 Click the Driver tab and click Update Driver. 7 Click Install from a list or specific location...
Owner's Manual
Page 40
..., using System Restore. To access the Windows Help and Support Center, see page 39) to resolve the problem. The Select a Restore Point screen provides a calendar that you set your data files or recover them. Creating a Restore Point 1 Click the Start button and click Help and Support. 2 Click the task for the Windows default view, so they may not apply if you prefer. 40 Advanced Troubleshooting • Dell PC Restore...
..., using System Restore. To access the Windows Help and Support Center, see page 39) to resolve the problem. The Select a Restore Point screen provides a calendar that you set your data files or recover them. Creating a Restore Point 1 Click the Start button and click Help and Support. 2 Click the task for the Windows default view, so they may not apply if you prefer. 40 Advanced Troubleshooting • Dell PC Restore...

Owner's Manual
Page 49
... Installing Parts 49 Connect the other end of the modem connectors. See "Removing the Computer Cover" on page 50. 7 modem connector (Optional) If you troubleshoot a computer problem based on the card. 5 network adapter connector To attach your network. If you have a modem, connect a telephone cable to ensure reliable operation. 6 cover latch Releases the cover from the computer. On computers with a network connector card, use the connector on the diagnostic code. A click indicates that you have a USB mouse, plug it into a USB connector. 2 diagnostic lights (4) Use...
... Installing Parts 49 Connect the other end of the modem connectors. See "Removing the Computer Cover" on page 50. 7 modem connector (Optional) If you troubleshoot a computer problem based on the card. 5 network adapter connector To attach your network. If you have a modem, connect a telephone cable to ensure reliable operation. 6 cover latch Releases the cover from the computer. On computers with a network connector card, use the connector on the diagnostic code. A click indicates that you have a USB mouse, plug it into a USB connector. 2 diagnostic lights (4) Use...

Owner's Manual
Page 59
... turn them on. 7 Remove the card's driver from the operating system. 8 If you are removing the card permanently, install a filler bracket in the empty card-slot opening. b Connect external audio devices to the add-in network adapter's connectors. b Connect the network cable to the sound card's connectors. NOTICE: Do not route card cables over the cards can cause damage to the equipment. 6 If you removed an add-in network connector: a Enter system setup (see "System Setup" on page 80), select Network Controller, and then change the setting to On. Cables...
... turn them on. 7 Remove the card's driver from the operating system. 8 If you are removing the card permanently, install a filler bracket in the empty card-slot opening. b Connect external audio devices to the add-in network adapter's connectors. b Connect the network cable to the sound card's connectors. NOTICE: Do not route card cables over the cards can cause damage to the equipment. 6 If you removed an add-in network connector: a Enter system setup (see "System Setup" on page 80), select Network Controller, and then change the setting to On. Cables...

Owner's Manual
Page 66
... of the drive with the screen holes on one side of the drive. c Attach the hard drive bracket to electrical outlets, and turn them on installing any software required for instructions. 15 Test the hard drive by running the Dell Diagnostics (see page 75). NOTICE: To connect a network cable, first plug the cable into the network wall jack and then plug it into drive A. 11 Turn on the computer. 12 Enter system setup (see "System Setup" on...
... of the drive with the screen holes on one side of the drive. c Attach the hard drive bracket to electrical outlets, and turn them on installing any software required for instructions. 15 Test the hard drive by running the Dell Diagnostics (see page 75). NOTICE: To connect a network cable, first plug the cable into the network wall jack and then plug it into drive A. 11 Turn on the computer. 12 Enter system setup (see "System Setup" on...

Owner's Manual
Page 82
.... Enables or disables the onboard audio controller Set to the PRI IDE connectors on the system board as Off, USB, Internal, or Read Only. Identifies and defines the parallel port settings. To boot from booting the computer using an external USB device. When the On w/ PXE setting is not available from the sequence of memory installed. The No Boot option restricts external access to press . Identifies whether the computer's processor supports Hyper-Threading and lists the processor bus speed, processor...
.... Enables or disables the onboard audio controller Set to the PRI IDE connectors on the system board as Off, USB, Internal, or Read Only. Identifies and defines the parallel port settings. To boot from booting the computer using an external USB device. When the On w/ PXE setting is not available from the sequence of memory installed. The No Boot option restricts external access to press . Identifies whether the computer's processor supports Hyper-Threading and lists the processor bus speed, processor...
Owner's Manual
Page 85
... a USB device, connect the USB device to a USB connector (see page 80). 1 If you to change the boot sequence for example, to restart your keyboard. Appendix 85 Numlock Key OS Install POST Hotkeys Keyboard Errors This option involves the rightmost bank of keys on your computer to a USB device such as a floppy drive, memory key, or CD-RW drive. This option disables or enables keyboard error reporting when the computer starts. The computer attempts to boot from the primary hard drive...
... a USB device, connect the USB device to a USB connector (see page 80). 1 If you to change the boot sequence for example, to restart your keyboard. Appendix 85 Numlock Key OS Install POST Hotkeys Keyboard Errors This option involves the rightmost bank of keys on your computer to a USB device such as a floppy drive, memory key, or CD-RW drive. This option disables or enables keyboard error reporting when the computer starts. The computer attempts to boot from the primary hard drive...
Owner's Manual
Page 109
... hard to read , 31 problems, 30 motherboard. See system board mouse connector, 49 problems, 25 N network connector, 49 Network Setup Wizard, 12 problems, 26 setting up, 11 Network Setup Wizard, 12 P password clearing, 86 jumper, 86 PC Restore, 41 PCI cards installing, 57 removing, 59 power button, 48 connector, 50 power (continued) light, 48 problems, 26 power light conditions, 26 printer cable, 9 connecting, 9 parallel, 10 problems, 27 setting up, 9 USB, 9 problems battery, 17 blue screen, 23 CD drive, 18 CD-RW drive, 18 computer crashes, 22-23 computer stops responding, 22 Dell Diagnostics...
... hard to read , 31 problems, 30 motherboard. See system board mouse connector, 49 problems, 25 N network connector, 49 Network Setup Wizard, 12 problems, 26 setting up, 11 Network Setup Wizard, 12 P password clearing, 86 jumper, 86 PC Restore, 41 PCI cards installing, 57 removing, 59 power button, 48 connector, 50 power (continued) light, 48 problems, 26 power light conditions, 26 printer cable, 9 connecting, 9 parallel, 10 problems, 27 setting up, 9 USB, 9 problems battery, 17 blue screen, 23 CD drive, 18 CD-RW drive, 18 computer crashes, 22-23 computer stops responding, 22 Dell Diagnostics...


