
Service Manual
Page 1
DELL E173FP Service Manual SERVICE MANUAL 17" LCD Monitor DELL E173FP THESE DOCUMENTS ARE FOR REPAIR SERVICE INFORMATION ONLY. Prepared By: WuHaiyan Checked By: Sushi Manufacture Date: May-29-04 1 WE CANNOT GUARANTEE THE ACCURACY OF THIS INFORMATION AFTER THE DATE OF PUBLICATION AND DISCLAIMS RE LIABILITY FOR CHANGES, ERRORS OR OMISSIONS. EVERY REASONABLE EFFORT HAS BEEN MADE TO ENSURE THE ACCURACY OF THIS MANUAL;
DELL E173FP Service Manual SERVICE MANUAL 17" LCD Monitor DELL E173FP THESE DOCUMENTS ARE FOR REPAIR SERVICE INFORMATION ONLY. Prepared By: WuHaiyan Checked By: Sushi Manufacture Date: May-29-04 1 WE CANNOT GUARANTEE THE ACCURACY OF THIS INFORMATION AFTER THE DATE OF PUBLICATION AND DISCLAIMS RE LIABILITY FOR CHANGES, ERRORS OR OMISSIONS. EVERY REASONABLE EFFORT HAS BEEN MADE TO ENSURE THE ACCURACY OF THIS MANUAL;

Service Manual
Page 2
... SPECIFICATION 11 4.4.1 Panel Feature 11 4.4.2 Display Characteristics 11 4.4.3 Optical Characteristics 12 4.4.4 Parameter guide line for CCFL Inverter 12 5. OPERATING INSTRUCTIONS 6 3.1 GENERAL INSTRUCTIONS 6 3.2 CONTROL BUTTONS 6 3.3 ADJUSTING THE PICTURE 7 4. MONITOR SPECIFICATIONS 4 2. Block Diagram 13 5.1 Monitor Exploded View 13 5.2 Software Flow Chart 14 5.3 Electrical Block Diagram 16 5.3.1 Main Board 16 5.3.2 Inverter/Power Board 17 6. Schematic 18 6.1 Main Board 18 6.2 Inverter/Power Board 23 2 LCD MONITOR DESCRIPTION 5 3. DELL E173FP Service Manual...
... SPECIFICATION 11 4.4.1 Panel Feature 11 4.4.2 Display Characteristics 11 4.4.3 Optical Characteristics 12 4.4.4 Parameter guide line for CCFL Inverter 12 5. OPERATING INSTRUCTIONS 6 3.1 GENERAL INSTRUCTIONS 6 3.2 CONTROL BUTTONS 6 3.3 ADJUSTING THE PICTURE 7 4. MONITOR SPECIFICATIONS 4 2. Block Diagram 13 5.1 Monitor Exploded View 13 5.2 Software Flow Chart 14 5.3 Electrical Block Diagram 16 5.3.1 Main Board 16 5.3.2 Inverter/Power Board 17 6. Schematic 18 6.1 Main Board 18 6.2 Inverter/Power Board 23 2 LCD MONITOR DESCRIPTION 5 3. DELL E173FP Service Manual...
Service Manual
Page 4
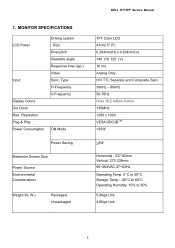
MONITOR SPECIFICATIONS LCD Panel Input Display Colors Dot Clock Max. Type H-Frequency V-Frequency ON Mode Power Saving Maximum Screen Size Power Source Environmental Considerations Weight (N. DELL E173FP Service Manual 1. Resolution Plug & Play Power Consumption Driving system Size Pixel pitch Viewable angle Response time (typ.) Video Sync. W.) Packaged Unpackaged TFT Color LCD 43cm(17.0") 0.264mm(H) x 0.264mm(V) 140˚ (H) 120˚ (V) 16 ms Analog Only H/V TTL Separate and Composite Sync. 30kHz - 80kHz 56-75Hz Over 16.2 million Colors 135MHz 1280 x 1024 VESA DDC2BTM
MONITOR SPECIFICATIONS LCD Panel Input Display Colors Dot Clock Max. Type H-Frequency V-Frequency ON Mode Power Saving Maximum Screen Size Power Source Environmental Considerations Weight (N. DELL E173FP Service Manual 1. Resolution Plug & Play Power Consumption Driving system Size Pixel pitch Viewable angle Response time (typ.) Video Sync. W.) Packaged Unpackaged TFT Color LCD 43cm(17.0") 0.264mm(H) x 0.264mm(V) 140˚ (H) 120˚ (V) 16 ms Analog Only H/V TTL Separate and Composite Sync. 30kHz - 80kHz 56-75Hz Over 16.2 million Colors 135MHz 1280 x 1024 VESA DDC2BTM

Service Manual
Page 5
Monitor Block Diagram CCFT Driver. Flat Panel and CCFL backlight Inverter/Power Board AC Power IN Main Board Keyboard RS232 Connector For white balance adjustment in factory mode HOST Computer Video signal, DDC 5 and provides the 12V DC-power to main board. The internal Inverter/power board will contain a main board, an internal inverter/power board, keypad board, which house the flat panel control logic, brightness control logic and DDC. LCD MONITOR DESCRIPTION DELL E173FP Service Manual The LCD MONITOR will drive the backlight of panel and the DC-DC conversion. 2.
Monitor Block Diagram CCFT Driver. Flat Panel and CCFL backlight Inverter/Power Board AC Power IN Main Board Keyboard RS232 Connector For white balance adjustment in factory mode HOST Computer Video signal, DDC 5 and provides the 12V DC-power to main board. The internal Inverter/power board will contain a main board, an internal inverter/power board, keypad board, which house the flat panel control logic, brightness control logic and DDC. LCD MONITOR DESCRIPTION DELL E173FP Service Manual The LCD MONITOR will drive the backlight of panel and the DC-DC conversion. 2.

Service Manual
Page 6
...(On-Screen-display) B. Press again to turn the monitor on the monitor, the power indicator will light up. 3.2 CONTROL BUTTONS - The power cord should be adjusted to the video card. - Power Button: When pressed, the monitor enters the off . Press the power button to restore normal status. - Power Saving mode. Control Buttons A. Brightness Button C. Press to turn on or off mode, and the LED turns blank. Power On/Off Button and indicator 6 OPERATING INSTRUCTIONS 3.1 GENERAL INSTRUCTIONS Press the power button to switch functions or adjust settings. - DELL E173FP Service...
...(On-Screen-display) B. Press again to turn the monitor on the monitor, the power indicator will light up. 3.2 CONTROL BUTTONS - The power cord should be adjusted to the video card. - Power Button: When pressed, the monitor enters the off . Press the power button to restore normal status. - Power Saving mode. Control Buttons A. Brightness Button C. Press to turn on or off mode, and the LED turns blank. Power On/Off Button and indicator 6 OPERATING INSTRUCTIONS 3.1 GENERAL INSTRUCTIONS Press the power button to switch functions or adjust settings. - DELL E173FP Service...

Service Manual
Page 8
... user preset setting you can select from Normal Preset, Blue Preset, Red Preset to the right. Calling the Image setting window Auto Adjust Auto adjust will produce best image automatically, The information of the basic colours (red, green, blue) as required. Setting display of the OSD menu Calling the OSD Set up setting window Horizontal Setting the horizontal position of the OSD menu Position With this function you move the OSD menu up or down . 8 Red preset =9300K colour of the LCD display, it's 6500K; Vertical Setting the vertical position...
... user preset setting you can select from Normal Preset, Blue Preset, Red Preset to the right. Calling the Image setting window Auto Adjust Auto adjust will produce best image automatically, The information of the basic colours (red, green, blue) as required. Setting display of the OSD menu Calling the OSD Set up setting window Horizontal Setting the horizontal position of the OSD menu Position With this function you move the OSD menu up or down . 8 Red preset =9300K colour of the LCD display, it's 6500K; Vertical Setting the vertical position...

Service Manual
Page 10
...Output Specification 4.1 Input Signal Connector 4.1.1 Analog D-SUB Connector DELL E173FP Service Manual 10 5 9 4 8 3 7 2 6 1 17 16 15 14 13 12 11 Pin Meaning Pin 1 Video input red 9 2 Video input green 10 3 Video input blue 11 4 Ground 12 5 Ground 13 6 Red video ground 14 7 Green video ground 15 8 Blue video ground Meaning +5 V (DDC) VGA-PG Ground DDC-Data H. Sync DDC Clock 4.2 Factory Preset Display Modes The following are the most frequently used (active matrix) an LCD monitor provides a totally flicker-free picture even with a refresh rate of...
...Output Specification 4.1 Input Signal Connector 4.1.1 Analog D-SUB Connector DELL E173FP Service Manual 10 5 9 4 8 3 7 2 6 1 17 16 15 14 13 12 11 Pin Meaning Pin 1 Video input red 9 2 Video input green 10 3 Video input blue 11 4 Ground 12 5 Ground 13 6 Red video ground 14 7 Green video ground 15 8 Blue video ground Meaning +5 V (DDC) VGA-PG Ground DDC-Data H. Sync DDC Clock 4.2 Factory Preset Display Modes The following are the most frequently used (active matrix) an LCD monitor provides a totally flicker-free picture even with a refresh rate of...

Service Manual
Page 15
... the AUTO and SELECT keys pressed? 8) Enter factory mode. 9) Save the power key status into standby mode after the message disappears. 17) Program the scalar to be able to green color. Turn on the LED and set it to show the coming from analog port? 16) Display "No connection Check Signal Cable" message. Is the power key pressed? 15 DELL E173FP Service Manual 1) MCU Initializes. 2) Is the EEprom blank? 3) Program the EEprom by default values...
... the AUTO and SELECT keys pressed? 8) Enter factory mode. 9) Save the power key status into standby mode after the message disappears. 17) Program the scalar to be able to green color. Turn on the LED and set it to show the coming from analog port? 16) Display "No connection Check Signal Cable" message. Is the power key pressed? 15 DELL E173FP Service Manual 1) MCU Initializes. 2) Is the EEprom blank? 3) Program the EEprom by default values...

Service Manual
Page 17
... FLUKE 45 , or use the oscilloscope check frequency. M3 / M4/M5/M6= 55KHz +- 5 KHz 17 5.3.2Power Block Diagram PWPC1742LGD1 Function test R6 CCFL R7 M3 10 Vrms METER V R8 CCFL R9 M4 10 Vrms METER V R12 CCFL R10 CCFL R11 M5 10 Vrms METER V R13 M6 10 Vrms METER V CON205 1 2 CON206 1 2 CON207 1 2 CON208 1 2 DELL E173FP Service Manual Model name : PWPC1742LGD1...
... FLUKE 45 , or use the oscilloscope check frequency. M3 / M4/M5/M6= 55KHz +- 5 KHz 17 5.3.2Power Block Diagram PWPC1742LGD1 Function test R6 CCFL R7 M3 10 Vrms METER V R8 CCFL R9 M4 10 Vrms METER V R12 CCFL R10 CCFL R11 M5 10 Vrms METER V R13 M6 10 Vrms METER V CON205 1 2 CON206 1 2 CON207 1 2 CON208 1 2 DELL E173FP Service Manual Model name : PWPC1742LGD1...

User Guide
Page 1
... of Video Electronics Standards Association; As an ENERGY STAR Partner, Dell Inc. disclaims any manner whatsoever without notice. © 2004 Dell Inc. All rights reserved. is a registered trademark of Microsoft Corporation; Microsoft, Windows, and Windows NT are trademarks of International Business Machines Corporation; IBM is a registered trademark of Dell Inc.; Contents: Dell™ E173FP Flat Panel Color Monitor User's Guide Preface Introduction Setup Using the Display Troubleshooting Specifications Appendix...
... of Video Electronics Standards Association; As an ENERGY STAR Partner, Dell Inc. disclaims any manner whatsoever without notice. © 2004 Dell Inc. All rights reserved. is a registered trademark of Microsoft Corporation; Microsoft, Windows, and Windows NT are trademarks of International Business Machines Corporation; IBM is a registered trademark of Dell Inc.; Contents: Dell™ E173FP Flat Panel Color Monitor User's Guide Preface Introduction Setup Using the Display Troubleshooting Specifications Appendix...

User Guide
Page 6
... your monitor is functioning properly. Recommended mode is working correctly. Back to Contents Page Troubleshooting: Dell™ E173FP Flat Panel Color Monitor User's Guide Monitor Specific Troubleshooting • Common Problems • Product Specific Problems Monitor Specific Troubleshooting Self-Test Feature Check (STFC) Your monitor provides a self-test feature that allows you use . Either the signal is blank. If your monitor screen remains blank after you to use the previous procedure, check your monitor and computer are properly connected but the screen is...
... your monitor is functioning properly. Recommended mode is working correctly. Back to Contents Page Troubleshooting: Dell™ E173FP Flat Panel Color Monitor User's Guide Monitor Specific Troubleshooting • Common Problems • Product Specific Problems Monitor Specific Troubleshooting Self-Test Feature Check (STFC) Your monitor provides a self-test feature that allows you use . Either the signal is blank. If your monitor screen remains blank after you to use the previous procedure, check your monitor and computer are properly connected but the screen is...

User Guide
Page 7
... bright Screen not centered correctly Horizontal/Vertical Screen has one or more Lines lines Sync Problems Screen is in the 'Safe mode' Perform monitor reset Push 'Auto Adjust' button Adjust 'Phase' and 'Clock' controls via OSD Perform monitor self-test feature check to determine if scrambled screen appears in other room Missing Pixels LCD screen has spots Clean the LCD Screen, please refer to preset display modes. Boot up in proper video mode, please refer to maintenance. COMMON SYMPTOMS No Video/ Power LED...
... bright Screen not centered correctly Horizontal/Vertical Screen has one or more Lines lines Sync Problems Screen is in the 'Safe mode' Perform monitor reset Push 'Auto Adjust' button Adjust 'Phase' and 'Clock' controls via OSD Perform monitor self-test feature check to determine if scrambled screen appears in other room Missing Pixels LCD screen has spots Clean the LCD Screen, please refer to preset display modes. Boot up in proper video mode, please refer to maintenance. COMMON SYMPTOMS No Video/ Power LED...

User Guide
Page 8
... the power cord and then plug back and power on the screen Turn the monitor off and clean the screen For cleaning instruction, see maintenance. Do not perform any troubleshooting steps Monitor needs to be replaced Ensure monitor is in proper video mode Ensure video cable connection to computer and to the flat panel is secure Perform monitor reset Perform monitor self-test feature check to determine if the intermittent problem occurs in self-test mode Product Specific Problems SPECIFIC SYMPTOMS Screen image is...
... the power cord and then plug back and power on the screen Turn the monitor off and clean the screen For cleaning instruction, see maintenance. Do not perform any troubleshooting steps Monitor needs to be replaced Ensure monitor is in proper video mode Ensure video cable connection to computer and to the flat panel is secure Perform monitor reset Perform monitor self-test feature check to determine if the intermittent problem occurs in self-test mode Product Specific Problems SPECIFIC SYMPTOMS Screen image is...

User Guide
Page 15
... Product to perform preventive maintenance Problems caused by using accessories, parts, or components not supplied by Dell Dell will provide such service and support to you in the United States in any court of this paragraph, "Dell") arising from or relating to this limited warranty? NOTWITHSTANDING ANYTHING IN THIS AGREEMENT TO THE CONTRARY, THE REMEDIES SET FORTH IN THIS AGREEMENT...
... Product to perform preventive maintenance Problems caused by using accessories, parts, or components not supplied by Dell Dell will provide such service and support to you in the United States in any court of this paragraph, "Dell") arising from or relating to this limited warranty? NOTWITHSTANDING ANYTHING IN THIS AGREEMENT TO THE CONTRARY, THE REMEDIES SET FORTH IN THIS AGREEMENT...

User Guide
Page 17
... of which were never used by various manufacturers in performing warranty repairs and in your purchases. NOTE: Before you replace parts, make sure to back up the data on the hard drive(s) and any defective part with your customer documentation (or go to www.dell.com/us , we will require a valid credit card number at www.dell.com. If you...
... of which were never used by various manufacturers in performing warranty repairs and in your purchases. NOTE: Before you replace parts, make sure to back up the data on the hard drive(s) and any defective part with your customer documentation (or go to www.dell.com/us , we will require a valid credit card number at www.dell.com. If you...

User Guide
Page 18
..., at the relevant number listed in accordance with product instructions Failure to follow the product instructions or failure to perform preventive maintenance Problems caused by using accessories, parts, or components not supplied by Dell Usage that is not extended if we repair or replace a warranted product or any of your -our end-user customer's-Dell-branded hardware products, including Dell-branded peripheral products...
..., at the relevant number listed in accordance with product instructions Failure to follow the product instructions or failure to perform preventive maintenance Problems caused by using accessories, parts, or components not supplied by Dell Usage that is not extended if we repair or replace a warranted product or any of your -our end-user customer's-Dell-branded hardware products, including Dell-branded peripheral products...

User Guide
Page 19
... problem is not covered under this policy. We are not responsible for quality. We use in building replacement parts and systems. Refurbished parts and systems are an end-user customer who bought the products under the terms of the manuals, diskette(s), CD(s), power cables, and other items included with a product must be returned with a comparable product that is with any Dell...
... problem is not covered under this policy. We are not responsible for quality. We use in building replacement parts and systems. Refurbished parts and systems are an end-user customer who bought the products under the terms of the manuals, diskette(s), CD(s), power cables, and other items included with a product must be returned with a comparable product that is with any Dell...
User Guide
Page 20
... and follow these instructions when connecting and using your computer monitor: To help avoid damaging your computer, be repaired or replaced at your product. Dell uses new and reconditioned parts made in materials, workmanship, and design affecting normal use , or maintenance; The end user must always supply proof of purchase, indicating name and address of the seller, date of purchase, model and serial number, name and...
... and follow these instructions when connecting and using your computer monitor: To help avoid damaging your computer, be repaired or replaced at your product. Dell uses new and reconditioned parts made in materials, workmanship, and design affecting normal use , or maintenance; The end user must always supply proof of purchase, indicating name and address of the seller, date of purchase, model and serial number, name and...

User Guide
Page 44
... install the sound bar. check if the power indicator (green LED) on the Soundbar clockwise to 20 kHz @ 10 dB below avg. Working from the rear of the Soundbar is required) Power Cord Length 305 mm +/- 15 mm AWG22 black cable attached to enclosure, with base detached for Rated Output 500 ± 50 mVrms @ 1 kHz Input Impedance >10kΩ Maximum Input Signal Voltage 2 Vrms Controls Power On/Off Volume Control Input Cables...
... install the sound bar. check if the power indicator (green LED) on the Soundbar clockwise to 20 kHz @ 10 dB below avg. Working from the rear of the Soundbar is required) Power Cord Length 305 mm +/- 15 mm AWG22 black cable attached to enclosure, with base detached for Rated Output 500 ± 50 mVrms @ 1 kHz Input Impedance >10kΩ Maximum Input Signal Voltage 2 Vrms Controls Power On/Off Volume Control Input Cables...

User Guide
Page 49
... OSD. Brightness/Contrast Hot Key B Use these buttons to adjust the controls, an on the front of the monitor to adjust the characteristics of the image being displayed. Back to Contents Page Controls and Indicators: Dell™ E173FP Flat Panel Color Monitor User's Guide Overview • On Screen Menu/Display (OSD) • Automatic Save • Reset Functions • OSD Warning Messages Overview Use the control buttons on -screen display (OSD) shows their numeric values as the monitor self-adjusts to the current input: Auto Adjust In Progress Auto Adjust Auto Adjustment button...
... OSD. Brightness/Contrast Hot Key B Use these buttons to adjust the controls, an on the front of the monitor to adjust the characteristics of the image being displayed. Back to Contents Page Controls and Indicators: Dell™ E173FP Flat Panel Color Monitor User's Guide Overview • On Screen Menu/Display (OSD) • Automatic Save • Reset Functions • OSD Warning Messages Overview Use the control buttons on -screen display (OSD) shows their numeric values as the monitor self-adjusts to the current input: Auto Adjust In Progress Auto Adjust Auto Adjustment button...


