Setup and Specifications
Page 3
Contents 1 Set up your computer...4 2 Create a USB recovery drive for Windows...7 3 Views of Inspiron 3670...8 Front...8 Back...9 Back panel...10 4 Specifications of Inspiron 3670...12 Computer model...12 System information...12 Dimensions and weight...12 Operating system...12 Memory...13 Ports and connectors...13 Communications...13 Wireless...14 Audio...14 Storage...14 Intel Optane memory...14 Media-card reader...15 Power ratings...15 Video...16 Computer environment...16 5 Intel Optane memory...17 Enabling Intel Optane memory...17 Disabling Intel...
Contents 1 Set up your computer...4 2 Create a USB recovery drive for Windows...7 3 Views of Inspiron 3670...8 Front...8 Back...9 Back panel...10 4 Specifications of Inspiron 3670...12 Computer model...12 System information...12 Dimensions and weight...12 Operating system...12 Memory...13 Ports and connectors...13 Communications...13 Wireless...14 Audio...14 Storage...14 Intel Optane memory...14 Media-card reader...15 Power ratings...15 Video...16 Computer environment...16 5 Intel Optane memory...17 Enabling Intel Optane memory...17 Disabling Intel...

Setup and Specifications
Page 5
... screen, enter your computer 5 For more information about configuring the Ubuntu install, see the knowledge base article SLN151664 at www.dell.com/support. If not connected to a network for the wireless network access when prompted. • If connected to complete the setup. When setting up your contact details. 7 Locate and use Dell apps from the Windows Start menu-Recommended Table 1. 5 Press the power button. 6 Finish operating system setup. NOTE: If connecting to a secured wireless network, enter the password for Windows updates...
... screen, enter your computer 5 For more information about configuring the Ubuntu install, see the knowledge base article SLN151664 at www.dell.com/support. If not connected to a network for the wireless network access when prompted. • If connected to complete the setup. When setting up your contact details. 7 Locate and use Dell apps from the Windows Start menu-Recommended Table 1. 5 Press the power button. 6 Finish operating system setup. NOTE: If connecting to a secured wireless network, enter the password for Windows updates...

Setup and Specifications
Page 10
... Inspiron 3670 Back panel 1 Microphone port Connect an external microphone to provide sound input. 2 HDMI port Connect to prevent unauthorized movement of your computer. 8 Security-cable slot (for Kensington locks) Connect a security cable to a TV or another HDMI-in enabled device. 2 Service Tag label The Service Tag is a unique alphanumeric identifier that enables Dell service technicians to identify the hardware components in your computer and access warranty information. 3 Expansion-card slots Provide access to ports on any installed PCI Express cards. 4 Power-supply diagnostics button...
... Inspiron 3670 Back panel 1 Microphone port Connect an external microphone to provide sound input. 2 HDMI port Connect to prevent unauthorized movement of your computer. 8 Security-cable slot (for Kensington locks) Connect a security cable to a TV or another HDMI-in enabled device. 2 Service Tag label The Service Tag is a unique alphanumeric identifier that enables Dell service technicians to identify the hardware components in your computer and access warranty information. 3 Expansion-card slots Provide access to ports on any installed PCI Express cards. 4 Power-supply diagnostics button...

Setup and Specifications
Page 11
3 VGA port Connect an external display or a projector. 4 USB 2.0 ports (4) Connect peripherals such as a microphone or CD player. Views of Inspiron 3670 11 The two lights next to 480 Mbps. 5 Network port (with lights) Connect an Ethernet (RJ45) cable from a router or a broadband modem for network or Internet access. Provides data transfer speeds up to the connector indicate the connectivity status and network activity. 6 Line-out port Connect speakers. 7 Line-in port Connect recording or playback devices such as external storage devices and printers.
3 VGA port Connect an external display or a projector. 4 USB 2.0 ports (4) Connect peripherals such as a microphone or CD player. Views of Inspiron 3670 11 The two lights next to 480 Mbps. 5 Network port (with lights) Connect an Ethernet (RJ45) cable from a router or a broadband modem for network or Internet access. Provides data transfer speeds up to the connector indicate the connectivity status and network activity. 6 Line-out port Connect speakers. 7 Line-in port Connect recording or playback devices such as external storage devices and printers.
Setup and Specifications
Page 13
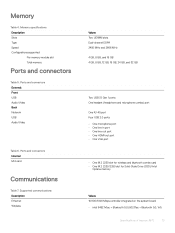
... port • One VGA port • One M.2 2230 slot for wireless and bluetooth combo card • One M.2 2230/2280 slot for Solid-State Drive (SSD)/Intel Optane memory Values 10/100/1000 Mbps controller integrated on the system board • intel 9462 1x1ac + Bluetooth 5.0 (802.11ac + Bluetooth 5.0, 1x1) Specifications of Inspiron 3670 13 Memory Table 4. Ports and connectors External: Front USB Audio/Video Back Network USB Audio/Video Table 6. Ports and connectors Internal: M.2 card Communications Table 7. Memory specifications Description Slots Type Speed Configurations supported...
... port • One VGA port • One M.2 2230 slot for wireless and bluetooth combo card • One M.2 2230/2280 slot for Solid-State Drive (SSD)/Intel Optane memory Values 10/100/1000 Mbps controller integrated on the system board • intel 9462 1x1ac + Bluetooth 5.0 (802.11ac + Bluetooth 5.0, 1x1) Specifications of Inspiron 3670 13 Memory Table 4. Ports and connectors External: Front USB Audio/Video Back Network USB Audio/Video Table 6. Ports and connectors Internal: M.2 card Communications Table 7. Memory specifications Description Slots Type Speed Configurations supported...

Setup and Specifications
Page 18
... press Enter. Self-help resources Self-help resources Information about your product: • Product specifications • Operating system • Setting up and using these self-help resources: Table 16. Contacting Dell To contact Dell for a variety of the following information about Dell products and services My Dell Resource location www.dell.com Tips Contact Support Online help for operating system Troubleshooting information, user manuals, setup instructions, product specifications, technical help blogs, drivers, software updates...
... press Enter. Self-help resources Self-help resources Information about your product: • Product specifications • Operating system • Setting up and using these self-help resources: Table 16. Contacting Dell To contact Dell for a variety of the following information about Dell products and services My Dell Resource location www.dell.com Tips Contact Support Online help for operating system Troubleshooting information, user manuals, setup instructions, product specifications, technical help blogs, drivers, software updates...

Service Manual
Page 6
... setup password...69 Assigning a system setup password...69 Deleting or changing an existing system setup password 70 Clearing Forgotten Passwords...70 Prerequisites...70 Procedure...70 Post-requisites...71 Clearing CMOS Settings...71 Prerequisites...71 Procedure...71 Post-requisites...72 37 Troubleshooting...73 Flashing the BIOS...73 Reinstall Windows using a USB recovery drive...73 Enhanced Pre-Boot System Assessment (ePSA) diagnostics 74 Running the ePSA Diagnostics...74 Diagnostics...74 Enabling Intel Optane memory...75 Disabling Intel Optane memory...75 Flea power...
... setup password...69 Assigning a system setup password...69 Deleting or changing an existing system setup password 70 Clearing Forgotten Passwords...70 Prerequisites...70 Procedure...70 Post-requisites...71 Clearing CMOS Settings...71 Prerequisites...71 Procedure...71 Post-requisites...72 37 Troubleshooting...73 Flashing the BIOS...73 Reinstall Windows using a USB recovery drive...73 Enhanced Pre-Boot System Assessment (ePSA) diagnostics 74 Running the ePSA Diagnostics...74 Diagnostics...74 Enabling Intel Optane memory...75 Disabling Intel Optane memory...75 Flea power...

Service Manual
Page 7
... to servicing that the ports and connectors are using a different operating system, see the Regulatory Compliance home page at the back of your operating system for 5 seconds to avoid bending any installed card from potential damage and ensure your personal safety. While you finish working inside the computer, replace all open files and exit all covers, panels, and screws before opening the computer cover or panels. When connecting cables...
... to servicing that the ports and connectors are using a different operating system, see the Regulatory Compliance home page at the back of your operating system for 5 seconds to avoid bending any installed card from potential damage and ensure your personal safety. While you finish working inside the computer, replace all open files and exit all covers, panels, and screws before opening the computer cover or panels. When connecting cables...

Service Manual
Page 9
After working inside your computer. 2 Connect any external devices, peripherals, or cables you removed before working on your computer. 3 Replace any media cards, discs, or any other parts that no stray screws remain inside your computer. 2 After working on your computer. 4 Connect your computer and all screws and ensure that you removed before working inside your computer CAUTION: Leaving stray or loose screws inside your computer may severely damage your computer. 1 Replace all attached devices to their electrical outlets. 5 Turn on your computer 9
After working inside your computer. 2 Connect any external devices, peripherals, or cables you removed before working on your computer. 3 Replace any media cards, discs, or any other parts that no stray screws remain inside your computer. 2 After working on your computer. 4 Connect your computer and all screws and ensure that you removed before working inside your computer CAUTION: Leaving stray or loose screws inside your computer may severely damage your computer. 1 Replace all attached devices to their electrical outlets. 5 Turn on your computer 9

Service Manual
Page 51
... computer cover. 2 Remove the front bezel. 3 Remove the memory module. 4 Remove the solid-state drive/Intel Optane memory. 5 Remove the graphics card. 6 Remove the wireless card. 7 Remove the processor fan and heat-sink assembly. 8 Remove the processor. NOTE: Your computer's Service Tag is installed skip step 3 or step 5 where applicable. 1 Disconnect the processor-power cable from the system board (ATX CPU). 2 Disconnect the optical-drive data cable from the system board (SATA 2). 3 Disconnect the hard-drive data cable from the system board (SATA 1). 4 Disconnect the hard-drive cable...
... computer cover. 2 Remove the front bezel. 3 Remove the memory module. 4 Remove the solid-state drive/Intel Optane memory. 5 Remove the graphics card. 6 Remove the wireless card. 7 Remove the processor fan and heat-sink assembly. 8 Remove the processor. NOTE: Your computer's Service Tag is installed skip step 3 or step 5 where applicable. 1 Disconnect the processor-power cable from the system board (ATX CPU). 2 Disconnect the optical-drive data cable from the system board (SATA 2). 3 Disconnect the hard-drive data cable from the system board (SATA 1). 4 Disconnect the hard-drive cable...

Service Manual
Page 55
... made to the BIOS using the BIOS setup program. You must enter the Service Tag in Before working inside your computer. For more safety best practices, see "System board components'. If only one hard-drive is stored in After working inside your computer. 33 Replacing the system board WARNING: Before working inside your computer, read the safety information that cables are connected to the correct system board connectors, see the Regulatory...
... made to the BIOS using the BIOS setup program. You must enter the Service Tag in Before working inside your computer. For more safety best practices, see "System board components'. If only one hard-drive is stored in After working inside your computer. 33 Replacing the system board WARNING: Before working inside your computer, read the safety information that cables are connected to the correct system board connectors, see the Regulatory...
Service Manual
Page 59
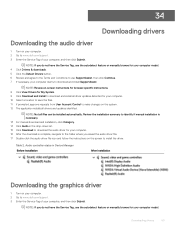
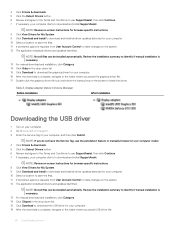
... Submit. NOTE: Review on the screen to download and install SupportAssist. Audio controller status in the drop-down list. 15 Click Download to download the audio driver for your computer. 16 After the download is necessary. 13 For manual download and installation, click Category. 14 Click Audio in Device Manager Before Installation After Installation Downloading the graphics driver 1 Turn on your computer. 2 Go to make changes on your computer. 2 Go to www.dell.com/support. 3 Enter the Service Tag of...
... Submit. NOTE: Review on the screen to download and install SupportAssist. Audio controller status in the drop-down list. 15 Click Download to download the audio driver for your computer. 16 After the download is necessary. 13 For manual download and installation, click Category. 14 Click Audio in Device Manager Before Installation After Installation Downloading the graphics driver 1 Turn on your computer. 2 Go to make changes on your computer. 2 Go to www.dell.com/support. 3 Enter the Service Tag of...
Service Manual
Page 60
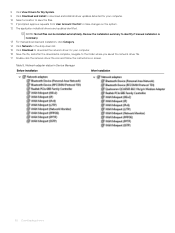
... Downloading drivers NOTE: Not all drivers and updates identified. Display adapter status in the drop-down list. 15 Click Download to download the graphics driver for your computer. 16 After the download is necessary. 13 For manual download and installation, click Category. 14 Click Chipset in Device Manager Before Installation After Installation Downloading the USB driver 1 Turn on your computer. 2 Go to www.dell.com/support. 3 Enter the Service Tag of your computer starts to make changes on -screen instructions for browser-specific instructions...
... Downloading drivers NOTE: Not all drivers and updates identified. Display adapter status in the drop-down list. 15 Click Download to download the graphics driver for your computer. 16 After the download is necessary. 13 For manual download and installation, click Category. 14 Click Chipset in Device Manager Before Installation After Installation Downloading the USB driver 1 Turn on your computer. 2 Go to www.dell.com/support. 3 Enter the Service Tag of your computer starts to make changes on -screen instructions for browser-specific instructions...

Service Manual
Page 61
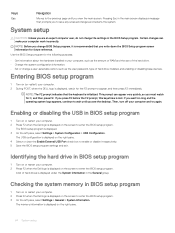
... Submit. Downloading the network driver 1 Turn on your computer. 2 Go to www.dell.com/support. 3 Enter the Service Tag of your computer. 10 Select a location to save the files. 11 If prompted, approve requests from User Account Control to install the driver. NOTE: If you do not have the Service Tag, use the autodetect feature or manually browse for browser-specific instructions. NOTE: Not all drivers and updates identified. USB controller status...
... Submit. Downloading the network driver 1 Turn on your computer. 2 Go to www.dell.com/support. 3 Enter the Service Tag of your computer. 10 Select a location to save the files. 11 If prompted, approve requests from User Account Control to install the driver. NOTE: If you do not have the Service Tag, use the autodetect feature or manually browse for browser-specific instructions. NOTE: Not all drivers and updates identified. USB controller status...
Service Manual
Page 62
... network driver file icon and follow the instructions on the system. 12 The application installs all drivers and updates identified. NOTE: Not all files can be installed automatically. 8 Click View Drivers for My System. 9 Click Download and Install to download and install all driver updates detected for your computer. 10 Select a location to save the files. 11 If prompted, approve requests from User Account Control to make changes on screen...
... network driver file icon and follow the instructions on the system. 12 The application installs all drivers and updates identified. NOTE: Not all files can be installed automatically. 8 Click View Drivers for My System. 9 Click Download and Install to download and install all driver updates detected for your computer. 10 Select a location to save the files. 11 If prompted, approve requests from User Account Control to make changes on screen...
Service Manual
Page 64
... the operating system logo appears, continue to wait until you view the main screen. Certain changes can appear very quickly, so you must watch for it respectively. 5 Save the BIOS setup program settings and exit. Entering BIOS setup program 1 Turn on the screen to enter the BIOS setup program. 3 On the left pane, select Settings > System Configuration > USB Configuration. NOTE: Before you change a user-selectable option, such as the user password, type of hard drives is displayed...
... the operating system logo appears, continue to wait until you view the main screen. Certain changes can appear very quickly, so you must watch for it respectively. 5 Save the BIOS setup program settings and exit. Entering BIOS setup program 1 Turn on the screen to enter the BIOS setup program. 3 On the left pane, select Settings > System Configuration > USB Configuration. NOTE: Before you change a user-selectable option, such as the user password, type of hard drives is displayed...

Service Manual
Page 65
... size. Displays the memory speed. Default: Enabled Enables you to enable or disable Intel Virtualization Technology feature for Direct I /O. Displays the BIOS version number. Enables you use AC adapters that are adjusted dynamically based on -board LAN controller. Table 7. Default: Enabled NOTE: If enabled, the processor clock speed and core voltage are not supported by your computer. Default: AHCI Enables you to enter the service tag of the CPU. Displays the primary hard disk. Displays the CPU type. Table 6. System setup options-Advanced menu Advanced...
... size. Displays the memory speed. Default: Enabled Enables you to enable or disable Intel Virtualization Technology feature for Direct I /O. Displays the BIOS version number. Enables you use AC adapters that are adjusted dynamically based on -board LAN controller. Table 7. Default: Enabled NOTE: If enabled, the processor clock speed and core voltage are not supported by your computer. Default: AHCI Enables you to enter the service tag of the CPU. Displays the primary hard disk. Displays the CPU type. Table 6. System setup options-Advanced menu Advanced...

Service Manual
Page 66
...Enables you to enable or disable BIOS Recovery from hard drive. Enables you to enable or disable the rear USB ports. System setup options-Security menu Security Unlock Setup Status Admin Password Status System Password Status HDD Password Status Admin Password Displays if the setup status is restored. Default: Software Controlled Displays the allocated memory size for SupportAssist OS Recovery tool will enable or disable the boot flow for Dell OS Recovery tool. Displays whether the admin password is set the status of certain system errors. Enables you to enable the USB devices...
...Enables you to enable or disable BIOS Recovery from hard drive. Enables you to enable or disable the rear USB ports. System setup options-Security menu Security Unlock Setup Status Admin Password Status System Password Status HDD Password Status Admin Password Displays if the setup status is restored. Default: Software Controlled Displays the allocated memory size for SupportAssist OS Recovery tool will enable or disable the boot flow for Dell OS Recovery tool. Displays whether the admin password is set the status of certain system errors. Enables you to enable the USB devices...

Service Manual
Page 73
... instructions on the screen. NOTE: This process may need to flash (update) the BIOS when an update is complete, navigate to your computer. 2 Restart your computer. 3 Press F12 after the Dell logo is displayed. 5 Choose your keyboard layout. 6 In the Choose an option screen, click Troubleshoot. 7 Click Recover from a drive. 8 Choose one -time boot menu message appears. 4 After the boot menu loads, select the USB recovery device under UEFI BOOT. NOTE: Before reinstalling Windows...
... instructions on the screen. NOTE: This process may need to flash (update) the BIOS when an update is complete, navigate to your computer. 2 Restart your computer. 3 Press F12 after the Dell logo is displayed. 5 Choose your keyboard layout. 6 In the Choose an option screen, click Troubleshoot. 7 Click Recover from a drive. 8 Choose one -time boot menu message appears. 4 After the boot menu loads, select the USB recovery device under UEFI BOOT. NOTE: Before reinstalling Windows...

Service Manual
Page 75
...Diagnostics Number of amber LED flashes 2, 1 2, 2 2, 3 2, 4 2, 5 2, 6 2, 7 3, 1 3, 2 3, 3 3, 4 3, 5 3, 6 3, 7 Problem description System board failure System board, PSU or PSU cabling failure System board, RAM or CPU failure CMOS battery failure Corrupt BIOS. The Intel Rapid Storage Technology window is displayed. 3 On the Status tab, click Enable to enable the Intel Optane memory. 4 On the warning screen, select a compatible fast drive, and then click Yes to continue enabling Intel Optane memory. 5 Click Intel Optane memory > Reboot to see the full performance benefits. Disabling...
...Diagnostics Number of amber LED flashes 2, 1 2, 2 2, 3 2, 4 2, 5 2, 6 2, 7 3, 1 3, 2 3, 3 3, 4 3, 5 3, 6 3, 7 Problem description System board failure System board, PSU or PSU cabling failure System board, RAM or CPU failure CMOS battery failure Corrupt BIOS. The Intel Rapid Storage Technology window is displayed. 3 On the Status tab, click Enable to enable the Intel Optane memory. 4 On the warning screen, select a compatible fast drive, and then click Yes to continue enabling Intel Optane memory. 5 Click Intel Optane memory > Reboot to see the full performance benefits. Disabling...


