
Service Manual
Page 3
... coin-cell battery...31 Installing the coin-cell battery...32 Memory modules...33 Removing the memory module...33 Installing the memory module...34 DC-in port...35 Removing the DC-in port...35 Installing the DC-in port...37 Solid state drive...39 Contents 3
... coin-cell battery...31 Installing the coin-cell battery...32 Memory modules...33 Removing the memory module...33 Installing the memory module...34 DC-in port...35 Removing the DC-in port...35 Installing the DC-in port...37 Solid state drive...39 Contents 3

Service Manual
Page 12
...(using a USB Type-C connector) Thunderbolt 3 over USB Type-C Thunderbolt is a hardware interface that is very small. USB Type-C ports can be transferred at speeds up to supported peripherals. 1. You could plug your laptop into one serial signal, and additionally provides DC ...) and DisplayPort (DP) into an external display connected to use the same connector as USB 3.1. Thunderbolt 3 uses a USB Type-C connector/port to connect to 40 Gbps 12 Technology and components Thunderbolt 1 and Thunderbolt 3 1. Thunderbolt 3 supports speed up to peripherals, while Thunderbolt ...
...(using a USB Type-C connector) Thunderbolt 3 over USB Type-C Thunderbolt is a hardware interface that is very small. USB Type-C ports can be transferred at speeds up to supported peripherals. 1. You could plug your laptop into one serial signal, and additionally provides DC ...) and DisplayPort (DP) into an external display connected to use the same connector as USB 3.1. Thunderbolt 3 uses a USB Type-C connector/port to connect to 40 Gbps 12 Technology and components Thunderbolt 1 and Thunderbolt 3 1. Thunderbolt 3 supports speed up to peripherals, while Thunderbolt ...
Service Manual
Page 15
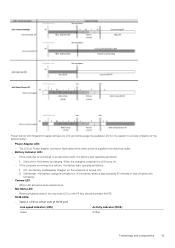
... the computer is connected to an electrical outlet, the battery light operates as follows: 1. A low battery state is approximately 30 minutes or less of RJ45 port Link speed indicator (LHS) Activity indicator (RHS) Green Amber Technology and components 15 Solid white -the battery is critically low. Solid amber -the battery charge...
... the computer is connected to an electrical outlet, the battery light operates as follows: 1. A low battery state is approximately 30 minutes or less of RJ45 port Link speed indicator (LHS) Activity indicator (RHS) Green Amber Technology and components 15 Solid white -the battery is critically low. Solid amber -the battery charge...
Service Manual
Page 17
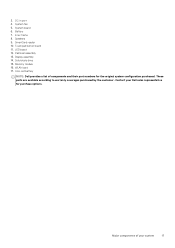
Battery 7. Solid-state drive 15. LED board 12. These parts are available according to warranty coverages purchased by the customer. Touchpad button board 11. Coin-cell battery NOTE: Dell provides a list of your Dell sales representative for the original system configuration purchased. Display assembly 14. Contact your system 17 Speakers 9. Inner frame 8. Memory module 16. DC-in port 4. Palmrest assembly 13. WLAN card 17. SmartCard reader 10. Major components of components and their part numbers for purchase options. 3. System fan 5. System board 6.
Battery 7. Solid-state drive 15. LED board 12. These parts are available according to warranty coverages purchased by the customer. Touchpad button board 11. Coin-cell battery NOTE: Dell provides a list of your Dell sales representative for the original system configuration purchased. Display assembly 14. Contact your system 17 Speakers 9. Inner frame 8. Memory module 16. DC-in port 4. Palmrest assembly 13. WLAN card 17. SmartCard reader 10. Major components of components and their part numbers for purchase options. 3. System fan 5. System board 6.

Service Manual
Page 35
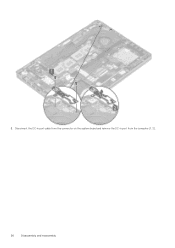
DC-in port Removing the DC-in before working inside your computer. Remove the base cover. 4. Steps 1. Remove the two (M2x5) screws that secure the Type-C bracket to the system board [1]. 2. Next steps 1. Follow the procedure in port Prerequisites 1. Replace the battery. 2. Lift the Type-C bracket away from the computer [2]. Replace the base cover. 3. Disassembly and reassembly 35 Replace the microSD card. 4. Remove the microSD card. 3. Follow the procedure in after working inside your computer. 2. Remove the battery.
DC-in port Removing the DC-in before working inside your computer. Remove the base cover. 4. Steps 1. Remove the two (M2x5) screws that secure the Type-C bracket to the system board [1]. 2. Next steps 1. Follow the procedure in port Prerequisites 1. Replace the battery. 2. Lift the Type-C bracket away from the computer [2]. Replace the base cover. 3. Disassembly and reassembly 35 Replace the microSD card. 4. Remove the microSD card. 3. Follow the procedure in after working inside your computer. 2. Remove the battery.
Service Manual
Page 36
3. Disconnect the DC-in port cable from the connector on the system board and remove the DC-in port from the computer [1, 2]. 36 Disassembly and reassembly
3. Disconnect the DC-in port cable from the connector on the system board and remove the DC-in port from the computer [1, 2]. 36 Disassembly and reassembly

Service Manual
Page 37
Connect the DC-in port cable to its slot on the system board [2]. Installing the DC-in port to the connector on the computer [1]. 2. Place the DC-in port Steps 1. Disassembly and reassembly 37
Connect the DC-in port cable to its slot on the system board [2]. Installing the DC-in port to the connector on the computer [1]. 2. Place the DC-in port Steps 1. Disassembly and reassembly 37

Service Manual
Page 67
b) LED board cable [2]. Remove the single (M2x3) screw that secures the fingerprint support bracket to the system board [1]. 3. Disassembly and reassembly 67 c) USH FFC [3]. Disconnect the fingerprint port [3]. d) Touchpad FFC [4]. 2. Lift the latch and disconnect the following cables from the computer [2]. 4. Lift the fingerprint support bracket away from the system board: a) Speaker cable [1]. Steps 1.
b) LED board cable [2]. Remove the single (M2x3) screw that secures the fingerprint support bracket to the system board [1]. 3. Disassembly and reassembly 67 c) USH FFC [3]. Disconnect the fingerprint port [3]. d) Touchpad FFC [4]. 2. Lift the latch and disconnect the following cables from the computer [2]. 4. Lift the fingerprint support bracket away from the system board: a) Speaker cable [1]. Steps 1.

Setup and specifications guide
Page 3
......11 Storage...12 System board connectors...12 Media card-reader...12 Audio...12 Video card...13 Camera...13 Communication...14 Mobile Broadband...14 Wireless...14 Ports and connectors...14 Display...15 Keyboard...15 Touchpad...16 Fingerprint reader-optional...16 Operating system...16 Battery...16 Power adapter...17 Sensor and control specifications...
......11 Storage...12 System board connectors...12 Media card-reader...12 Audio...12 Video card...13 Camera...13 Communication...14 Mobile Broadband...14 Wireless...14 Ports and connectors...14 Display...15 Keyboard...15 Touchpad...16 Fingerprint reader-optional...16 Operating system...16 Battery...16 Power adapter...17 Sensor and control specifications...

Setup and specifications guide
Page 8
...Chassis overview Touchpad 2. USB 3.1 Gen 1 2. microSD card reader 3. Headset/ Microphone port 5. micro-SIM card slot 4. Power connector port 3. USB 3.1 Gen 2 (USB Type-C) port with optional fingerprint 3. HDMI port 8. Trackstick (optional) Bottom view 1. Thermal vent 2. Camera status light 6. Wedge-...shaped lock slot Palmrest view 1. Array microphone 7. USB 3.1 Gen 1 port with PowerShare 7. Keyboard 4. Speakers Keyboard shortcuts NOTE: Keyboard characters may differ depending on the keyboard language configuration....
...Chassis overview Touchpad 2. USB 3.1 Gen 1 2. microSD card reader 3. Headset/ Microphone port 5. micro-SIM card slot 4. Power connector port 3. USB 3.1 Gen 2 (USB Type-C) port with optional fingerprint 3. HDMI port 8. Trackstick (optional) Bottom view 1. Thermal vent 2. Camera status light 6. Wedge-...shaped lock slot Palmrest view 1. Array microphone 7. USB 3.1 Gen 1 port with PowerShare 7. Keyboard 4. Speakers Keyboard shortcuts NOTE: Keyboard characters may differ depending on the keyboard language configuration....
Setup and specifications guide
Page 10
... • Storage • System board connectors • Media card-reader • Audio • Video card • Camera • Communication • Mobile Broadband • Wireless • Ports and connectors • Display • Keyboard • Touchpad • Fingerprint reader-optional • Operating system • Battery • Power adapter • Sensor and control specifications...
... • Storage • System board connectors • Media card-reader • Audio • Video card • Camera • Communication • Mobile Broadband • Wireless • Ports and connectors • Display • Keyboard • Touchpad • Fingerprint reader-optional • Operating system • Battery • Power adapter • Sensor and control specifications...

Setup and specifications guide
Page 13
...-8665U CPU (vPro) • Intel Core i5-8365U CPU • Intel Core i5-8265U CPU • Intel Core i3-8145U CPU Shared system HDMI 1.4b port memory AMD Radeon Discrete NA 540X GDDR5 2 GB N/A Maximum resolution 4096 x 2304 @24 Hz N/A Camera Table 11. Table 9. Audio specifications (continued) Feature Internal speaker amplifier...
...-8665U CPU (vPro) • Intel Core i5-8365U CPU • Intel Core i5-8265U CPU • Intel Core i3-8145U CPU Shared system HDMI 1.4b port memory AMD Radeon Discrete NA 540X GDDR5 2 GB N/A Maximum resolution 4096 x 2304 @24 Hz N/A Camera Table 11. Table 9. Audio specifications (continued) Feature Internal speaker amplifier...
Setup and specifications guide
Page 14
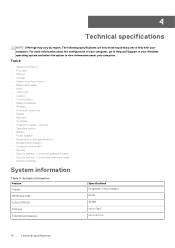
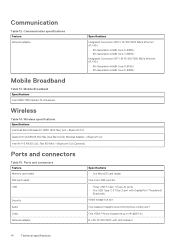
... SIM card slot • Three USB 3.1 Gen 1 (Type-A) ports • One USB Type-C 3.1 Gen 2 port with DisplayPort/Thunderbolt 3(optional) Noble wedge lock slot One headset (headphone and microphone combo) port One HDMI 1.4b port (supports up to 4k @30 Hz) RJ-45, 10/100/...QCA61x4A 802.11ac Dual Band (2x2) Wireless Adapter + Bluetooth 4.2 Intel Wi-Fi 6 AX200 2x2 .11ax 160 MHz + Bluetooth 5.0 (Optional) Ports and connectors Table 15. Communication Table 12. Mobile Broadband Specifications Intel XMM 7360 Global LTE-Advanced Wireless Table 14. Communication specifications Feature Network adapter ...
... SIM card slot • Three USB 3.1 Gen 1 (Type-A) ports • One USB Type-C 3.1 Gen 2 port with DisplayPort/Thunderbolt 3(optional) Noble wedge lock slot One headset (headphone and microphone combo) port One HDMI 1.4b port (supports up to 4k @30 Hz) RJ-45, 10/100/...QCA61x4A 802.11ac Dual Band (2x2) Wireless Adapter + Bluetooth 4.2 Intel Wi-Fi 6 AX200 2x2 .11ax 160 MHz + Bluetooth 5.0 (Optional) Ports and connectors Table 15. Communication Table 12. Mobile Broadband Specifications Intel XMM 7360 Global LTE-Advanced Wireless Table 14. Communication specifications Feature Network adapter ...
Setup and specifications guide
Page 26
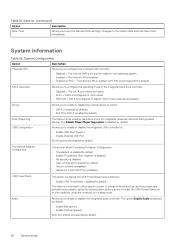
...Allows you to power or charge external devices, such as phones and portable music players, using the stored system battery power through the USN PowerShare port on -board: • SATA-2 (enabled by default) • M.2 PCIe SSD-0 (enabled by default) Smart Reporting USB Configuration This field...Support-is disabled • No security-is disabled • User configuration-enabled by default • Secure connect-is disabled • Display port and USB Only-is disabled by default. disabled by default This feature is intended to allow users to enable or disable the integrated USB ...
...Allows you to power or charge external devices, such as phones and portable music players, using the stored system battery power through the USN PowerShare port on -board: • SATA-2 (enabled by default) • M.2 PCIe SSD-0 (enabled by default) Smart Reporting USB Configuration This field...Support-is disabled • No security-is disabled • User configuration-enabled by default • Secure connect-is disabled • Display port and USB Only-is disabled by default. disabled by default This feature is intended to allow users to enable or disable the integrated USB ...
Setup and specifications guide
Page 31
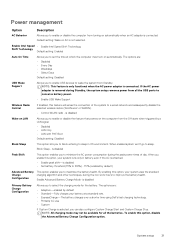
...: Enabled Auto On Time Allows you to set the time at a standard rate. • ExpressCharge-The battery charges over a shorter time using Dell's fast charging technology. • Primarily AC use • Custom If Custom Charge is selected, you can also configure Custom Charge Start and Custom...feature that powers on AC is connected. is disabled Primary Battery Charge Configuration Allows you to select the charging mode for all the USB ports to conserve battery power. • Enable USB Wake Support Wireless Radio Control If Enabled, this option, your system runs only in OS ...
...: Enabled Auto On Time Allows you to set the time at a standard rate. • ExpressCharge-The battery charges over a shorter time using Dell's fast charging technology. • Primarily AC use • Custom If Custom Charge is selected, you can also configure Custom Charge Start and Custom...feature that powers on AC is connected. is disabled Primary Battery Charge Configuration Allows you to select the charging mode for all the USB ports to conserve battery power. • Enable USB Wake Support Wireless Radio Control If Enabled, this option, your system runs only in OS ...


