
Tower Owners Manual
Page 53
... USB 3.0/USB 3.1 Gen 1 Hard Drives ● USB 3.0/USB 3.1 Gen 1 Drive Docks & Adapters ● USB 3.0/USB 3.1 Gen 1 Flash Drives & Readers ● USB 3.0/USB 3.1 Gen 1 Solid-state Drives ● USB 3.0/USB 3.1 Gen 1 RAIDs ● Optical Media Drives ● Multimedia Devices ● Networking ● USB 3.0/USB 3.1 Gen 1 Adapter Cards & Hubs Compatibility The good news is not out of the question to think that Windows 7 would trickle down to a proper SuperSpeed USB connection. The intended applications for USB 3.1 Gen 1 controllers. Adds high-speed networking to an HDMI...
... USB 3.0/USB 3.1 Gen 1 Hard Drives ● USB 3.0/USB 3.1 Gen 1 Drive Docks & Adapters ● USB 3.0/USB 3.1 Gen 1 Flash Drives & Readers ● USB 3.0/USB 3.1 Gen 1 Solid-state Drives ● USB 3.0/USB 3.1 Gen 1 RAIDs ● Optical Media Drives ● Multimedia Devices ● Networking ● USB 3.0/USB 3.1 Gen 1 Adapter Cards & Hubs Compatibility The good news is not out of the question to think that Windows 7 would trickle down to a proper SuperSpeed USB connection. The intended applications for USB 3.1 Gen 1 controllers. Adds high-speed networking to an HDMI...

Tower Owners Manual
Page 57
..., Current Clock Speed, Minimum Clock Speed, Maximum Clock Speed, Processor L2 Cache, Processor L3 Cache, HT Capable, and 64-Bit Technology. ● Device Information: Displays SATA-0, SATA-1, SATA-2, SATA-3, SATA-4, M.2 PCIe SSD-0, LOM MAC Address, Video Controller, and Audio Controller. . In the System BIOS or System Setup screen, select System Security and press Enter. Press Esc and a message prompts you change the existing System and/or Setup password. The computer reboots. System Setup options NOTE: Depending...
..., Current Clock Speed, Minimum Clock Speed, Maximum Clock Speed, Processor L2 Cache, Processor L3 Cache, HT Capable, and 64-Bit Technology. ● Device Information: Displays SATA-0, SATA-1, SATA-2, SATA-3, SATA-4, M.2 PCIe SSD-0, LOM MAC Address, Video Controller, and Audio Controller. . In the System BIOS or System Setup screen, select System Security and press Enter. Press Esc and a message prompts you change the existing System and/or Setup password. The computer reboots. System Setup options NOTE: Depending...

Tower Owners Manual
Page 58
... appear. The options are hidden ● RAID ON = SATA is disabled by default. Front USB Configuration Rear USB Configuration USB PowerShare Audio Allows you to support RAID mode (selected by default. This option allows you to enable or disable the integrated USB controller for AHCI mode Serial Port Allows you to enable or disable the various drives on the computer and its installed devices, the items listed in serial port to control the on -board devices. ● Enable PCI Slot (default option) ● Enable Media Card (default option) ● Disable Media Card 58 System...
... appear. The options are hidden ● RAID ON = SATA is disabled by default. Front USB Configuration Rear USB Configuration USB PowerShare Audio Allows you to support RAID mode (selected by default. This option allows you to enable or disable the integrated USB controller for AHCI mode Serial Port Allows you to enable or disable the various drives on the computer and its installed devices, the items listed in serial port to control the on -board devices. ● Enable PCI Slot (default option) ● Enable Media Card (default option) ● Disable Media Card 58 System...
Tower Owners Manual
Page 59
... and internal HDD passwords when powered on -board graphics device will block BIOS updates from services such as Microsoft Windows Update and Linux Vendor Firmware Service (LVFS) Allows you to the operating system. ● TPM On (default) ● Clear ● PPI Bypass for Enable Commands ● PPI Bypass for the system. System setup 59 Always prompt for a administrative password and the system password. Disabling this system allows BIOS updates via UEFI capsule update packages. This option controls...
... and internal HDD passwords when powered on -board graphics device will block BIOS updates from services such as Microsoft Windows Update and Linux Vendor Firmware Service (LVFS) Allows you to the operating system. ● TPM On (default) ● Clear ● PPI Bypass for Enable Commands ● PPI Bypass for the system. System setup 59 Always prompt for a administrative password and the system password. Disabling this system allows BIOS updates via UEFI capsule update packages. This option controls...

Tower Owners Manual
Page 60
... enable or disable the option to a user-selected file ● Replace from File- After next boot, the setting will restore to enter Option ROM Configuration screens via the hotkey. ● One-Time Enable - This option is in the context of the processor. Intel Software Guard Extensions Option Description Intel SGX Enable Allows you to default setting ● Delete All Keys- User may enter OROM configuration screens via the hotkey. User may enter OROM configuration screens via hotkeys during boot. Table 11. Adds a key...
... enable or disable the option to a user-selected file ● Replace from File- After next boot, the setting will restore to enter Option ROM Configuration screens via the hotkey. ● One-Time Enable - This option is in the context of the processor. Intel Software Guard Extensions Option Description Intel SGX Enable Allows you to default setting ● Delete All Keys- User may enter OROM configuration screens via the hotkey. User may enter OROM configuration screens via hotkeys during boot. Table 11. Adds a key...

Tower Owners Manual
Page 63
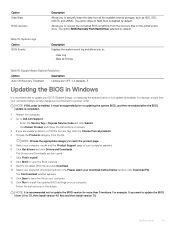
... Dell.com/support. ● Enter the Service Tag or Express Service Code and click Submit. ● ClickDetect Product and follow the instructions on replacing the system board or if an update is set by default. Go to updating the system BIOS, and then re-enabled after the BIOS update is blocked. Advanced configurations Option Description ASPM Allows you to activate the state power management. ● Auto (Default) ● Disabled ● L1 Only Updating the BIOS...
... Dell.com/support. ● Enter the Service Tag or Express Service Code and click Submit. ● ClickDetect Product and follow the instructions on replacing the system board or if an update is set by default. Go to updating the system BIOS, and then re-enabled after the BIOS update is blocked. Advanced configurations Option Description ASPM Allows you to activate the state power management. ● Auto (Default) ● Disabled ● L1 Only Updating the BIOS...
Tower Owners Manual
Page 64
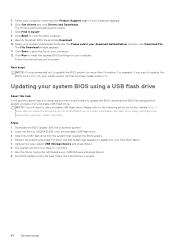
...:// www.dell.com/support/article/us/en/19/SLN143196/how-to-create-a-bootable-usb-flash-drive-using a USB flash drive About this task If the system cannot load into the system that requires the BIOS update. 4. Copy the file e.g. Identify the latest BIOS file and click Download. 10. Click Run to display the One Time Boot Menu. 5. O9010A12.EXE onto the bootable USB Flash drive. 3. Using arrow keys, select USB Storage Device and press...
...:// www.dell.com/support/article/us/en/19/SLN143196/how-to-create-a-bootable-usb-flash-drive-using a USB flash drive About this task If the system cannot load into the system that requires the BIOS update. 4. Copy the file e.g. Identify the latest BIOS file and click Download. 10. Click Run to display the One Time Boot Menu. 5. O9010A12.EXE onto the bootable USB Flash drive. 3. Using arrow keys, select USB Storage Device and press...

Tower Owners Manual
Page 73
... file to a different disk or use these characters in the hard drive bay. Do not use a larger capacity disk. A memory module may be faulty. Reinstall the memory module or, if necessary, replace it can continue. Run the hard drive tests in the System Setup program. NOTE: The Enhanced Pre-boot System Assessment window displays, listing all the detected devices. 4. Repeat steps 3-7 above. Enable the Pointing Device option in Dell Diagnostics. Ensure that you have...
... file to a different disk or use these characters in the hard drive bay. Do not use a larger capacity disk. A memory module may be faulty. Reinstall the memory module or, if necessary, replace it can continue. Run the hard drive tests in the System Setup program. NOTE: The Enhanced Pre-boot System Assessment window displays, listing all the detected devices. 4. Repeat steps 3-7 above. Enable the Pointing Device option in Dell Diagnostics. Ensure that you have...

Tower Owners Manual
Page 74
... a utility. Run the Hard Disk Drive tests in Dell Diagnostics. INSERT BOOTABLE MEDIA The operating system is conflicting with the operating system, another drive. Restart the computer, and avoid touching the keyboard or the mouse during the boot routine. KEYBOARD DATA LINE FAILURE For external keyboards, check the cable connection. MEMORY ADDRESS LINE FAILURE AT ADDRESS, READ A memory module may be defective. Shut down the computer, remove the hard drive, and boot the computer from an optical. If the problem...
... a utility. Run the Hard Disk Drive tests in Dell Diagnostics. INSERT BOOTABLE MEDIA The operating system is conflicting with the operating system, another drive. Restart the computer, and avoid touching the keyboard or the mouse during the boot routine. KEYBOARD DATA LINE FAILURE For external keyboards, check the cable connection. MEMORY ADDRESS LINE FAILURE AT ADDRESS, READ A memory module may be defective. Shut down the computer, remove the hard drive, and boot the computer from an optical. If the problem...

Small Form Factor Owners Manual
Page 6
... working inside your computer, read the safety information that shipped with your computer and all covers, panels, and screws before connecting to servicing that both connectors are disconnecting this document. You should only perform troubleshooting and simple repairs as authorized in this type of your product documentation, or as touching a connector on the locking tabs before opening the computer cover or panels. Some cables have...
... working inside your computer, read the safety information that shipped with your computer and all covers, panels, and screws before connecting to servicing that both connectors are disconnecting this document. You should only perform troubleshooting and simple repairs as authorized in this type of your product documentation, or as touching a connector on the locking tabs before opening the computer cover or panels. Some cables have...

Small Form Factor Owners Manual
Page 48
... Memory Installed, Memory Available, Memory Speed, Memory Channel Mode, Memory Technology, DIMM 1 Size, DIMM 2 Size, DIMM 3 Size, and DIMM 4 Size. • PCI Information: Displays SLOT1, SLOT2, and SLOT3_M.2 • Processor Information: Displays Processor Type, Core Count, Processor ID, Current Clock Speed, Minimum Clock Speed, Maximum Clock Speed, Processor L2 Cache, Processor L3 Cache, HT Capable, and 64-Bit Technology. • Device Information: Displays SATA-0, SATA-1, SATA-2, SATA-4, M.2 PCIe SSD-0, LOM MAC Address, Video Controller, and Audio Controller. . To enter the System Setup...
... Memory Installed, Memory Available, Memory Speed, Memory Channel Mode, Memory Technology, DIMM 1 Size, DIMM 2 Size, DIMM 3 Size, and DIMM 4 Size. • PCI Information: Displays SLOT1, SLOT2, and SLOT3_M.2 • Processor Information: Displays Processor Type, Core Count, Processor ID, Current Clock Speed, Minimum Clock Speed, Maximum Clock Speed, Processor L2 Cache, Processor L3 Cache, HT Capable, and 64-Bit Technology. • Device Information: Displays SATA-0, SATA-1, SATA-2, SATA-4, M.2 PCIe SSD-0, LOM MAC Address, Video Controller, and Audio Controller. . To enter the System Setup...
Small Form Factor Owners Manual
Page 50
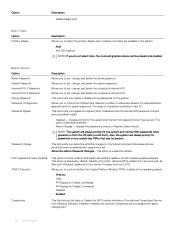
... whether changes to set , change , and delete the system password. Allow Non-Admin Password Changes - Enables or disables the optional Computrace service designed for the system. Allows you bypass the System (Boot) Password and the internal HDD password prompts during a system restart. • Disabled - Also, the system will block BIOS updates from Absolute Software. Option Description • Disable Media Card Table 7. Video Option Primary Display Description Allows you to the operating system. • TPM On • Clear •...
... whether changes to set , change , and delete the system password. Allow Non-Admin Password Changes - Enables or disables the optional Computrace service designed for the system. Allows you bypass the System (Boot) Password and the internal HDD password prompts during a system restart. • Disabled - Also, the system will block BIOS updates from Absolute Software. Option Description • Disable Media Card Table 7. Video Option Primary Display Description Allows you to the operating system. • TPM On • Clear •...
Small Form Factor Owners Manual
Page 55
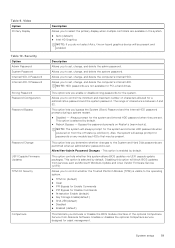
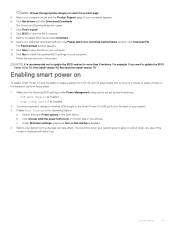
...: 1 Make sure the following BIOS settings under Power Management setup option are set as mentioned here: • USB Wake Support as Enabled. • Deep Sleep Control as Disabled. 2 Connect a keyboard, mouse, or wireless USB dongle to the Smart Power On USB port(s) on the back of your download method below window, click Download File. System setup 55 The Drivers and Downloads section opens. 7 Click Find it up. Enabling smart power on To enable Smart Power On and the ability to wake a system from 1.0 to 7.0, then install...
...: 1 Make sure the following BIOS settings under Power Management setup option are set as mentioned here: • USB Wake Support as Enabled. • Deep Sleep Control as Disabled. 2 Connect a keyboard, mouse, or wireless USB dongle to the Smart Power On USB port(s) on the back of your download method below window, click Download File. System setup 55 The Drivers and Downloads section opens. 7 Click Find it up. Enabling smart power on To enable Smart Power On and the ability to wake a system from 1.0 to 7.0, then install...

Small Form Factor Owners Manual
Page 60
... the memory modules or, if necessary, replace them. Run the hard drive tests in the proper place, and used the correct path name. Reinsert the card or try another card. Power LED light status Possible cause Troubleshooting steps • If the display is connected and turned on ChengMing 3977 and Optiplex D8 and OptiPlex D8 AIO platforms. ChengMing 3977 and OptiPlex D8 and D8 AIO platforms without processor installed or when processor power cable...
... the memory modules or, if necessary, replace them. Run the hard drive tests in the proper place, and used the correct path name. Reinsert the card or try another card. Power LED light status Possible cause Troubleshooting steps • If the display is connected and turned on ChengMing 3977 and Optiplex D8 and OptiPlex D8 AIO platforms. ChengMing 3977 and OptiPlex D8 and D8 AIO platforms without processor installed or when processor power cable...
BIOS for Intel Optane Memory Pre-Installation Guide
Page 5
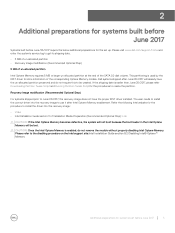
... Systems built before June 2017 5 This partitioning is used by the IRST driver to install the driver into the recovery image to create the partition. Dell systems shipped after Intel Optane Memory enablement. Refer the following Intel website for the set up. The user needs to install the correct driver into the recovery image: • Video • Intel Installation Guide section 3 of the corresponding Optane Memory module. If the shipping date is...
... Systems built before June 2017 5 This partitioning is used by the IRST driver to install the driver into the recovery image to create the partition. Dell systems shipped after Intel Optane Memory enablement. Refer the following Intel website for the set up. The user needs to install the correct driver into the recovery image: • Video • Intel Installation Guide section 3 of the corresponding Optane Memory module. If the shipping date is...

Micro Owners Manual
Page 6
... before opening the computer cover or panels. if you follow the safety instructions that shipped with care. After you finish working inside the computer, replace all power sources before you disconnect a cable, pull on its connector or on the back of the computer. As you connect a cable, ensure that is not authorized by the online or telephone service and support team. WARNING: Disconnect all covers, panels...
... before opening the computer cover or panels. if you follow the safety instructions that shipped with care. After you finish working inside the computer, replace all power sources before you disconnect a cable, pull on its connector or on the back of the computer. As you connect a cable, ensure that is not authorized by the online or telephone service and support team. WARNING: Disconnect all covers, panels...

Micro Owners Manual
Page 33
... setup password Ensure that Password Status is not supported in Intel 7th Generation processors. You cannot delete or change an existing System or Setup password, if the Password Status is Unlocked (in the System Setup) before attempting to select the Enable Legacy Option ROMs option, when in UEFI boot mode. To enter the System Setup, press F2 immediately after a power-on the computer and its installed devices, the items listed in this option...
... setup password Ensure that Password Status is not supported in Intel 7th Generation processors. You cannot delete or change an existing System or Setup password, if the Password Status is Unlocked (in the System Setup) before attempting to select the Enable Legacy Option ROMs option, when in UEFI boot mode. To enter the System Setup, press F2 immediately after a power-on the computer and its installed devices, the items listed in this option...

Micro Owners Manual
Page 35
... password. This option is enabled by default. • Disable • Activate CPU XD Support Admin Setup Lockout Allows you to set , change , and delete the computer's internal HDD. This option is visible to set , change , and delete the admin password. Allows you to control the minimum and maximum number of the optional Computrace Service from the off state (a cold boot). This option lets you to enable or disable the option to the System and Hard Disk passwords are set...
... password. This option is enabled by default. • Disable • Activate CPU XD Support Admin Setup Lockout Allows you to set , change , and delete the computer's internal HDD. This option is visible to set , change , and delete the admin password. Allows you to control the minimum and maximum number of the optional Computrace Service from the off state (a cold boot). This option lets you to enable or disable the option to the System and Hard Disk passwords are set...
Micro Owners Manual
Page 39
... all the available internal storages, such as HDD, SSD, mSATA, and eMMC. System setup 39 Allows you are : OFF, 1, 2 (default), 3. The option BIOS Recovery from the list. The Drivers and Downloads section opens. 7 Click Find it must be suspended prior to updating the system BIOS, and then re-enabled after the BIOS update is recommended not to install the updated BIOS settings on the primary hard drive. The File Download window appears. 11 Click...
... all the available internal storages, such as HDD, SSD, mSATA, and eMMC. System setup 39 Allows you are : OFF, 1, 2 (default), 3. The option BIOS Recovery from the list. The Drivers and Downloads section opens. 7 Click Find it must be suspended prior to updating the system BIOS, and then re-enabled after the BIOS update is recommended not to install the updated BIOS settings on the primary hard drive. The File Download window appears. 11 Click...

Micro Owners Manual
Page 45
.... Run the hard drive tests in the System Setup program. Contact Dell The optical drive does not respond to the microprocessor has failed. The BIOS behavior specification defines that you have the power LED flashing amber as per the design. Reinsert the card or try another card. Diagnostic error messages Error messages AUXILIARY DEVICE FAILURE BAD COMMAND OR FILE NAME CACHE DISABLED DUE TO FAILURE CD DRIVE CONTROLLER FAILURE DATA ERROR DECREASING AVAILABLE MEMORY DISK C: FAILED INITIALIZATION DRIVE NOT...
.... Run the hard drive tests in the System Setup program. Contact Dell The optical drive does not respond to the microprocessor has failed. The BIOS behavior specification defines that you have the power LED flashing amber as per the design. Reinsert the card or try another card. Diagnostic error messages Error messages AUXILIARY DEVICE FAILURE BAD COMMAND OR FILE NAME CACHE DISABLED DUE TO FAILURE CD DRIVE CONTROLLER FAILURE DATA ERROR DECREASING AVAILABLE MEMORY DISK C: FAILED INITIALIZATION DRIVE NOT...


