
Setup and specifications guide
Page 4
... Wireless options...33 Maintenance...33 System logs...34 Updating the BIOS in Windows ...34 Updating BIOS on systems with BitLocker enabled 34 Updating your system BIOS using a USB flash drive 34 Updating the Dell BIOS in Linux and Ubuntu environments 35 Flashing the BIOS from the F12 One-Time boot menu 35 System and setup password...38 Assigning a system setup password...38 Deleting or changing an existing system setup password 39 5 Software...40 Operating system...40 Downloading Windows drivers...40 Network adapter drivers...40 Audio drivers...41 Display adapter...41 Security drivers...
... Wireless options...33 Maintenance...33 System logs...34 Updating the BIOS in Windows ...34 Updating BIOS on systems with BitLocker enabled 34 Updating your system BIOS using a USB flash drive 34 Updating the Dell BIOS in Linux and Ubuntu environments 35 Flashing the BIOS from the F12 One-Time boot menu 35 System and setup password...38 Assigning a system setup password...38 Deleting or changing an existing system setup password 39 5 Software...40 Operating system...40 Downloading Windows drivers...40 Network adapter drivers...40 Audio drivers...41 Display adapter...41 Security drivers...

Setup and specifications guide
Page 16
... Card Support Prox (Proximity) (125kHz) Card support ISO 14443 Type A Card Support ISO 14443 Type B Card Support ISO/IEC 21481 Description Dell ControlVault 3 Contactless Smartcard reader with Intel Remote Wake UP and PXE • Wi-Fi 802.11n/ac via M.2 • Bluetooth Contactless smart card Table 16. Ports and connectors Features Memory card reader Smart card reader USB Security Docking port Audio Video Network adapter Thunderbolt Specifications SD 4.0 memory card reader Standard Three USB 3.1 Gen 1 ports with PowerShare Noble wedge lock slot Cable dock support • Headset port...
... Card Support Prox (Proximity) (125kHz) Card support ISO 14443 Type A Card Support ISO 14443 Type B Card Support ISO/IEC 21481 Description Dell ControlVault 3 Contactless Smartcard reader with Intel Remote Wake UP and PXE • Wi-Fi 802.11n/ac via M.2 • Bluetooth Contactless smart card Table 16. Ports and connectors Features Memory card reader Smart card reader USB Security Docking port Audio Video Network adapter Thunderbolt Specifications SD 4.0 memory card reader Standard Three USB 3.1 Gen 1 ports with PowerShare Noble wedge lock slot Cable dock support • Headset port...

Setup and specifications guide
Page 17
... Personal Computer/Smart Card Yes specification for integration of hardware readers into personal computer environments CCID driver compliance Common driver support for Integrated Yes Circuit Card Interface Device for OS level drivers Windows Certified Device certified by Microsoft WHCK Yes Dell ControlVault support Device connects to Dell ControlVault for Yes usage and processing NOTE: 125 Khz proximity cards are not supported. Supported cards Manufacturer HID NXP/Mifare G&D Card jCOP readertest3 A card (14443a) 1430...
... Personal Computer/Smart Card Yes specification for integration of hardware readers into personal computer environments CCID driver compliance Common driver support for Integrated Yes Circuit Card Interface Device for OS level drivers Windows Certified Device certified by Microsoft WHCK Yes Dell ControlVault support Device connects to Dell ControlVault for Yes usage and processing NOTE: 125 Khz proximity cards are not supported. Supported cards Manufacturer HID NXP/Mifare G&D Card jCOP readertest3 A card (14443a) 1430...
Setup and specifications guide
Page 22
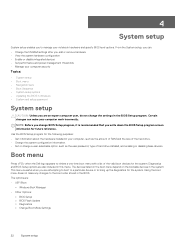
... information about the hardware installed in the system. Using the boot menu does not make your computer security Topics: • System setup • Boot menu • Navigation keys • Boot Sequence • System setup options • Updating the BIOS in Windows • System and setup password System setup CAUTION: Unless you are : • UEFI Boot: ○ Windows Boot Manager • Other Options: ○ BIOS Setup ○ BIOS Flash Update ○ Diagnostics ○ Change Boot Mode Settings 22 System setup The devices listed on the boot menu depend on the...
... information about the hardware installed in the system. Using the boot menu does not make your computer security Topics: • System setup • Boot menu • Navigation keys • Boot Sequence • System setup options • Updating the BIOS in Windows • System and setup password System setup CAUTION: Unless you are : • UEFI Boot: ○ Windows Boot Manager • Other Options: ○ BIOS Setup ○ BIOS Flash Update ○ Diagnostics ○ Change Boot Mode Settings 22 System setup The devices listed on the boot menu depend on the...

Setup and specifications guide
Page 23
... the type of AC adapter connected to save any unsaved changes and restarts the system. Navigation keys NOTE: For most of the System Setup options, changes that you make are recorded but do not take effect until you can boot from including the diagnostic option. Moves to a specific device (for example: optical drive or hard drive). General options Table 26. During the Power-on the laptop and its installed devices, the items listed...
... the type of AC adapter connected to save any unsaved changes and restarts the system. Navigation keys NOTE: For most of the System Setup options, changes that you make are recorded but do not take effect until you can boot from including the diagnostic option. Moves to a specific device (for example: optical drive or hard drive). General options Table 26. During the Power-on the laptop and its installed devices, the items listed...

Setup and specifications guide
Page 25
...) Option USB Configuration Dell Type-C Dock Configuration Thunderbolt Adapter Configuration Thunderbolt Auto Switch USB PowerShare Audio Keyboard Illumination Keyboard Backlight Tmeout on AC Description Allows you to configure the Thunderbolt adapter security settings within the operating system. NOTE: USB keyboard and mouse always work in the system. The options are : • Disabled • Dim • Bright-Default Allows to 100%. This field configures the USB PowerShare feature behavior. This option allows you to charge external devices using the stored system battery power...
...) Option USB Configuration Dell Type-C Dock Configuration Thunderbolt Adapter Configuration Thunderbolt Auto Switch USB PowerShare Audio Keyboard Illumination Keyboard Backlight Tmeout on AC Description Allows you to configure the Thunderbolt adapter security settings within the operating system. NOTE: USB keyboard and mouse always work in the system. The options are : • Disabled • Dim • Bright-Default Allows to 100%. This field configures the USB PowerShare feature behavior. This option allows you to charge external devices using the stored system battery power...

Setup and specifications guide
Page 26
... Configuration(continued) Option Keyboard Backlight Tmeout on battery power. Allows you press Fn+F7. When the Integrated NIC option is selected, we recommend one of the following: • Disable the integrated NIC in the system when you to turn off all light and sound emissions in the BIOS to set the display brightness depending upon the power source. This option is default) and On AC (100% default). Video Option...
... Configuration(continued) Option Keyboard Backlight Tmeout on battery power. Allows you press Fn+F7. When the Integrated NIC option is selected, we recommend one of the following: • Disable the integrated NIC in the system when you to turn off all light and sound emissions in the BIOS to set the display brightness depending upon the power source. This option is default) and On AC (100% default). Video Option...
Setup and specifications guide
Page 27
... default. Hence, password has to "Not set ". Min = 4, Max = 32 Allows you to bypass the System password and the Internal HDD password, when it is marked to be set , during a system restart. NOTE: For the first time login, "Enter the old password:" field is set for the first time you login and then you set the password. Video(continued) Option Switchable Graphics Description This option enables or disables switchable graphics...
... default. Hence, password has to "Not set ". Min = 4, Max = 32 Allows you to bypass the System password and the Internal HDD password, when it is marked to be set , during a system restart. NOTE: For the first time login, "Enter the old password:" field is set for the first time you login and then you set the password. Video(continued) Option Switchable Graphics Description This option enables or disables switchable graphics...

Setup and specifications guide
Page 28
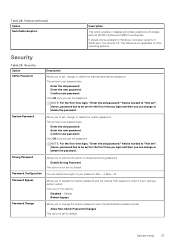
...; Disable • Activate-Default OROM keyboard Access Allows you to determine whether changes to enable or disable Option ROM configuration screens via UEFI capsule update packages. • Enable UEFI Capsule Firmware Updates This option is not set by default. Security(continued) Option Description Non-Admin Setup Changes Allows you to the setup options are locked by the admin password. • Allow Wireless Switch Changes This option is not set by default. Table 29. Master Password Lockout Allows you to disable master password support. • Enable...
...; Disable • Activate-Default OROM keyboard Access Allows you to determine whether changes to enable or disable Option ROM configuration screens via UEFI capsule update packages. • Enable UEFI Capsule Firmware Updates This option is not set by default. Security(continued) Option Description Non-Admin Setup Changes Allows you to the setup options are locked by the admin password. • Allow Wireless Switch Changes This option is not set by default. Table 29. Master Password Lockout Allows you to disable master password support. • Enable...

Setup and specifications guide
Page 33
... Wipe BIOS Recovery Description Displays the service tag of the system firmware. • Allow BIOS Downgrade This option is set the wireless devices that can be enabled. Allows you to securely erase data from Hard Drive field should be controlled by default. This option is not set . System setup 33 Allows you to flash previous revisions of your computer. NOTE: BIOS Recovery from all internal storage devices. • Wipe on the HDD or an external USB drive...
... Wipe BIOS Recovery Description Displays the service tag of the system firmware. • Allow BIOS Downgrade This option is set the wireless devices that can be enabled. Allows you to securely erase data from Hard Drive field should be controlled by default. This option is not set . System setup 33 Allows you to flash previous revisions of your computer. NOTE: BIOS Recovery from all internal storage devices. • Wipe on the HDD or an external USB drive...

Setup and specifications guide
Page 34
... USB Flash Drive. If you reboot the system it myself. 8. If the recovery key is completed. 1. Follow the instructions on Dell Systems With BitLocker Enabled Updating your computer battery is still a need to detect or find the Service Tag, click Choose from the list. For laptops, ensure that your system BIOS using a USB flash drive If the system cannot load into Windows, but there is fully charged and connected to a power before updating...
... USB Flash Drive. If you reboot the system it myself. 8. If the recovery key is completed. 1. Follow the instructions on Dell Systems With BitLocker Enabled Updating your computer battery is still a need to detect or find the Service Tag, click Choose from the list. For laptops, ensure that your system BIOS using a USB flash drive If the system cannot load into Windows, but there is fully charged and connected to a power before updating...

Setup and specifications guide
Page 40
... install. 7. Select the operating system installed on your notebook, and then click Submit. Scroll down the page and select the driver to Dell.com/support. 3. 5 Software This chapter details the supported operating systems along with instructions on how to download the driver for your notebook model. 4. Topics: • Operating system • Downloading Windows drivers • Network adapter drivers • Audio drivers • Display adapter • Security drivers • Storage controller • System device drivers • Other device drivers • Identifying Windows...
... install. 7. Select the operating system installed on your notebook, and then click Submit. Scroll down the page and select the driver to Dell.com/support. 3. 5 Software This chapter details the supported operating systems along with instructions on how to download the driver for your notebook model. 4. Topics: • Operating system • Downloading Windows drivers • Network adapter drivers • Audio drivers • Display adapter • Security drivers • Storage controller • System device drivers • Other device drivers • Identifying Windows...

Service Manual
Page 6
... by a certified service technician. Also, before opening the computer cover or panels. NOTE: The color of cable, press in this type of your computer and certain components may only be replaced or, if purchased separately, installed by performing the removal procedure in your product documentation, or as a processor by its edges, not by its pins. Damage due to turn off your computer...
... by a certified service technician. Also, before opening the computer cover or panels. NOTE: The color of cable, press in this type of your computer and certain components may only be replaced or, if purchased separately, installed by performing the removal procedure in your product documentation, or as a processor by its edges, not by its pins. Damage due to turn off your computer...
Service Manual
Page 7
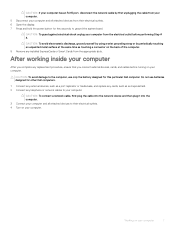
... the computer. 3 Connect your computer and all attached devices from their electrical outlets. 4 Turn on the back of the computer. 8 Remove any telephone or network cables to the computer, use batteries designed for this particular Dell computer. Do not use only the battery designed for other Dell computers. 1 Connect any external devices, such as a port replicator or media base, and replace any cards, such as touching a connector on your computer...
... the computer. 3 Connect your computer and all attached devices from their electrical outlets. 4 Turn on the back of the computer. 8 Remove any telephone or network cables to the computer, use batteries designed for this particular Dell computer. Do not use only the battery designed for other Dell computers. 1 Connect any external devices, such as a port replicator or media base, and replace any cards, such as touching a connector on your computer...

Service Manual
Page 10
... new physical connections and thus new cables to imagine that much better. the actual real-world maximum. First of the available SuperSpeed USB 3.0/USB 3.1 Gen 1 products: • External Desktop USB 3.0/USB 3.1 Gen 1 Hard Drives • Portable USB 3.0/USB 3.1 Gen 1 Hard Drives • USB 3.0/USB 3.1 Gen 1 Drive Docks & Adapters • USB 3.0/USB 3.1 Gen 1 Flash Drives & Readers • USB 3.0/USB 3.1 Gen 1 Solid-state Drives • USB 3.0/USB 3.1 Gen 1 RAIDs • Optical Media Drives • Multimedia Devices • Networking • USB 3.0/USB 3.1 Gen 1 Adapter Cards...
... new physical connections and thus new cables to imagine that much better. the actual real-world maximum. First of the available SuperSpeed USB 3.0/USB 3.1 Gen 1 products: • External Desktop USB 3.0/USB 3.1 Gen 1 Hard Drives • Portable USB 3.0/USB 3.1 Gen 1 Hard Drives • USB 3.0/USB 3.1 Gen 1 Drive Docks & Adapters • USB 3.0/USB 3.1 Gen 1 Flash Drives & Readers • USB 3.0/USB 3.1 Gen 1 Solid-state Drives • USB 3.0/USB 3.1 Gen 1 RAIDs • Optical Media Drives • Multimedia Devices • Networking • USB 3.0/USB 3.1 Gen 1 Adapter Cards...

Service Manual
Page 105
.... Diagnostic LED Blinking Pattern Amber White 2 1 2 2 2 3 Possible Problem CPU failure System Board failure (included BIOS corruption or ROM error) No Memory/ RAM detected 2 4 2 5 2 6 2 7 3 1 3 2 3 3 3 4 Memory / RAM failure Invalid memory installed System board / Chipset Error / Clock failure / Gate A20 failure / Super I/O failure / Keyboard controller failure LCD failure RTC power failure PCI or Video card/chip failure BIOS Recovery image not found BIOS Recovery image found but invalid Battery status LED Suggested Resolution Replace the system board Flash latest...
.... Diagnostic LED Blinking Pattern Amber White 2 1 2 2 2 3 Possible Problem CPU failure System Board failure (included BIOS corruption or ROM error) No Memory/ RAM detected 2 4 2 5 2 6 2 7 3 1 3 2 3 3 3 4 Memory / RAM failure Invalid memory installed System board / Chipset Error / Clock failure / Gate A20 failure / Super I/O failure / Keyboard controller failure LCD failure RTC power failure PCI or Video card/chip failure BIOS Recovery image not found BIOS Recovery image found but invalid Battery status LED Suggested Resolution Replace the system board Flash latest...

Hard Drive Assembly Installation Guide
Page 4
... that your product documentation, or as a processor by its edges, not by a certified service technician. CAUTION: To avoid electrostatic discharge, ground yourself by using a wrist grounding strap or by Dell is connected to prevent the computer cover from the computer (if available). After you finish working inside the computer, replace all network cables from being scratched. 2 Turn off your computer. 3 If the...
... that your product documentation, or as a processor by its edges, not by a certified service technician. CAUTION: To avoid electrostatic discharge, ground yourself by using a wrist grounding strap or by Dell is connected to prevent the computer cover from the computer (if available). After you finish working inside the computer, replace all network cables from being scratched. 2 Turn off your computer. 3 If the...

Hard Drive Assembly Installation Guide
Page 5
... failure is connected to bare metal and never to be unplugged before you remove all network cables, telephone, and telecommunications lines from the system. • Use an ESD field service kit when working inside any notebook to avoid electrostatic discharge (ESD) damage. • After removing any system component, carefully place the removed component on LAN) and suspended into a sleep mode and has other advanced power management...
... failure is connected to bare metal and never to be unplugged before you remove all network cables, telephone, and telecommunications lines from the system. • Use an ESD field service kit when working inside any notebook to avoid electrostatic discharge (ESD) damage. • After removing any system component, carefully place the removed component on LAN) and suspended into a sleep mode and has other advanced power management...

Solid State Drive Installation Guide
Page 4
... may only be replaced or, if purchased separately, installed by its pins. Hold a card by its edges or by performing the removal procedure in reverse order. As you pull connectors apart, keep them evenly aligned to servicing that shipped with your warranty. WARNING: Before working inside the computer, replace all network cables from the appropriate slots. 4 Before you begin Safety instructions Use the following conditions...
... may only be replaced or, if purchased separately, installed by its pins. Hold a card by its edges or by performing the removal procedure in reverse order. As you pull connectors apart, keep them evenly aligned to servicing that shipped with your warranty. WARNING: Before working inside the computer, replace all network cables from the appropriate slots. 4 Before you begin Safety instructions Use the following conditions...

Solid State Drive Installation Guide
Page 5
... failures. The high rate of intermittent failures means that may cause degradation of memory integrity, intermittent memory errors, etc. Touching the chassis before handling parts does not ensure adequate ESD protection on parts with increased sensitivity to ESD damage. Standby power Dell products with standby power must be remotely turned on (wake on LAN) and suspended into a sleep mode and has other advanced power management features. When connecting a bonding wire...
... failures. The high rate of intermittent failures means that may cause degradation of memory integrity, intermittent memory errors, etc. Touching the chassis before handling parts does not ensure adequate ESD protection on parts with increased sensitivity to ESD damage. Standby power Dell products with standby power must be remotely turned on (wake on LAN) and suspended into a sleep mode and has other advanced power management features. When connecting a bonding wire...


