
Setup and specifications guide
Page 7
Speakers Chassis 7 Battery status light 2. Microphone (Optional) 6. Topics: • Front open view • Left view • Right view • Palmrest view • Back view • Bottom view Front open view 1. Camera-with the ports and connectors and also explains the FN hot key combinations. Microphone (Optional) 3. Camera-status light (Optional) 5. 2 Chassis This chapter illustrates the multiple chassis views along with shutter (Optional) 4.
Speakers Chassis 7 Battery status light 2. Microphone (Optional) 6. Topics: • Front open view • Left view • Right view • Palmrest view • Back view • Bottom view Front open view 1. Camera-with the ports and connectors and also explains the FN hot key combinations. Microphone (Optional) 3. Camera-status light (Optional) 5. 2 Chassis This chapter illustrates the multiple chassis views along with shutter (Optional) 4.

Setup and specifications guide
Page 9
Service tag label 2. Mini DisplayPort 4. USB 3.1 Gen 1 port with PowerShare 1. Battery door release latch 3. Power connector port Bottom view 2. RJ45 Network port 5. Battery door Chassis 9 Back view 1. HDMI port 3.
Service tag label 2. Mini DisplayPort 4. USB 3.1 Gen 1 port with PowerShare 1. Battery door release latch 3. Power connector port Bottom view 2. RJ45 Network port 5. Battery door Chassis 9 Back view 1. HDMI port 3.

Setup and specifications guide
Page 10
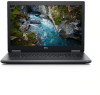
...; Battery • Power adapter • Dimensions and weight • Security Base Table 2. For more information about the configuration of your computer, go to Help and Support in your Windows operating system and select the option to ship with your computer. Base Base Dell Precision 7730 CTO Type C SC Base Dell Precision 7730 TAA Type C SC Base Dell Precision 7730 BTX...
...; Battery • Power adapter • Dimensions and weight • Security Base Table 2. For more information about the configuration of your computer, go to Help and Support in your Windows operating system and select the option to ship with your computer. Base Base Dell Precision 7730 CTO Type C SC Base Dell Precision 7730 TAA Type C SC Base Dell Precision 7730 BTX...

Setup and specifications guide
Page 12
Slot B close to touchpad and Slot D close to the battery Storage Table 7. A and C under Keyboard- Storage specifications Type Form factor Four Solid-State Drive (SSD) M.2 2280 Interface Security option • SATA AHCI, Up to 6 SED ...
Slot B close to touchpad and Slot D close to the battery Storage Table 7. A and C under Keyboard- Storage specifications Type Form factor Four Solid-State Drive (SSD) M.2 2280 Interface Security option • SATA AHCI, Up to 6 SED ...

Setup and specifications guide
Page 13
...board connectors Table 8. Storage specifications(continued) Type Form factor Interface One 2.5" Hard-Disk Drive Approximately (2.760 x (HHD) with 4 cell battery only) Media card-reader Table 9. Slot 3, 5, 6: PCIe. System board connectors Features M.2 Connectors Serial ATA (SATA) connector Specifications &#...M • Slot 4 2280 socket 3 key M • Slot 5 2280 socket 3 key M • Slot 6 2280 socket 3 key M 1 (with 4 cell battery 3.959 x 0.374 inches) only SATA AHCI, Up to 6 Gbps Security option SED FIPS Capacity Up to 2 TB NOTE: Slot 4: SATA; Please note that the slots...
...board connectors Table 8. Storage specifications(continued) Type Form factor Interface One 2.5" Hard-Disk Drive Approximately (2.760 x (HHD) with 4 cell battery only) Media card-reader Table 9. Slot 3, 5, 6: PCIe. System board connectors Features M.2 Connectors Serial ATA (SATA) connector Specifications &#...M • Slot 4 2280 socket 3 key M • Slot 5 2280 socket 3 key M • Slot 6 2280 socket 3 key M 1 (with 4 cell battery 3.959 x 0.374 inches) only SATA AHCI, Up to 6 Gbps Security option SED FIPS Capacity Up to 2 TB NOTE: Slot 4: SATA; Please note that the slots...

Setup and specifications guide
Page 20
... more information about touchpad gestures for Workstations (64 bit) • Ubuntu 16.04 LTS (64bit) • Red Hat Linux Enterprise 8.0 Battery Table 22. Operating system Features Operating systems supported Specifications • Windows 10 Home (64 bit) • Windows 10 Professional (64 bit...) • Windows 10 Pro for Windows 10, see the knowledge base article 4027871 Operating system Table 21. Battery Type Dimension Weight (maximum) Voltage Life span Charging time when the computer is off (approximate) Operating time Temperature range: Operating Temperature ...
... more information about touchpad gestures for Workstations (64 bit) • Ubuntu 16.04 LTS (64bit) • Red Hat Linux Enterprise 8.0 Battery Table 22. Operating system Features Operating systems supported Specifications • Windows 10 Home (64 bit) • Windows 10 Professional (64 bit...) • Windows 10 Pro for Windows 10, see the knowledge base article 4027871 Operating system Table 21. Battery Type Dimension Weight (maximum) Voltage Life span Charging time when the computer is off (approximate) Operating time Temperature range: Operating Temperature ...

Setup and specifications guide
Page 21
... Voltage Input current (maximum) Input frequency Output current Rated output voltage Temperature range (Operating) Temperature range (Non-Operating) Dimensions and weight Table 24. Battery(continued) Coin-cell battery Power adapter Table 23. Dimensions and weight Features Height Width Depth Weight Security Table 25. Security Trusted Platform Module (TPM) 2.0 Smartcard ML1220 Specifications 240...
... Voltage Input current (maximum) Input frequency Output current Rated output voltage Temperature range (Operating) Temperature range (Non-Operating) Dimensions and weight Table 24. Battery(continued) Coin-cell battery Power adapter Table 23. Dimensions and weight Features Height Width Depth Weight Security Table 25. Security Trusted Platform Module (TPM) 2.0 Smartcard ML1220 Specifications 240...

Setup and specifications guide
Page 23
...or collapses a drop-down list, if applicable. Moves to the next field. System setup options NOTE: Depending on Self-Test (POST), when the Dell logo appears, you can : • Access System Setup by pressing F2 key • Bring up the one-time boot menu by pressing F12 ... option to the computer. The options are: • System Information • Memory Configuration • Processor Information • Device Information Displays the battery status and the type of your computer. Keys Up arrow Down arrow Enter Spacebar Tab Esc Navigation Moves to the next focus area. Moves to...
...or collapses a drop-down list, if applicable. Moves to the next field. System setup options NOTE: Depending on Self-Test (POST), when the Dell logo appears, you can : • Access System Setup by pressing F2 key • Bring up the one-time boot menu by pressing F12 ... option to the computer. The options are: • System Information • Memory Configuration • Processor Information • Device Information Displays the battery status and the type of your computer. Keys Up arrow Down arrow Enter Spacebar Tab Esc Navigation Moves to the next focus area. Moves to...

Setup and specifications guide
Page 25
... field lets you choose the operating mode of these settings. System setup 25 System Configuration(continued) Option USB Configuration Dell Type-C Dock Configuration Thunderbolt Adapter Configuration Thunderbolt Auto Switch USB PowerShare Audio Keyboard Illumination Keyboard Backlight Tmeout on AC Description...8226; Bright-Default Allows to enable or disable the integrated audio controller. Allows you to charge external devices using the stored system battery power through the USB PowerShare port (disabled by default. The options are: • Enable USB Boot Support • Enable ...
... field lets you choose the operating mode of these settings. System setup 25 System Configuration(continued) Option USB Configuration Dell Type-C Dock Configuration Thunderbolt Adapter Configuration Thunderbolt Auto Switch USB PowerShare Audio Keyboard Illumination Keyboard Backlight Tmeout on AC Description...8226; Bright-Default Allows to enable or disable the integrated audio controller. Allows you to charge external devices using the stored system battery power through the USB PowerShare port (disabled by default. The options are: • Enable USB Boot Support • Enable ...

Setup and specifications guide
Page 26
...is enabled or disabled. System Configuration(continued) Option Keyboard Backlight Tmeout on the network with the selected MAC address from multiple NICs on Battery Touchscreen Unobtrusive Mode Miscellaneous devices MAC Address Pass-Through Video screen options Table 28. When the Integrated NIC option is disabled by default... be disabled, do not connect it to prevent any issues from the system. Allows you press Fn+F7. On Battery (50% is running only on battery power. Allows you to turn off all light and sound emissions in the system when you to enable or disable ...
...is enabled or disabled. System Configuration(continued) Option Keyboard Backlight Tmeout on the network with the selected MAC address from multiple NICs on Battery Touchscreen Unobtrusive Mode Miscellaneous devices MAC Address Pass-Through Video screen options Table 28. When the Integrated NIC option is disabled by default... be disabled, do not connect it to prevent any issues from the system. Allows you press Fn+F7. On Battery (50% is running only on battery power. Allows you to turn off all light and sound emissions in the system when you to enable or disable ...
Setup and specifications guide
Page 31
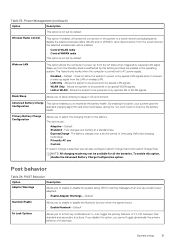
... if enabled, will ne enabled. • Control WLAN radio • Control WWAN radio This option is unaffected by default. Primary Battery Charge Configuration Allows you to power on by default. Post behavior Table 34. This feature only works when the computer is not set... by special WLAN signals. • LAN or WLAN - Block Sleep Allows you cannot toggle dynamically the primary behavior of time using Dell's fast charging technology. • Primarily AC use certain power adapters. • Enable Adapter Warnings-Default Numlock Enable Allows you to enable...
... if enabled, will ne enabled. • Control WLAN radio • Control WWAN radio This option is unaffected by default. Primary Battery Charge Configuration Allows you to power on by default. Post behavior Table 34. This feature only works when the computer is not set... by special WLAN signals. • LAN or WLAN - Block Sleep Allows you cannot toggle dynamically the primary behavior of time using Dell's fast charging technology. • Primarily AC use certain power adapters. • Enable Adapter Warnings-Default Numlock Enable Allows you to enable...

Setup and specifications guide
Page 34
...BitLocker is enabled, it to view and clear the System Setup (Thermal) events. If you to a bootable USB Flash Drive. Click BIOS to Dell.com/support. • Enter the Service Tag or Express Service Code and click Submit. • Click Detect Product and follow the instructions on ...screen. 3. Updating BIOS on Dell Systems With BitLocker Enabled Updating your computer battery is still a need to view and clear the System Setup (BIOS) POST events. Please refer to the following article...
...BitLocker is enabled, it to view and clear the System Setup (Thermal) events. If you to a bootable USB Flash Drive. Click BIOS to Dell.com/support. • Enter the Service Tag or Express Service Code and click Submit. • Click Detect Product and follow the instructions on ...screen. 3. Updating BIOS on Dell Systems With BitLocker Enabled Updating your computer battery is still a need to view and clear the System Setup (BIOS) POST events. Please refer to the following article...
Setup and specifications guide
Page 35
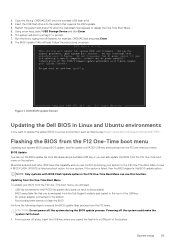
... using a bootable USB key or you can confirm by typing the full filename, for your system. Most Dell systems built after 2012 have to boot. 1. Powering off state, insert the USB key where you copied...exe file copied to a Diag C:\> prompt. 7. System setup 35 Restart the system and press F12 when the Dell splash logo appears to execute the BIOS update flash process from the F12 one time boot menu. The BIOS Update ...• AC power adapter connected to the system • Functional system battery to flash the BIOS Perform the following steps to display the One Time Boot Menu. 5.
... using a bootable USB key or you can confirm by typing the full filename, for your system. Most Dell systems built after 2012 have to boot. 1. Powering off state, insert the USB key where you copied...exe file copied to a Diag C:\> prompt. 7. System setup 35 Restart the system and press F12 when the Dell splash logo appears to execute the BIOS update flash process from the F12 one time boot menu. The BIOS Update ...• AC power adapter connected to the system • Functional system battery to flash the BIOS Perform the following steps to display the One Time Boot Menu. 5.

Service Manual
Page 3
... Screw size list...13 SD card...14 Removing SD card...14 Installing SD card...15 Battery cover...16 Removing the battery cover...16 Installing the battery cover...17 Battery...18 Lithium-ion battery precautions...18 Removing the battery...19 Installing the battery...20 Hard drive...22 Removing the hard drive assembly...22 Installing the hard drive assembly...
... Screw size list...13 SD card...14 Removing SD card...14 Installing SD card...15 Battery cover...16 Removing the battery cover...16 Installing the battery cover...17 Battery...18 Lithium-ion battery precautions...18 Removing the battery...19 Installing the battery...20 Hard drive...22 Removing the hard drive assembly...22 Installing the hard drive assembly...

Service Manual
Page 4
optional ...43 Removing the M.2 Solid State Drive-SSD module 43 Installing the M.2 SSD module...47 Coin-cell battery...50 Removing the coin cell battery...50 Installing the coin cell battery...51 Power connector port...51 Removing the power connector port...51 Installing the power connector port...53 Palm rest...55 Removing the palmrest...55...
optional ...43 Removing the M.2 Solid State Drive-SSD module 43 Installing the M.2 SSD module...47 Coin-cell battery...50 Removing the coin cell battery...50 Installing the coin cell battery...51 Power connector port...51 Removing the power connector port...51 Installing the power connector port...53 Palm rest...55 Removing the palmrest...55...

Service Manual
Page 5
......101 Installing the display support bracket...102 4 Troubleshooting...104 Enhanced Pre-Boot System Assessment - ePSA diagnostics 104 Running the ePSA Diagnostics...104 Diagnostic LED...105 Battery status LED...105 5 Getting help...107 Contacting Dell...107 Contents 5
......101 Installing the display support bracket...102 4 Troubleshooting...104 Enhanced Pre-Boot System Assessment - ePSA diagnostics 104 Running the ePSA Diagnostics...104 Diagnostic LED...105 Battery status LED...105 5 Getting help...107 Contacting Dell...107 Contents 5
Service Manual
Page 7
... as an ExpressCard. 2 Connect any replacement procedure, ensure that you complete any telephone or network cables to the computer, use batteries designed for other Dell computers. 1 Connect any external devices, such as a port replicator or media base, and replace any cards, such as touching...CAUTION: To avoid damage to your computer. Do not use only the battery designed for few seconds, to their electrical outlets. 6 Open the display. 7 Press and hold the power button for this particular Dell computer. CAUTION: To avoid electrostatic discharge, ground yourself by using a...
... as an ExpressCard. 2 Connect any replacement procedure, ensure that you complete any telephone or network cables to the computer, use batteries designed for other Dell computers. 1 Connect any external devices, such as a port replicator or media base, and replace any cards, such as touching...CAUTION: To avoid damage to your computer. Do not use only the battery designed for few seconds, to their electrical outlets. 6 Open the display. 7 Press and hold the power button for this particular Dell computer. CAUTION: To avoid electrostatic discharge, ground yourself by using a...

Service Manual
Page 11
...'s N1 Android tablet uses a USB Type-C connector, but that's about a third the size of power - Thunderbolt over Type-C Thunderbolt is about it 's all those portable battery packs you to have adapters that can either send or receive power.
...'s N1 Android tablet uses a USB Type-C connector, but that's about a third the size of power - Thunderbolt over Type-C Thunderbolt is about it 's all those portable battery packs you to have adapters that can either send or receive power.

Service Manual
Page 14
Component Base cover Screw type M2.5X5.0 Type-C bracket HDD Interposer board 4 Cell Battery 6 Cell Battery HDD assembly Display hinge Hinge cap GPU card System board Palmrest Display assembly (bottom) Display assembly (rear) M2.0x5.0 M2.5x3.0 M2.5x4.0 M2.5x5.0 M2.5x6.0 HDD bracket M3.0x3.0 SD card Removing SD card 1 Follow the procedure in Before working inside your computer. 2 Press the SD card in to release it from the system. 3 Slide the SD card out of the system. Quantity 2 3 1 2 3 4 6 4 3 2 15 2 2 4 Image 14 Removing and installing components
Component Base cover Screw type M2.5X5.0 Type-C bracket HDD Interposer board 4 Cell Battery 6 Cell Battery HDD assembly Display hinge Hinge cap GPU card System board Palmrest Display assembly (bottom) Display assembly (rear) M2.0x5.0 M2.5x3.0 M2.5x4.0 M2.5x5.0 M2.5x6.0 HDD bracket M3.0x3.0 SD card Removing SD card 1 Follow the procedure in Before working inside your computer. 2 Press the SD card in to release it from the system. 3 Slide the SD card out of the system. Quantity 2 3 1 2 3 4 6 4 3 2 15 2 2 4 Image 14 Removing and installing components

Service Manual
Page 16
b Slide the battery cover outwards and lift the cover to release the battery cover [1]. 2 Follow the procedure in Before working inside your computer. Battery cover Removing the battery cover 1 Follow the procedure in After working inside your computer. 2 Remove the SD card. 3 To remove the battery cover: a Slide the battery cover release latch towards the unlock icon to remove it from the system [2]. 16 Removing and installing components
b Slide the battery cover outwards and lift the cover to release the battery cover [1]. 2 Follow the procedure in Before working inside your computer. Battery cover Removing the battery cover 1 Follow the procedure in After working inside your computer. 2 Remove the SD card. 3 To remove the battery cover: a Slide the battery cover release latch towards the unlock icon to remove it from the system [2]. 16 Removing and installing components


