
Setup and Specifications
Page 3
... Back panel...11 Chapter 5: Specifications...13 Computer model...13 System information...13 Operating system...13 Dimensions and weight...13 Memory...14 Intel Optane memory...14 Ports and connectors...15 Communications...15 Wireless module...16 Audio...16 Storage...16 Video...16 Power ratings...17 Computer Environment...17 Chapter 6: Intel Optane memory 18...
... Back panel...11 Chapter 5: Specifications...13 Computer model...13 System information...13 Operating system...13 Dimensions and weight...13 Memory...14 Intel Optane memory...14 Ports and connectors...15 Communications...15 Wireless module...16 Audio...16 Storage...16 Video...16 Power ratings...17 Computer Environment...17 Chapter 6: Intel Optane memory 18...

Setup and Specifications
Page 4
Connect the display to your computer Connect the keyboard and mouse. 1 Set up your network using a cable, or connect to a wireless network. 3. Connect the display. NOTE: If you ordered your computer with a discrete graphics card, the HDMI and the display ports on the back panel of your computer 2. Connect the power cable. 4 Set up your computer are covered. Connect to the discrete graphics card. 4. 1.
Connect the display to your computer Connect the keyboard and mouse. 1 Set up your network using a cable, or connect to a wireless network. 3. Connect the display. NOTE: If you ordered your computer with a discrete graphics card, the HDMI and the display ports on the back panel of your computer 2. Connect the power cable. 4 Set up your computer are covered. Connect to the discrete graphics card. 4. 1.

Setup and Specifications
Page 8
optional 1. 3 Setting up the Virtual Reality (VR) headset - NOTE: If you connect the VR headset to the HDMI port on your computer, when prompted. Download and run the setup tools for your computer, the performance will be optimum. 3. Connect the VR headset to complete the setup. 8 Setting up the Virtual Reality (VR) headset - Follow the instructions on the screen to the designated USB 3.1 Gen 1 ports on the back of your computer and HDMI port on the graphics card on your VR headset at www.dell.com/VRsupport. 2. optional
optional 1. 3 Setting up the Virtual Reality (VR) headset - NOTE: If you connect the VR headset to the HDMI port on your computer, when prompted. Download and run the setup tools for your computer, the performance will be optimum. 3. Connect the VR headset to complete the setup. 8 Setting up the Virtual Reality (VR) headset - Follow the instructions on the screen to the designated USB 3.1 Gen 1 ports on the back of your computer and HDMI port on the graphics card on your VR headset at www.dell.com/VRsupport. 2. optional

Setup and Specifications
Page 9
... Power Options. Press and hold for 4 seconds to turn on . Headphone/speaker port Connect headphones or speakers. 4. Power button Press to force shut-down the computer. For more information, see Me and My Dell at www.dell.com/support/manuals. 2. Microphone port Views 9 NOTE: You can customize the power-button behavior in hibernate state...
... Power Options. Press and hold for 4 seconds to turn on . Headphone/speaker port Connect headphones or speakers. 4. Power button Press to force shut-down the computer. For more information, see Me and My Dell at www.dell.com/support/manuals. 2. Microphone port Views 9 NOTE: You can customize the power-button behavior in hibernate state...

Setup and Specifications
Page 10
...tray. provides data transfer speeds up to external storage devices. Back 1. USB 3.1 Gen 1 ports (3) Connect peripheral such as graphics, audio, or network card to provide sound input. 5. NOTE: The port on the graphics card may vary depending on the graphics card ordered. 3. NOTE: This... port does not support video/audio streaming. 6. Optical drive Reads from and writes to enhance the...
...tray. provides data transfer speeds up to external storage devices. Back 1. USB 3.1 Gen 1 ports (3) Connect peripheral such as graphics, audio, or network card to provide sound input. 5. NOTE: The port on the graphics card may vary depending on the graphics card ordered. 3. NOTE: This... port does not support video/audio streaming. 6. Optical drive Reads from and writes to enhance the...
Setup and Specifications
Page 11
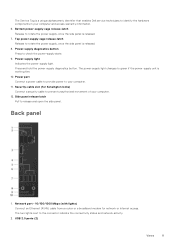
...once the side panel is working fine. 10. Power-supply light Indicates the power-supply light. Power port Connect a power cable to provide power to release and open the side panel. USB 2.0 ports (2) Views 11 Top power-supply cage release-latch Release to prevent unauthorized movement of your computer. ... 7. Bottom power-supply cage release-latch Release to rotate the power supply, once the side panel is a unique alphanumeric identifier that enables Dell service technicians to green if the power-supply unit is released. 8. The two lights next to check the power‑supply state. 9.
...once the side panel is working fine. 10. Power-supply light Indicates the power-supply light. Power port Connect a power cable to provide power to release and open the side panel. USB 2.0 ports (2) Views 11 Top power-supply cage release-latch Release to prevent unauthorized movement of your computer. ... 7. Bottom power-supply cage release-latch Release to rotate the power supply, once the side panel is a unique alphanumeric identifier that enables Dell service technicians to green if the power-supply unit is released. 8. The two lights next to check the power‑supply state. 9.

Setup and Specifications
Page 12
... to 10 Gbps. 7. Center/subwoofer LFE surround port Connect the subwoofer. Provides data transfer speeds up to 10 Gbps. 8. USB 3.1 Gen 2 Type-C port Connect peripherals such as storage devices and printers. USB 3.1 Gen 2 port Connect peripherals, such as external storage devices and ...such as external storage devices and printers. Connect peripherals such as speakers and amplifiers. HDMI port Connect a TV or another HDMI-in enabled device. USB 3.1 Gen 1 ports (3) Connect peripherals such as speakers and amplifiers. Provides data transfer speeds up to the documentation...
... to 10 Gbps. 7. Center/subwoofer LFE surround port Connect the subwoofer. Provides data transfer speeds up to 10 Gbps. 8. USB 3.1 Gen 2 Type-C port Connect peripherals such as storage devices and printers. USB 3.1 Gen 2 port Connect peripherals, such as external storage devices and ...such as external storage devices and printers. Connect peripherals such as speakers and amplifiers. HDMI port Connect a TV or another HDMI-in enabled device. USB 3.1 Gen 1 ports (3) Connect peripherals such as speakers and amplifiers. Provides data transfer speeds up to the documentation...
Setup and Specifications
Page 13
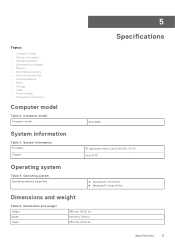
...) Specifications 13 5 Specifications Topics: • Computer model • System information • Operating system • Dimensions and weight • Memory • Intel Optane memory • Ports and connectors • Communications • Audio • Storage • Video • Power ratings • Computer Environment Computer model Table 2. Computer model Computer model XPS 8930 System information Table 3.
...) Specifications 13 5 Specifications Topics: • Computer model • System information • Operating system • Dimensions and weight • Memory • Intel Optane memory • Ports and connectors • Communications • Audio • Storage • Video • Power ratings • Computer Environment Computer model Table 2. Computer model Computer model XPS 8930 System information Table 3.

Setup and Specifications
Page 15
... integrated on system board ● Wi-Fi 802.11a/b/g/n ● Wi-Fi 802.11ac ● Bluetooth 4.1 Specifications 15 Ports and connectors Back panel ports Network USB Video/Audio Table 10. Ports and connectors Front panel ports: Audio USB Card Reader Table 11. NOTE: For more information about enabling or disabling the Intel Optane memory...
... integrated on system board ● Wi-Fi 802.11a/b/g/n ● Wi-Fi 802.11ac ● Bluetooth 4.1 Specifications 15 Ports and connectors Back panel ports Network USB Video/Audio Table 10. Ports and connectors Front panel ports: Audio USB Card Reader Table 11. NOTE: For more information about enabling or disabling the Intel Optane memory...

Service Manual
Page 8
... repairs as a processor by its edges, not by using a different operating system, see the Regulatory Compliance home page at www.dell.com/regulatory_compliance. CAUTION: Before touching anything inside your computer, ground yourself by its pins. While you must disengage before disconnecting the ...cable. When connecting cables, ensure that the ports and connectors are using a wrist grounding strap or by its pull tab, not on the configuration you are correctly oriented and aligned...
... repairs as a processor by its edges, not by using a different operating system, see the Regulatory Compliance home page at www.dell.com/regulatory_compliance. CAUTION: Before touching anything inside your computer, ground yourself by its pins. While you must disengage before disconnecting the ...cable. When connecting cables, ensure that the ports and connectors are using a wrist grounding strap or by its pull tab, not on the configuration you are correctly oriented and aligned...

Service Manual
Page 84
... screws that secure the system board to step 10 in "Replacing the power-supply unit". 8. Replace the wireless card. 4. Replace the memory modules. 7. Slide the I/O ports on the system board into the slots on the chassis and align the screw holes on the chassis. 2. Route and connect the cables that you... stored in Before working inside your computer, follow the steps in the system board. For more information, see the Regulatory Compliance home page at www.dell.com/regulatory_compliance. You must enter the Service Tag in After working inside your computer.
... screws that secure the system board to step 10 in "Replacing the power-supply unit". 8. Replace the wireless card. 4. Replace the memory modules. 7. Slide the I/O ports on the system board into the slots on the chassis and align the screw holes on the chassis. 2. Route and connect the cables that you... stored in Before working inside your computer, follow the steps in the system board. For more information, see the Regulatory Compliance home page at www.dell.com/regulatory_compliance. You must enter the Service Tag in After working inside your computer.

Service Manual
Page 89
... only if the Auto Power On mode is set to Enabled 1 to Enabled hh:mm:ss. Enable or disable the boot flow for the Dell OS Recovery tool. Allows you to turn on automatically every day or on by Integrated LAN AC Recovery Deep Sleep Control USB Wake Support (S3...Intel Ready Mode Technology. This option can be configured only if the Auto Power On mode is enabled. Default: Disabled USB Configuration Front USB Ports Rear USB Ports Power Options Numlock Key Wake Up by special LAN signals. This option can be powered on a preselected date. Allows you to wake the computer...
... only if the Auto Power On mode is set to Enabled 1 to Enabled hh:mm:ss. Enable or disable the boot flow for the Dell OS Recovery tool. Allows you to turn on automatically every day or on by Integrated LAN AC Recovery Deep Sleep Control USB Wake Support (S3...Intel Ready Mode Technology. This option can be configured only if the Auto Power On mode is enabled. Default: Disabled USB Configuration Front USB Ports Rear USB Ports Power Options Numlock Key Wake Up by special LAN signals. This option can be powered on a preselected date. Allows you to wake the computer...


