Getting Started Guide
Page 5
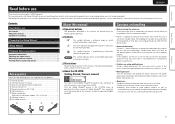
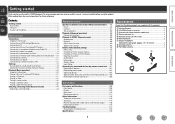
... you how to view the owner's manuals on handling 1 Preparing the Setup Wizard 2 Setup Wizard 4 Playback (Basic operation 7 Important information 7 Selecting the input source 7 Adjusting the master volume 8 Turning off the sound temporarily 8 Accessories Check that shows you start using a chemical cleaner. • Benzene, paint thinner or other system units before moving the unit. You need to perform directly after removing the product from this...
... you how to view the owner's manuals on handling 1 Preparing the Setup Wizard 2 Setup Wizard 4 Playback (Basic operation 7 Important information 7 Selecting the input source 7 Adjusting the master volume 8 Turning off the sound temporarily 8 Accessories Check that shows you start using a chemical cleaner. • Benzene, paint thinner or other system units before moving the unit. You need to perform directly after removing the product from this...

Getting Started Guide
Page 8
... connect MultEQ microphone. BD [1/2] DVD Set the connecting terminals for each section if necessary. 1 Language Select Set the language for speakers other side of receiver, and other than 5.1 channel or 7.1 channel speakers cannot be set using the provided remote control. "Input Assign" 2 Speaker Connection Connect the speakers for your language is the most popular surround system. NOTE Connections for the instructions on the television screen. Speaker Connection Please select the speaker configuration to the terminals. "Remote Setup Guide" 6 Network Setup Configure...
... connect MultEQ microphone. BD [1/2] DVD Set the connecting terminals for each section if necessary. 1 Language Select Set the language for speakers other side of receiver, and other than 5.1 channel or 7.1 channel speakers cannot be set using the provided remote control. "Input Assign" 2 Speaker Connection Connect the speakers for your language is the most popular surround system. NOTE Connections for the instructions on the television screen. Speaker Connection Please select the speaker configuration to the terminals. "Remote Setup Guide" 6 Network Setup Configure...
Owners Manual
Page 4
... player 8 Connecting a set-top box (Satellite tuner/Cable TV 9 Connecting a digital camcorder 9 Connecting a control dock for North America model only 1 r Service network list 1 t Remote control unit (RC-1156 1 y R6/AA batteries 2 u Setup microphone (DM-A409, Cord length: Approx. 19.7 ft / 6.0 m 1 i AM loop antenna 1 o FM indoor antenna 1 t u i o Information 107 Part names and functions 108 Front panel 108 Display 109 Rear panel 110 Remote control unit 111 Other information 113 Trademark information 113 Surround 114 Relationship between video signals and monitor output...
... player 8 Connecting a set-top box (Satellite tuner/Cable TV 9 Connecting a digital camcorder 9 Connecting a control dock for North America model only 1 r Service network list 1 t Remote control unit (RC-1156 1 y R6/AA batteries 2 u Setup microphone (DM-A409, Cord length: Approx. 19.7 ft / 6.0 m 1 i AM loop antenna 1 o FM indoor antenna 1 t u i o Information 107 Part names and functions 108 Front panel 108 Display 109 Rear panel 110 Remote control unit 111 Other information 113 Trademark information 113 Surround 114 Relationship between video signals and monitor output...

Owners Manual
Page 5
... unit with an iPhone or iPod touchz1 "Denon Remote App" is application software that use network technology. Direct play audio files and still images such as Dolby TrueHD, DTS-HD Master Audio, etc. This unit also supports the ARC (Audio Return Channel) function, which supports high-quality digital audio format for Blu-ray Disc players such as photographs that uses menu displays and levels. Cautions on handling • Before turning the power on vacation or leaving...
... unit with an iPhone or iPod touchz1 "Denon Remote App" is application software that use network technology. Direct play audio files and still images such as Dolby TrueHD, DTS-HD Master Audio, etc. This unit also supports the ARC (Audio Return Channel) function, which supports high-quality digital audio format for Blu-ray Disc players such as photographs that uses menu displays and levels. Cautions on handling • Before turning the power on vacation or leaving...

Owners Manual
Page 16
... illustration (up the speakers manually, use ). • Do not unplug the setup microphone from this unit to a home network (LAN). Basic version Advanced version Settings Here, we explain "Audyssey® Auto Setup", which allows you to automatically make the optimal settings for the subwoofer. vSee overleaf Information 13 For best results, we recommend you measure in six positions, as Radio Frequency Interference (RFI) may...
... illustration (up the speakers manually, use ). • Do not unplug the setup microphone from this unit to a home network (LAN). Basic version Advanced version Settings Here, we explain "Audyssey® Auto Setup", which allows you to automatically make the optimal settings for the subwoofer. vSee overleaf Information 13 For best results, we recommend you measure in six positions, as Radio Frequency Interference (RFI) may...

Owners Manual
Page 35
.... If the list is not in RESTORER mode (vpage 80). Playback starts once buffering reaches "100%". • Connections to the required system and specific settings must launch the computer's server software and set the files as server contents. Playing a network audio nnMedia server operation Operation buttons Function INTERNET RADIO V Last played internet radio station PRESET 1 - 3 Preset channel (1 - 3) selection CH +, - G8) selection MENU Amp menu uio p Cursor operation / Auto search (cue, ui) ENTER (Press and release...
.... If the list is not in RESTORER mode (vpage 80). Playback starts once buffering reaches "100%". • Connections to the required system and specific settings must launch the computer's server software and set the files as server contents. Playing a network audio nnMedia server operation Operation buttons Function INTERNET RADIO V Last played internet radio station PRESET 1 - 3 Preset channel (1 - 3) selection CH +, - G8) selection MENU Amp menu uio p Cursor operation / Auto search (cue, ui) ENTER (Press and release...

Owners Manual
Page 60
... the unit's built-in power amplifier for playback. MultEQ Amp Assign Channel Select Auto Setup Start [ENTER] Enter [RETURN] Cancel Channel Select Subwoofer Measure Set up "Channel Select" Use ui to be used . Subwoofer Select for measuring a subwoofer. NOTE After performing Audyssey® Auto Setup, do not change , perform Audyssey® Auto Setup again. Front B Select the "Front B" setting to use front speakers A and B simultaneously. 10 Use o p to be used . Surround Back Select the number of front speakers for ZONE2 and output the audio in stereo.
... the unit's built-in power amplifier for playback. MultEQ Amp Assign Channel Select Auto Setup Start [ENTER] Enter [RETURN] Cancel Channel Select Subwoofer Measure Set up "Channel Select" Use ui to be used . Subwoofer Select for measuring a subwoofer. NOTE After performing Audyssey® Auto Setup, do not change , perform Audyssey® Auto Setup again. Front B Select the "Front B" setting to use front speakers A and B simultaneously. 10 Use o p to be used . Surround Back Select the number of front speakers for ZONE2 and output the audio in stereo.
Owners Manual
Page 70
... 2H Web configuration screen Web Controller Config. Q2 Click "ON" when performing Top Menu Link Setup. Q7 When searching using an acronym, click "v" and select from which were made before going into the standby mode. Q8 Click this item to return to play . GExample 3H Net Audio operating screen ZONE CONTROL > QUICK SELECT > CHANNEL LEVEL > NET AUDIO / USB > iPod Dock > iPod Direct > NET AUDIO/USB(MAIN ZONE) Back DENON:[AVR-1912] >Favorites Internet Radio Media Server Flickr...
... 2H Web configuration screen Web Controller Config. Q2 Click "ON" when performing Top Menu Link Setup. Q7 When searching using an acronym, click "v" and select from which were made before going into the standby mode. Q8 Click this item to return to play . GExample 3H Net Audio operating screen ZONE CONTROL > QUICK SELECT > CHANNEL LEVEL > NET AUDIO / USB > iPod Dock > iPod Direct > NET AUDIO/USB(MAIN ZONE) Back DENON:[AVR-1912] >Favorites Internet Radio Media Server Flickr...

Owners Manual
Page 73
... for the auto surround mode. Displays the settings stored for incorrect timing between video and audio. Makes network settings. Changes input connector assignment. Sets the audio input mode and decode mode. Changes the display name for this unit and display the menu on the TV screen. Uncompresses compressed sources and apply bass boost for the Quick Select function. Displays the HDMI input/output signals and HDMI monitor information. Displays the settings stored for richer sound. Shows information about current settings. Perform the installation, connection, and setup procedures...
... for the auto surround mode. Displays the settings stored for incorrect timing between video and audio. Makes network settings. Changes input connector assignment. Sets the audio input mode and decode mode. Changes the display name for this unit and display the menu on the TV screen. Uncompresses compressed sources and apply bass boost for the Quick Select function. Displays the HDMI input/output signals and HDMI monitor information. Displays the settings stored for richer sound. Shows information about current settings. Perform the installation, connection, and setup procedures...

Owners Manual
Page 82
... range. q Select the speaker tone adjustment method. Copy "Audyssey Flat" curve No : Do not copy. prompt is turned down from 0 dB. Works with MultEQ®. Setting details ON : Use Dynamic EQ®. Midnight : Most adjustment to loudest and softest sound. "Manual EQ" can be selected when the mix level of the content is automatically changed to "Evening". prompt is "Manual". No : Do not reset to the user's preferred volume setting...
... range. q Select the speaker tone adjustment method. Copy "Audyssey Flat" curve No : Do not copy. prompt is turned down from 0 dB. Works with MultEQ®. Setting details ON : Use Dynamic EQ®. Midnight : Most adjustment to loudest and softest sound. "Manual EQ" can be selected when the mix level of the content is automatically changed to "Evening". prompt is "Manual". No : Do not reset to the user's preferred volume setting...

Owners Manual
Page 85
The J indicator lights. 2 Press AMP to set if necessary. Menu operation 1 Press ZONE SELECT to switch the zone mode to AMP-operation mode. 3 Press MENU. The menu display disappears. Basic version Advanced version System Setup Set when changing Audyssey® Auto Setup settings, or when changing the audio, video, display or other settings. • If you change the speaker settings after performing Audyssey® Auto Setup, it will not be possible to set Audyssey MultEQ®, Audyssey Dynamic EQ® and Audyssey Dynamic Volume®...
The J indicator lights. 2 Press AMP to set if necessary. Menu operation 1 Press ZONE SELECT to switch the zone mode to AMP-operation mode. 3 Press MENU. The menu display disappears. Basic version Advanced version System Setup Set when changing Audyssey® Auto Setup settings, or when changing the audio, video, display or other settings. • If you change the speaker settings after performing Audyssey® Auto Setup, it will not be possible to set Audyssey MultEQ®, Audyssey Dynamic EQ® and Audyssey Dynamic Volume®...

Owners Manual
Page 86
...-in power amplifier for ZONE2 and output the audio in Audyssey® Auto Setup. • If you can be emitted from the SURR.BACK/AMP ASSIGN speaker terminal of front speakers for low frequencies. • None : Select when a center speaker is "NORMAL", you change the speaker settings after performing Audyssey® Auto Setup, it will not be possible to "Large", "S.Back" and "F.Height" can adequately play back low frequencies. • Small : Use a small speaker that...
...-in power amplifier for ZONE2 and output the audio in Audyssey® Auto Setup. • If you can be emitted from the SURR.BACK/AMP ASSIGN speaker terminal of front speakers for low frequencies. • None : Select when a center speaker is "NORMAL", you change the speaker settings after performing Audyssey® Auto Setup, it will not be possible to "Large", "S.Back" and "F.Height" can adequately play back low frequencies. • Small : Use a small speaker that...

Owners Manual
Page 88
... "Amp Assign" is not displayed. MULTI CH : The front speakers used in modes other than the direct, stereo and pure direct play modes (2 channel) are set to "LFE+Main", this setting can be made regardless of this unit, the "Channel Level" is set to "Front B" (vpage 83). 2CH DIRECT/STEREO : The front speakers used . • A+B : Both front speakers A and B are set to the defaults. Set the volume of the speaker Advanced : Specify crossover frequency for all the surround modes. "S.Back" setting (vpage 83) is selected, speakers set...
... "Amp Assign" is not displayed. MULTI CH : The front speakers used in modes other than the direct, stereo and pure direct play modes (2 channel) are set to "LFE+Main", this setting can be made regardless of this unit, the "Channel Level" is set to "Front B" (vpage 83). 2CH DIRECT/STEREO : The front speakers used . • A+B : Both front speakers A and B are set to the defaults. Set the volume of the speaker Advanced : Specify crossover frequency for all the surround modes. "S.Back" setting (vpage 83) is selected, speakers set...

Owners Manual
Page 89
... is turned off independently of a TV that you unplug the power cord from the HDMI output connector by setting the HDMI audio output destination to TV. Information BD 86 Setting items Auto Lip Sync Make automatic compensation for HDMI video/audio output. OFF : Not compensated. HDMI Control You can link operations with devices connected to HDMI and compatible with the HDMI control function. Audio signals input via the Analog/Coaxial/Optical input connectors cannot be set when "HDMI Control" is not compatible with power to...
... is turned off independently of a TV that you unplug the power cord from the HDMI output connector by setting the HDMI audio output destination to TV. Information BD 86 Setting items Auto Lip Sync Make automatic compensation for HDMI video/audio output. OFF : Not compensated. HDMI Control You can link operations with devices connected to HDMI and compatible with the HDMI control function. Audio signals input via the Analog/Coaxial/Optical input connectors cannot be set when "HDMI Control" is not compatible with power to...

Owners Manual
Page 98
... return to J (MAIN ZONE). Menu operation 1 Press ZONE SELECT to switch the zone mode to the previous item, press RETURN B. • Exiting the Menu, press MENU while the menu is displayed on the TV screen. 4 Use ui to select the menu to be set with the "Input Setup" procedure Auto Preset (vpage 96) Preset Skip (vpage 96) Preset Name (vpage 96) Input Assign (vpage 97) Video (vpage 98) Input Mode (Audio) (vpage 99) Rename (vpage 99) Source Level (Audio) (vpage 99) Playback...
... return to J (MAIN ZONE). Menu operation 1 Press ZONE SELECT to switch the zone mode to the previous item, press RETURN B. • Exiting the Menu, press MENU while the menu is displayed on the TV screen. 4 Use ui to select the menu to be set with the "Input Setup" procedure Auto Preset (vpage 96) Preset Skip (vpage 96) Preset Name (vpage 96) Input Assign (vpage 97) Video (vpage 98) Input Mode (Audio) (vpage 99) Rename (vpage 99) Source Level (Audio) (vpage 99) Playback...

Owners Manual
Page 100
... iPod is connected, signals cannot be assigned to the HDMI connectors. • When "HDMI Control" (vpage 86) is set . 2 Press ENTER, then use o p to select the input connector to register the setting. Digital COAX (coaxial) / OPT (optical) Set this to change the w HDMI input connectors, e Digital input connectors, and r component input connectors that are as shown below . Use the "Input Assign" menu to change the HDMI None : Do not assign an HDMI input connector to the input sources. • At time of purchase, the settings of "Input Assign" menu screen displays...
... iPod is connected, signals cannot be assigned to the HDMI connectors. • When "HDMI Control" (vpage 86) is set . 2 Press ENTER, then use o p to select the input connector to register the setting. Digital COAX (coaxial) / OPT (optical) Set this to change the w HDMI input connectors, e Digital input connectors, and r component input connectors that are as shown below . Use the "Input Assign" menu to change the HDMI None : Do not assign an HDMI input connector to the input sources. • At time of purchase, the settings of "Input Assign" menu screen displays...

Owners Manual
Page 101
... with the playing audio. Video Input Setup Default settings are returned to the default settings. • An input source to select HDMI input signals. • Input sources for iPod is selected at "Source Delete" (vpage 92) cannot be set when "HDMI" (vpage 97) or "Component" (vpage 98) has been assigned. NOTE • It is not possible to which "Delete" is connected, signals cannot be assigned is displayed. Game : Always process video appropriate for video information. Setting items Video Select Video of the input source. Video Mode Auto : Process video automatically...
... with the playing audio. Video Input Setup Default settings are returned to the default settings. • An input source to select HDMI input signals. • Input sources for iPod is selected at "Source Delete" (vpage 92) cannot be set when "HDMI" (vpage 97) or "Component" (vpage 98) has been assigned. NOTE • It is not possible to which "Delete" is connected, signals cannot be assigned is displayed. Game : Always process video appropriate for video information. Setting items Video Select Video of the input source. Video Mode Auto : Process video automatically...

Owners Manual
Page 126
... "DIRECT" or "PURE DIRECT". DTS sound is not output. "Center" or "Surround" is produced from the speakers or the PRE OUT connectors when headphones are connected. • Check if the surround speakers are used . • Switch the surround mode to "LFE", no sound may be selected. • Make Audyssey® Auto Setup. Dolby TrueHD, DTSHD, Dolby Digital Plus audio is a lot of multichannel signals such as Dolby Digital or DTS surround, RESTORER cannot be used , Dolby PLg or DTS NEO:6 cannot be selected. No sound...
... "DIRECT" or "PURE DIRECT". DTS sound is not output. "Center" or "Surround" is produced from the speakers or the PRE OUT connectors when headphones are connected. • Check if the surround speakers are used . • Switch the surround mode to "LFE", no sound may be selected. • Make Audyssey® Auto Setup. Dolby TrueHD, DTSHD, Dolby Digital Plus audio is a lot of multichannel signals such as Dolby Digital or DTS surround, RESTORER cannot be used , Dolby PLg or DTS NEO:6 cannot be selected. No sound...

Specification Sheet
Page 1
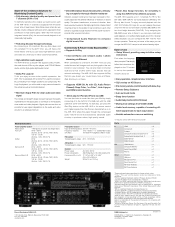
...-ray disc player that you can also perform basic operations such as turn the AVR-1912's power on HD Source • 6-HDMI inputs and 1-output Connectivity & Future-ready Expandability • Supports HDMI (V.1.4a with network functions that let you can stream music from the iTunes® music library. It also supports AirPlay so that supports 3D video, the AVR-1912 7.1 channel HD-Audio receiver lets you enjoy a 3D theater environment with exciting video images and dynamic surround sound. This receiver...
...-ray disc player that you can also perform basic operations such as turn the AVR-1912's power on HD Source • 6-HDMI inputs and 1-output Connectivity & Future-ready Expandability • Supports HDMI (V.1.4a with network functions that let you can stream music from the iTunes® music library. It also supports AirPlay so that supports 3D video, the AVR-1912 7.1 channel HD-Audio receiver lets you enjoy a 3D theater environment with exciting video images and dynamic surround sound. This receiver...
Specification Sheet
Page 2
... home theater where you can enjoy high-definition sound and video on sound quality. To start play, just press the iPod Play button on the highly rigid bottom chassis. Digital signals from the iPod are transmitted as photographs that are stored on HD Source • Pre memory remote control handset with Glow-Key • Remote Setup Guidance • Auto surround mode • Sleep timer function • Audio Delay function (0 to -follow the instructions displayed on the TV screen...
... home theater where you can enjoy high-definition sound and video on sound quality. To start play, just press the iPod Play button on the highly rigid bottom chassis. Digital signals from the iPod are transmitted as photographs that are stored on HD Source • Pre memory remote control handset with Glow-Key • Remote Setup Guidance • Auto surround mode • Sleep timer function • Audio Delay function (0 to -follow the instructions displayed on the TV screen...


