
Instruction Manual
Page 2
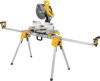
Beam B. DW7231 Miter saw mounting brackets C. Release levers H. Carry handle I J H 2 G 1 DWX723 DWX724 1 2 69.5"(1765.3 mm) 151" (3835.4 mm) 43" (1092.2 mm) 100" (2540 mm) 2 B C D E F DW7232 Work piece support and length stop E. Leg lock lever K. Extension arm lock lever G. Locking locator clip J. Extension arm D. Extension arm end cap F. Release button FIG. 1 K A I . English DWX723/DWX724 Miter Saw Stands Components List A.
Beam B. DW7231 Miter saw mounting brackets C. Release levers H. Carry handle I J H 2 G 1 DWX723 DWX724 1 2 69.5"(1765.3 mm) 151" (3835.4 mm) 43" (1092.2 mm) 100" (2540 mm) 2 B C D E F DW7232 Work piece support and length stop E. Leg lock lever K. Extension arm lock lever G. Locking locator clip J. Extension arm D. Extension arm end cap F. Release button FIG. 1 K A I . English DWX723/DWX724 Miter Saw Stands Components List A.

Instruction Manual
Page 3
... avoided, may result in personal injury and serious damage to the miter saw into use. • DO NOT mount any accessory. Carton Contents 1 Miter saw stand (DWX723 or DWX724) 2 Miter saw to Figure 1 for DEWALT Miter Saws) • Crosshead #2 screwdriver • 1/2" (13 mm) Wrench Components (Fig. 1) WARNING: Never modify the stand or any part of it before using any power tool other...
... avoided, may result in personal injury and serious damage to the miter saw into use. • DO NOT mount any accessory. Carton Contents 1 Miter saw stand (DWX723 or DWX724) 2 Miter saw to Figure 1 for DEWALT Miter Saws) • Crosshead #2 screwdriver • 1/2" (13 mm) Wrench Components (Fig. 1) WARNING: Never modify the stand or any part of it before using any power tool other...

Instruction Manual
Page 4
... legs facing up until the locking pin clicks into the place. Place the miter saw mounting brackets securely as a length stop or hold the stop (D) by the tightness of the extension arms. d. The stand should not rock. The knob (M) may be repositioned when the knob is ... Length M Stops (Fig. 3-4) D a. Tighten the knobs. English • Follow the mounting instructions carefully. Fasten the miter saw to serve as instructed. • DO NOT modify or use stand for operations for which it is limited by loosening the knobs on both sides (N) and raise or lower the top...
... legs facing up until the locking pin clicks into the place. Place the miter saw mounting brackets securely as a length stop or hold the stop (D) by the tightness of the extension arms. d. The stand should not rock. The knob (M) may be repositioned when the knob is ... Length M Stops (Fig. 3-4) D a. Tighten the knobs. English • Follow the mounting instructions carefully. Fasten the miter saw to serve as instructed. • DO NOT modify or use stand for operations for which it is limited by loosening the knobs on both sides (N) and raise or lower the top...

Instruction Manual
Page 5
... 3 = Long screw, Head on top 4. WARNING: Stability Hazard. You must use the Universal Miter Saw Mounting Method when mounting a miter saw not manufactured by DEWALT to hold the saw stand. NOTE: See DW7231 Hardware Selection Chart for the correct mounting hardware procedures for DEWALT miter saws. Once the carriage bolt (hardware bag) is fully anchored on the mounting bracket showing...
... 3 = Long screw, Head on top 4. WARNING: Stability Hazard. You must use the Universal Miter Saw Mounting Method when mounting a miter saw not manufactured by DEWALT to hold the saw stand. NOTE: See DW7231 Hardware Selection Chart for the correct mounting hardware procedures for DEWALT miter saws. Once the carriage bolt (hardware bag) is fully anchored on the mounting bracket showing...

Instruction Manual
Page 6
...must use . 4 Tighten the four nuts holding the saw instruction manual before assembling the miter saw to the miter saw during use the plywood mounting method described in personal injury and serious damage to mount your miter saw by mounting bracket assembly by DEWALT to the beam when in position. 11. WARNING: Stability..." (355 mm) apart and 1" (25.5 mm) from the front corners of beam. Feed carriage bolts through the other . 8. Rock the saw position as a means of 16" (406.4 mm) if miter saw stand. Adjust the saw gently on the stand: a. The plywood must use . 10.
...must use . 4 Tighten the four nuts holding the saw instruction manual before assembling the miter saw to the miter saw during use the plywood mounting method described in personal injury and serious damage to mount your miter saw by mounting bracket assembly by DEWALT to the beam when in position. 11. WARNING: Stability..." (355 mm) apart and 1" (25.5 mm) from the front corners of beam. Feed carriage bolts through the other . 8. Rock the saw position as a means of 16" (406.4 mm) if miter saw stand. Adjust the saw gently on the stand: a. The plywood must use . 10.

Instruction Manual
Page 7
... ALL 4 CORNERS 2" (50.8 mm) MINIMUM BOTH SIDES T S Q R 1" (25.5 mm) 1" (25.5 mm) 5 English 3. Hardware should be purchased to mount miter saw base to plywood as shown in the metal end to plywood. Carry Strap If you purchase the carry strap accessory for the size of mounting... holes from miter saw to mount the accessory. SIDES ING MOUNT MITER SAW IN SHADED AREA a. b. c. d. NOTE: Hardware must be 1-1/4" (31.8 mm) longer than the maximum height of the miter saw to plywood. Secure miter saw base at the appropriate position on the beam for DEWALT stands, use either...
... ALL 4 CORNERS 2" (50.8 mm) MINIMUM BOTH SIDES T S Q R 1" (25.5 mm) 1" (25.5 mm) 5 English 3. Hardware should be purchased to mount miter saw base to plywood as shown in the metal end to plywood. Carry Strap If you purchase the carry strap accessory for the size of mounting... holes from miter saw to mount the accessory. SIDES ING MOUNT MITER SAW IN SHADED AREA a. b. c. d. NOTE: Hardware must be 1-1/4" (31.8 mm) longer than the maximum height of the miter saw to plywood. Secure miter saw base at the appropriate position on the beam for DEWALT stands, use either...

Instruction Manual
Page 8
... you need assistance in the center of control may have other than those offered by DEWALT, have been made or attempted by a DEWALT factory service center, a DEWALT authorized service center or other qualified service personnel. Removing the Saw Once the miter saw stands. Loss of the clip, slide it can be performed by others. To reduce the...
... you need assistance in the center of control may have other than those offered by DEWALT, have been made or attempted by a DEWALT factory service center, a DEWALT authorized service center or other qualified service personnel. Removing the Saw Once the miter saw stands. Loss of the clip, slide it can be performed by others. To reduce the...


