
User Manual (English)
Page 2
...the stand 3 Installing a wall-mount bracket 4 TV components 4 Front 4 Back 5 Remote control 5 Using the remote control 6 Installing remote control batteries 6 Aiming the remote control 6 Programming a universal remote control to work with your TV 7 Making connections 7 Selecting a location 7 Connecting the power 7 Connecting an HDMI device (best 8 Connecting a component video device (better 8 Connecting an antenna, cable TV, or satellite TV box 8 Connecting a VCR, camcorder, or game (good 9 Connecting a computer 9 Connecting headphones 9 Turning on your TV for the first time...
...the stand 3 Installing a wall-mount bracket 4 TV components 4 Front 4 Back 5 Remote control 5 Using the remote control 6 Installing remote control batteries 6 Aiming the remote control 6 Programming a universal remote control to work with your TV 7 Making connections 7 Selecting a location 7 Connecting the power 7 Connecting an HDMI device (best 8 Connecting a component video device (better 8 Connecting an antenna, cable TV, or satellite TV box 8 Connecting a VCR, camcorder, or game (good 9 Connecting a computer 9 Connecting headphones 9 Turning on your TV for the first time...
User Manual (English)
Page 3
...parental controls 17 Turning parental controls on or off 17 Setting or changing the password 17 Turning button lock on or off 18 Setting parental control levels 19 Adjusting time settings 20 Setting the date and time 20 Setting the sleep timer 21 Using closed captioning 22 Selecting the closed captioning mode 22 Selecting the closed captioning type 22 Customizing digital TV closed captioning styles 23 Adjusting menu settings 24 Selecting the menu language and transparency 24 Labeling an input source 24 Restoring default settings 25 Troubleshooting 25 Video and audio 25 Remote...
...parental controls 17 Turning parental controls on or off 17 Setting or changing the password 17 Turning button lock on or off 18 Setting parental control levels 19 Adjusting time settings 20 Setting the date and time 20 Setting the sleep timer 21 Using closed captioning 22 Selecting the closed captioning mode 22 Selecting the closed captioning type 22 Customizing digital TV closed captioning styles 23 Adjusting menu settings 24 Selecting the menu language and transparency 24 Labeling an input source 24 Restoring default settings 25 Troubleshooting 25 Video and audio 25 Remote...
User Manual (English)
Page 6
... antenna or cable system. When a cart is used, use caution when moving the cart/apparatus combination to rain or moisture, does not operate normally, or has been dropped. 15 The mains plug is the disconnecting device. Class I apparatus need to a mains socket outlet with a protective grounded connection. 17 Remote control batteries should not be located in the panel. No user-serviceable parts are important operating...
... antenna or cable system. When a cart is used, use caution when moving the cart/apparatus combination to rain or moisture, does not operate normally, or has been dropped. 15 The mains plug is the disconnecting device. Class I apparatus need to a mains socket outlet with a protective grounded connection. 17 Remote control batteries should not be located in the panel. No user-serviceable parts are important operating...

User Manual (English)
Page 7
... To avoid interference with your TV: • Remote control • Composite video and audio cable • AAA batteries (2) • Stand • Quick Setup Guide Installing and removing the stand You must be recycled and reused. Non-active pixels The LCD panel contains almost 3 million thin film transistors, which provide exceptionally sharp video quality. If you intend to mount your cordless and cellular telephones away from an...
... To avoid interference with your TV: • Remote control • Composite video and audio cable • AAA batteries (2) • Stand • Quick Setup Guide Installing and removing the stand You must be recycled and reused. Non-active pixels The LCD panel contains almost 3 million thin film transistors, which provide exceptionally sharp video quality. If you intend to mount your cordless and cellular telephones away from an...
User Manual (English)
Page 9
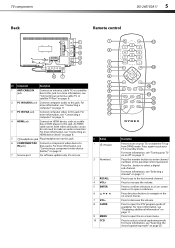
... IN VGA jack Connect computer video to select a closed captioning mode" on page 11. Press to go to this jack. TV components Back DX-24E150A11 5 Remote control ## Component Description 1 ANT/CABLE IN jack Connect an antenna, cable TV, or a satellite box to the last viewed channel. For more information, see "Selecting the closed captioning mode. Press to open the DTV program guide (if available). Press to increase the volume. For more information, see "Turning your TV on or off" on page 8. 5 Headphone jack Plug headphones...
... IN VGA jack Connect computer video to select a closed captioning mode" on page 11. Press to go to this jack. TV components Back DX-24E150A11 5 Remote control ## Component Description 1 ANT/CABLE IN jack Connect an antenna, cable TV, or a satellite box to the last viewed channel. For more information, see "Selecting the closed captioning mode. Press to open the DTV program guide (if available). Press to increase the volume. For more information, see "Turning your TV on or off" on page 8. 5 Headphone jack Plug headphones...
User Manual (English)
Page 10
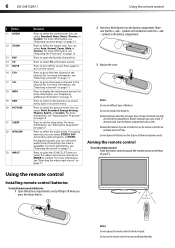
... select STEREO, SAP (secondary audio program), or MONO. VOL VOL CH CH MENU INPUT POWER 30° 30° 26.2 ft (8 m) Notes: Do not expose the remote control to select the picture mode. 6 DX-24E150A11 Using the remote control # Button 11 AUDIO 12 ZOOM 13 FAV 14 TV 15 MUTE 16 CH+ 17 CH18 INFO 19 EXIT 20 PICTURE 21 SLEEP 22 MTS/SAP 23 INPUT Description Press to select the aspect ratio. Press to select the sound mode...
... select STEREO, SAP (secondary audio program), or MONO. VOL VOL CH CH MENU INPUT POWER 30° 30° 26.2 ft (8 m) Notes: Do not expose the remote control to select the picture mode. 6 DX-24E150A11 Using the remote control # Button 11 AUDIO 12 ZOOM 13 FAV 14 TV 15 MUTE 16 CH+ 17 CH18 INFO 19 EXIT 20 PICTURE 21 SLEEP 22 MTS/SAP 23 INPUT Description Press to select the aspect ratio. Press to select the sound mode...

User Manual (English)
Page 11
... 8043 Set-top box manufacturer and model Comcast M1057 Dish Network VIP508, VIP622 Motorola DRC800 0463 720 0463 TIVO Series 3, HD 0091 For more help, call 01-800-926-3020. Codes for your equipment. Making connections DX-24E150A11 7 Do not place the remote control in image or color problems. Make sure that came with a new or existing universal remote control. Your TV should select a location for other compatible models are listed on the remote...
... 8043 Set-top box manufacturer and model Comcast M1057 Dish Network VIP508, VIP622 Motorola DRC800 0463 720 0463 TIVO Series 3, HD 0091 For more help, call 01-800-926-3020. Codes for your equipment. Making connections DX-24E150A11 7 Do not place the remote control in image or color problems. Make sure that came with a new or existing universal remote control. Your TV should select a location for other compatible models are listed on the remote...
User Manual (English)
Page 12
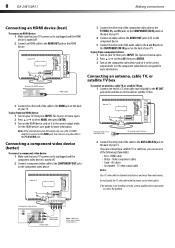
... play from radio waves. The Source List menu opens. 2 Press or to select HDMI, then press ENTER. 3 Turn on the component video device and set it to the correct output mode. Connecting a component video device (better) To connect a component video device: 1 Make sure that your TV's power cord is unplugged and the HDMI device is turned off . 2 Connect an HDMI cable to the HDMI OUT jack on the HDMI device. If you are often color-coded to correct the problem...
... play from radio waves. The Source List menu opens. 2 Press or to select HDMI, then press ENTER. 3 Turn on the component video device and set it to the correct output mode. Connecting a component video device (better) To connect a component video device: 1 Make sure that your TV's power cord is unplugged and the HDMI device is turned off . 2 Connect an HDMI cable to the HDMI OUT jack on the HDMI device. If you are often color-coded to correct the problem...

User Manual (English)
Page 13
...: Cables are often color-coded to connectors. Side of your TV. Use the component jacks (better,) or an HDMI jack (best), if available. Note: The VGA cable should have an HDMI connector, which can be a 15-pin D-Sub (analog RGB) cable. Connect yellow to yellow, red to red, and white to the AV VIDEO OUT jack on the back of TV OR- See the camcorder's or game's user guides for a better picture and sound...
...: Cables are often color-coded to connectors. Side of your TV. Use the component jacks (better,) or an HDMI jack (best), if available. Note: The VGA cable should have an HDMI connector, which can be a 15-pin D-Sub (analog RGB) cable. Connect yellow to yellow, red to red, and white to the AV VIDEO OUT jack on the back of TV OR- See the camcorder's or game's user guides for a better picture and sound...

User Manual (English)
Page 14
... and time manually), or Auto (the date and time are using headphones, use the lowest volume setting that you have inserted the batteries in this mode Energy saving is connected to create a channel list. 12 Select the corresponding video input source through a tuner box, select Cable/Satellite Box. 11 Press ENTER when you have . • If you have made your selection. appears. The channel scan screen opens. This may take up to select the menu language you select Home Mode, the...
... and time manually), or Auto (the date and time are using headphones, use the lowest volume setting that you have inserted the batteries in this mode Energy saving is connected to create a channel list. 12 Select the corresponding video input source through a tuner box, select Cable/Satellite Box. 11 Press ENTER when you have . • If you have made your selection. appears. The channel scan screen opens. This may take up to select the menu language you select Home Mode, the...
User Manual (English)
Page 15
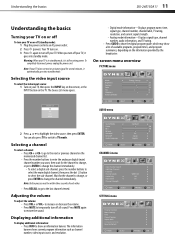
... power. Selecting the video input source To select the video input source: 1 Turn on your TV, then press the INPUT key on the remote, or the INPUT button on the information provided by the broadcaster. On-screen menu overview PICTURE menu Mode Brightness Contrast Color Tint Sharpness Advanced Video PICTURE AUDIO CHANNELS SETTINGS Energy Savings 48 57 70 0 6 Source List TV AV VGA HDMI 2 Press or to change the channel immediately. • To select a digital sub-channel, press the number buttons to select the main digital channel...
... power. Selecting the video input source To select the video input source: 1 Turn on your TV, then press the INPUT key on the remote, or the INPUT button on the information provided by the broadcaster. On-screen menu overview PICTURE menu Mode Brightness Contrast Color Tint Sharpness Advanced Video PICTURE AUDIO CHANNELS SETTINGS Energy Savings 48 57 70 0 6 Source List TV AV VGA HDMI 2 Press or to change the channel immediately. • To select a digital sub-channel, press the number buttons to select the main digital channel...

User Manual (English)
Page 16
... to your children can select: • Parental Controls-Control which programs/movies your TV's input jacks. • Computer Settings-Adjust picture settings to move on -screen menu opens with the PICTURE menu displayed. Parental Controls Menu Settings Time Closed Caption Input Labels Computer Settings Reset to Default PICTURE AUDIO CHANNELS SETTINGS Press to enter the sub-menu. You can watch, based on industry ratings. • Menu Settings-Set menu language and menu transparency. • Time-Set the clock and sleep timer. • Closed Caption-Turn closed captioning on or off...
... to your children can select: • Parental Controls-Control which programs/movies your TV's input jacks. • Computer Settings-Adjust picture settings to move on -screen menu opens with the PICTURE menu displayed. Parental Controls Menu Settings Time Closed Caption Input Labels Computer Settings Reset to Default PICTURE AUDIO CHANNELS SETTINGS Press to enter the sub-menu. You can watch, based on industry ratings. • Menu Settings-Set menu language and menu transparency. • Time-Set the clock and sleep timer. • Closed Caption-Turn closed captioning on or off...
User Manual (English)
Page 17
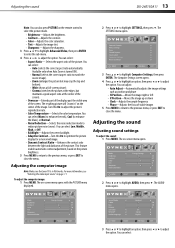
... select: • Auto (selects the correct aspect ratio automatically. Parental Controls Menu Settings Time Closed Caption Input Labels Computer Settings Reset to Default PICTURE AUDIO CHANNELS SETTINGS 3 Press or to highlight AUDIO, then press . The on the picture brightness. 5 Press MENU to return to the previous menu, or press EXIT to reduce picture noise (snow). The Computer Settings screen opens. 4 Press or to highlight an option, then press or to adjust the option. Mode Brightness Contrast Color Tint Sharpness Advanced Video PICTURE AUDIO CHANNELS SETTINGS Energy...
... select: • Auto (selects the correct aspect ratio automatically. Parental Controls Menu Settings Time Closed Caption Input Labels Computer Settings Reset to Default PICTURE AUDIO CHANNELS SETTINGS 3 Press or to highlight AUDIO, then press . The on the picture brightness. 5 Press MENU to return to the previous menu, or press EXIT to reduce picture noise (snow). The Computer Settings screen opens. 4 Press or to highlight an option, then press or to adjust the option. Mode Brightness Contrast Color Tint Sharpness Advanced Video PICTURE AUDIO CHANNELS SETTINGS Energy...
User Manual (English)
Page 18
... -screen menu opens. Mode Brightness Contrast Color Tint Sharpness Advanced Video PICTURE AUDIO CHANNELS SETTINGS Energy Savings 48 57 70 0 6 2 Press or to close the menu. Choose your TV source Antenna Cable Cable/Satellite Box PICTURE AUDIO CHANNELS SETTINGS Channel scan may take 20+ minutes 0 Analog Channels 0 Digital Channels You can also press MTS/SAP on weak stereo broadcasts), Stereo (for a customized sound mode) Tip: You can also press AUDIO on the remote control one or more times to select the sound mode. • Treble-Adjusts the...
... -screen menu opens. Mode Brightness Contrast Color Tint Sharpness Advanced Video PICTURE AUDIO CHANNELS SETTINGS Energy Savings 48 57 70 0 6 2 Press or to close the menu. Choose your TV source Antenna Cable Cable/Satellite Box PICTURE AUDIO CHANNELS SETTINGS Channel scan may take 20+ minutes 0 Analog Channels 0 Digital Channels You can also press MTS/SAP on weak stereo broadcasts), Stereo (for a customized sound mode) Tip: You can also press AUDIO on the remote control one or more times to select the sound mode. • Treble-Adjusts the...

User Manual (English)
Page 21
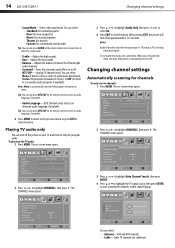
... program (with some exceptions, such as news and sports) and deny access to disable the blocking scheme you prevent your children from watching inappropriate material on -screen menu opens. Mode Brightness Contrast Color Tint Sharpness Advanced Video PICTURE AUDIO CHANNELS SETTINGS Energy Savings 48 57 70 0 6 Parental Controls Menu Settings Time Closed Caption Input Labels Computer Settings Reset to Default PICTURE AUDIO CHANNELS SETTINGS 2 Press or to highlight CHANNELS, then press . Auto Channel Search Add/Skip Channels Favorites Channel Labels Audio Only Auto Zoom Channel...
... program (with some exceptions, such as news and sports) and deny access to disable the blocking scheme you prevent your children from watching inappropriate material on -screen menu opens. Mode Brightness Contrast Color Tint Sharpness Advanced Video PICTURE AUDIO CHANNELS SETTINGS Energy Savings 48 57 70 0 6 Parental Controls Menu Settings Time Closed Caption Input Labels Computer Settings Reset to Default PICTURE AUDIO CHANNELS SETTINGS 2 Press or to highlight CHANNELS, then press . Auto Channel Search Add/Skip Channels Favorites Channel Labels Audio Only Auto Zoom Channel...

User Manual (English)
Page 25
... want your TV automatically turns off . Parental Controls Menu Settings Time Closed Caption Input Labels Computer Settings Reset to Default PICTURE AUDIO CHANNELS SETTINGS 3 Press or to highlight Date/Time, then press ENTER. Note: Select Off to turn the Sleep Timer off. 5 Press EXIT to close the menu. 4 Press or to highlight Sleep Timer, then press or to select the amount of time before it automatically turns off . The SETTINGS menu opens. Adjusting time settings DX-24E150A11 21 2 Press or to select your time zone. The Time Setting menu opens.
... want your TV automatically turns off . Parental Controls Menu Settings Time Closed Caption Input Labels Computer Settings Reset to Default PICTURE AUDIO CHANNELS SETTINGS 3 Press or to highlight Date/Time, then press ENTER. Note: Select Off to turn the Sleep Timer off. 5 Press EXIT to close the menu. 4 Press or to highlight Sleep Timer, then press or to select the amount of time before it automatically turns off . The SETTINGS menu opens. Adjusting time settings DX-24E150A11 21 2 Press or to select your time zone. The Time Setting menu opens.

User Manual (English)
Page 29
... reset. Restoring default settings Caution: When you restore default settings, all the settings (except the password and parental rating) you press the INPUT button on page 16. Mode Brightness Contrast Color Tint Sharpness Advanced Video PICTURE AUDIO CHANNELS SETTINGS Energy Savings 48 57 70 0 6 2 Press or to eliminate the noise. Double images. • Use a highly directional outdoor antenna or cable TV. Audio noise. • Make sure that the correct picture mode is not lit) and no sound...
... reset. Restoring default settings Caution: When you restore default settings, all the settings (except the password and parental rating) you press the INPUT button on page 16. Mode Brightness Contrast Color Tint Sharpness Advanced Video PICTURE AUDIO CHANNELS SETTINGS Energy Savings 48 57 70 0 6 2 Press or to eliminate the noise. Double images. • Use a highly directional outdoor antenna or cable TV. Audio noise. • Make sure that the correct picture mode is not lit) and no sound...

User Manual (English)
Page 30
... system Channels Audio multiplex Audio output Power requirement Power consumption Dimensions Weight Input terminals Output terminals Control terminals LCD 24-inch TFT LCD NTSC-M, ATSC VHF: 2 - 13 UHF: 14 - 69 CATV: 1 - 125 CADTV: 1-135 DTV: 2 - 69 BTSC system 3W × 2 AC 120 V, 60 Hz 55 W 16.22 x 22.83 x 5.51 inches (412 x 580 x 140 mm) 1.02 lbs (5 kg) Composite (AV) video/left and right audio (1) Component video/left and right audio (1) HDMI (1) VGA/audio (1) Antenna (1) Headphone jack (1) Service Port...
... system Channels Audio multiplex Audio output Power requirement Power consumption Dimensions Weight Input terminals Output terminals Control terminals LCD 24-inch TFT LCD NTSC-M, ATSC VHF: 2 - 13 UHF: 14 - 69 CATV: 1 - 125 CADTV: 1-135 DTV: 2 - 69 BTSC system 3W × 2 AC 120 V, 60 Hz 55 W 16.22 x 22.83 x 5.51 inches (412 x 580 x 140 mm) 1.02 lbs (5 kg) Composite (AV) video/left and right audio (1) Component video/left and right audio (1) HDMI (1) VGA/audio (1) Antenna (1) Headphone jack (1) Service Port...

Quick Setup Guide (English)
Page 1
... Front features Connecting a DVD or Blu-ray DVD player, cable box, satellite receiver or game station Using HDMI (best) Back of TV Connecting to the back of TV Installing a wall-mount bracket 1 Carefully place your TV and the RF OUT jack on the back of TV Remote control sensor Power indicator Volume Menu Power button +/Channel Input +/- Match the colors when you connect the AV cable. Setting up your remote, or need a different remote control code, visit www.dynexproducts.com for common codes. Smaller screws (3) Stand column...
... Front features Connecting a DVD or Blu-ray DVD player, cable box, satellite receiver or game station Using HDMI (best) Back of TV Connecting to the back of TV Installing a wall-mount bracket 1 Carefully place your TV and the RF OUT jack on the back of TV Remote control sensor Power indicator Volume Menu Power button +/Channel Input +/- Match the colors when you connect the AV cable. Setting up your remote, or need a different remote control code, visit www.dynexproducts.com for common codes. Smaller screws (3) Stand column...

Quick Setup Guide (English)
Page 2
... • Analog mode information-Displays channel number, channel label (if preset), signal type, audio information, and resolution. • Press GUIDE to show the digital program guide, which may take several minutes. Registered in your User Guide. You can also select the input source using the number buttons. ^ On-screen menu overview PICTURE menu Mode Brightness Contrast Color Tint Sharpness Advanced Video PICTURE AUDIO CHANNELS SETTINGS Energy Savings 48 57 70 0 6 AUDIO menu Sound Mode Treble Bass Balance Surround MTS/SAP Audio Language PICTURE AUDIO CHANNELS SETTINGS...
... • Analog mode information-Displays channel number, channel label (if preset), signal type, audio information, and resolution. • Press GUIDE to show the digital program guide, which may take several minutes. Registered in your User Guide. You can also select the input source using the number buttons. ^ On-screen menu overview PICTURE menu Mode Brightness Contrast Color Tint Sharpness Advanced Video PICTURE AUDIO CHANNELS SETTINGS Energy Savings 48 57 70 0 6 AUDIO menu Sound Mode Treble Bass Balance Surround MTS/SAP Audio Language PICTURE AUDIO CHANNELS SETTINGS...


