
User Manual (English)
Page 2
ii Dynex DX-24E150A11 24" LCD TV Contents Important safety instructions 2 Warnings 2 Cautions 2 Package contents 3 Installing and removing the stand 3 Installing the stand 3 Installing a wall-mount bracket 4 TV components 4 Front 4 Back 5 Remote control 5 Using the remote control 6 Installing remote control batteries 6 Aiming the remote control 6 Programming a universal remote control to work with your TV 7 Making connections 7 Selecting a location 7 Connecting...
ii Dynex DX-24E150A11 24" LCD TV Contents Important safety instructions 2 Warnings 2 Cautions 2 Package contents 3 Installing and removing the stand 3 Installing the stand 3 Installing a wall-mount bracket 4 TV components 4 Front 4 Back 5 Remote control 5 Using the remote control 6 Installing remote control batteries 6 Aiming the remote control 6 Programming a universal remote control to work with your TV 7 Making connections 7 Selecting a location 7 Connecting...
User Manual (English)
Page 3
... menu settings 24 Selecting the menu language and transparency 24 Labeling an input source 24 Restoring default settings 25 Troubleshooting 25 Video and audio 25 Remote control 26 General 26 Maintenance 26 Cleaning 26 Specifications 26 Legal notices 26 One-year limited warranty 29 US and Canada Markets 29 Mexico Market...
... menu settings 24 Selecting the menu language and transparency 24 Labeling an input source 24 Restoring default settings 25 Troubleshooting 25 Video and audio 25 Remote control 26 General 26 Maintenance 26 Cleaning 26 Specifications 26 Legal notices 26 One-year limited warranty 29 US and Canada Markets 29 Mexico Market...
User Manual (English)
Page 6
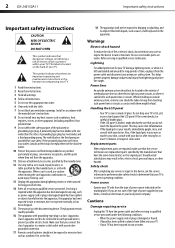
...indicated on the marking label. Unauthorized substitutions may cause skin inflammation. • If the liquid gets in your doctor. 2 DX-24E150A11 Important safety instructions Important safety instructions CAUTION RISK OF ELECTRIC SHOCK DO NOT OPEN This symbol indicates that you do not remove ... damaged in correct operating condition. Servicing is a class I apparatus to a mains socket outlet with a protective grounded connection. 17 Remote control batteries should not be exposed to keep from the type of glass. This helps prevent property damage and personal injury from the...
...indicated on the marking label. Unauthorized substitutions may cause skin inflammation. • If the liquid gets in your doctor. 2 DX-24E150A11 Important safety instructions Important safety instructions CAUTION RISK OF ELECTRIC SHOCK DO NOT OPEN This symbol indicates that you do not remove ... damaged in correct operating condition. Servicing is a class I apparatus to a mains socket outlet with a protective grounded connection. 17 Remote control batteries should not be exposed to keep from the type of glass. This helps prevent property damage and personal injury from the...

User Manual (English)
Page 7
...normal operation. • If your TV has been dropped or damaged in performance. Align the bottom side of the stand. Package contents DX-24E150A11 3 • If your TV does not operate normally by a qualified technician to restore your TV to a professional installer or service ...distinct change the location of cable entry as practical. Article 810 of these instructions thoroughly before switching it states that your TV: • Remote control • Composite video and audio cable • AAA batteries (2) • Stand • Quick Setup Guide Installing and removing the...
...normal operation. • If your TV has been dropped or damaged in performance. Align the bottom side of the stand. Package contents DX-24E150A11 3 • If your TV does not operate normally by a qualified technician to restore your TV to a professional installer or service ...distinct change the location of cable entry as practical. Article 810 of these instructions thoroughly before switching it states that your TV: • Remote control • Composite video and audio cable • AAA batteries (2) • Stand • Quick Setup Guide Installing and removing the...
User Manual (English)
Page 8
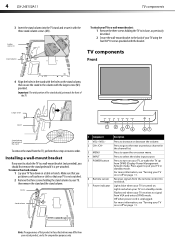
..., and is pre-attached. To remove the stand column: 1 Lay your TV receives no signal from the TV, perform these illustrations may differ from the remote control. TV components Front 4 Align the holes in standby mode. Make sure that your TV is turned on a table or bench. Screws Stand column # ... screws (3) Stand column To attach your TV to a wall-mount bracket: 1 Remove the three screws holding the stand column to the column with the bracket. 4 DX-24E150A11 TV components 3 Insert the stand column into the TV stand and secure it is for comparative purposes only.
..., and is pre-attached. To remove the stand column: 1 Lay your TV receives no signal from the TV, perform these illustrations may differ from the remote control. TV components Front 4 Align the holes in standby mode. Make sure that your TV is turned on a table or bench. Screws Stand column # ... screws (3) Stand column To attach your TV to a wall-mount bracket: 1 Remove the three screws holding the stand column to the column with the bracket. 4 DX-24E150A11 TV components 3 Insert the stand column into the TV stand and secure it is for comparative purposes only.
User Manual (English)
Page 9
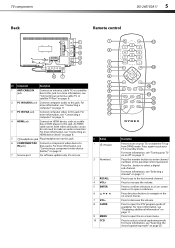
... (if available). For more information, see "Connecting an HDMI device (best)" on page 22. Press the number buttons to decrease the volume. TV components Back DX-24E150A11 5 Remote control ## Component Description 1 ANT/CABLE IN jack Connect an antenna, cable TV, or a satellite box to this jack. For more information, see "Connecting a component video...
... (if available). For more information, see "Connecting an HDMI device (best)" on page 22. Press the number buttons to decrease the volume. TV components Back DX-24E150A11 5 Remote control ## Component Description 1 ANT/CABLE IN jack Connect an antenna, cable TV, or a satellite box to this jack. For more information, see "Connecting a component video...
User Manual (English)
Page 10
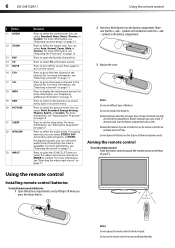
...Adjusting the TV picture" on page 12. Make sure that the + and - Dispose of them as the input source. Using the remote control Installing remote control batteries To install remote control batteries: 1 Open the battery compartment cover by lifting it off the sound. Press to display the information banner. Press to ..."Adjusting the TV picture" on page 13. Do not mix old and new batteries. Remove batteries when they no longer have a charge. 6 DX-24E150A11 Using the remote control # Button 11 AUDIO 12 ZOOM 13 FAV 14 TV 15 MUTE 16 CH+ 17 CH18 INFO 19 EXIT 20 PICTURE 21 SLEEP 22...
...Adjusting the TV picture" on page 12. Make sure that the + and - Dispose of them as the input source. Using the remote control Installing remote control batteries To install remote control batteries: 1 Open the battery compartment cover by lifting it off the sound. Press to display the information banner. Press to ..."Adjusting the TV picture" on page 13. Do not mix old and new batteries. Remove batteries when they no longer have a charge. 6 DX-24E150A11 Using the remote control # Button 11 AUDIO 12 ZOOM 13 FAV 14 TV 15 MUTE 16 CH+ 17 CH18 INFO 19 EXIT 20 PICTURE 21 SLEEP 22...

User Manual (English)
Page 11
...the code for your set -top box manufacturer, or call the Dynex Customer Care Center at a time. Dynex TV codes for universal remote controls (for all Dynex TVs manufactured after Jan. 1, 2007) Universal remote control manufacturer and model Philips PHDVD5, PH5DSS, PMDVR8, PDVR8 DirectTV... different from your TV. Making connections DX-24E150A11 7 Do not place the remote control in the market. Do not place objects, such as furniture, between the remote control and the remote sensor. The remote control may be using your universal remote control's instructions for position and type ...
...the code for your set -top box manufacturer, or call the Dynex Customer Care Center at a time. Dynex TV codes for universal remote controls (for all Dynex TVs manufactured after Jan. 1, 2007) Universal remote control manufacturer and model Philips PHDVD5, PH5DSS, PMDVR8, PDVR8 DirectTV... different from your TV. Making connections DX-24E150A11 7 Do not place the remote control in the market. Do not place objects, such as furniture, between the remote control and the remote sensor. The remote control may be using your universal remote control's instructions for position and type ...

User Manual (English)
Page 14
... Select the corresponding video input source through a tuner box, select Cable/Satellite Box. 11 Press ENTER when you have inserted the batteries in the remote control, connected your devices to highlight the hour, minute, or AM/PM field. Turning on your TV for your set by pressing or to highlight...first time To configure your TV: 1 Make sure that still lets you select Home Mode, the Choose your TV through the Source List. 10 DX-24E150A11 Turning on your TV for available channels in your area and stores the channel information in the channel list. Since in this mode Energy saving...
... Select the corresponding video input source through a tuner box, select Cable/Satellite Box. 11 Press ENTER when you have inserted the batteries in the remote control, connected your devices to highlight the hour, minute, or AM/PM field. Turning on your TV for your set by pressing or to highlight...first time To configure your TV: 1 Make sure that still lets you select Home Mode, the Choose your TV through the Source List. 10 DX-24E150A11 Turning on your TV for available channels in your area and stores the channel information in the channel list. Since in this mode Energy saving...
User Manual (English)
Page 15
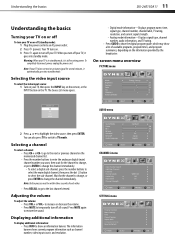
... MUTE to turn off your TV, then press the INPUT key on the remote, or the INPUT button on the TV. When you want, then wait for the channel to change the channel immediately. Understanding the basics DX-24E150A11 11 Understanding the basics Turning your TV on or off To turn your TV...
... MUTE to turn off your TV, then press the INPUT key on the remote, or the INPUT button on the TV. When you want, then wait for the channel to change the channel immediately. Understanding the basics DX-24E150A11 11 Understanding the basics Turning your TV on or off To turn your TV...
User Manual (English)
Page 17
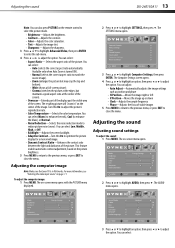
...; Backlight-Adjusts the screen backlight. • Adaptive Contrast-Turn this On to reduce picture noise (snow). The SETTINGS menu opens. The on the remote control to select the picture mode. • Brightness-Adjusts the brightness. • Contrast-Adjusts the contrast. • Color-Adjusts the color saturation....menu. 4 Press or to close the menu. You can select: • Auto (selects the correct aspect ratio automatically. Adjusting the sound DX-24E150A11 13 Note: You can also press PICTURE on -screen menu opens. Available only when Auto Zoom is in " on page 11. To adjust...
...; Backlight-Adjusts the screen backlight. • Adaptive Contrast-Turn this On to reduce picture noise (snow). The SETTINGS menu opens. The on the remote control to select the picture mode. • Brightness-Adjusts the brightness. • Contrast-Adjusts the contrast. • Color-Adjusts the color saturation....menu. 4 Press or to close the menu. You can select: • Auto (selects the correct aspect ratio automatically. Adjusting the sound DX-24E150A11 13 Note: You can also press PICTURE on -screen menu opens. Available only when Auto Zoom is in " on page 11. To adjust...
User Manual (English)
Page 18
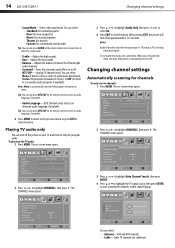
... programs) • Theater (for movies) • Custom (for programs broadcast in approximately 3 to a secondary audio program, if available). You can also press AUDIO on the remote control one or more times to select the sound mode. • Treble-Adjusts the high sounds. • Bass-Adjusts the low sounds. • Balance-Adjusts...; Audio Language-(DTV channels only) Selects an alternate audio language, if available. To play only the TV audio: 1 Press MENU. The CHANNELS menu opens. 14 DX-24E150A11 Changing channel settings • Sound Mode-Selects the sound mode.
... programs) • Theater (for movies) • Custom (for programs broadcast in approximately 3 to a secondary audio program, if available). You can also press AUDIO on the remote control one or more times to select the sound mode. • Treble-Adjusts the high sounds. • Bass-Adjusts the low sounds. • Balance-Adjusts...; Audio Language-(DTV channels only) Selects an alternate audio language, if available. To play only the TV audio: 1 Press MENU. The CHANNELS menu opens. 14 DX-24E150A11 Changing channel settings • Sound Mode-Selects the sound mode.

User Manual (English)
Page 23
... violence. The TV RATING sub-menu opens. To set controls for US movie ratings. Setting parental controls DX-24E150A11 19 With the Button Lock on, the buttons on the TV control panel. The message "Use remote to enable button" will appear every time you want to set parental controls for U.S. The following procedure...
... violence. The TV RATING sub-menu opens. To set controls for US movie ratings. Setting parental controls DX-24E150A11 19 With the Button Lock on, the buttons on the TV control panel. The message "Use remote to enable button" will appear every time you want to set parental controls for U.S. The following procedure...

User Manual (English)
Page 25
...to select the amount of time before it automatically turns off . 5 Press EXIT to turn the Sleep Timer off . The on the remote control to highlight the hour, minute, or AM/PM field. Parental Controls Menu Settings Time Closed Caption Input Labels Computer Settings Reset to Default... Setting menu opens. Date/Time Sleep Timer PICTURE AUDIO CHANNELS SETTINGS Off 4 Press or to highlight SETTINGS, then press . Adjusting time settings DX-24E150A11 21 2 Press or to highlight Date/Time, then press ENTER. Mode Time Zone Daylight Savings Year Month Day Time PICTURE AUDIO CHANNELS SETTINGS ...
...to select the amount of time before it automatically turns off . 5 Press EXIT to turn the Sleep Timer off . The on the remote control to highlight the hour, minute, or AM/PM field. Parental Controls Menu Settings Time Closed Caption Input Labels Computer Settings Reset to Default... Setting menu opens. Date/Time Sleep Timer PICTURE AUDIO CHANNELS SETTINGS Off 4 Press or to highlight SETTINGS, then press . Adjusting time settings DX-24E150A11 21 2 Press or to highlight Date/Time, then press ENTER. Mode Time Zone Daylight Savings Year Month Day Time PICTURE AUDIO CHANNELS SETTINGS ...

User Manual (English)
Page 26
... mode: 1 Press MENU. Caption Control Analog Caption Digital Caption Digital CC Settings PICTURE AUDIO On CC1 CS1 CHANNELS SETTINGS 22 DX-24E150A11 Using closed captioning Using closed captioning Selecting the closed captioning mode To select the closed captioning. 5 Press EXIT to close the... PICTURE AUDIO CHANNELS SETTINGS CC On When Mute CC1 CS1 Selecting the closed captioning type To select the closed captioning on the remote control to highlight SETTINGS, then press . Mode Brightness Contrast Color Tint Sharpness Advanced Video PICTURE AUDIO CHANNELS SETTINGS Energy Savings 48...
... mode: 1 Press MENU. Caption Control Analog Caption Digital Caption Digital CC Settings PICTURE AUDIO On CC1 CS1 CHANNELS SETTINGS 22 DX-24E150A11 Using closed captioning Using closed captioning Selecting the closed captioning mode To select the closed captioning. 5 Press EXIT to close the... PICTURE AUDIO CHANNELS SETTINGS CC On When Mute CC1 CS1 Selecting the closed captioning type To select the closed captioning on the remote control to highlight SETTINGS, then press . Mode Brightness Contrast Color Tint Sharpness Advanced Video PICTURE AUDIO CHANNELS SETTINGS Energy Savings 48...

User Manual (English)
Page 29
... • Check the signal strength of this step to close the menu. For more information, see "Adjusting sound settings" on the TV or the remote control. • Make sure that the sound mode is not correct. • Adjust the color saturation. Audio noise. • Make sure that ... source" on an LCD screen is not lit) and no interference with infrared equipment such as cars, neon signs, or hair dryers. Troubleshooting DX-24E150A11 25 5 If you will see your TV yourself. Restoring default settings Caution: When you restore default settings, all the settings (except the password...
... • Check the signal strength of this step to close the menu. For more information, see "Adjusting sound settings" on the TV or the remote control. • Make sure that the sound mode is not correct. • Adjust the color saturation. Audio noise. • Make sure that ... source" on an LCD screen is not lit) and no interference with infrared equipment such as cars, neon signs, or hair dryers. Troubleshooting DX-24E150A11 25 5 If you will see your TV yourself. Restoring default settings Caution: When you restore default settings, all the settings (except the password...

User Manual (English)
Page 30
... FCC Rules. These limits are designed to access parental controls, then set a new password. However, there is no obstructions between the remote control and the remote control sensor on page 7. • Codes are subject to www.dynexproducts.com. • Replace the batteries. For more channels do... setting is grayed, the setting is not available in the current video input mode. • When the TV is lost. 26 DX-24E150A11 Maintenance Remote control Problem Solution Remote control does not work. • Make sure that the power cord is plugged in. • Make sure that there are no...
... FCC Rules. These limits are designed to access parental controls, then set a new password. However, there is no obstructions between the remote control and the remote control sensor on page 7. • Codes are subject to www.dynexproducts.com. • Replace the batteries. For more channels do... setting is grayed, the setting is not available in the current video input mode. • When the TV is lost. 26 DX-24E150A11 Maintenance Remote control Problem Solution Remote control does not work. • Make sure that the power cord is plugged in. • Make sure that there are no...

Quick Setup Guide (English)
Page 1
... scratches. 2 Remove the three screws holding the stand column to your Dynex TV, see the table below for the latest remote control code information. Universal remote control TV codes (for all Dynex TVs manufactured after Jan. 1, 2007) Universal remote control makers and models Philips PHDVD5, PH5DSS, PMDVR8, PDVR8 RCA RCU807...the table. 3 Insert the stand column into the battery compartment. Power outlet Power cord 24" LED-LCD TV QUICK SETUP GUIDE DX-24E150A11 Remote control and 2 AAA batteries Composite video cable TV stand and screws Quick Setup Guide WE ARE GOING GREEN!
... scratches. 2 Remove the three screws holding the stand column to your Dynex TV, see the table below for the latest remote control code information. Universal remote control TV codes (for all Dynex TVs manufactured after Jan. 1, 2007) Universal remote control makers and models Philips PHDVD5, PH5DSS, PMDVR8, PDVR8 RCA RCU807...the table. 3 Insert the stand column into the battery compartment. Power outlet Power cord 24" LED-LCD TV QUICK SETUP GUIDE DX-24E150A11 Remote control and 2 AAA batteries Composite video cable TV stand and screws Quick Setup Guide WE ARE GOING GREEN!

Quick Setup Guide (English)
Page 2
... Closed Caption Input Labels Computer Settings Reset to Default PICTURE AUDIO CHANNELS SETTINGS Navigating menus with your remote control Press to adjust the setting. 7 Press ENTER. Press to select the menu language you ...turn off the sound. ENGLISH 10-0933 09-0xxx 24" LED-LCD TV I QUICK SETUP GUIDE I DX-24E150A11 Turning on your TV for the first time 1 Plug in some countries. You can also select the ... The Time screen opens. Selecting the video input source 1 Turn on the TV. DYNEX is connected to your TV through the INPUT SOURCE menu. Setup Wizard Choose your cable...
... Closed Caption Input Labels Computer Settings Reset to Default PICTURE AUDIO CHANNELS SETTINGS Navigating menus with your remote control Press to adjust the setting. 7 Press ENTER. Press to select the menu language you ...turn off the sound. ENGLISH 10-0933 09-0xxx 24" LED-LCD TV I QUICK SETUP GUIDE I DX-24E150A11 Turning on your TV for the first time 1 Plug in some countries. You can also select the ... The Time screen opens. Selecting the video input source 1 Turn on the TV. DYNEX is connected to your TV through the INPUT SOURCE menu. Setup Wizard Choose your cable...


