
User Manual (English)
Page 2
ii Dynex DX-24E150A11 24" LCD TV Contents Important safety instructions 2 Warnings 2 Cautions 2 Package contents 3 Installing and removing the stand 3 Installing the stand 3 Installing a wall-mount bracket 4 TV components 4 ... Navigating the menus 12 Adjusting basic settings 12 Adjusting the picture 12 Adjusting the TV picture 12 Adjusting the computer image 13 Adjusting the sound 13 Adjusting sound settings 13 Playing TV audio only 14 Changing channel settings 14 Automatically scanning for channels 14 Hiding channels 15 Setting up a favorite channel list...
ii Dynex DX-24E150A11 24" LCD TV Contents Important safety instructions 2 Warnings 2 Cautions 2 Package contents 3 Installing and removing the stand 3 Installing the stand 3 Installing a wall-mount bracket 4 TV components 4 ... Navigating the menus 12 Adjusting basic settings 12 Adjusting the picture 12 Adjusting the TV picture 12 Adjusting the computer image 13 Adjusting the sound 13 Adjusting sound settings 13 Playing TV audio only 14 Changing channel settings 14 Automatically scanning for channels 14 Hiding channels 15 Setting up a favorite channel list...

User Manual (English)
Page 7
...so that your TV does not operate normally by a qualified technician to restore your TV to a professional installer or service personnel. Package contents DX-24E150A11 3 • If your TV is not scratched. When this job, refer to its new surroundings for correct grounding. In such cases, ...by the operating instructions because incorrect adjustment of the National Electrical Code, ANSI/NFPA No. 70, provides information with your TV picture and sound, operating problems, or even damage, keep your area. Cautions: Read these materials may appear on a wall or other flat surface. ...
...so that your TV does not operate normally by a qualified technician to restore your TV to a professional installer or service personnel. Package contents DX-24E150A11 3 • If your TV is not scratched. When this job, refer to its new surroundings for correct grounding. In such cases, ...by the operating instructions because incorrect adjustment of the National Electrical Code, ANSI/NFPA No. 70, provides information with your TV picture and sound, operating problems, or even damage, keep your area. Cautions: Read these materials may appear on a wall or other flat surface. ...
User Manual (English)
Page 10
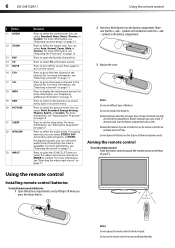
...VOL VOL CH CH MENU INPUT POWER 30° 30° 26.2 ft (8 m) Notes: Do not expose the remote control to select the sound mode. 6 DX-24E150A11 Using the remote control # Button 11 AUDIO 12 ZOOM 13 FAV 14 TV 15 MUTE 16 CH+ 17 CH18 INFO 19 EXIT 20 PICTURE 21...one track is available). You can cause a rash. For more information, see "Displaying additional information" on page 13. For more information, see "Adjusting sound settings" on page 11. Press to select the audio mode. For more information, see "Selecting the video input source" on page 11. Press to display...
...VOL VOL CH CH MENU INPUT POWER 30° 30° 26.2 ft (8 m) Notes: Do not expose the remote control to select the sound mode. 6 DX-24E150A11 Using the remote control # Button 11 AUDIO 12 ZOOM 13 FAV 14 TV 15 MUTE 16 CH+ 17 CH18 INFO 19 EXIT 20 PICTURE 21...one track is available). You can cause a rash. For more information, see "Displaying additional information" on page 13. For more information, see "Adjusting sound settings" on page 11. Press to select the audio mode. For more information, see "Selecting the video input source" on page 11. Press to display...

User Manual (English)
Page 13
Making connections DX-24E150A11 9 Connecting a VCR, camcorder, or game (good) Connect the equipment using the best available connection. Use the component jacks (better,) or an HDMI jack (best), if ... a videotape, then press PLAY on the camcorder or game, and set it to white. See the camcorder's or game's user guides for a better picture and sound.
Making connections DX-24E150A11 9 Connecting a VCR, camcorder, or game (good) Connect the equipment using the best available connection. Use the component jacks (better,) or an HDMI jack (best), if ... a videotape, then press PLAY on the camcorder or game, and set it to white. See the camcorder's or game's user guides for a better picture and sound.

User Manual (English)
Page 14
...or to select your time zone. You can damage your hearing. Setup Wizard Choose your Picture Mode screen opens. appears. If you hear the sound. Mode Time Zone Daylight Savings Year Month Day Time Setup Wizard Time Auto Pacific Off 2000 Jan 13 12 : 07 AM 4 Press or... Box 0 Analog Channels 0 Digital Channels 10 Press or to select Home Mode or Retail Mode, then press ENTER. If you want Retail mode? 10 DX-24E150A11 Turning on your TV). The channel scan screen opens. While scanning, the TV displays a progress report. - If you select Retail Mode, a message stating...
...or to select your time zone. You can damage your hearing. Setup Wizard Choose your Picture Mode screen opens. appears. If you hear the sound. Mode Time Zone Daylight Savings Year Month Day Time Setup Wizard Time Auto Pacific Off 2000 Jan 13 12 : 07 AM 4 Press or... Box 0 Analog Channels 0 Digital Channels 10 Press or to select Home Mode or Retail Mode, then press ENTER. If you want Retail mode? 10 DX-24E150A11 Turning on your TV). The channel scan screen opens. While scanning, the TV displays a progress report. - If you select Retail Mode, a message stating...
User Manual (English)
Page 15
... or digital (main) channel number you turn off your TV is in standby mode, it is still receiving power. Understanding the basics DX-24E150A11 11 Understanding the basics Turning your TV on or off To turn your TV on the TV. Warning: When your TV, it automatically... PICTURE AUDIO CHANNELS SETTINGS WGBH-SD Off On SETTINGS menu Parental Controls Menu Settings Time Closed Caption Input Labels Computer Settings Reset to restore the sound. The Source List menu opens. • Digital mode information-Displays program name, time, signal type, channel number, channel label, TV rating...
... or digital (main) channel number you turn off your TV is in standby mode, it is still receiving power. Understanding the basics DX-24E150A11 11 Understanding the basics Turning your TV on or off To turn your TV on the TV. Warning: When your TV, it automatically... PICTURE AUDIO CHANNELS SETTINGS WGBH-SD Off On SETTINGS menu Parental Controls Menu Settings Time Closed Caption Input Labels Computer Settings Reset to restore the sound. The Source List menu opens. • Digital mode information-Displays program name, time, signal type, channel number, channel label, TV rating...
User Manual (English)
Page 17
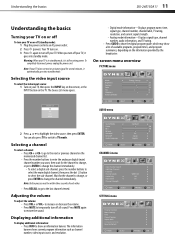
... Video PICTURE AUDIO CHANNELS SETTINGS Energy Savings 48 57 70 0 6 2 Press or to highlight Computer Settings, then press ENTER. Adjusting the sound DX-24E150A11 13 Note: You can also press PICTURE on the center of the image. Selects the aspect ratio of stable images 5 Press MENU to ... -screen menu opens. The on page 11. You can select: • Auto (selects the correct aspect ratio automatically. Adjusting the sound Adjusting sound settings To adjust the sound: 1 Press MENU. Adjusting the computer image Note: Make sure that your TV is turned ON). • Normal (selects the correct...
... Video PICTURE AUDIO CHANNELS SETTINGS Energy Savings 48 57 70 0 6 2 Press or to highlight Computer Settings, then press ENTER. Adjusting the sound DX-24E150A11 13 Note: You can also press PICTURE on the center of the image. Selects the aspect ratio of stable images 5 Press MENU to ... -screen menu opens. The on page 11. You can select: • Auto (selects the correct aspect ratio automatically. Adjusting the sound Adjusting sound settings To adjust the sound: 1 Press MENU. Adjusting the computer image Note: Make sure that your TV is turned ON). • Normal (selects the correct...
User Manual (English)
Page 18
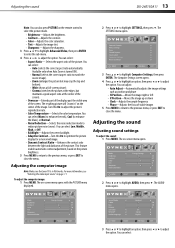
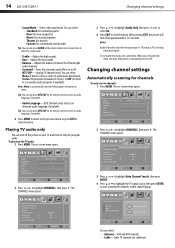
...the left and right audio channels. • Surround-Turns the surround sound effect on your TV is automatically reset to only the program audio. 14 DX-24E150A11 Changing channel settings • Sound Mode-Selects the sound mode. Note: Mono is automatically selected if the program is noise or... 57 70 0 6 2 Press or to highlight CHANNELS, then press . Changing channel settings Automatically scanning for channels To auto scan for a customized sound mode) Tip: You can also press AUDIO on weak stereo broadcasts), Stereo (for channels in mono. You can select: • Standard (for...
...the left and right audio channels. • Surround-Turns the surround sound effect on your TV is automatically reset to only the program audio. 14 DX-24E150A11 Changing channel settings • Sound Mode-Selects the sound mode. Note: Mono is automatically selected if the program is noise or... 57 70 0 6 2 Press or to highlight CHANNELS, then press . Changing channel settings Automatically scanning for channels To auto scan for a customized sound mode) Tip: You can also press AUDIO on weak stereo broadcasts), Stereo (for channels in mono. You can select: • Standard (for...

User Manual (English)
Page 26
... the sound is analog, Analog Caption will be available and the Digital Caption will be grayed out (inactive). Caption Control Analog Caption Digital Caption Digital CC Settings PICTURE AUDIO CHANNELS SETTINGS CC On When Mute CC1 CS1 Selecting the closed captioning type To select the closed captioning mode: 1 Press MENU. 22 DX-24E150A11...
... the sound is analog, Analog Caption will be available and the Digital Caption will be grayed out (inactive). Caption Control Analog Caption Digital Caption Digital CC Settings PICTURE AUDIO CHANNELS SETTINGS CC On When Mute CC1 CS1 Selecting the closed captioning type To select the closed captioning mode: 1 Press MENU. 22 DX-24E150A11...

User Manual (English)
Page 29
... antenna, cable TV, or satellite TV box" on an LCD screen is set to eliminate the noise. Repeat this TV. • Make sure that the sound is not muted. • Make sure that the power cord is plugged in the INPUT SOURCE menu. The next time you press the INPUT button... or to select Yes, then press ENTER. 5 Press EXIT to the next position. For more information, see "Adjusting the TV picture" on page 12. Troubleshooting DX-24E150A11 25 5 If you select Custom, press or to highlight Custom Label, then press ENTER. 6 Press or to select a character, then press or to move to...
... antenna, cable TV, or satellite TV box" on an LCD screen is set to eliminate the noise. Repeat this TV. • Make sure that the sound is not muted. • Make sure that the power cord is plugged in the INPUT SOURCE menu. The next time you press the INPUT button... or to select Yes, then press ENTER. 5 Press EXIT to the next position. For more information, see "Adjusting the TV picture" on page 12. Troubleshooting DX-24E150A11 25 5 If you select Custom, press or to highlight Custom Label, then press ENTER. 6 Press or to select a character, then press or to move to...

Quick Setup Guide (English)
Page 2
... the on-screen cursor left or right. Press to highlight the video source, then press ENTER. DYNEX is a trademark of their respective owners. Registered in the channel list, press CH^ or CH ...Sharpness Advanced Video PICTURE AUDIO CHANNELS SETTINGS Energy Savings 48 57 70 0 6 AUDIO menu Sound Mode Treble Bass Balance Surround MTS/SAP Audio Language PICTURE AUDIO CHANNELS SETTINGS Standard 50 40... top box. ENGLISH 10-0933 09-0xxx 24" LED-LCD TV I QUICK SETUP GUIDE I DX-24E150A11 Press to close the menu. 11 Select the corresponding video input source through a tuner box, ...
... the on-screen cursor left or right. Press to highlight the video source, then press ENTER. DYNEX is a trademark of their respective owners. Registered in the channel list, press CH^ or CH ...Sharpness Advanced Video PICTURE AUDIO CHANNELS SETTINGS Energy Savings 48 57 70 0 6 AUDIO menu Sound Mode Treble Bass Balance Surround MTS/SAP Audio Language PICTURE AUDIO CHANNELS SETTINGS Standard 50 40... top box. ENGLISH 10-0933 09-0xxx 24" LED-LCD TV I QUICK SETUP GUIDE I DX-24E150A11 Press to close the menu. 11 Select the corresponding video input source through a tuner box, ...


