
FAQs (English)
Page 2
... are using cable connected directly to the TV: 1. Press ◄ or ► to highlight Auto Scan, then press ENTER. Press ▲ or ▼ to highlight Channel, then press ▼. Press MENU. A confirmation box opens. 5. PMDVR8, 6690 PDVR8 115 135 0464 8043 Set-top box manufacturer and model Comcast Dish Motorola TIVO DirecTV M1057 Network DRC800 Series 3, HD RC23 VIP508, VIP622 0463 720 0463 0091 10463 o Codes for...
... are using cable connected directly to the TV: 1. Press ◄ or ► to highlight Auto Scan, then press ENTER. Press ▲ or ▼ to highlight Channel, then press ▼. Press MENU. A confirmation box opens. 5. PMDVR8, 6690 PDVR8 115 135 0464 8043 Set-top box manufacturer and model Comcast Dish Motorola TIVO DirecTV M1057 Network DRC800 Series 3, HD RC23 VIP508, VIP622 0463 720 0463 0091 10463 o Codes for...

FAQs (English)
Page 3
... for further instructions. Connect a component video cable and audio cables to the COMPONENT IN jacks on the back of your quick start the scan. b. Connect A/V cables to the AV IN jacks on the back or side of your TV, then press HDMI. b. o If you have a yellow video cable, and red and white audio cables. 1. o If you must use the remote that came with that box to change channels. Make sure you are using an antenna: 1. b. Turn on...
... for further instructions. Connect a component video cable and audio cables to the COMPONENT IN jacks on the back of your quick start the scan. b. Connect A/V cables to the AV IN jacks on the back or side of your TV, then press HDMI. b. o If you have a yellow video cable, and red and white audio cables. 1. o If you must use the remote that came with that box to change channels. Make sure you are using an antenna: 1. b. Turn on...
Firmware Installation Guide (English)
Page 1
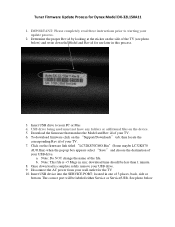
Tuner Firmware Update Process for use later in this process. 3. Insert USB drive to starting your update process. 2. USB drive being used must not have any folders or additional files on the "Support/Downloads" tab; Note: Do NOT change the name of the TV (see photo below) and write down the Model and Rev id for Dynex Model DX‐32L150A11... box appears select "Save" and choose the destination of your TV. 7. Download the firmware that matches the Model and Rev id of your USB drive. To download firmware click on the device. 5. a. IMPORTANT: Please completely read these instructions ...
Tuner Firmware Update Process for use later in this process. 3. Insert USB drive to starting your update process. 2. USB drive being used must not have any folders or additional files on the "Support/Downloads" tab; Note: Do NOT change the name of the TV (see photo below) and write down the Model and Rev id for Dynex Model DX‐32L150A11... box appears select "Save" and choose the destination of your TV. 7. Download the firmware that matches the Model and Rev id of your USB drive. To download firmware click on the device. 5. a. IMPORTANT: Please completely read these instructions ...
Quick Setup Guide (English)
Page 1
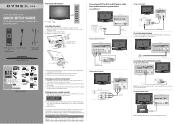
...", 40", and 46" LCD TV QUICK SETUP GUIDE DX-32L150A11, DX-37L150A11, DX-40L130A11, and DX-46L150A11 Remote control Power sensor indicator Installing the stand 1 Remove the stand from damages and scratches. 2 Remove the four screws holding the TV to its stand column, then remove the stand column. 3 Secure the wall-mount bracket (not included) to the column with the + and - Note: Pay close attention to work with digital TV channels. Component video cable Component video device Using composite(good) Video device 2 Insert two AAA...
...", 40", and 46" LCD TV QUICK SETUP GUIDE DX-32L150A11, DX-37L150A11, DX-40L130A11, and DX-46L150A11 Remote control Power sensor indicator Installing the stand 1 Remove the stand from damages and scratches. 2 Remove the four screws holding the TV to its stand column, then remove the stand column. 3 Secure the wall-mount bracket (not included) to the column with the + and - Note: Pay close attention to work with digital TV channels. Component video cable Component video device Using composite(good) Video device 2 Insert two AAA...

Quick Setup Guide (English)
Page 2
...signal type, audio information, and resolution. • Press GUIDE to change the volume. On-screen menu overview Picture menu Picture Mode Contrast Brightness Color Tint Sharpness Backlight Advanced Video Move Picture Audio Setup Channel Custom 70 40 60 0 50 30 Select MENU Exit AUDIO menu Sound Mode Bass Treble Balance Surround AVC Digital Output Audio Language Move Picture Audio Setup Channel Custom 57 50 0 Off Off RAW English Select MENU Exit SETUP menu Parental Controls Time Closed Caption Menu Settings VGA Settings Input Label Restore Default Audio Only Move Picture Audio...
...signal type, audio information, and resolution. • Press GUIDE to change the volume. On-screen menu overview Picture menu Picture Mode Contrast Brightness Color Tint Sharpness Backlight Advanced Video Move Picture Audio Setup Channel Custom 70 40 60 0 50 30 Select MENU Exit AUDIO menu Sound Mode Bass Treble Balance Surround AVC Digital Output Audio Language Move Picture Audio Setup Channel Custom 57 50 0 Off Off RAW English Select MENU Exit SETUP menu Parental Controls Time Closed Caption Menu Settings VGA Settings Input Label Restore Default Audio Only Move Picture Audio...

User Manual (English)
Page 2
... Installing and removing the stand 4 Installing the stand 4 Installing a wall-mount bracket 4 TV components 5 Accessories 5 Front 5 Side 5 Back 6 Remote control 7 Using the remote control 8 Installing remote control batteries 8 Aiming the remote control 8 Programming a universal remote control to work with your TV 8 Making connections 9 Selecting a location 9 Connecting the power 9 Connecting an HDMI device 9 Connecting a component video device 9 Connecting an antenna, cable TV, or satellite TV box 10 Connecting a VCR 10 Connecting a camcorder or game console 10 Connecting...
... Installing and removing the stand 4 Installing the stand 4 Installing a wall-mount bracket 4 TV components 5 Accessories 5 Front 5 Side 5 Back 6 Remote control 7 Using the remote control 8 Installing remote control batteries 8 Aiming the remote control 8 Programming a universal remote control to work with your TV 8 Making connections 9 Selecting a location 9 Connecting the power 9 Connecting an HDMI device 9 Connecting a component video device 9 Connecting an antenna, cable TV, or satellite TV box 10 Connecting a VCR 10 Connecting a camcorder or game console 10 Connecting...

User Manual (English)
Page 3
... 20 Turning parental controls on or off 20 Setting or changing the password 21 Turning the button lock on or off 21 Setting parental control levels 22 Using closed captioning 24 Turning closed captioning on or off 24 Selecting the closed captioning mode 25 Customizing digital TV closed captioning styles 25 Adjusting time settings 26 Setting the date and time 26 Setting the sleep timer 27 Adjusting menu settings 27 Selecting the menu language and transparency 27 Labeling an input source 28 Restoring default settings 28 Troubleshooting 29 Video and audio 29 Remote control 29...
... 20 Turning parental controls on or off 20 Setting or changing the password 21 Turning the button lock on or off 21 Setting parental control levels 22 Using closed captioning 24 Turning closed captioning on or off 24 Selecting the closed captioning mode 25 Customizing digital TV closed captioning styles 25 Adjusting time settings 26 Setting the date and time 26 Setting the sleep timer 27 Adjusting menu settings 27 Selecting the menu language and transparency 27 Labeling an input source 28 Restoring default settings 28 Troubleshooting 29 Video and audio 29 Remote control 29...

User Manual (English)
Page 4
... electronics industry are required for safe wall mount installation. Use only a TV stand rated for the weight of your TV. • Carefully read and understand all enclosed instructions for proper use your flat panel display As you enjoy your new product, keep these safety tips in this product. • Don't let children climb on or play with steel studs or cinder blocks...
... electronics industry are required for safe wall mount installation. Use only a TV stand rated for the weight of your TV. • Carefully read and understand all enclosed instructions for proper use your flat panel display As you enjoy your new product, keep these safety tips in this product. • Don't let children climb on or play with steel studs or cinder blocks...

User Manual (English)
Page 11
... operate both your set-top box and your universal remote control's instructions to enter the code you have problems programming your remote, or need to change the angle at : http://www.dynexproducts.com/universalcontrolcodes.aspx Tips: • The brand name is often visible on the back. • The codes shown above are common codes, but many other compatible models are available online at which you can cause a rash. 8 DX...
... operate both your set-top box and your universal remote control's instructions to enter the code you have problems programming your remote, or need to change the angle at : http://www.dynexproducts.com/universalcontrolcodes.aspx Tips: • The brand name is often visible on the back. • The codes shown above are common codes, but many other compatible models are available online at which you can cause a rash. 8 DX...

User Manual (English)
Page 12
... the power cord when not using the TV for a long period of time. Refer to the instructions that your universal remote control or set it to the correct mode. Match the colors when making connections. Back of TV M HDMI device HDMI cable Note: To connect a DVI device, use that all plugs are unplugged. Back of cables to make sure that the TV and the device are turned off . 2 Connect a component video cable to the COMPONENT OUT jacks...
... the power cord when not using the TV for a long period of time. Refer to the instructions that your universal remote control or set it to the correct mode. Match the colors when making connections. Back of TV M HDMI device HDMI cable Note: To connect a DVI device, use that all plugs are unplugged. Back of cables to make sure that the TV and the device are turned off . 2 Connect a component video cable to the COMPONENT OUT jacks...

User Manual (English)
Page 14
... Digital sound system Digital optical cable 3 Connect the other end of the audio cable to the AUDIO IN jacks on the TV, then press INPUT. The INPUT SOURCE menu opens. 2 Press or to select AV2, then press ENTER. Connecting a home theater system Connecting using an analog audio cable To connect using a digital optical cable: 1 Make sure that came with digital TV channels. Back of TV Audio cable Audio amplifier AUDIO IN Note: Cable connectors and jacks are often color-coded. To play video from the camcorder or game console. Connecting...
... Digital sound system Digital optical cable 3 Connect the other end of the audio cable to the AUDIO IN jacks on the TV, then press INPUT. The INPUT SOURCE menu opens. 2 Press or to select AV2, then press ENTER. Connecting a home theater system Connecting using an analog audio cable To connect using a digital optical cable: 1 Make sure that came with digital TV channels. Back of TV Audio cable Audio amplifier AUDIO IN Note: Cable connectors and jacks are often color-coded. To play video from the camcorder or game console. Connecting...

User Manual (English)
Page 15
... select Antenna, Cable, or Cable/Satellite Box, depending on the type of the TV. 6 Press or to highlight Mode, then press or to select Manual (to set the date/time manually), or Auto (the date/time are using an antenna for a standard or HD TV signal, select Antenna. • If your cable is connected directly to the TV (without a tuner box), select Cable. • If your cable is not realized." To connect headphones: • Plug the headphones (not included) into the (headphone) jack...
... select Antenna, Cable, or Cable/Satellite Box, depending on the type of the TV. 6 Press or to highlight Mode, then press or to select Manual (to set the date/time manually), or Auto (the date/time are using an antenna for a standard or HD TV signal, select Antenna. • If your cable is connected directly to the TV (without a tuner box), select Cable. • If your cable is not realized." To connect headphones: • Plug the headphones (not included) into the (headphone) jack...

User Manual (English)
Page 16
... connected to your TV. to increase or decrease the volume. • Press MUTE to temporarily turn your TV. On-screen menu overview Picture menu Picture Mode Contrast Brightness Color T int Sharpness Backlight Advanced Video Move Picture Audio Custom Setup Channel 70 40 60 0 50 30 Select MENU Exit Warning: When your TV, then press the INPUT key on the remote, or the INPUT button on . 3 Press again to turn off all available digital programs...
... connected to your TV. to increase or decrease the volume. • Press MUTE to temporarily turn your TV. On-screen menu overview Picture menu Picture Mode Contrast Brightness Color T int Sharpness Backlight Advanced Video Move Picture Audio Custom Setup Channel 70 40 60 0 50 30 Select MENU Exit Warning: When your TV, then press the INPUT key on the remote, or the INPUT button on . 3 Press again to turn off all available digital programs...

User Manual (English)
Page 17
... your TV. Parental Controls T ime Closed Caption Menu Settings VGA Settings Input Label Restore Default Audio Only Move Picture Audio Setup Channel Off Select MENU Exit The above menus are grayed out. 14 DX-32L/37L/40L/46L Understanding the basics Audio menu Sound Mode Bass Treble Balance Surround AVC Digital Output Audio Language Move Setup menu Picture Audio Setup Channel Custom 57 50 0 Off Off RA W English Select MENU Exit Navigating the menus Press to the previous screen. Press to select menus, to adjust selected items, or...
... your TV. Parental Controls T ime Closed Caption Menu Settings VGA Settings Input Label Restore Default Audio Only Move Picture Audio Setup Channel Off Select MENU Exit The above menus are grayed out. 14 DX-32L/37L/40L/46L Understanding the basics Audio menu Sound Mode Bass Treble Balance Surround AVC Digital Output Audio Language Move Setup menu Picture Audio Setup Channel Custom 57 50 0 Off Off RA W English Select MENU Exit Navigating the menus Press to the previous screen. Press to select menus, to adjust selected items, or...

User Manual (English)
Page 18
... your TV's input jacks. • Restore Default-Reset most TV settings for a device connected to your TV is in VGA mode. You can watch, based on industry ratings. • Time-Set the clock and sleep timer. • Closed Caption-Turn closed caption options. • Menu Settings-Set menu language and menu transparency. • VGA Settings-Lets you set closed captioning on -screen menu opens with the Picture menu displayed. Picture Mode Contrast Brightness Color T int Sharpness Backlight Advanced Video Move Picture Audio Custom Setup Channel 70 40 60 0 50 30 Select MENU Exit
... your TV's input jacks. • Restore Default-Reset most TV settings for a device connected to your TV is in VGA mode. You can watch, based on industry ratings. • Time-Set the clock and sleep timer. • Closed Caption-Turn closed caption options. • Menu Settings-Set menu language and menu transparency. • VGA Settings-Lets you set closed captioning on -screen menu opens with the Picture menu displayed. Picture Mode Contrast Brightness Color T int Sharpness Backlight Advanced Video Move Picture Audio Custom Setup Channel 70 40 60 0 50 30 Select MENU Exit

User Manual (English)
Page 19
...; Surround-Turns the surround sound effect on the remote one is broadcast in mono. Parental Controls T ime Closed Caption Menu Settings VGA Settings Input Label Restore Default Audio Only Move Picture Audio Setup Channel Off Select MENU Exit Sound Mode Bass Treble Balance Surround AVC Digital Output Audio Language Move Picture Audio Setup Channel Custom 57 50 0 Off Off RA W English Select MENU Exit 4 Press or to highlight Audio, then press . The VGA settings menu opens. Adjusting the sound Adjusting the sound To adjust the sound: 1 Press MENU. To select an audio track...
...; Surround-Turns the surround sound effect on the remote one is broadcast in mono. Parental Controls T ime Closed Caption Menu Settings VGA Settings Input Label Restore Default Audio Only Move Picture Audio Setup Channel Off Select MENU Exit Sound Mode Bass Treble Balance Surround AVC Digital Output Audio Language Move Picture Audio Setup Channel Custom 57 50 0 Off Off RA W English Select MENU Exit 4 Press or to highlight Audio, then press . The VGA settings menu opens. Adjusting the sound Adjusting the sound To adjust the sound: 1 Press MENU. To select an audio track...

User Manual (English)
Page 24
...close the menu. Turning the button lock on or off : 1 Press MENU. Picture Mode Contrast Brightness Color T int Sharpness Backlight Advanced Video Move Picture Audio Custom Setup Channel 70 40 60 0 50 30 Select MENU Exit Enter Password Picture Audio Setup _ _ _ _ Channel The default password is 0000. Move Select MENU Exit 6 Press the number buttons to enter the four-digit password. Setting parental controls DX-32L/37L/40L/46L 21 4 Press the number buttons to input old password, then input a new password. Enter Old Password Enter New Password Confirm Password...
...close the menu. Turning the button lock on or off : 1 Press MENU. Picture Mode Contrast Brightness Color T int Sharpness Backlight Advanced Video Move Picture Audio Custom Setup Channel 70 40 60 0 50 30 Select MENU Exit Enter Password Picture Audio Setup _ _ _ _ Channel The default password is 0000. Move Select MENU Exit 6 Press the number buttons to enter the four-digit password. Setting parental controls DX-32L/37L/40L/46L 21 4 Press the number buttons to input old password, then input a new password. Enter Old Password Enter New Password Confirm Password...

User Manual (English)
Page 30
... and menu transparency: 1 Press MENU. Parental Controls T ime Closed Caption Menu Settings VGA Settings Input Label Restore Default Audio Only Move Picture Audio Setup Channel Off Select MENU Exit 3 Press or to set the sleep timer. Adjusting menu settings Selecting the menu language and transparency To select the on -screen menu opens. Picture Mode Contrast Brightness Color T int Sharpness Backlight Advanced Video Move Picture Audio Custom Setup Channel 70 40 60 0 50 30 Select MENU Exit 2 Press or to highlight the hour, minute, or AM/PM field. Adjusting menu settings DX-32L...
... and menu transparency: 1 Press MENU. Parental Controls T ime Closed Caption Menu Settings VGA Settings Input Label Restore Default Audio Only Move Picture Audio Setup Channel Off Select MENU Exit 3 Press or to set the sleep timer. Adjusting menu settings Selecting the menu language and transparency To select the on -screen menu opens. Picture Mode Contrast Brightness Color T int Sharpness Backlight Advanced Video Move Picture Audio Custom Setup Channel 70 40 60 0 50 30 Select MENU Exit 2 Press or to highlight the hour, minute, or AM/PM field. Adjusting menu settings DX-32L...

User Manual (English)
Page 32
Parental Controls T ime Closed Caption Menu Settings VGA Settings Input Label Restore Default Audio Only Move Picture Audio Setup Channel Off Select MENU Exit 3 Press or to repair the TV yourself. Caution: Do not try to highlight Restore Default, then press ENTER. No color, dark picture, or color is not correct. • Make sure that the power cord is plugged in . • Make sure that the correct video input source is no obstructions between the remote control and the remote control sensor...
Parental Controls T ime Closed Caption Menu Settings VGA Settings Input Label Restore Default Audio Only Move Picture Audio Setup Channel Off Select MENU Exit 3 Press or to repair the TV yourself. Caution: Do not try to highlight Restore Default, then press ENTER. No color, dark picture, or color is not correct. • Make sure that the power cord is plugged in . • Make sure that the correct video input source is no obstructions between the remote control and the remote control sensor...

User Manual (English)
Page 33
... access parental controls, then set a new password. Some settings cannot be determined by turning the equipment off and on, the user is in accordance with the instructions, may cause harmful interference to the channel list. Weight and dimensions shown are extremely dirty, use a soft cloth dampened with Part 15 of the FCC Rules. This equipment generates, uses, and can radiate radio frequency energy and, if not installed and used...
... access parental controls, then set a new password. Some settings cannot be determined by turning the equipment off and on, the user is in accordance with the instructions, may cause harmful interference to the channel list. Weight and dimensions shown are extremely dirty, use a soft cloth dampened with Part 15 of the FCC Rules. This equipment generates, uses, and can radiate radio frequency energy and, if not installed and used...


