
User Manual (English)
Page 2
... Dynex DX-40L261A12 40" LCD TV Contents CHILD SAFETY 1 Important safety instructions 2 Warnings 2 Cautions 3 Installing the stand or wall-mount bracket 4 Installing the stand 4 Installing a wall-mount bracket 4 TV components 5 Package contents 5 Front 5 Back 5 Remote control 6 Making connections 7 What connection should I use 7 Connecting power 7 Connecting a cable or satellite box 8 Connecting an antenna or cable TV (no box 10 Connecting a DVD or Blu-ray player 11 Connecting a VCR 13 Connecting a camcorder or game console 13 Connecting a computer 14 Connecting headphones...
... Dynex DX-40L261A12 40" LCD TV Contents CHILD SAFETY 1 Important safety instructions 2 Warnings 2 Cautions 3 Installing the stand or wall-mount bracket 4 Installing the stand 4 Installing a wall-mount bracket 4 TV components 5 Package contents 5 Front 5 Back 5 Remote control 6 Making connections 7 What connection should I use 7 Connecting power 7 Connecting a cable or satellite box 8 Connecting an antenna or cable TV (no box 10 Connecting a DVD or Blu-ray player 11 Connecting a VCR 13 Connecting a camcorder or game console 13 Connecting a computer 14 Connecting headphones...

User Manual (English)
Page 3
... parental control levels 23 Downloading rating information 24 Blocking unrated TV 25 Using closed captioning 25 Selecting the analog closed captioning mode 25 Customizing digital closed captioning styles 26 Adjusting the aspect ratio 27 Setting the aspect ratio 27 Adjusting time settings 27 Setting the clock 27 Setting the sleep timer 28 Adjusting menu settings 28 Selecting the menu language 28 Changing the DPMS setting 29 Restoring settings to the defaults 29 Maintaining 29 Cleaning the TV cabinet 29 Cleaning the TV screen 29 Troubleshooting 30 Video and audio 30 Remote...
... parental control levels 23 Downloading rating information 24 Blocking unrated TV 25 Using closed captioning 25 Selecting the analog closed captioning mode 25 Customizing digital closed captioning styles 26 Adjusting the aspect ratio 27 Setting the aspect ratio 27 Adjusting time settings 27 Setting the clock 27 Setting the sleep timer 28 Adjusting menu settings 28 Selecting the menu language 28 Changing the DPMS setting 29 Restoring settings to the defaults 29 Maintaining 29 Cleaning the TV cabinet 29 Cleaning the TV screen 29 Troubleshooting 30 Video and audio 30 Remote...

User Manual (English)
Page 5
... route all cords and cables so that are not always supported on the proper stands or installed according to walls backed with entertainment system furniture and TVs. • Don't place TVs on or play with steel studs or cinder blocks. At least two people are required for your TV. • Follow all enclosed instructions for proper use your flat panel display As...
... route all cords and cables so that are not always supported on the proper stands or installed according to walls backed with entertainment system furniture and TVs. • Don't place TVs on or play with steel studs or cinder blocks. At least two people are required for your TV. • Follow all enclosed instructions for proper use your flat panel display As...
User Manual (English)
Page 9
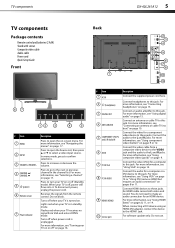
...to turn your TV on or off (Standby mode). For software update only. Receives the signals from the remote control. For more information, see "Turning your TV on page 10. Connect an antenna or cable TV to this jack. Connect the audio for a computer to this jack. Connect the audio to the L and R jacks. TV components TV components Package contents Remote control and batteries (2 AAA) Stand with screws Composite video cable Audio cable Power cord Quick Setup Guide Front Back DX-40L261A12 5 # Item 1 MENU 2 INPUT 3 VOLUME+/VOLUME- 4 CHANNEL / CHANNEL 5 (power) 6 Remote sensor...
...to turn your TV on or off (Standby mode). For software update only. Receives the signals from the remote control. For more information, see "Turning your TV on page 10. Connect an antenna or cable TV to this jack. Connect the audio for a computer to this jack. Connect the audio to the L and R jacks. TV components TV components Package contents Remote control and batteries (2 AAA) Stand with screws Composite video cable Audio cable Power cord Quick Setup Guide Front Back DX-40L261A12 5 # Item 1 MENU 2 INPUT 3 VOLUME+/VOLUME- 4 CHANNEL / CHANNEL 5 (power) 6 Remote sensor...
User Manual (English)
Page 10
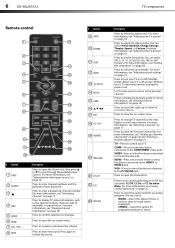
... VGA jack. VGA-Press to select the device connected to the AV IN video jack. Press to set the sleep timer. Press to enter a digital sub-channel number. In TV mode, press to return to select the aspect ratio. Press to open the channel list. Press to open the Favorite Channel list. 6 DX-40L261A12 TV components Remote control # Button 9 ZOOM 10 PICTURE 11 SLEEP 12 AUDIO 13 (power) 14 RECALL 15 GUIDE 16 17 EXIT 18 CH +/CH- 19 FAVORITE # Button 1 INPUT 2 Numbers 3 4 INFO 5 ENTER 6 MENU...
... VGA jack. VGA-Press to select the device connected to the AV IN video jack. Press to set the sleep timer. Press to enter a digital sub-channel number. In TV mode, press to return to select the aspect ratio. Press to open the channel list. Press to open the Favorite Channel list. 6 DX-40L261A12 TV components Remote control # Button 9 ZOOM 10 PICTURE 11 SLEEP 12 AUDIO 13 (power) 14 RECALL 15 GUIDE 16 17 EXIT 18 CH +/CH- 19 FAVORITE # Button 1 INPUT 2 Numbers 3 4 INFO 5 ENTER 6 MENU...
User Manual (English)
Page 13
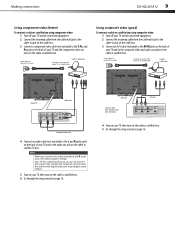
... digital audio output. 5 Turn on your TV and to match color-coded jacks. Your TV has a digital audio jack, so you connect the audio using composite video: 1 Turn off your TV and all connected equipment. 2 Connect the incoming cable from the cable wall jack to the cable-in jack on the cable TV or satellite box Using composite video (good) To connect a cable or satellite box using the L and R audio jacks, the audio output is analog. From cable TV wall jack (75 ohm) Cable or satellite box To Cable-in jack on the cable box. 3 Connect a component video cable...
... digital audio output. 5 Turn on your TV and to match color-coded jacks. Your TV has a digital audio jack, so you connect the audio using composite video: 1 Turn off your TV and all connected equipment. 2 Connect the incoming cable from the cable wall jack to the cable-in jack on the cable TV or satellite box Using composite video (good) To connect a cable or satellite box using the L and R audio jacks, the audio output is analog. From cable TV wall jack (75 ohm) Cable or satellite box To Cable-in jack on the cable box. 3 Connect a component video cable...
User Manual (English)
Page 19
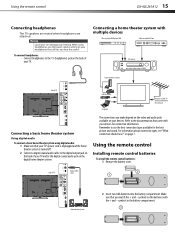
... TV USB flash drive Computer Antenna or cable TV connected directly to the wall jack Connecting a basic home theater system Using digital audio To connect a basic home theater system using headphones, use ?" Using the remote control DX-40L261A12 15 Connecting headphones The TV speakers are muted when headphones are attached. When using digital audio: 1 Make sure that came with your TV and to the digital output jack on the back of your devices for the best picture and sound. Refer to the documentation that your TV's power cord...
... TV USB flash drive Computer Antenna or cable TV connected directly to the wall jack Connecting a basic home theater system Using digital audio To connect a basic home theater system using headphones, use ?" Using the remote control DX-40L261A12 15 Connecting headphones The TV speakers are muted when headphones are attached. When using digital audio: 1 Make sure that came with your TV and to the digital output jack on the back of your devices for the best picture and sound. Refer to the documentation that your TV's power cord...

User Manual (English)
Page 20
.... To set up basic settings including the menu language, picture mode, TV signal source, and the channel list. Input TV AV Component VGA HDMI 1 HDMI 2 OK Selec t Exit 2 Press or to a cable or satellite box using a composite video cable, select AV. If chemicals touch your viewing area. The Setup Wizard guides you through setting up your TV: 1 Make sure that the power cord is connected to a power outlet. 2 Press (power) to turn on your TV is connected to a cable or satellite box using a component video cable, select Component...
.... To set up basic settings including the menu language, picture mode, TV signal source, and the channel list. Input TV AV Component VGA HDMI 1 HDMI 2 OK Selec t Exit 2 Press or to a cable or satellite box using a composite video cable, select AV. If chemicals touch your viewing area. The Setup Wizard guides you through setting up your TV: 1 Make sure that the power cord is connected to a power outlet. 2 Press (power) to turn on your TV is connected to a cable or satellite box using a component video cable, select Component...

User Manual (English)
Page 22
...MENU. The on -screen menu opens. By reducing the amount of images. If you manually adjust picture settings such as channel number, video input source, and resolution. • Digital channel information-Displays the channel number, station name, channel label, broadcast program name, TV rating, signal type, audio information, resolution, CC mode, current time, and current program start and end times. • Analog channel information-Displays channel number, channel label (if preset), signal type, audio information, and resolution. • Press GUIDE to turn off the sound. Adjusting...
...MENU. The on -screen menu opens. By reducing the amount of images. If you manually adjust picture settings such as channel number, video input source, and resolution. • Digital channel information-Displays the channel number, station name, channel label, broadcast program name, TV rating, signal type, audio information, resolution, CC mode, current time, and current program start and end times. • Analog channel information-Displays channel number, channel label (if preset), signal type, audio information, and resolution. • Press GUIDE to turn off the sound. Adjusting...
User Manual (English)
Page 34
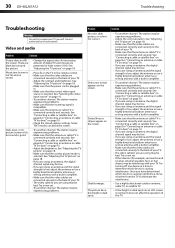
... picture (screen is good. • Change the aspect ratio. Try a new set . • Other devices (for example, surround sound receiver, external speakers, fans, or hair dryers) may be bad. See "Connecting a cable or satellite box" on page 10. • If you are using an antenna, the digital channel signal may be low. • If you are using an antenna and the signal strength is causing interference. Contact authorized service personnel. See "Adjusting...
... picture (screen is good. • Change the aspect ratio. Try a new set . • Other devices (for example, surround sound receiver, external speakers, fans, or hair dryers) may be bad. See "Connecting a cable or satellite box" on page 10. • If you are using an antenna, the digital channel signal may be low. • If you are using an antenna and the signal strength is causing interference. Contact authorized service personnel. See "Adjusting...

User Manual (English)
Page 35
... sure that the correct audio mode is selected. • Make sure that the audio cables are connected correctly and securely to view channels from the cable or satellite box. Problem Solution Trouble programming your existing universal remote control. • See instructions and a table of the speakers • Adjust the contrast, color, and brightness settings. • Other devices (for example, surround sound receiver, external speakers, fans, or hair dryers) may be accessed. Try turning off one device...
... sure that the correct audio mode is selected. • Make sure that the audio cables are connected correctly and securely to view channels from the cable or satellite box. Problem Solution Trouble programming your existing universal remote control. • See instructions and a table of the speakers • Adjust the contrast, color, and brightness settings. • Other devices (for example, surround sound receiver, external speakers, fans, or hair dryers) may be accessed. Try turning off one device...

User Manual (English)
Page 37
... lbs. (14 kg) With stand: 34.1 lbs. (15.5 kg) DX-40L261A12 Screen size measured diagonally Display type Panel 60 Hz vs.120 Hz Display resolution Panel resolution 40" LCD 60Hz 1080p 1920 (H) × 1080 (V) Aspect ratio Contrast ratio (typical)-panel Brightness (center typical) cd/m2 Comb filter Response time 16:9 2000:1 400 nits 3d y/c digital 8 ms Horizontal viewing angle 178 Vertical viewing angle 178 Display resolutions/VGA scan rates HDMI 1.3 Component video PC/VGA Tuner DX-40L261A12 Suggested Resolutions: 1080p, 1080i, 720p, 480p...
... lbs. (14 kg) With stand: 34.1 lbs. (15.5 kg) DX-40L261A12 Screen size measured diagonally Display type Panel 60 Hz vs.120 Hz Display resolution Panel resolution 40" LCD 60Hz 1080p 1920 (H) × 1080 (V) Aspect ratio Contrast ratio (typical)-panel Brightness (center typical) cd/m2 Comb filter Response time 16:9 2000:1 400 nits 3d y/c digital 8 ms Horizontal viewing angle 178 Vertical viewing angle 178 Display resolutions/VGA scan rates HDMI 1.3 Component video PC/VGA Tuner DX-40L261A12 Suggested Resolutions: 1080p, 1080i, 720p, 480p...

User Manual (English)
Page 38
... visible on the back. • If your universal remote control isn't listed on the front of the universal remote control, and the model number is a list of the remote/set-top box you found in Step 1. You may need a different remote control code, visit www.dynexproducts.com/remotecodes for the remote control code. For additional help and information... 1. 34 DX-40L261A12 Programming universal remote controls Programming universal remote controls Programming a universal remote control You can manually program it using the Dynex TV remote to "teach" the commands one at : www...
... visible on the back. • If your universal remote control isn't listed on the front of the universal remote control, and the model number is a list of the remote/set-top box you found in Step 1. You may need a different remote control code, visit www.dynexproducts.com/remotecodes for the remote control code. For additional help and information... 1. 34 DX-40L261A12 Programming universal remote controls Programming universal remote controls Programming a universal remote control You can manually program it using the Dynex TV remote to "teach" the commands one at : www...
Quick Setup Guide (English)
Page 1
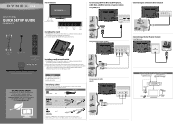
.../VIDEO OUT 2 Remove the four screws that secure the base to the TV, then remove the base. 3 Attach the wall-mount bracket to protect the screen from damages and scratches. 2 Secure the stand to correctly hang your model number in the box but is available online. For the best video quality, connect a device to www.dynexproducts.com, click Support & Service. Using composite cables (good) AUDIO/VIDEO OUT COMPONENT IN Connecting an antenna/cable wall jack COMPONENT IN IANNTENONUA T Connecting a Home Theater System Using Digital audio DIGITAL OUTPUT DIGITAL AUDIO IN Connecting a home...
.../VIDEO OUT 2 Remove the four screws that secure the base to the TV, then remove the base. 3 Attach the wall-mount bracket to protect the screen from damages and scratches. 2 Secure the stand to correctly hang your model number in the box but is available online. For the best video quality, connect a device to www.dynexproducts.com, click Support & Service. Using composite cables (good) AUDIO/VIDEO OUT COMPONENT IN Connecting an antenna/cable wall jack COMPONENT IN IANNTENONUA T Connecting a Home Theater System Using Digital audio DIGITAL OUTPUT DIGITAL AUDIO IN Connecting a home...

Quick Setup Guide (English)
Page 2
..., click Support & Service. Input Opens the Input Source list. Aspect ratio options Normal: Displays the original 4:3 aspect ratio with your remote or need a different remote control code, visit http://www.dynexproducts.com/remotecodes for available channels. Enter a digital sub-channel number. (Example: 4.1) INFO Opens a TV status banner. The power indicator turns off and the Choose your TV is connected to select the video input source for analog programs. CH-LIST Opens the channel list. For example, select HDMI if your menu Language screen opens...
..., click Support & Service. Input Opens the Input Source list. Aspect ratio options Normal: Displays the original 4:3 aspect ratio with your remote or need a different remote control code, visit http://www.dynexproducts.com/remotecodes for available channels. Enter a digital sub-channel number. (Example: 4.1) INFO Opens a TV status banner. The power indicator turns off and the Choose your TV is connected to select the video input source for analog programs. CH-LIST Opens the channel list. For example, select HDMI if your menu Language screen opens...
Important Info (English)
Page 2
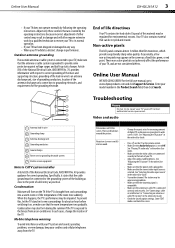
ii Dynex DX-40L261A12 40" LCD TV Contents CHILD SAFETY 1 Important safety instructions 2 Warnings 2 Cautions 2 Online User Manual 3 Troubleshooting 3 Video and audio 3 Remote control 5 General 5 Maintenance 5 Cleaning 5 Specifications 6 Legal notices 7 One-year limited warranty 9 US and Canada Markets 9 Online User Manual WE ARE GOING GREEN! A copy of your model number in the box but is available online. Click Support/Downloads. Go to www.dynexproducts.com, click Support & Service, enter your User Guide is not provided in the Product Search field, then press ENTER.
ii Dynex DX-40L261A12 40" LCD TV Contents CHILD SAFETY 1 Important safety instructions 2 Warnings 2 Cautions 2 Online User Manual 3 Troubleshooting 3 Video and audio 3 Remote control 5 General 5 Maintenance 5 Cleaning 5 Specifications 6 Legal notices 7 One-year limited warranty 9 US and Canada Markets 9 Online User Manual WE ARE GOING GREEN! A copy of your model number in the box but is available online. Click Support/Downloads. Go to www.dynexproducts.com, click Support & Service, enter your User Guide is not provided in the Product Search field, then press ENTER.
Important Info (English)
Page 5
... system installer Article 820 of digital TV and movies are black bars around the picture. • Change the aspect ratio. See "Adjusting the TV picture" in the online User Guide. • Check the closed caption settings. Enter your TV yourself. Condensation Moisture will often require extensive work by following the operating instructions. Condensation may appear on the TV if the TV is selected. Some TEXT modes can be experiencing problems. •...
... system installer Article 820 of digital TV and movies are black bars around the picture. • Change the aspect ratio. See "Adjusting the TV picture" in the online User Guide. • Check the closed caption settings. Enter your TV yourself. Condensation Moisture will often require extensive work by following the operating instructions. Condensation may appear on the TV if the TV is selected. Some TEXT modes can be experiencing problems. •...

Important Info (English)
Page 6
... correct picture mode is selected. Try a new set . Turn off one or more devices. See "Connecting a cable or satellite box" or "Connecting an antenna or cable TV (no box)" in the online User Guide. • Make sure that the antenna or cable TV is connected correctly and securely. Once you are connected correctly and securely to eliminate the interference. 4 DX-40L261A12 Troubleshooting Problem Solution Dark, poor, or no picture (screen is lit), but poor color • Adjust...
... correct picture mode is selected. Try a new set . Turn off one or more devices. See "Connecting a cable or satellite box" or "Connecting an antenna or cable TV (no box)" in the online User Guide. • Make sure that the antenna or cable TV is connected correctly and securely. Once you are connected correctly and securely to eliminate the interference. 4 DX-40L261A12 Troubleshooting Problem Solution Dark, poor, or no picture (screen is lit), but poor color • Adjust...
Important Info (English)
Page 7
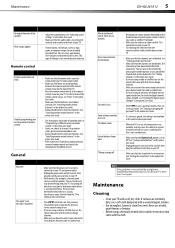
... damage is not covered by pressing the number buttons or you are connected correctly and securely to the User Guide that the sleep timer is not a malfunction. See "Hiding channels" in the online User Guide. • Refer to the back of common codes in "Programming a different universal remote control" in the current video input mode. Maintenance DX-40L261A12 5 Problem Solution No output from the cable or satellite box. Some settings cannot be interfering with your TV...
... damage is not covered by pressing the number buttons or you are connected correctly and securely to the User Guide that the sleep timer is not a malfunction. See "Hiding channels" in the online User Guide. • Refer to the back of common codes in "Programming a different universal remote control" in the current video input mode. Maintenance DX-40L261A12 5 Problem Solution No output from the cable or satellite box. Some settings cannot be interfering with your TV...

Important Info (English)
Page 8
... Clear-QAM Inputs Outputs DX-40L261A12 HDMI/DVI 2 (side) E-EDID compliant HDCP compliant Component video 1 (side) Composite video 1 (side) Shared audio (component No and composite) S-Video No PC/VGA 1 (side) 3.5mm PC audio input 1 (side) USB 1 (side) Supports firmware upgrade only Audio Video Analog audio Digital audio WiFi Ethernet Headphone DX-40L261A12 No No 1 (side) No No 1 (side) Power DX-40L261A12 Simulated Surround Sound Audyssey Dynamic Volume Sound Leveler Watts/Channel Number of Speakers No No Yes 8 W x 2 2 DX-40L261A12 Power consumption Power input On...
... Clear-QAM Inputs Outputs DX-40L261A12 HDMI/DVI 2 (side) E-EDID compliant HDCP compliant Component video 1 (side) Composite video 1 (side) Shared audio (component No and composite) S-Video No PC/VGA 1 (side) 3.5mm PC audio input 1 (side) USB 1 (side) Supports firmware upgrade only Audio Video Analog audio Digital audio WiFi Ethernet Headphone DX-40L261A12 No No 1 (side) No No 1 (side) Power DX-40L261A12 Simulated Surround Sound Audyssey Dynamic Volume Sound Leveler Watts/Channel Number of Speakers No No Yes 8 W x 2 2 DX-40L261A12 Power consumption Power input On...


