
Warranty (English)
Page 1
... you. This warranty does not cover: • Customer instruction • Installation • Set up adjustments • Cosmetic damage • Damage due to acts of God, such as lightning strikes • Accident • Misuse • Abuse • Negligence • Commercial use • Modification of any part of the product • Plasma display panel damaged by an authorized Dynex repair center or store...
... you. This warranty does not cover: • Customer instruction • Installation • Set up adjustments • Cosmetic damage • Damage due to acts of God, such as lightning strikes • Accident • Misuse • Abuse • Negligence • Commercial use • Modification of any part of the product • Plasma display panel damaged by an authorized Dynex repair center or store...

User Manual (English)
Page 2
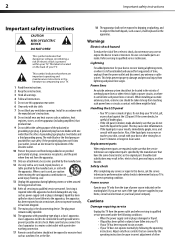
ii Dynex DX-L15-L19-L22-10A 15", 19", and 22" LCD TVs Contents Child Safety 1 Important safety instructions 2 Warnings 2 Cautions 2 Installing and removing the stand 3 Installing the stand 3 Adjusting the viewing angle of the TV 4 Removing the stand 4 Installing a wall-mount bracket 4 TV components 5 Front 5 Side 5 Back 5 Remote control 6 Using the remote control 7 Installing remote control batteries 7 Aiming the remote control 7 Programming a universal remote control to work with your TV 7 Making connections 8 Connecting the power 8 Connecting an antenna, cable TV, or ...
ii Dynex DX-L15-L19-L22-10A 15", 19", and 22" LCD TVs Contents Child Safety 1 Important safety instructions 2 Warnings 2 Cautions 2 Installing and removing the stand 3 Installing the stand 3 Adjusting the viewing angle of the TV 4 Removing the stand 4 Installing a wall-mount bracket 4 TV components 5 Front 5 Side 5 Back 5 Remote control 6 Using the remote control 7 Installing remote control batteries 7 Aiming the remote control 7 Programming a universal remote control to work with your TV 7 Making connections 8 Connecting the power 8 Connecting an antenna, cable TV, or ...
User Manual (English)
Page 3
...DTV signal strength 18 Setting parental controls 18 Turning parental controls on or off 18 Setting or changing the password 19 Setting parental control levels 20 Downloading rating information 21 Using closed captioning 22 Turning closed captioning on or off 22 Selecting the closed captioning mode 22 Customizing DTV closed captioning styles 23 Adjusting time settings 24 Setting the clock 24 Setting the sleep timer 24 Adjusting menu settings 25 Selecting the menu language and transparency 25 Labeling an input source 26 Restoring default settings 26 Troubleshooting 27 Video and...
...DTV signal strength 18 Setting parental controls 18 Turning parental controls on or off 18 Setting or changing the password 19 Setting parental control levels 20 Downloading rating information 21 Using closed captioning 22 Turning closed captioning on or off 22 Selecting the closed captioning mode 22 Customizing DTV closed captioning styles 23 Adjusting time settings 24 Setting the clock 24 Setting the sleep timer 24 Adjusting menu settings 25 Selecting the menu language and transparency 25 Labeling an input source 26 Restoring default settings 26 Troubleshooting 27 Video and...

User Manual (English)
Page 4
... all . Wall mounting If you decide to wall mount your TV, always: • Use only a wall mount rated for proper use your flat panel display As you enjoy your new product, keep these safety tips in this manual, or otherwise listed by this product. • Don't let children climb on or play with steel studs or cinder blocks. Some wall mounts are unsure, ask a professional installer. • TVs can...
... all . Wall mounting If you decide to wall mount your TV, always: • Use only a wall mount rated for proper use your flat panel display As you enjoy your new product, keep these safety tips in this manual, or otherwise listed by this product. • Don't let children climb on or play with steel studs or cinder blocks. Some wall mounts are unsure, ask a professional installer. • TVs can...
User Manual (English)
Page 5
... power cord from lightning and power line surges. Handling the LCD panel • Your TV's screen is required when the apparatus has been damaged in correct operating condition. Replacement parts When replacement parts are required, make absolutely sure that you connect the class I apparatus to a mains socket outlet with a protective earthing connection. 17 Remote control batteries should be exposed to qualified service personnel under the following the operating instructions. Install...
... power cord from lightning and power line surges. Handling the LCD panel • Your TV's screen is required when the apparatus has been damaged in correct operating condition. Replacement parts When replacement parts are required, make absolutely sure that you connect the class I apparatus to a mains socket outlet with a protective earthing connection. 17 Remote control batteries should be exposed to qualified service personnel under the following the operating instructions. Install...

User Manual (English)
Page 6
... antenna or cable system is grounded to provide some protection against voltage surges and built-up static charges. When using a table or bench as a fixed blue, green, or red point. In such cases, change in performance. End of life directives Your TV contains tin-lead solder and a fluorescent lamp containing a small amount of your TV very carefully when attempting assembly or removal...
... antenna or cable system is grounded to provide some protection against voltage surges and built-up static charges. When using a table or bench as a fixed blue, green, or red point. In such cases, change in performance. End of life directives Your TV contains tin-lead solder and a fluorescent lamp containing a small amount of your TV very carefully when attempting assembly or removal...

User Manual (English)
Page 7
... a wall-mount bracket: Warning: These servicing instructions are qualified to the back of the stand together and push them into the stand column, then pull the stand off the stand. Removing the stand To remove the stand from your TV is not scratched). 2 Adjust the stand so that your TV is not scratched). Installing and removing the stand 3 Press the two black tabs on a table or bench. Stand Remove four screws 2 Remove the four screws holding the TV...
... a wall-mount bracket: Warning: These servicing instructions are qualified to the back of the stand together and push them into the stand column, then pull the stand off the stand. Removing the stand To remove the stand from your TV is not scratched). 2 Adjust the stand so that your TV is not scratched). Installing and removing the stand 3 Press the two black tabs on a table or bench. Stand Remove four screws 2 Remove the four screws holding the TV...

User Manual (English)
Page 8
... the channel list. For more information, see "Connecting an antenna, cable TV, or satellite TV box" on page 8. For more information, see "Connecting a component video device" on . TV components 5 TV components Back Front Model DX-L15-10A is used in standby mode. Do not use . Match the color of the jacks (yellow for video, red for audio right, and white for illustration purposes. # Component Description 1 Remote sensor Receives signals from the device to the audio jacks. Connect an HDMI device, such as a cable box or DVD player, to the color...
... the channel list. For more information, see "Connecting an antenna, cable TV, or satellite TV box" on page 8. For more information, see "Connecting a component video device" on . TV components 5 TV components Back Front Model DX-L15-10A is used in standby mode. Do not use . Match the color of the jacks (yellow for video, red for audio right, and white for illustration purposes. # Component Description 1 Remote sensor Receives signals from the device to the audio jacks. Connect an HDMI device, such as a cable box or DVD player, to the color...
User Manual (English)
Page 9
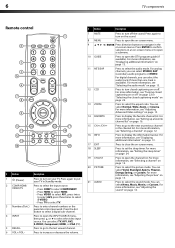
... the sound. For more information, see "Selecting a channel" on page 24. 6 TV components Remote control INFO # Button Description 1 (Power) Press to turn on page 13. 11 MTS/SAP 12 CCD Press to select the audio mode. Press again to enter channel numbers or the parental control password. You can select Normal, Wide, Zoom, or Cinema. Press ENTER to confirm selections in Standby mode. 2 COMP/HDMI/ VIDEO/TV Press to select the input source...
... the sound. For more information, see "Selecting a channel" on page 24. 6 TV components Remote control INFO # Button Description 1 (Power) Press to turn on page 13. 11 MTS/SAP 12 CCD Press to select the audio mode. Press again to enter channel numbers or the parental control password. You can select Normal, Wide, Zoom, or Cinema. Press ENTER to confirm selections in Standby mode. 2 COMP/HDMI/ VIDEO/TV Press to select the input source...
User Manual (English)
Page 10
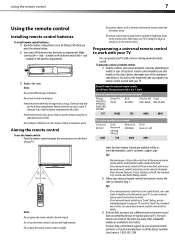
... the battery compartment. Dynex TV codes for universal remote controls (for all else fails, you must use a different universal remote control that can manually program it using your TV remote to work if direct sunlight or bright light shines on the front of the numbered code below , then make note of the universal remote control, and the model number is often visible on the remote sensor. For more help, call technical support for your universal remote control or set-top box manufacturer, or...
... the battery compartment. Dynex TV codes for universal remote controls (for all else fails, you must use a different universal remote control that can manually program it using your TV remote to work if direct sunlight or bright light shines on the front of the numbered code below , then make note of the universal remote control, and the model number is often visible on the remote sensor. For more help, call technical support for your universal remote control or set-top box manufacturer, or...
User Manual (English)
Page 11
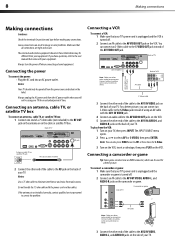
... power cord from the VCR: 1 Turn on your TV for a better picture. You can result in these illustrations may be operated from radio waves. Note: You can connect an S-Video cable to the AV2 IN VIDEO, AUDIO-L, and AUDIO-R jacks on the side of using your TV, then press INPUT. Connect yellow to yellow, red to red, and white to select AV1 or S-VIDEO, then press ENTER. Connecting an antenna, cable TV, or satellite TV box...
... power cord from the VCR: 1 Turn on your TV for a better picture. You can result in these illustrations may be operated from radio waves. Note: You can connect an S-Video cable to the AV2 IN VIDEO, AUDIO-L, and AUDIO-R jacks on the side of using your TV, then press INPUT. Connect yellow to yellow, red to red, and white to select AV1 or S-VIDEO, then press ENTER. Connecting an antenna, cable TV, or satellite TV box...
User Manual (English)
Page 12
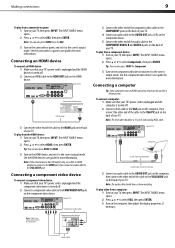
... external device has DVI output only, use a DVI-to-HDMI adapter to connect to the HDMI jack, then connect an audio cable to select Component, then press ENTER. Audio cable Back of TV Device with HDMI output HDMI cable 3 Connect the other end of the cable to the correct output mode. Making connections 9 To play from a camcorder or game: 1 Turn on the HDMI device. To play from a component device: 1 Turn on the component video device. Connecting a component video device To connect a component video device: 1 Make sure that your TV's power cord...
... external device has DVI output only, use a DVI-to-HDMI adapter to connect to the HDMI jack, then connect an audio cable to select Component, then press ENTER. Audio cable Back of TV Device with HDMI output HDMI cable 3 Connect the other end of the cable to the correct output mode. Making connections 9 To play from a camcorder or game: 1 Turn on the HDMI device. To play from a component device: 1 Turn on the component video device. Connecting a component video device To connect a component video device: 1 Make sure that your TV's power cord...
User Manual (English)
Page 13
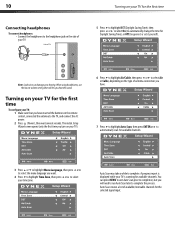
... remote control, connected the antenna to complete the process. A progress report is scanning for the selected signal input. 10 Turning on your TV for the first time Connecting headphones To connect headphones: • Connect the headphones to complete. Turning on your TV is displayed while your TV). 6 Press to highlight Air/Cable, then press or to select Air or Cable, depending on the type of your TV. You can damage your time...
... remote control, connected the antenna to complete the process. A progress report is scanning for the selected signal input. 10 Turning on your TV for the first time Connecting headphones To connect headphones: • Connect the headphones to complete. Turning on your TV is displayed while your TV). 6 Press to highlight Air/Cable, then press or to select Air or Cable, depending on the type of your TV. You can damage your time...
User Manual (English)
Page 15
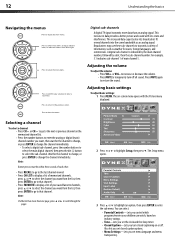
... enter the analog or digital (main) channel number you turn off . Also lets you set closed captioning on -screen menu opens with less static and interference. Press to select menu items, to adjust selected items, or move on the memorized channel list. • Press the number buttons to display a list of main channel 5. Adjusting basic settings To adjust basic settings: 1 Press MENU. The on or off all sound. Digital sub-channels A digital TV signal transmits more than an analog signal. A digital sub-channel is...
... enter the analog or digital (main) channel number you turn off . Also lets you set closed captioning on -screen menu opens with less static and interference. Press to select menu items, to adjust selected items, or move on the memorized channel list. • Press the number buttons to display a list of main channel 5. Adjusting basic settings To adjust basic settings: 1 Press MENU. The on or off all sound. Digital sub-channels A digital TV signal transmits more than an analog signal. A digital sub-channel is...
User Manual (English)
Page 16
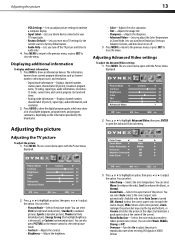
..., TV rating, signal type, audio information, resolution, CC mode, current time, and current program start and end times. • Analog mode information-Displays channel number, channel label (if preset), signal type, audio information, and resolution. 2 Press GUIDE to show an information banner. The on the information provided by the broadcaster. You can select Auto (selects the correct aspect ratio automatically. You can also press PICTURE on -screen menu opens with the Picture menu displayed. The on the remote control...
..., TV rating, signal type, audio information, resolution, CC mode, current time, and current program start and end times. • Analog mode information-Displays channel number, channel label (if preset), signal type, audio information, and resolution. 2 Press GUIDE to show an information banner. The on the information provided by the broadcaster. You can select Auto (selects the correct aspect ratio automatically. You can also press PICTURE on -screen menu opens with the Picture menu displayed. The on the remote control...

User Manual (English)
Page 18
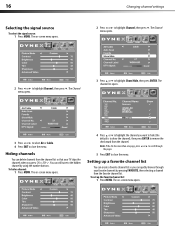
... audio program, if available. Notes: Audio Only works only when the input source is receiving a broadcast signal. Playing TV audio only You can select: • MONO-Select this option if there is broadcast in stereo. • SAP-Select this option to listen to start the scan. To exit Audio Only mode, press any button. Parental Controls 3 Press or to select Air or Cable. 4 Press or to close the menu. The Channel menu...
... audio program, if available. Notes: Audio Only works only when the input source is receiving a broadcast signal. Playing TV audio only You can select: • MONO-Select this option if there is broadcast in stereo. • SAP-Select this option to listen to start the scan. To exit Audio Only mode, press any button. Parental Controls 3 Press or to select Air or Cable. 4 Press or to close the menu. The Channel menu...
User Manual (English)
Page 19
... select Air or Cable. 4 Press EXIT to close the menu. To hide a channel: 1 Press MENU. Changing channel settings 2 Press or to remove the check mark from the channel list so that your favorite channels by using the number buttons. The on -screen menu opens. The on-screen menu opens. 4 Press or to highlight the channel you can delete channels from the channel. Setting up the favorite channel list: 1 Press MENU. Hiding channels You can quickly browse through the...
... select Air or Cable. 4 Press EXIT to close the menu. To hide a channel: 1 Press MENU. Changing channel settings 2 Press or to remove the check mark from the channel list so that your favorite channels by using the number buttons. The on -screen menu opens. The on-screen menu opens. 4 Press or to highlight the channel you can delete channels from the channel. Setting up the favorite channel list: 1 Press MENU. Hiding channels You can quickly browse through the...

User Manual (English)
Page 30
... "Installing remote control batteries" on page 8. • Adjust the color saturation. You can add the channel back to the channel list. TV type LCD TV panel 15-inch (DX-L15-10A) TFT LCD 19-inch (DX-L19-10A) TFT LCD TV system Channels 22-inch (DX-L22-10A) TFT LCD NTSC-M, ATSC VHF: 2 - 13 UHF: 14 - 69 CATV: 1 - 125 CADTV: 1-135 DTV: 2 - 69 Audio multiplex BTSC system Audio output 3W × 2 Power requirement AC 120 V, 60 Hz For more information, see "Adjusting the picture" on...
... "Installing remote control batteries" on page 8. • Adjust the color saturation. You can add the channel back to the channel list. TV type LCD TV panel 15-inch (DX-L15-10A) TFT LCD 19-inch (DX-L19-10A) TFT LCD TV system Channels 22-inch (DX-L22-10A) TFT LCD NTSC-M, ATSC VHF: 2 - 13 UHF: 14 - 69 CATV: 1 - 125 CADTV: 1-135 DTV: 2 - 69 Audio multiplex BTSC system Audio output 3W × 2 Power requirement AC 120 V, 60 Hz For more information, see "Adjusting the picture" on...

User Manual (English)
Page 31
... lbs. (4 kg) - 19" 10 lbs. (4.5 kg) - 22" Composite video/left and right audio (2) S-Video (1) Component video/left and right audio (1) HDMI (1) VGA/audio (1) Antenna (1) Headphone jack (1) RS-232 (1) Service Port (1) Legal notices FCC Part 15 This device complies with the FCC Rules could void the user's authority to operate this equipment. FCC warning Changes or modifications not expressly approved by turning the equipment off and on a circuit...
... lbs. (4 kg) - 19" 10 lbs. (4.5 kg) - 22" Composite video/left and right audio (2) S-Video (1) Component video/left and right audio (1) HDMI (1) VGA/audio (1) Antenna (1) Headphone jack (1) RS-232 (1) Service Port (1) Legal notices FCC Part 15 This device complies with the FCC Rules could void the user's authority to operate this equipment. FCC warning Changes or modifications not expressly approved by turning the equipment off and on a circuit...

User Manual (English)
Page 32
... service, terms of this warranty apply. Where is a trademark of Best Buy Enterprise Services, Inc. Products and parts replaced under this warranty become the property of Dynex and are required after the Warranty Period expires, you . Make sure that you place the Product in the United States, Canada, and Mexico. This warranty does not cover: • Customer instruction • Installation • Set up adjustments...
... service, terms of this warranty apply. Where is a trademark of Best Buy Enterprise Services, Inc. Products and parts replaced under this warranty become the property of Dynex and are required after the Warranty Period expires, you . Make sure that you place the Product in the United States, Canada, and Mexico. This warranty does not cover: • Customer instruction • Installation • Set up adjustments...


