
Warranty (English)
Page 1
... use • Modification of any part of the product • Plasma display panel damaged by an authorized Dynex repair center or store personnel, Dynex will have an Insignia-approved repair person dispatched to acts of Dynex and are required after the Warranty Period expires, you sell or otherwise transfer the product. This warranty does not cover: • Customer instruction • Installation • Set up adjustments...
... use • Modification of any part of the product • Plasma display panel damaged by an authorized Dynex repair center or store personnel, Dynex will have an Insignia-approved repair person dispatched to acts of Dynex and are required after the Warranty Period expires, you sell or otherwise transfer the product. This warranty does not cover: • Customer instruction • Installation • Set up adjustments...

User Manual (English)
Page 2
...-L42-10A 37" and 42" LCD TVs Contents Child Safety 1 Important safety instructions 2 Warnings 2 Cautions 2 Installing and removing the stand 3 Installing the stand 3 Installing a wall-mount bracket 4 TV components 4 Front 4 Side 4 Back 5 Remote control 5 Using the remote control 6 Installing remote control batteries 6 Aiming the remote control 6 Programming a universal remote control to work with your TV 7 Making connections 7 Connecting the power 7 Connecting an antenna, cable TV, or satellite TV box 7 Connecting a VCR 8 Connecting a camcorder or game 8 Connecting an HDMI...
...-L42-10A 37" and 42" LCD TVs Contents Child Safety 1 Important safety instructions 2 Warnings 2 Cautions 2 Installing and removing the stand 3 Installing the stand 3 Installing a wall-mount bracket 4 TV components 4 Front 4 Side 4 Back 5 Remote control 5 Using the remote control 6 Installing remote control batteries 6 Aiming the remote control 6 Programming a universal remote control to work with your TV 7 Making connections 7 Connecting the power 7 Connecting an antenna, cable TV, or satellite TV box 7 Connecting a VCR 8 Connecting a camcorder or game 8 Connecting an HDMI...

User Manual (English)
Page 3
...DTV signal strength 18 Setting parental controls 18 Turning parental controls on or off 18 Setting or changing the password 19 Setting parental control levels 20 Downloading rating information 21 Using closed captioning 22 Turning closed captioning on or off 22 Selecting the closed captioning mode 22 Customizing DTV closed captioning styles 23 Adjusting time settings 24 Setting the clock 24 Setting the sleep timer 25 Adjusting menu settings 25 Selecting the menu language and transparency 25 Labeling an input source 26 Restoring default settings 26 Troubleshooting 27 Video and...
...DTV signal strength 18 Setting parental controls 18 Turning parental controls on or off 18 Setting or changing the password 19 Setting parental control levels 20 Downloading rating information 21 Using closed captioning 22 Turning closed captioning on or off 22 Selecting the closed captioning mode 22 Customizing DTV closed captioning styles 23 Adjusting time settings 24 Setting the clock 24 Setting the sleep timer 25 Adjusting menu settings 25 Selecting the menu language and transparency 25 Labeling an input source 26 Restoring default settings 26 Troubleshooting 27 Video and...

User Manual (English)
Page 4
... wall mount installation. Tune into safety • One size of TV stand does not fit all cords and cables so that children can be mounted to be heavy. One size of wall mount does not fit all. • Follow all instructions supplied by the TV and wall mount manufacturers. • If you have any doubts about your ability to wall mount your TV, always: • Use only a wall mount rated for proper use your flat panel display...
... wall mount installation. Tune into safety • One size of TV stand does not fit all cords and cables so that children can be mounted to be heavy. One size of wall mount does not fit all. • Follow all instructions supplied by the TV and wall mount manufacturers. • If you have any doubts about your ability to wall mount your TV, always: • Use only a wall mount rated for proper use your flat panel display...

User Manual (English)
Page 5
... be connected to earth ground wire to your home, consult an electrician or your device receiver during lightning storms or when unused for long periods of time. 14 Refer all instructions. 5 Do not use this TV from the type of fire or electric shock, do not touch the liquid in correct operating condition. Handling the LCD panel • Your TV's screen is located...
... be connected to earth ground wire to your home, consult an electrician or your device receiver during lightning storms or when unused for long periods of time. 14 Refer all instructions. 5 Do not use this TV from the type of fire or electric shock, do not touch the liquid in correct operating condition. Handling the LCD panel • Your TV's screen is located...

User Manual (English)
Page 6
... AC power cord. To prevent this installation. If you must be regulated for about an hour before attempting this , let the TV stand in your TV. Secure the stand to the point of a table or bench. If you intend to mount your TV on a soft cushion or cloth so that your TV is connected to support the weight of these instructions thoroughly before switching it on a wall...
... AC power cord. To prevent this installation. If you must be regulated for about an hour before attempting this , let the TV stand in your TV. Secure the stand to the point of a table or bench. If you intend to mount your TV on a soft cushion or cloth so that your TV is connected to support the weight of these instructions thoroughly before switching it on a wall...
User Manual (English)
Page 7
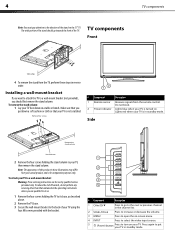
... the operating instructions unless you should go to turn on -screen menu. 4 INPUT Press to select the video input source. 5 (Power) button Press to the next or previous channel in standby mode. The wide portion of the stand should first remove the stand column. Installing a wall-mount bracket If you put your TV, then remove the stand column. Note: The appearance of this product in these steps in standby mode. Lights red when your TV. Side Remove the stand column Stand column 2 Remove...
... the operating instructions unless you should go to turn on -screen menu. 4 INPUT Press to select the video input source. 5 (Power) button Press to the next or previous channel in standby mode. The wide portion of the stand should first remove the stand column. Installing a wall-mount bracket If you put your TV, then remove the stand column. Note: The appearance of this product in these steps in standby mode. Lights red when your TV. Side Remove the stand column Stand column 2 Remove...

User Manual (English)
Page 8
... a digital sound system jack to play your TV's audio through the sound system. Remote control # Component Description 1 Service port For software update only. Do not use . 2 DIGITAL OUTPUT Connect this jack. Press again to put your TV. TV components Back AC IN SERVICE PORT DIGITAL OUTPUT 5 # Component 12 HDMI3 jack 13 Headphone jack Description Connect an HDMI device, such as a cable box or DVD player, to these jacks. For more information, see "Connecting an HDMI device" on your TV in Standby mode. For more information, see "Connecting a component video...
... a digital sound system jack to play your TV's audio through the sound system. Remote control # Component Description 1 Service port For software update only. Do not use . 2 DIGITAL OUTPUT Connect this jack. Press again to put your TV. TV components Back AC IN SERVICE PORT DIGITAL OUTPUT 5 # Component 12 HDMI3 jack 13 Headphone jack Description Connect an HDMI device, such as a cable box or DVD player, to these jacks. For more information, see "Connecting an HDMI device" on your TV in Standby mode. For more information, see "Connecting a component video...

User Manual (English)
Page 9
... the audio mode" on the front of your TV. 16.4 ft (5m) Notes: Do not expose the remote control to select the video input source. symbols on page 14. Do not dispose of them as furniture, between the remote control and the remote sensor. Do not use the remote control for an extended amount of batteries. Press again to turn closed captioning on or off the sound. For digital channels, you...
... the audio mode" on the front of your TV. 16.4 ft (5m) Notes: Do not expose the remote control to select the video input source. symbols on page 14. Do not dispose of them as furniture, between the remote control and the remote sensor. Do not use the remote control for an extended amount of batteries. Press again to turn closed captioning on or off the sound. For digital channels, you...

User Manual (English)
Page 10
... numbered code to program your remote control to the user manual that matches your TV. Always turn the power off when connecting external equipment. The AC plug may be using your equipment. Notes: Use a 75 ohm cable to the RF OUT jack on the antenna or on the back of your TV with a new or existing universal remote control. Making connections 7 The remote control may not work with your TV You can operate your TV. To program a universal remote control: 1 Find the code...
... numbered code to program your remote control to the user manual that matches your TV. Always turn the power off when connecting external equipment. The AC plug may be using your equipment. Notes: Use a 75 ohm cable to the RF OUT jack on the antenna or on the back of your TV with a new or existing universal remote control. Making connections 7 The remote control may not work with your TV You can operate your TV. To program a universal remote control: 1 Find the code...

User Manual (English)
Page 11
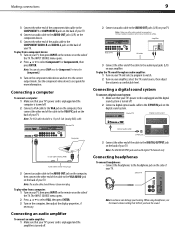
... INPUT SOURCE menu opens. Back of TV AV1 IN VIDEO Back of your TV. S-Video cable 3 Connect the other end of TV Note: Cables are often color-coded to white. Side of the cable to the correct output mode. Connecting a component video device To connect a component video device: 1 Make sure that your TV's power cord is unplugged and the HDMI device is turned off . 2 Connect an HDMI cable to the HDMI OUT jack on the HDMI device, and set it to connectors. Connecting a camcorder or game...
... INPUT SOURCE menu opens. Back of TV AV1 IN VIDEO Back of your TV. S-Video cable 3 Connect the other end of TV Note: Cables are often color-coded to white. Side of the cable to the correct output mode. Connecting a component video device To connect a component video device: 1 Make sure that your TV's power cord is unplugged and the HDMI device is turned off . 2 Connect an HDMI cable to the HDMI OUT jack on the HDMI device, and set it to connectors. Connecting a camcorder or game...
User Manual (English)
Page 12
... a program to watch. 2 Turn on your TV, then press INPUT on the remote or on the side of the TV. Note: The VGA cable should have a stereo mini plug. Connecting an audio amplifier To connect an audio amplifier: 1 Make sure that your TV's power cord is unplugged and the computer is turned off . 2 Connect a digital optical audio cable to the S/PDIF IN jack on the digital sound system. Note: The DIGITAL OUTPUT jack works with digital TV channels only...
... a program to watch. 2 Turn on your TV, then press INPUT on the remote or on the side of the TV. Note: The VGA cable should have a stereo mini plug. Connecting an audio amplifier To connect an audio amplifier: 1 Make sure that your TV's power cord is unplugged and the computer is turned off . 2 Connect a digital optical audio cable to the S/PDIF IN jack on the digital sound system. Note: The DIGITAL OUTPUT jack works with digital TV channels only...

User Manual (English)
Page 14
.... Press twice to select TV. Press twice to highlight the video source, then press ENTER. On-screen menu overview Picture menu Parental Controls Channel menu Notes: Depending on the signal source selected, you may vary from the actual screens on your screen. The illustrations and screens shown in TV mode. The INPUT SOURCE menu opens. Audio menu Setup menu 2 Press or to select AV2. Press three times to select Component2. • HDMI- Menu items that are not selectable...
.... Press twice to select TV. Press twice to highlight the video source, then press ENTER. On-screen menu overview Picture menu Parental Controls Channel menu Notes: Depending on the signal source selected, you may vary from the actual screens on your screen. The illustrations and screens shown in TV mode. The INPUT SOURCE menu opens. Audio menu Setup menu 2 Press or to select AV2. Press three times to select Component2. • HDMI- Menu items that are not selectable...

User Manual (English)
Page 15
... an analog signal. to increase or decrease the volume. • Press MUTE to temporarily turn closed caption options. • Menu Settings-Lets you set menu language and menu transparency. The Setup menu opens. Also lets you set closed captioning on -screen cursor left or right. This increase in data provides a better picture and sound with the Picture menu displayed. Adjusting basic settings To adjust basic settings: 1 Press MENU. Digital sub-channels A digital TV signal transmits more than an analog signal. Press to select menu items...
... an analog signal. to increase or decrease the volume. • Press MUTE to temporarily turn closed caption options. • Menu Settings-Lets you set menu language and menu transparency. The Setup menu opens. Also lets you set closed captioning on -screen cursor left or right. This increase in data provides a better picture and sound with the Picture menu displayed. Adjusting basic settings To adjust basic settings: 1 Press MENU. Digital sub-channels A digital TV signal transmits more than an analog signal. Press to select menu items...

User Manual (English)
Page 16
... INFO to adjust the picture's reproduction rate when receiving DVI signals in VIDEO format. The information banner shows current program information such as channel number, video input source, and resolution. • Digital mode information-Displays channel number, station name, channel label (if preset), broadcast program name, TV rating, signal type, audio information, resolution, CC mode, current time, and current program start and end times. • Analog mode information-Displays channel number, channel label (if preset), signal type, audio information, and resolution. 2 Press GUIDE to...
... INFO to adjust the picture's reproduction rate when receiving DVI signals in VIDEO format. The information banner shows current program information such as channel number, video input source, and resolution. • Digital mode information-Displays channel number, station name, channel label (if preset), broadcast program name, TV rating, signal type, audio information, resolution, CC mode, current time, and current program start and end times. • Analog mode information-Displays channel number, channel label (if preset), signal type, audio information, and resolution. 2 Press GUIDE to...

User Manual (English)
Page 18
... analog channels. You can turn off the picture on -screen menu opens. 2 Press or to highlight Setup, then press . The Channel menu opens. 2 Press or to highlight Channel, then press . Changing channel settings 15 • Digital Output-(DTV channels only) Selects the digital audio output mode. Notes: Audio Only works only when the input source is TV and your TV and listen to a secondary audio program, if available. Playing TV audio only You can select RAW (outputs audio in its original format) or PCM (outputs...
... analog channels. You can turn off the picture on -screen menu opens. 2 Press or to highlight Setup, then press . The Channel menu opens. 2 Press or to highlight Channel, then press . Changing channel settings 15 • Digital Output-(DTV channels only) Selects the digital audio output mode. Notes: Audio Only works only when the input source is TV and your TV and listen to a secondary audio program, if available. Playing TV audio only You can select RAW (outputs audio in its original format) or PCM (outputs...
User Manual (English)
Page 19
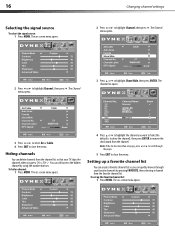
... to remove the check mark from the channel list so that your TV skips the channels when you can quickly browse through the pages. 5 Press EXIT to scroll through your favorite channels by using the number buttons. To set up a favorite channel list You can create a favorite channel list so you press CH /CH . The on -screen menu opens. 16 Selecting the signal source To select the signal source: 1 Press MENU. Changing channel settings 2 Press...
... to remove the check mark from the channel list so that your TV skips the channels when you can quickly browse through the pages. 5 Press EXIT to scroll through your favorite channels by using the number buttons. To set up a favorite channel list You can create a favorite channel list so you press CH /CH . The on -screen menu opens. 16 Selecting the signal source To select the signal source: 1 Press MENU. Changing channel settings 2 Press...

User Manual (English)
Page 30
..., see "Connecting an antenna, cable TV, or satellite TV box" on your TV, then turn it on page 18. • The channel may be blocked through the parental controls. Contact authorized service personnel. Remote control Problem Remote control does not work • Unplug the power cord for the password, then set to watch may have been deleted from your TV yourself. The problem could be with the TV station. • Adjust the antenna. • Move your TV with...
..., see "Connecting an antenna, cable TV, or satellite TV box" on your TV, then turn it on page 18. • The channel may be blocked through the parental controls. Contact authorized service personnel. Remote control Problem Remote control does not work • Unplug the power cord for the password, then set to watch may have been deleted from your TV yourself. The problem could be with the TV station. • Adjust the antenna. • Move your TV with...

User Manual (English)
Page 31
... is connected. • Consult the dealer or an experienced technician for help. For service and support call (800) 305-2204. If this equipment. 28 Specifications Specifications Design and specifications are designed to provide reasonable protection against harmful interference in a residential installation. TV type TV panel TV system Channels LCD 37-inch (DX-L37-10A) TFT LCD 42-inch (DX-L42-10A) TFT LCD NTSC-M, ATSC VHF: 2 - 13 UHF: 14 - 69 CATV: 1 - 125 Audio multiplex Audio output Power requirement Power consumption Dimensions Weight Input...
... is connected. • Consult the dealer or an experienced technician for help. For service and support call (800) 305-2204. If this equipment. 28 Specifications Specifications Design and specifications are designed to provide reasonable protection against harmful interference in a residential installation. TV type TV panel TV system Channels LCD 37-inch (DX-L37-10A) TFT LCD 42-inch (DX-L42-10A) TFT LCD NTSC-M, ATSC VHF: 2 - 13 UHF: 14 - 69 CATV: 1 - 125 Audio multiplex Audio output Power requirement Power consumption Dimensions Weight Input...

User Manual (English)
Page 32
...-moving) images applied for a television with a screen 30 inches or larger, call 1-800-305-2204 www.dynexproducts.com Distributed by Dynex to service the Product • Products sold as fuses or batteries • Products where the factory applied serial number has been altered or removed REPAIR REPLACEMENT AS PROVIDED UNDER THIS WARRANTY IS YOUR EXCLUSIVE REMEDY. This warranty also does not cover: •...
...-moving) images applied for a television with a screen 30 inches or larger, call 1-800-305-2204 www.dynexproducts.com Distributed by Dynex to service the Product • Products sold as fuses or batteries • Products where the factory applied serial number has been altered or removed REPAIR REPLACEMENT AS PROVIDED UNDER THIS WARRANTY IS YOUR EXCLUSIVE REMEDY. This warranty also does not cover: •...


