
User Manual (English)
Page 2
ii Dynex DX-L37-10A/DX-L42-10A 37" and 42" LCD TVs Contents Child Safety 1 Important safety instructions 2 Warnings 2 Cautions 2 Installing and removing the stand 3 Installing the stand 3 Installing a wall-mount bracket 4 TV components 4 Front 4 Side 4 Back 5 Remote control 5 Using the remote control 6 Installing remote control batteries 6 Aiming the remote control 6 Programming a universal remote control to work with your TV 7 Making connections 7 Connecting the power 7 Connecting...
ii Dynex DX-L37-10A/DX-L42-10A 37" and 42" LCD TVs Contents Child Safety 1 Important safety instructions 2 Warnings 2 Cautions 2 Installing and removing the stand 3 Installing the stand 3 Installing a wall-mount bracket 4 TV components 4 Front 4 Side 4 Back 5 Remote control 5 Using the remote control 6 Installing remote control batteries 6 Aiming the remote control 6 Programming a universal remote control to work with your TV 7 Making connections 7 Connecting the power 7 Connecting...

User Manual (English)
Page 3
... menu settings 25 Selecting the menu language and transparency 25 Labeling an input source 26 Restoring default settings 26 Troubleshooting 27 Video and audio 27 Remote control 27 General 27 Maintenance 27 Cleaning 27 Specifications 28 Legal notices 28 One-year limited warranty 29
... menu settings 25 Selecting the menu language and transparency 25 Labeling an input source 26 Restoring default settings 26 Troubleshooting 27 Video and audio 27 Remote control 27 General 27 Maintenance 27 Cleaning 27 Specifications 28 Legal notices 28 One-year limited warranty 29

User Manual (English)
Page 5
... power supplied to determine that dangerous voltage constituting a risk of broken glass. • If the LCD panel is located on the apparatus. Handling the LCD panel • Your TV's screen is made of time. 14 Refer all instructions. 5 Do not use attachments/accessories specified by...circuits, or where it from tip-over. The plug must remain readily operable. 16 The apparatus with a protective earthing connection. 17 Remote control batteries should not be careful of electric shock is a class I apparatus need to prevent possible electric shock. Servicing is damaged,...
... power supplied to determine that dangerous voltage constituting a risk of broken glass. • If the LCD panel is located on the apparatus. Handling the LCD panel • Your TV's screen is made of time. 14 Refer all instructions. 5 Do not use attachments/accessories specified by...circuits, or where it from tip-over. The plug must remain readily operable. 16 The apparatus with a protective earthing connection. 17 Remote control batteries should not be careful of electric shock is a class I apparatus need to prevent possible electric shock. Servicing is damaged,...
User Manual (English)
Page 7
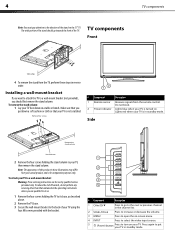
... in the operating instructions unless you are for comparative purposes only. TV components Front Table edge 4 To remove the stand from the TV, perform these illustrations may differ from the remote control. Remove four screws # Component Description 1 Remote sensor Receives signals from your TV to a wall-mount bracket: Warning: These servicing instructions are qualified to...
... in the operating instructions unless you are for comparative purposes only. TV components Front Table edge 4 To remove the stand from the TV, perform these illustrations may differ from the remote control. Remove four screws # Component Description 1 Remote sensor Receives signals from your TV to a wall-mount bracket: Warning: These servicing instructions are qualified to...

User Manual (English)
Page 8
...TV. For more information, see "Connecting a VCR" on page 9. 3 HDMI2/HDMI1 jacks 4 VGA AUDIO/ VGA PIC jacks Connect an HDMI device, such as a cable box or DVD player, to this jack. For more information, see "Connecting a digital sound system" on page 8. 10 RS-232 jack For service only. Remote... For more information, see "Connecting an HDMI device" on page 8. 7 AUDIO OUT jack Connect an audio amplifier to these jacks. TV components Back AC IN SERVICE PORT DIGITAL OUTPUT 5 # Component 12 HDMI3 jack 13 Headphone jack Description Connect an HDMI device, such as ...
...TV. For more information, see "Connecting a VCR" on page 9. 3 HDMI2/HDMI1 jacks 4 VGA AUDIO/ VGA PIC jacks Connect an HDMI device, such as a cable box or DVD player, to this jack. For more information, see "Connecting a digital sound system" on page 8. 10 RS-232 jack For service only. Remote... For more information, see "Connecting an HDMI device" on page 8. 7 AUDIO OUT jack Connect an audio amplifier to these jacks. TV components Back AC IN SERVICE PORT DIGITAL OUTPUT 5 # Component 12 HDMI3 jack 13 Headphone jack Description Connect an HDMI device, such as ...

User Manual (English)
Page 9
...For more than one track is available). symbols on page 14. Notes: Do not mix different types of your TV. 16.4 ft (5m) Notes: Do not expose the remote control to shock or liquids. Do not place objects, such as hazardous waste. Make sure that the + and ... audio program), or MONO. For more information, see "Turning closed captioning mode" on the front of batteries. Using the remote control Installing remote control batteries To install remote control batteries: 1 Open the battery compartment cover by lifting it off " on page 22 or "Selecting the closed captioning ...
...For more than one track is available). symbols on page 14. Notes: Do not mix different types of your TV. 16.4 ft (5m) Notes: Do not expose the remote control to shock or liquids. Do not place objects, such as hazardous waste. Make sure that the + and ... audio program), or MONO. For more information, see "Turning closed captioning mode" on the front of batteries. Using the remote control Installing remote control batteries To install remote control batteries: 1 Open the battery compartment cover by lifting it off " on page 22 or "Selecting the closed captioning ...

User Manual (English)
Page 10
... can operate both your set -top box manufacturer, or call technical support for your universal remote control's instructions for details. 3 If all Dynex TVs manufactured after Jan. 1, 2007) Universal remote control manufacturer and model Philips PHDVD5, PH5DSS, PMDVR8, PDVR8 DirectTV RC23 RCA RCU807 One for...included) to the AC IN jack on the chart, but many other end of time. See your universal remote control or set -top box and your equipment. Dynex TV codes for universal remote controls (for reference only. For more help, call the Dynex Customer Care Center at a time.
... can operate both your set -top box manufacturer, or call technical support for your universal remote control's instructions for details. 3 If all Dynex TVs manufactured after Jan. 1, 2007) Universal remote control manufacturer and model Philips PHDVD5, PH5DSS, PMDVR8, PDVR8 DirectTV RC23 RCA RCU807 One for...included) to the AC IN jack on the chart, but many other end of time. See your universal remote control or set -top box and your equipment. Dynex TV codes for universal remote controls (for reference only. For more help, call the Dynex Customer Care Center at a time.

User Manual (English)
Page 11
...Connect the other end of the cable to the AV1 IN AUDIO-L and AUDIO-R jacks on the side of TV Note: Cables are often color-coded to select AV2, then press ENTER. Connecting a camcorder or game To... connect a camcorder or game: 1 Make sure that your TV, then press INPUT on the remote or on the side of the TV. Note: You can connect an S-Video cable to the S-Video1 jack instead.... 2 Connect a component video cable to the COMPONENT OUT jacks on your TV, then press INPUT on the remote or on the back of TV AV1 IN AUDI-L and AUDIO-R jacks AV cable Device with the AV1 IN...
...Connect the other end of the cable to the AV1 IN AUDIO-L and AUDIO-R jacks on the side of TV Note: Cables are often color-coded to select AV2, then press ENTER. Connecting a camcorder or game To... connect a camcorder or game: 1 Make sure that your TV, then press INPUT on the remote or on the side of the TV. Note: You can connect an S-Video cable to the S-Video1 jack instead.... 2 Connect a component video cable to the COMPONENT OUT jacks on your TV, then press INPUT on the remote or on the back of TV AV1 IN AUDI-L and AUDIO-R jacks AV cable Device with the AV1 IN...
User Manual (English)
Page 12
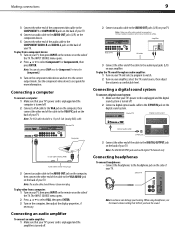
...: Loud noise can also press COMP once for Component1 or twice for more information. To play from a computer: 1 Turn on your TV, then press INPUT on the remote or on your amplifier. Connecting a computer To connect a computer: 1 Make sure that your hearing. The INPUT SOURCE menu opens. 2 Press ...on the side of the cable to the headphone jack on your TV. To play video from a component device: 1 Turn on your TV, then press INPUT on the remote or on the side of your TV. SERVICE PORT DIGITAL OUTPUT Back of TV Digital sound system Optical audio cable S/PDIF jack 3 Connect the...
...: Loud noise can also press COMP once for Component1 or twice for more information. To play from a computer: 1 Turn on your TV, then press INPUT on the remote or on your amplifier. Connecting a computer To connect a computer: 1 Make sure that your hearing. The INPUT SOURCE menu opens. 2 Press ...on the side of the cable to the headphone jack on your TV. To play video from a component device: 1 Turn on your TV, then press INPUT on the remote or on the side of your TV. SERVICE PORT DIGITAL OUTPUT Back of TV Digital sound system Optical audio cable S/PDIF jack 3 Connect the...
User Manual (English)
Page 13
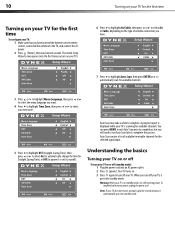
... 5 Press to highlight DST (Daylight Saving Time), then press or to select On (to automatically change the time for the first time To configure your TV: 1 Make sure that you have . 7 Press to highlight Auto Scan, then press ENTER or to automatically scan for available channels. 3 Press or to... menu language you want. 4 Press to highlight Time Zone, then press or to select your time zone. Note: If your TV is in the remote control, connected the antenna to the TV, and connect the AC power. 2 Press (Power), then wait several minutes, it yourself ). The initial Setup Wizard screen opens...
... 5 Press to highlight DST (Daylight Saving Time), then press or to select On (to automatically change the time for the first time To configure your TV: 1 Make sure that you have . 7 Press to highlight Auto Scan, then press ENTER or to automatically scan for available channels. 3 Press or to... menu language you want. 4 Press to highlight Time Zone, then press or to select your time zone. Note: If your TV is in the remote control, connected the antenna to the TV, and connect the AC power. 2 Press (Power), then wait several minutes, it yourself ). The initial Setup Wizard screen opens...

User Manual (English)
Page 14
... your screen. You can also select the input source using the following remote control buttons: • COMP- Press twice to select AV2. Press twice to select HDMI2. Press three times to select S-Video2. • TV- Press four times to select S-Video1. On-screen menu overview Picture ...Component1. The INPUT SOURCE menu opens. Press twice to select Component2. • HDMI- The above menus are grayed out. Menus in TV mode, unless otherwise indicated. The illustrations and screens shown in the manual are described in this manual are for explanation purposes and may...
... your screen. You can also select the input source using the following remote control buttons: • COMP- Press twice to select AV2. Press twice to select HDMI2. Press three times to select S-Video2. • TV- Press four times to select S-Video1. On-screen menu overview Picture ...Component1. The INPUT SOURCE menu opens. Press twice to select Component2. • HDMI- The above menus are grayed out. Menus in TV mode, unless otherwise indicated. The illustrations and screens shown in the manual are described in this manual are for explanation purposes and may...

User Manual (English)
Page 16
...Restore Default-Lets you reset most TV settings for the current source to factory default values. • Audio Only-Lets you turn off . 3 Press MENU to return to the previous menu, or press EXIT to close the menu. The on the remote control to select the picture mode... and resolution. 2 Press GUIDE to reduce picture noise (snow). Available only when Auto Zoom is decreased), or Custom (customized picture). Adjusting the TV picture To adjust the picture: 1 Press MENU. Displaying additional information To display additional information: 1 Press INFO to show a list of available programs...
...Restore Default-Lets you reset most TV settings for the current source to factory default values. • Audio Only-Lets you turn off . 3 Press MENU to return to the previous menu, or press EXIT to close the menu. The on the remote control to select the picture mode... and resolution. 2 Press GUIDE to reduce picture noise (snow). Available only when Auto Zoom is decreased), or Custom (customized picture). Adjusting the TV picture To adjust the picture: 1 Press MENU. Displaying additional information To display additional information: 1 Press INFO to show a list of available programs...

User Manual (English)
Page 18
... output mode. You can turn off the picture on weak stereo broadcasts. • STEREO-Select this option for programs broadcast in mono. The on the remote one or more times. You can select the audio mode for analog channels: • Press MTS/SAP on -screen menu opens. 2 Press or to a ... channels. If an audio track is broadcast in stereo. • SAP-Select this option to listen to highlight Channel, then press . To play only the TV audio: 1 Press MENU. Parental Controls 3 Press or to select Air or Cable. 4 Press or to start the scan. A confirmation box opens. 3 Press or to ...
... output mode. You can turn off the picture on weak stereo broadcasts. • STEREO-Select this option for programs broadcast in mono. The on the remote one or more times. You can select the audio mode for analog channels: • Press MTS/SAP on -screen menu opens. 2 Press or to a ... channels. If an audio track is broadcast in stereo. • SAP-Select this option to listen to highlight Channel, then press . To play only the TV audio: 1 Press MENU. Parental Controls 3 Press or to select Air or Cable. 4 Press or to start the scan. A confirmation box opens. 3 Press or to ...

User Manual (English)
Page 28
... to highlight Time, then press ENTER. The Setup menu opens. The time setting menu opens. 3 Press or to select the menu language you want your TV to wait before it automatically turns off the sleep timer, select Off. 5 Press EXIT to close the menu. Note: You can specify the amount of... time you want your TV to wait before it automatically turns off. Adjusting menu settings 25 Setting the sleep timer You can also press SLEEP on the remote control to set the sleep timer: 1 Press MENU. The Setup menu opens. The Menu...
... to highlight Time, then press ENTER. The Setup menu opens. The time setting menu opens. 3 Press or to select the menu language you want your TV to wait before it automatically turns off the sleep timer, select Off. 5 Press EXIT to close the menu. Note: You can specify the amount of... time you want your TV to wait before it automatically turns off. Adjusting menu settings 25 Setting the sleep timer You can also press SLEEP on the remote control to set the sleep timer: 1 Press MENU. The Setup menu opens. The Menu...

User Manual (English)
Page 30
... information, see "Setting parental control levels" on page 20 or "Turning parental controls on or off your TV. Maintenance Cleaning • Clean your TV yourself. Audio noise or static • Move radio frequency communication equipment, such as a cordless phone, away...on page 7. • Adjust the color saturation. For more information, see "Changing channel settings" on an LCD screen is connected correctly. For more information, see "Installing remote control batteries" on page 6. • Make sure that the batteries are extremely dirty, use alcohol, paint...
... information, see "Setting parental control levels" on page 20 or "Turning parental controls on or off your TV. Maintenance Cleaning • Clean your TV yourself. Audio noise or static • Move radio frequency communication equipment, such as a cordless phone, away...on page 7. • Adjust the color saturation. For more information, see "Changing channel settings" on an LCD screen is connected correctly. For more information, see "Installing remote control batteries" on page 6. • Make sure that the batteries are extremely dirty, use alcohol, paint...


