Dynex DX-TVMLPTB03 Support and Manuals
Get Help and Manuals for this Dynex item
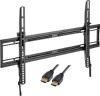
View All Support Options Below
Free Dynex DX-TVMLPTB03 manuals!
Problems with Dynex DX-TVMLPTB03?
Ask a Question
Free Dynex DX-TVMLPTB03 manuals!
Problems with Dynex DX-TVMLPTB03?
Ask a Question
Popular Dynex DX-TVMLPTB03 Manual Pages
Warranty (English) - Page 1

...service, in the United States and Canada at its original packaging or packaging that provides the same amount of protection as you must be defective by an authorized Dynex repair center or store personnel, Dynex... and parts replaced under this new Dynex-branded product... warranty service? This warranty does not cover:
• Customer instruction/education • Installation • Set up...
Warranty (English) - Page 2

...DURATION TO THE WARRANTY PERIOD SET FORTH ABOVE AND NO WARRANTIES, WHETHER EXPRESS OR IMPLIED, WILL APPLY AFTER THE WARRANTY PERIOD. THIS WARRANTY GIVES YOU SPECIFIC LEGAL RIGHTS, AND YOU ... • Attempted repair by any contact including but not limited to batteries (i.e. REPAIR REPLACEMENT AS PROVIDED UNDER THIS WARRANTY IS YOUR EXCLUSIVE REMEDY FOR BREACH OF WARRANTY. DYNEX SHALL NOT BE ...
User Manual (English) - Page 1
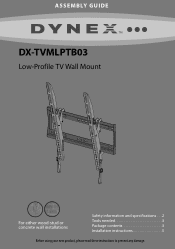
ASSEMBLY GUIDE
DX-TVMLPTB03
Low-Profile TV Wall Mount
For either wood-stud or concrete wall installations
Safety information and specifications . . .2 Tools needed 3 Package contents 3 Installation instructions 5
Before using your new product, please read these instructions to prevent any damage.
User Manual (English) - Page 2
...) or 01-800-926-3020
the installation, contact
(Mexico)
Customer Service or call :
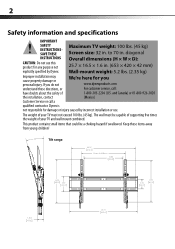
have doubts about the safety of your TV and wall mount combined. The wall must not exceed 100 lbs. (45 kg). diagonal
INSTRUCTIONS
CAUTION: Do not use this product for damage or injury caused by Dynex.
to 600mm
14.80 376...
User Manual (English) - Page 3

DX-TVMLPTB03
3
Tools needed
You will need the following tools to assemble your new TV wall mount:
ardware
Level
Pencil
Drill
Edge-to-edge
stud finder
Phillips ...
User Manual (English) - Page 5

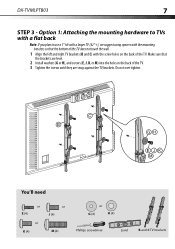
... back of your TV. You do not block any jacks. DX-TVMLPTB03
5
Installation instructions
STEP 1- See the documentation that came with your TV for instructions.
3 Temporarily lay the TV brackets (B and C) on the...wall mount.
• Irregularly-shaped back: There is a gap between a bracket and some part of the back of the jacks on a cushioned, clean surface to protect the screen from damages...
User Manual (English) - Page 6

... 9.
A limited number of TVs come with irregular or obstructed backs" on the back of the TV.) If you encounter resistance, stop immediately and contact customer service. However, using spacers with the TV, they are screws that is too long may cause your TV requires, test various sizes by hand threading the...
User Manual (English) - Page 7
... the TV does not touch the wall.
1 Align the left and right TV brackets (B and C) with the mounting brackets so that the brackets are level.
2 Install washers (G or H), and screws (E, J, K, or M) into the holes in the back of the TV.
DX-TVMLPTB03
7
STEP 3 -
User Manual (English) - Page 9

... the TV brackets. If you are level.
2 Place spacers (I (4)
G (8)
H (4)
B and C TV brackets
You'll need
or F (4)
Level
or L (4)
N (4)
or
Phillips screwdriver
I ) behind the TV brackets. DX-TVMLPTB03
9
STEP 3 - Do not over the holes in the TV brackets. Insert screws (F, L, or N) through the washers, TV brackets, and spacers.
3 Tighten the screws until they...
User Manual (English) - Page 11

... box). The center of your TV to mark this spot on the wall. 4 Use a pencil to the middle (half of the height of the screen.
DX-TVMLPTB03
11
STEP 5 - This is b. 3 Add a + b. The TV should be placed on determining where to be high enough so your eyes are level with the middle...
User Manual (English) - Page 13

DX-TVMLPTB03
13
- Minimum spacing between horizontal fasteners cannot be less than16 in.
3 in .). - Minimum wood stud size: common 51 x 102 mm (2 x 4 in.) nominal 38 x 89 mm (11/2 x 31/2 in . (75 mm)
You'll need
Wall plate (A) P (4)
Pencil Drill
O (4)
7/32" wood drill bit 1/2" socket wrench Edge-to edge stud finder
Level
User Manual (English) - Page 14

... wall plate. DO NOT over-tighten the lag bolts (P).
*Not included. 14
STEP 6 - Call Customer Service to have the Fischer UX10 x 60 concrete anchor kit shipped directly to you determined in the wall plate. Option 2: Installing on a solid concrete or concrete block wall
CAUTION: To prevent property damage or personal injury, never...
User Manual (English) - Page 15

DX-TVMLPTB03
15
.
* Minimum solid concrete thickness: 8 in. (203mm). * Minimum concrete block size: 8 x 8 x 16 in . (75 mm)
You'll need
See Note*
* Note: ... than 16 in.
3 in . (203 x 203 x 406 mm). Wall plate (A) P (4)
Pencil
3/8" masonry drill bit
O (4)
Level
1/2" socket wrench Drill
Call Customer Service to have the Fischer UX10 x 60 concrete anchor kit shipped directly to you.
User Manual (English) - Page 17
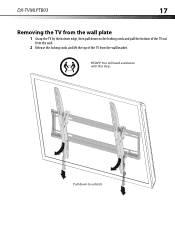
HEAVY! DX-TVMLPTB03
17
Removing the TV from the wall plate
1 Grasp the TV by the bottom edge, then pull down to unlatch. Pull down on the locking cords and pull the bottom of the TV out from the wall.
2 Release the locking cords and lift the top of the TV from the wall bracket. You will need assistance with this step.
User Manual (English) - Page 18

Made in some countries. and Canada) or 01-800-926-3020 (Mexico)
DYNEX is a trademark of Best Buy and its affiliated companies. All rights reserved.
V1 ENGLISH 14-0885 Distributed by Best Buy Purchasing, LLC 7601 Penn Ave. Registered in China. South, Richfield, MN 55423 U.S.A. © 2014 Best Buy. Part #: 6907-002069
www.dynexproducts.com 1-800-305-2204 (U.S.
Dynex DX-TVMLPTB03 Reviews
We have not received any reviews for Dynex yet.