
PDF Spec Sheet
Page 1
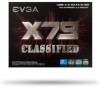
...; 2 Port USB 3.0 Bracket • 2-way SLI Bridge • Visual Installation Guide • Manual WARRANTY 'Plot ;I ' ' The EVGA X79 Classified is available upon registration within 30 days of your system for the lowest impedance, and highest current transfer. This board is loaded: 10 USB 3.0 Ports, SATA III/6G support, 5 PCI-E 3.0* ports, integrated Bluetooth, PCI-E/DIMM Disable jumpers, and a Right Angled 24pin power connector to maximize your graphics performance. RAID 0, 1, 5, 10, JBOD USB 2.0 Ports/Controller - 10 / Intel® X79 PCH USB 3.0 Ports/Controller...
...; 2 Port USB 3.0 Bracket • 2-way SLI Bridge • Visual Installation Guide • Manual WARRANTY 'Plot ;I ' ' The EVGA X79 Classified is available upon registration within 30 days of your system for the lowest impedance, and highest current transfer. This board is loaded: 10 USB 3.0 Ports, SATA III/6G support, 5 PCI-E 3.0* ports, integrated Bluetooth, PCI-E/DIMM Disable jumpers, and a Right Angled 24pin power connector to maximize your graphics performance. RAID 0, 1, 5, 10, JBOD USB 2.0 Ports/Controller - 10 / Intel® X79 PCH USB 3.0 Ports/Controller...
PDF Spec Sheet
Page 2
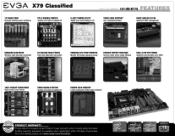
... TUNING UTILITY Adjust your overclocking in O.S. SSE]. 55563. ON' 1 2 • I CORE i7 44=4 4•4.• 7-1Ir Sart SSE• 61164T Core 56660 I 3900 0 tri, I Data .6 Kflyles- 6 ii rma• X 390,2.33 Mat IE 6is 32 Kflyles w eve.2 (1) Cores Threads TRIPLE BIOS SUPPORT Use 3 separate profiles! 8IOS_SELI 3 I C15 1 K C15 DIMM DISABLE SWITCH Quickly and easily troubleshoot! I Cr) ( ONBOARD BLUETOOTH Wireless input and data connection PCI-E DISABLE SWITCH...
... TUNING UTILITY Adjust your overclocking in O.S. SSE]. 55563. ON' 1 2 • I CORE i7 44=4 4•4.• 7-1Ir Sart SSE• 61164T Core 56660 I 3900 0 tri, I Data .6 Kflyles- 6 ii rma• X 390,2.33 Mat IE 6is 32 Kflyles w eve.2 (1) Cores Threads TRIPLE BIOS SUPPORT Use 3 separate profiles! 8IOS_SELI 3 I C15 1 K C15 DIMM DISABLE SWITCH Quickly and easily troubleshoot! I Cr) ( ONBOARD BLUETOOTH Wireless input and data connection PCI-E DISABLE SWITCH...

User Guide
Page 3
EVGA X79 Motherboard Table of Contents Motherboard ...1 Before You Begin...5 Parts NOT in the Kit ...6 Intentions of the Kit...6 Motherboard ...7 Motherboard Specifications ...7 Unpacking and Parts Descriptions 9 Unpacking ...9 Equipment...9 Hardware Installation ...11 Safety Instructions ...11 Preparing the Motherboard ...12 Installing the CPU...12 Installing the Cooling Device...13 Installing System Memory (DIMMs 14 Installing the Motherboard...15 Installing the I/O Shield...15 Securing the Motherboard into a System Case 16 Connecting Cables ...16 24pin ATX Power (PW1) ...17 8pin ATX 12V ...
EVGA X79 Motherboard Table of Contents Motherboard ...1 Before You Begin...5 Parts NOT in the Kit ...6 Intentions of the Kit...6 Motherboard ...7 Motherboard Specifications ...7 Unpacking and Parts Descriptions 9 Unpacking ...9 Equipment...9 Hardware Installation ...11 Safety Instructions ...11 Preparing the Motherboard ...12 Installing the CPU...12 Installing the Cooling Device...13 Installing System Memory (DIMMs 14 Installing the Motherboard...15 Installing the I/O Shield...15 Securing the Motherboard into a System Case 16 Connecting Cables ...16 24pin ATX Power (PW1) ...17 8pin ATX 12V ...
User Guide
Page 4
EVGA X79 Motherboard Connecting Internal Headers ...19 Front Panel Header ...19 Firewire 1394a (1394b optional 20 USB Headers ...21 Audio ...22 PCI-E x1 Slots...23 PCI-E x16/x8 Slots ...23 Onboard Buttons ...24 Clear CMOS Button ...24 RESET and POWER Button ...24 Post Port Debug LED and LED Status Indicators 25 Post Port Debug LED ...25 LED Status Indicators ...25 Installing Drivers and Software 26 Windows 7/Vista/XP Driver Installation 26 POST Codes ...27 EVGA Glossary of Terms ...32 Compliance Information ...35 4
EVGA X79 Motherboard Connecting Internal Headers ...19 Front Panel Header ...19 Firewire 1394a (1394b optional 20 USB Headers ...21 Audio ...22 PCI-E x1 Slots...23 PCI-E x16/x8 Slots ...23 Onboard Buttons ...24 Clear CMOS Button ...24 RESET and POWER Button ...24 Post Port Debug LED and LED Status Indicators 25 Post Port Debug LED ...25 LED Status Indicators ...25 Installing Drivers and Software 26 Windows 7/Vista/XP Driver Installation 26 POST Codes ...27 EVGA Glossary of Terms ...32 Compliance Information ...35 4

User Guide
Page 5
... optimizing performance on the fly from the palm of your hand. This product packs in EVGA EVBot support*, you an uncompromised experience: Uncompromised Performance - Uncompromised Power - True next generation motherboards have arrived with the latest technologies like a full UEFI BIOS, USB 3.0 Ports, SATA III/6G support, PCI-E 3.0** ports, E-SATA, a true next generation board layout, and more! *sold separately **pending PCI Express 3.0 supported CPU 5 This board is loaded with the EVGA X79 motherboards! EVGA X79 Motherboard Before You Begin...
... optimizing performance on the fly from the palm of your hand. This product packs in EVGA EVBot support*, you an uncompromised experience: Uncompromised Performance - Uncompromised Power - True next generation motherboards have arrived with the latest technologies like a full UEFI BIOS, USB 3.0 Ports, SATA III/6G support, PCI-E 3.0** ports, E-SATA, a true next generation board layout, and more! *sold separately **pending PCI Express 3.0 supported CPU 5 This board is loaded with the EVGA X79 motherboards! EVGA X79 Motherboard Before You Begin...

User Guide
Page 6
... system even though the current storage drive may already have purchased all the necessary parts needed to make the motherboard functional. ‰ Intel Socket 2011 Processor ‰ DDR3 System Memory ‰ Socket 2011 CPU Cooling Device ‰ PCI Express Graphics Card ‰ Power Supply EVGA assumes you have one installed. 6 EVGA X79 Motherboard Parts NOT in a PC case, you with the motherboard and all connecting cables necessary to install and connect your new EVGA X79 Motherboard. However, it does not contain...
... system even though the current storage drive may already have purchased all the necessary parts needed to make the motherboard functional. ‰ Intel Socket 2011 Processor ‰ DDR3 System Memory ‰ Socket 2011 CPU Cooling Device ‰ PCI Express Graphics Card ‰ Power Supply EVGA assumes you have one installed. 6 EVGA X79 Motherboard Parts NOT in a PC case, you with the motherboard and all connecting cables necessary to install and connect your new EVGA X79 Motherboard. However, it does not contain...

User Guide
Page 7
EVGA X79 Motherboard EVGA X79 Motherboard Motherboard Specifications ‰ Size ATX form factor of 12 inches x 9.6 inches EATX form factor of DDR3 memory. ‰ USB 2.0 Ports Supports hot plug Supports wake-up from S1 and S3 mode Supports USB 2.0 protocol up to a 480 Mbps transmission rate ‰ USB 3.0 Ports Backwards compatible USB 2.0 and USB 1.1 support Supports transfer speeds up to 5Gbps 7 Officially supports up to 32GBs of 12 inches x 10.3 inches ‰ Microprocessor support Intel Socket 2011 Processor ‰ Operating systems Supports Windows 7 / Vista / XP...
EVGA X79 Motherboard EVGA X79 Motherboard Motherboard Specifications ‰ Size ATX form factor of 12 inches x 9.6 inches EATX form factor of DDR3 memory. ‰ USB 2.0 Ports Supports hot plug Supports wake-up from S1 and S3 mode Supports USB 2.0 protocol up to a 480 Mbps transmission rate ‰ USB 3.0 Ports Backwards compatible USB 2.0 and USB 1.1 support Supports transfer speeds up to 5Gbps 7 Officially supports up to 32GBs of 12 inches x 10.3 inches ‰ Microprocessor support Intel Socket 2011 Processor ‰ Operating systems Supports Windows 7 / Vista / XP...

User Guide
Page 8
EVGA X79 Motherboard ‰ SATA Ports SATA ports up to 3G (300 MB/s) data transfer rate SATA ports up to disk - off) ‰ Expansion Slots PCI-E x1 slots PCI-E x8/x16 slots 8 depends on suspend), S3 (suspend to RAM), S4 (Suspend to 6G (600 MB/s) data transfer rate Support for RAID 0, RAID 1, RAID 0+1, RAID5 and RAID 10 ESATA ‰ Onboard LAN Supports 10/100/1000 Mb/sec Ethernet ‰ Onboard Firewire 1394a (1394b optional) Supports hot plug ‰ Onboard Audio Realtek...
EVGA X79 Motherboard ‰ SATA Ports SATA ports up to 3G (300 MB/s) data transfer rate SATA ports up to disk - off) ‰ Expansion Slots PCI-E x1 slots PCI-E x8/x16 slots 8 depends on suspend), S3 (suspend to RAM), S4 (Suspend to 6G (600 MB/s) data transfer rate Support for RAID 0, RAID 1, RAID 0+1, RAID5 and RAID 10 ESATA ‰ Onboard LAN Supports 10/100/1000 Mb/sec Ethernet ‰ Onboard Firewire 1394a (1394b optional) Supports hot plug ‰ Onboard Audio Realtek...

User Guide
Page 10
... Contains drivers and software needed to the motherboard header. User Manual The user manual you are reading right now! 10 EVGA X79 Motherboard 2-Port USB 2.0 / 1394a Firewire Bracket Provides two additional USB ports and 1 additional 1394a Firewire port to the back panel of the chassis. 2-Port USB 3.0 Bracket (Optional) Allows addition of 2 USB 3.0 ports by Connecting to setup the motherboard. SATA 3G/6G Data Cables Used to support the SATA protocol and each one connects a single drive to the motherboard. 2-way SLI Bridge Bridges two graphics cards...
... Contains drivers and software needed to the motherboard header. User Manual The user manual you are reading right now! 10 EVGA X79 Motherboard 2-Port USB 2.0 / 1394a Firewire Bracket Provides two additional USB ports and 1 additional 1394a Firewire port to the back panel of the chassis. 2-Port USB 3.0 Bracket (Optional) Allows addition of 2 USB 3.0 ports by Connecting to setup the motherboard. SATA 3G/6G Data Cables Used to support the SATA protocol and each one connects a single drive to the motherboard. 2-way SLI Bridge Bridges two graphics cards...

User Guide
Page 11
... the motherboard ‰ Installing the CPU ‰ Installing the Cooling Device ‰ Installing the memory ‰ Installing the motherboard ‰ Connecting cables Safety Instructions To reduce the risk of the motherboard. EVGA X79 Motherboard Hardware Installation This section will guide you through the installation of fire, electric shock, and injury, always follow basic safety precautions. Remember to remove power from your computer by disconnecting the AC main source before removing or installing any equipment...
... the motherboard ‰ Installing the CPU ‰ Installing the Cooling Device ‰ Installing the memory ‰ Installing the motherboard ‰ Connecting cables Safety Instructions To reduce the risk of the motherboard. EVGA X79 Motherboard Hardware Installation This section will guide you through the installation of fire, electric shock, and injury, always follow basic safety precautions. Remember to remove power from your computer by disconnecting the AC main source before removing or installing any equipment...

User Guide
Page 13
Follow the instructions that can be used with your cooling assembly. 13 Note: Make sure the CPU is resting on the CPU to the notches in the socket. ‰ Lower the load plate so it is fully seated and level in the socket. ‰ Lower the processor straight down to lock into place. ‰ Carefully lock the lever back into the socket. EVGA X79 Motherboard Installing the Cooling Device There are many different cooling devices that came with this motherboard. ‰ Align the notches on the CPU. ‰ Press the right socket lever down into place.
Follow the instructions that can be used with your cooling assembly. 13 Note: Make sure the CPU is resting on the CPU to the notches in the socket. ‰ Lower the load plate so it is fully seated and level in the socket. ‰ Lower the processor straight down to lock into place. ‰ Carefully lock the lever back into the socket. EVGA X79 Motherboard Installing the Cooling Device There are many different cooling devices that came with this motherboard. ‰ Align the notches on the CPU. ‰ Press the right socket lever down into place.

User Guide
Page 16
... ATX 12V power ‰ Internal Headers Front Panel Header IEEE 1394a Header (IEEE 1394b Optional) USB Headers Audio Header ‰ SATA II ‰ SATA III ‰ USB 3.0/2.0 ‰ Expansion slots ‰ CMOS Clear Button 16 Connecting Cables This section takes you remove that stud to prevent the possibility of a short circuit. ‰ Carefully place the motherboard onto the stand offs located inside the chassis. ‰ Align the mounting holes with the stand offs. ‰ Align the connectors...
... ATX 12V power ‰ Internal Headers Front Panel Header IEEE 1394a Header (IEEE 1394b Optional) USB Headers Audio Header ‰ SATA II ‰ SATA III ‰ USB 3.0/2.0 ‰ Expansion slots ‰ CMOS Clear Button 16 Connecting Cables This section takes you remove that stud to prevent the possibility of a short circuit. ‰ Carefully place the motherboard onto the stand offs located inside the chassis. ‰ Align the mounting holes with the stand offs. ‰ Align the connectors...

User Guide
Page 18
EVGA X79 Motherboard 8-pin ATX 12V Power (PW12-1 & PW12-2) PW12-1 & PW12-2 (optional), the 8-pin ATX 12V power connections, are to be used to provide power to the connector and press firmly until seated. If your motherboard has two 8-pin connectors, the secondary is optional for improved overclocking. +12V GND BIOS Select Switch (Optional) The BIOS Select Switch is featured on select motherboards and located directly on the bottom edge of physical BIOS chips are used when the system is powered on. 18 This jumper controls which of the motherboard. Align the pins to the CPU.
EVGA X79 Motherboard 8-pin ATX 12V Power (PW12-1 & PW12-2) PW12-1 & PW12-2 (optional), the 8-pin ATX 12V power connections, are to be used to provide power to the connector and press firmly until seated. If your motherboard has two 8-pin connectors, the secondary is optional for improved overclocking. +12V GND BIOS Select Switch (Optional) The BIOS Select Switch is featured on select motherboards and located directly on the bottom edge of physical BIOS chips are used when the system is powered on. 18 This jumper controls which of the motherboard. Align the pins to the CPU.

User Guide
Page 19
... case to these two pins. Be sure to match the name on the connectors to the corresponding pins. ‰ PWRSW Attach the power button cable from the front panel of the connector. The Power LED indicates the system's status. When the system is one connector used to connect the following four cables. ‰ PWRLED Attach the front panel power LED cable to these two pins. EVGA X79 Motherboard Connecting Internal Headers Front Panel Header The front panel header on this motherboard...
... case to these two pins. Be sure to match the name on the connectors to the corresponding pins. ‰ PWRSW Attach the power button cable from the front panel of the connector. The Power LED indicates the system's status. When the system is one connector used to connect the following four cables. ‰ PWRLED Attach the front panel power LED cable to these two pins. EVGA X79 Motherboard Connecting Internal Headers Front Panel Header The front panel header on this motherboard...

User Guide
Page 25
... fully booted into the Operating System. EVGA X79 Motherboard Post Port Debug LED and LED Status Indicators Post Port Debug LED Provides two-digit POST codes to show why the system may be failing to boot. This Debug LED will remain on . Debug LED with CPU Temperature Monitor LED Status Indicators Theses LEDs indicate the system's status. ‰ POWER LED: When the System is powered on: This LED is on. ‰ DIMM LED: When the Memory slot is...
... fully booted into the Operating System. EVGA X79 Motherboard Post Port Debug LED and LED Status Indicators Post Port Debug LED Provides two-digit POST codes to show why the system may be failing to boot. This Debug LED will remain on . Debug LED with CPU Temperature Monitor LED Status Indicators Theses LEDs indicate the system's status. ‰ POWER LED: When the System is powered on: This LED is on. ‰ DIMM LED: When the Memory slot is...

User Guide
Page 26
... software. The motherboard supports 32bit and 64bit versions of Windows 7, Vista and XP. If the CD does not run, go to open. 26 The kit comes with the EVGA X79 Motherboard contains the following software and drivers: ‰ Chipset Drivers ‰ Audio Drivers ‰ RAID Drivers ‰ LAN Drivers ‰ USB 3.0 Drivers ‰ EVGA E-LEET ‰ User's Manual Windows 7/Vista/XP Driver Installation 1. Install the drivers and utilities listed on the CD to My Computer and click on the install screen. EVGA X79 Motherboard Installing Drivers and Software...
... software. The motherboard supports 32bit and 64bit versions of Windows 7, Vista and XP. If the CD does not run, go to open. 26 The kit comes with the EVGA X79 Motherboard contains the following software and drivers: ‰ Chipset Drivers ‰ Audio Drivers ‰ RAID Drivers ‰ LAN Drivers ‰ USB 3.0 Drivers ‰ EVGA E-LEET ‰ User's Manual Windows 7/Vista/XP Driver Installation 1. Install the drivers and utilities listed on the CD to My Computer and click on the install screen. EVGA X79 Motherboard Installing Drivers and Software...
User Guide
Page 27
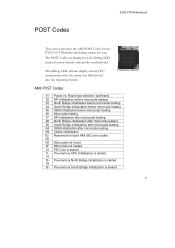
... error codes 0D 0E Microcode not found 0F Microcode not loaded 10 PEI Core is started 14 15- Pre-memory South Bridge initialization is started 18 19- The POST Codes are displayed on . Pre-memory North Bridge initialization is started 11- Debug LED with CPU Temperature Monitor AMI POST Codes 01 Power on the Debug LED readout located directly onboard the motherboard. Reserved for the EVGA X79 Motherboard during system boot up. This Debug LED will also display current CPU temperatures...
... error codes 0D 0E Microcode not found 0F Microcode not loaded 10 PEI Core is started 14 15- Pre-memory South Bridge initialization is started 18 19- The POST Codes are displayed on . Pre-memory North Bridge initialization is started 11- Debug LED with CPU Temperature Monitor AMI POST Codes 01 Power on the Debug LED readout located directly onboard the motherboard. Reserved for the EVGA X79 Motherboard during system boot up. This Debug LED will also display current CPU temperatures...

User Guide
Page 28
...54 Unspecified memory initialization error. 55 Memory not installed 56 Invalid CPU type or Speed 57 CPU mismatch 58 CPU self test failed or possible CPU cache error 59 CPU micro-code is started 3A 3B- Invalid memory type or incompatible memory speed 51 Memory initialization error. OEM pre-memory initialization codes 2A 2B Memory initialization. Post-Memory South Bridge initialization is started 50 Memory initialization error. EVGA X79 Motherboard 1C 1D- Post-Memory North Bridge initialization is started 33 CPU post-memory initialization. Configuring memory 2F Memory...
...54 Unspecified memory initialization error. 55 Memory not installed 56 Invalid CPU type or Speed 57 CPU mismatch 58 CPU self test failed or possible CPU cache error 59 CPU micro-code is started 3A 3B- Invalid memory type or incompatible memory speed 51 Memory initialization error. OEM pre-memory initialization codes 2A 2B Memory initialization. Post-Memory South Bridge initialization is started 50 Memory initialization error. EVGA X79 Motherboard 1C 1D- Post-Memory North Bridge initialization is started 33 CPU post-memory initialization. Configuring memory 2F Memory...

User Guide
Page 30
... 77 module specific) 78 ACPI module initialization 79 CSM initialization 7A- Reserved for future AMI codes 9F A0 IDE initialization is started A1 IDE Reset A2 IDE Detect A3 IDE Enable A4 SCSI initialization is started 72 South Bridge devices initialization 73- EVGA X79 Motherboard 71 South Bridge DXE SMM initialization is started A5 SCSI Reset A6 SCSI Detect A7 SCSI Enable A8 Setup Verifying Password A9 Start of Setup AA Reserved...
... 77 module specific) 78 ACPI module initialization 79 CSM initialization 7A- Reserved for future AMI codes 9F A0 IDE initialization is started A1 IDE Reset A2 IDE Detect A3 IDE Enable A4 SCSI initialization is started 72 South Bridge devices initialization 73- EVGA X79 Motherboard 71 South Bridge DXE SMM initialization is started A5 SCSI Reset A6 SCSI Detect A7 SCSI Enable A8 Setup Verifying Password A9 Start of Setup AA Reserved...

User Guide
Page 34
... Rate QPI - Random Access Memory ROM - Scalable Link Interface SPD - Transmission Control Protocol/Internet Protocol USB - Video Graphics Array VREG - Power on Self Test PWM - Red Green Blue SATA - Serial Attached SCSI SB - Solid State Drive TCP/IP - Quick Path Interconnect RAID - Small Computer System Interface SFR - Serial Presence Detect SPDIF - EVGA X79 Motherboard PCB - Peripheral Component Interconnect Express PCI-X - Redundant Array of Inexpensive Disks RAM - Southbridge SCSI - Voltage Regulator 1337 - Read...
... Rate QPI - Random Access Memory ROM - Scalable Link Interface SPD - Transmission Control Protocol/Internet Protocol USB - Video Graphics Array VREG - Power on Self Test PWM - Red Green Blue SATA - Serial Attached SCSI SB - Solid State Drive TCP/IP - Quick Path Interconnect RAID - Small Computer System Interface SFR - Serial Presence Detect SPDIF - EVGA X79 Motherboard PCB - Peripheral Component Interconnect Express PCI-X - Redundant Array of Inexpensive Disks RAM - Southbridge SCSI - Voltage Regulator 1337 - Read...


