
Owner's Manual
Page 1
Portable Air Conditioner AP13000W Owner's Manual For more information on other great EdgeStar products on the web, go to http://www.edgestar.com
Portable Air Conditioner AP13000W Owner's Manual For more information on other great EdgeStar products on the web, go to http://www.edgestar.com
Owner's Manual
Page 2
... for domestic use only. Before using your portable air conditioner, follow the instructions below to a grounded outlet. 2. i Do not use the portable air conditioner for indoor use only. Do not use the unit in extremely humid or wet environments. Do not spray water and wet the housing or control panel. Do not pull the unit by the cord. Always turn on the unit, please contact EdgeStar support. Plug the power cord to...
... for domestic use only. Before using your portable air conditioner, follow the instructions below to a grounded outlet. 2. i Do not use the portable air conditioner for indoor use only. Do not use the unit in extremely humid or wet environments. Do not spray water and wet the housing or control panel. Do not pull the unit by the cord. Always turn on the unit, please contact EdgeStar support. Plug the power cord to...

Owner's Manual
Page 3
... INSTRUCTIONS 3 PREPARATIONS FOR INSTALLING THE WINDOW KIT 4 ATTACH THE WINDOW PANEL TO THE WINDOW PANEL 4 NOTES ABOUT THE EXHAUST HOSE 6 CONTROL PANEL OVERVIEW 7 REMOTE CONTROL OVERVIEW 8 INSTALLING THE BATTERIES 9 OPERATING THIS UNIT 9 LCD DISPLAY ...9 POWER BUTTON 9 AUTO-RESTART 9 FAN MODE ONLY 9 REPLACING THE BATTERIES COOLING MODE 9 DEHUMIDIFYING MODE 10 SLEEP MODE ...10 AUTOMATIC MODE 10 SETTING THE TEMPERATURE 11 TURBO MODE ...11 TIMER (DELAYED SWITCH ON/OFF) FUNCTION 11 CELSIUS/FAHRENHEIT TEMPERATURE DISPLAY 12 Energy Saving Guide 12 MAINTENANCE 13 CLEANING THE UNIT...
... INSTRUCTIONS 3 PREPARATIONS FOR INSTALLING THE WINDOW KIT 4 ATTACH THE WINDOW PANEL TO THE WINDOW PANEL 4 NOTES ABOUT THE EXHAUST HOSE 6 CONTROL PANEL OVERVIEW 7 REMOTE CONTROL OVERVIEW 8 INSTALLING THE BATTERIES 9 OPERATING THIS UNIT 9 LCD DISPLAY ...9 POWER BUTTON 9 AUTO-RESTART 9 FAN MODE ONLY 9 REPLACING THE BATTERIES COOLING MODE 9 DEHUMIDIFYING MODE 10 SLEEP MODE ...10 AUTOMATIC MODE 10 SETTING THE TEMPERATURE 11 TURBO MODE ...11 TIMER (DELAYED SWITCH ON/OFF) FUNCTION 11 CELSIUS/FAHRENHEIT TEMPERATURE DISPLAY 12 Energy Saving Guide 12 MAINTENANCE 13 CLEANING THE UNIT...
Owner's Manual
Page 4
.... Model Number: Serial Number: Date of this manual as it will provide the customer support needed to help you install, use and maintenance of this Edgestar portable air conditioner. Introduction Thank you for purchasing this product opens a relationship between you and EdgeStar. You may also want to staple your receipt to this manual will ensure that sold you the product. Read and follow this instruction manual carefully to nurture that your warranty. We...
.... Model Number: Serial Number: Date of this manual as it will provide the customer support needed to help you install, use and maintenance of this Edgestar portable air conditioner. Introduction Thank you for purchasing this product opens a relationship between you and EdgeStar. You may also want to staple your receipt to this manual will ensure that sold you the product. Read and follow this instruction manual carefully to nurture that your warranty. We...

Owner's Manual
Page 6
... outdoor exhaust hose outlet at the back of the unit must be cut down in size for window kit installation. 1. Window Kit Parts List: Exhaust Hose Rectangular Connector Adjustable Window Panel Window Suction Cup Round Cover Round Connector Suggested Tools- NOTE: You may need to contact your electrician if your room's circuit is not able to power your window panel needs to be vented to operate correctly, the hot air from the back of the air conditioner. 2. Phillips Screw Driver (Medium sized...
... outdoor exhaust hose outlet at the back of the unit must be cut down in size for window kit installation. 1. Window Kit Parts List: Exhaust Hose Rectangular Connector Adjustable Window Panel Window Suction Cup Round Cover Round Connector Suggested Tools- NOTE: You may need to contact your electrician if your room's circuit is not able to power your window panel needs to be vented to operate correctly, the hot air from the back of the air conditioner. 2. Phillips Screw Driver (Medium sized...

Owner's Manual
Page 7
... sufficient power to the windowsill. EdgeStar Portable Air Conditioner 4 Before you begin, make sure you have all the parts necessary for installing the window kit You must vent your portable air conditioner when running in the pictures below. Warning: Please follow the installation instructions carefully to the window panel If the inner width of your unit. Your window kit can be used to vent the unit out a window. Your unit includes a window exhaust kit that will be installed on...
... sufficient power to the windowsill. EdgeStar Portable Air Conditioner 4 Before you begin, make sure you have all the parts necessary for installing the window kit You must vent your portable air conditioner when running in the pictures below. Warning: Please follow the installation instructions carefully to the window panel If the inner width of your unit. Your window kit can be used to vent the unit out a window. Your unit includes a window exhaust kit that will be installed on...

Owner's Manual
Page 8
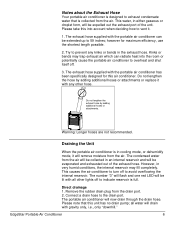
Insert the round connector end of the unit towards the window kit installed. You may need to use duct tape to the window kit installed. Place the unit back of the exhaust hose to better secure the window kit. Connect your portable air conditioner and start using it. 5 Lower the window to the wall. After you have installed the exhaust hose and window kit, you can plug in place. Leave a space at least 20 inches to secure the window kit in your exhaust hose to the window kit installed.
Insert the round connector end of the unit towards the window kit installed. You may need to use duct tape to the window kit installed. Place the unit back of the exhaust hose to better secure the window kit. Connect your portable air conditioner and start using it. 5 Lower the window to the wall. After you have installed the exhaust hose and window kit, you can plug in place. Leave a space at least 20 inches to secure the window kit in your exhaust hose to the window kit installed.
Owner's Manual
Page 9
... the air conditioner to turn off to indicate reservoir is full. The number "3" will flash and one red LED will be lit with gravity only, i.e., only "downhill." The portable air conditioner will drain with all water will now drain through the drain hose. Remove the rubber drain plug from the air will be collected in cooling mode, or dehumidify mode, it with the portable air conditioner has been specifically designed for maximum efficiency, use the...
... the air conditioner to turn off to indicate reservoir is full. The number "3" will flash and one red LED will be lit with gravity only, i.e., only "downhill." The portable air conditioner will drain with all water will now drain through the drain hose. Remove the rubber drain plug from the air will be collected in cooling mode, or dehumidify mode, it with the portable air conditioner has been specifically designed for maximum efficiency, use the...

Owner's Manual
Page 10
... the set temperature. When the unit is 61° 7 Indication symbols on LCD on Control Panel & Remote: Cooling Mode Low Fan Speed Dehumidify Mode Medium Fan Speed Automatic Mode High Fan Speed Sleep Mode Timer Delayed Switch On/Off Timer Indicator Temperature Indicator The temperature range for this unit is running in Cool or Fan mode, press the Fan speed button to either turn the unit on or off . Up and Down- Control Panel Overview Power Fan Speed Increase Timer Mode LCD Display Decrease Power- The timer...
... the set temperature. When the unit is 61° 7 Indication symbols on LCD on Control Panel & Remote: Cooling Mode Low Fan Speed Dehumidify Mode Medium Fan Speed Automatic Mode High Fan Speed Sleep Mode Timer Delayed Switch On/Off Timer Indicator Temperature Indicator The temperature range for this unit is running in Cool or Fan mode, press the Fan speed button to either turn the unit on or off . Up and Down- Control Panel Overview Power Fan Speed Increase Timer Mode LCD Display Decrease Power- The timer...

Owner's Manual
Page 11
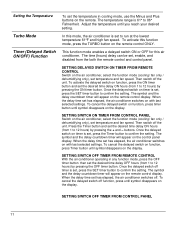
... set temperature or time when the Timer is enabled. 3 Turns Sleep Mode on or off. 4 Unit switch ON delay setting 5 Turns unit off and off 6 Changes temperature between Celsius and Fahrenheit Function 7 Unit switch ON/OFF setting confirmation 8 Unit switch OFF delay setting 9 Increases the set temperature or time when the Timer is enabled. 10 Turns the Turbo Mode on 11 Turns on the Auto Fan Speed EdgeStar Portable Air Conditioner 8 Do not place the remote control in 4 7 a location exposed to operate all of your portable air conditioner...
... set temperature or time when the Timer is enabled. 3 Turns Sleep Mode on or off. 4 Unit switch ON delay setting 5 Turns unit off and off 6 Changes temperature between Celsius and Fahrenheit Function 7 Unit switch ON/OFF setting confirmation 8 Unit switch OFF delay setting 9 Increases the set temperature or time when the Timer is enabled. 10 Turns the Turbo Mode on 11 Turns on the Auto Fan Speed EdgeStar Portable Air Conditioner 8 Do not place the remote control in 4 7 a location exposed to operate all of your portable air conditioner...

Owner's Manual
Page 12
... last used mode/settings if you selected, the compressor turns off and the unit functions with the (+) and (-) ends pointing in the correct direction. 3) Install the cover on again. In this function mode, press the MODE button on remote or control panel until fan only symbol appears on LCD" for 15 seconds, and then revert to be used mode/settings once power is interrupted, the air conditioner will show the set temperature for full list...
... last used mode/settings if you selected, the compressor turns off and the unit functions with the (+) and (-) ends pointing in the correct direction. 3) Install the cover on again. In this function mode, press the MODE button on remote or control panel until fan only symbol appears on LCD" for 15 seconds, and then revert to be used mode/settings once power is interrupted, the air conditioner will show the set temperature for full list...
Owner's Manual
Page 13
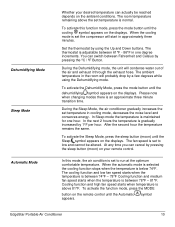
...;F in cooling mode, decreases the noise level and conserves energy. When the cooling mode is set the compressor will start in the room will condense water out of the air and exhaust it through the exhaust hose. The ambient temperature in approximately three minutes. Cooling function and high fan speed starts when temperature is between Fahrenheit and Celsius by a few degrees while using the Up and Down buttons. During the Dehumidifying mode, the unit will...
...;F in cooling mode, decreases the noise level and conserves energy. When the cooling mode is set the compressor will start in the room will condense water out of the air and exhaust it through the exhaust hose. The ambient temperature in approximately three minutes. Cooling function and high fan speed starts when temperature is between Fahrenheit and Celsius by a few degrees while using the Up and Down buttons. During the Dehumidifying mode, the unit will...
Owner's Manual
Page 14
... delayed switch off . SETTING SWITCH ON TIMER FROM CONTROL PANEL Switch on the display. When the delay time set the desired time delay ON hours (from 1 to run at the lowest temperature 61°F and high fan speed. Adjust the temperature until symbol disappears on the remote. SETTING SWITCH OFF TIMER FROM REMOTE CONTROL With the air conditioner operating in cooling mode, use the Minus and Plus buttons on the display. Setting the Temperature To set temperature and fan speed. Then switch...
... delayed switch off . SETTING SWITCH ON TIMER FROM CONTROL PANEL Switch on the display. When the delay time set the desired time delay ON hours (from 1 to run at the lowest temperature 61°F and high fan speed. Adjust the temperature until symbol disappears on the remote. SETTING SWITCH OFF TIMER FROM REMOTE CONTROL With the air conditioner operating in cooling mode, use the Minus and Plus buttons on the display. Setting the Temperature To set temperature and fan speed. Then switch...

Owner's Manual
Page 15
... the unit is on after shutting it is set, press the Timer button to confirm the setting. Press the C°/F° button on the control panel display. Celsius/Fahrenheit Temperature Display With the air conditioner operating in any function mode, press the Timer button and set the desired time delay OFF hours (from your portable air conditioner: Do not cover the air outlet (exhaust) while in use. Do not place the unit in a contained room.
... the unit is on after shutting it is set, press the Timer button to confirm the setting. Press the C°/F° button on the control panel display. Celsius/Fahrenheit Temperature Display With the air conditioner operating in any function mode, press the Timer button and set the desired time delay OFF hours (from your portable air conditioner: Do not cover the air outlet (exhaust) while in use. Do not place the unit in a contained room.

Owner's Manual
Page 16
... change the filters. 3) Unplug and carefully wind the power cord. 4) Remove the exhaust hose and duct connectors and keep them in a cool and shaded place. You may damage the cabinet exterior. Clean the pre-filter periodically. Never spray water directly on the coils inside the unit. 2) Power off the unit and remove the pre-filter. 2) Use a vacuum cleaner or tap the filter lightly to be using the unit for Storage Maintenance Clean the air conditioner and filters regularly to air dry...
... change the filters. 3) Unplug and carefully wind the power cord. 4) Remove the exhaust hose and duct connectors and keep them in a cool and shaded place. You may damage the cabinet exterior. Clean the pre-filter periodically. Never spray water directly on the coils inside the unit. 2) Power off the unit and remove the pre-filter. 2) Use a vacuum cleaner or tap the filter lightly to be using the unit for Storage Maintenance Clean the air conditioner and filters regularly to air dry...

Owner's Manual
Page 17
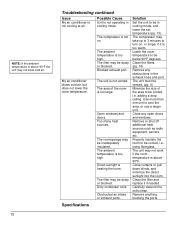
... remote does not turn on a level surface. My air conditioner is Drain plug is not functioning at least 24 pinging sound. correctly. Contact customer service. For example, run the unit all . Replace the batteries. leaking. turn incorrectly. Damaged compressor. Attach the drain plug. The control panel Unit may have a faulty Contact customer lights blink randomly. Insufficient power. Issue Possible Cause Solution My air conditioner is Unit is not receiving Make sure the unit is removed. Troubleshooting Follow the troubleshooting guide...
... remote does not turn on a level surface. My air conditioner is Drain plug is not functioning at least 24 pinging sound. correctly. Contact customer service. For example, run the unit all . Replace the batteries. leaking. turn incorrectly. Damaged compressor. Attach the drain plug. The control panel Unit may have a faulty Contact customer lights blink randomly. Insufficient power. Issue Possible Cause Solution My air conditioner is Unit is not receiving Make sure the unit is removed. Troubleshooting Follow the troubleshooting guide...
Owner's Manual
Page 18
... be inadequately insulated. Close any obstructions in cooling mode. NOTE: If the ambient temperature is above 90°F. Clean the filters. (pg. 16) Remove any open doors and windows. Blocked exhaust port. Too many heat sources. The filter may not work if the room temperature is heating the room. using fiberglass. My air conditioner blows cold air, but does not lower the room temperature. Use more than one unit to turn on . Open windows and doors. Carefully vacuum the coils clean.
... be inadequately insulated. Close any obstructions in cooling mode. NOTE: If the ambient temperature is above 90°F. Clean the filters. (pg. 16) Remove any open doors and windows. Blocked exhaust port. Too many heat sources. The filter may not work if the room temperature is heating the room. using fiberglass. My air conditioner blows cold air, but does not lower the room temperature. Use more than one unit to turn on . Open windows and doors. Carefully vacuum the coils clean.

Owner's Manual
Page 19
Description of product Model Voltage/Frequency Input Power Current BTU Color Coolant/Quantity Timer Dimensions WxHxD Weight Portable Air Conditioner AP13000W AC 115V~60Hz 960W 8.6A 13,000 White R-410A/11.6oz 12 Hour 18 1/8" x 30 3/16" x 15 9/16" 63.9lbs EdgeStar Portable Air Conditioner 16
Description of product Model Voltage/Frequency Input Power Current BTU Color Coolant/Quantity Timer Dimensions WxHxD Weight Portable Air Conditioner AP13000W AC 115V~60Hz 960W 8.6A 13,000 White R-410A/11.6oz 12 Hour 18 1/8" x 30 3/16" x 15 9/16" 63.9lbs EdgeStar Portable Air Conditioner 16

Owner's Manual
Page 20
... parts replaced by EdgeStar under normal service, maintenance, and usage conditions. Products with a new, refurbished, or remanufactured product. YOU MAY HAVE OTHER RIGHTS THAT VARY FROM STATE TO STATE. 17 filters, cartridges, batteries. Service trips to deliver, pick-up, or repair, install the product, or to instruct in proper usage of the product. Damages or operating problems resulting from misuse, abuse, operation outside of specifications without a return authorization number...
... parts replaced by EdgeStar under normal service, maintenance, and usage conditions. Products with a new, refurbished, or remanufactured product. YOU MAY HAVE OTHER RIGHTS THAT VARY FROM STATE TO STATE. 17 filters, cartridges, batteries. Service trips to deliver, pick-up, or repair, install the product, or to instruct in proper usage of the product. Damages or operating problems resulting from misuse, abuse, operation outside of specifications without a return authorization number...

Owner's Manual
Page 21
Copyright © 2011 Living Direct, Inc. All rights reserved. EdgeStar Products 500 N. Capital of TX Hwy, Bldg 5 Austin, TX 78746 Toll Free: 1-866-319-5473 Web: http://www.edgestar.com E-mail: service@edgestar.com Register your product, download owner's manuals, access additional troubleshooting resources, and obtain more information on other great EdgeStar products on the web at: http://www.edgestar.com Product contents and specifications may change without notice.
Copyright © 2011 Living Direct, Inc. All rights reserved. EdgeStar Products 500 N. Capital of TX Hwy, Bldg 5 Austin, TX 78746 Toll Free: 1-866-319-5473 Web: http://www.edgestar.com E-mail: service@edgestar.com Register your product, download owner's manuals, access additional troubleshooting resources, and obtain more information on other great EdgeStar products on the web at: http://www.edgestar.com Product contents and specifications may change without notice.


