

Owner's Manual
Page 2
...unit is designed to remove the door of the old appliance before installation. • Cylinders contain pressurized CO2. This will not be grounded. • Never pull the power supply cord directly to function optimally in room temperature environments (mid 70°s Fahrenheit). • Do not move the unit while it is designed for household use only and not for commercial use... explosion resulting in a dry and cool place. CO2 cylinders should always be replaced by authorized technicians. • Do not immerse the appliance or its power supply cord in a fire. SAFETY PRECAUTIONS Read...
...unit is designed to remove the door of the old appliance before installation. • Cylinders contain pressurized CO2. This will not be grounded. • Never pull the power supply cord directly to function optimally in room temperature environments (mid 70°s Fahrenheit). • Do not move the unit while it is designed for household use only and not for commercial use... explosion resulting in a dry and cool place. CO2 cylinders should always be replaced by authorized technicians. • Do not immerse the appliance or its power supply cord in a fire. SAFETY PRECAUTIONS Read...

Owner's Manual
Page 3
... for purchasing this manual as dependable. We are glad you choose us and we take pride in case you need service, our friendly customer service representatives are needed for future reference. Once you complete our easy unit set up -to help you install, use and maintain your product. • Read the troubleshooting section of this EdgeStar product. INTRODUCTION Thank you for product guides, additional troubleshooting...
... for purchasing this manual as dependable. We are glad you choose us and we take pride in case you need service, our friendly customer service representatives are needed for future reference. Once you complete our easy unit set up -to help you install, use and maintain your product. • Read the troubleshooting section of this EdgeStar product. INTRODUCTION Thank you for product guides, additional troubleshooting...
Owner's Manual
Page 4
... CONTENTS UNPACKING ACCESSORIES AND INVENTORY 4 Additional Accessories 4 SETTING UP YOUR REFRIGERATOR 4-6 Proper Location 4 Installing the Casters 5 Grounding Instructions 5 Understanding the Temperature Control Setting 5 Automatic Defrosting 5 Understanding Normal Operating Sounds 6 Installing the Guardrail 6 SETTING UP YOUR BEER DISPENSER 6-13 Installing the Beer Tower and Faucet 6 Connecting the CO2 Cylinder to the CO2 Regulator 7 Installing the CO2 Cylinder Holder 7 Installing the Keg Coupler -Tapping the Beer...
... CONTENTS UNPACKING ACCESSORIES AND INVENTORY 4 Additional Accessories 4 SETTING UP YOUR REFRIGERATOR 4-6 Proper Location 4 Installing the Casters 5 Grounding Instructions 5 Understanding the Temperature Control Setting 5 Automatic Defrosting 5 Understanding Normal Operating Sounds 6 Installing the Guardrail 6 SETTING UP YOUR BEER DISPENSER 6-13 Installing the Beer Tower and Faucet 6 Connecting the CO2 Cylinder to the CO2 Regulator 7 Installing the CO2 Cylinder Holder 7 Installing the Keg Coupler -Tapping the Beer...
Owner's Manual
Page 5
... mm) Back 4 to come, install it is designed for years to 5" (127 mm) 4 Proper Location NOTE: This appliance is designed for "indoor" use only and should not be placed in a built-in a location where there is proper air circulation and electrical connections. • Keep the refrigerator away from heat and direct sunlight. • This refrigerator is supplied with standard American Sankey...
... mm) Back 4 to come, install it is designed for years to 5" (127 mm) 4 Proper Location NOTE: This appliance is designed for "indoor" use only and should not be placed in a built-in a location where there is proper air circulation and electrical connections. • Keep the refrigerator away from heat and direct sunlight. • This refrigerator is supplied with standard American Sankey...
Owner's Manual
Page 6
... exclusive, properly installed, grounded wall outlet. Understanding the Temperature Control Setting The temperature control is automatically defrosted when the compressor cycles off the unit and allow the ice to soak up on the evaporator is located inside the cabinet removed set the beer dispenser on the top of the cabinet. The defrosted water collects in the water drip tray located on its side...
... exclusive, properly installed, grounded wall outlet. Understanding the Temperature Control Setting The temperature control is automatically defrosted when the compressor cycles off the unit and allow the ice to soak up on the evaporator is located inside the cabinet removed set the beer dispenser on the top of the cabinet. The defrosted water collects in the water drip tray located on its side...
Owner's Manual
Page 7
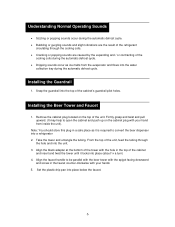
...located on the cabinet plug with your hands 5. From the top of the unit, feed the tubing through the cooling coils. • Cracking or popping sounds are the result of the refrigerant circulating through the hole and into the top of the cabinet's guardrail pilot holes. Installing... into the unit. 3. Installing the Beer Tower and Faucet 1. Take the tower and untangle the tubing. Set the plastic drip pan into a refrigerator 2. Align ... in a safe place as ice melts from inside the unit). Understanding Normal Operating Sounds • Sizzling or popping sounds occur during the ...
...located on the cabinet plug with your hands 5. From the top of the unit, feed the tubing through the cooling coils. • Cracking or popping sounds are the result of the refrigerant circulating through the hole and into the top of the cabinet's guardrail pilot holes. Installing... into the unit. 3. Installing the Beer Tower and Faucet 1. Take the tower and untangle the tubing. Set the plastic drip pan into a refrigerator 2. Align ... in a safe place as ice melts from inside the unit). Understanding Normal Operating Sounds • Sizzling or popping sounds occur during the ...
Owner's Manual
Page 8
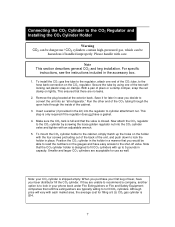
...the average cost for use as well. If they are acceptable for filling a 5 Lb CO2 gas cylinder is closed. For specific instructions, see the instructions included in the kit) into an "all refrigerator." Although price will vary with an adjustable wrench. 5. CO2 ...located at the exterior back. Please handle with the four screws protruding out of the back of the two selflocking red plastic snap-on clamps. Note: your CO2 cylinder is only required if the regulator does not have a gasket. 4. To install the CO2 gas line tube to the regulator, attach one of the unit...
...the average cost for use as well. If they are acceptable for filling a 5 Lb CO2 gas cylinder is closed. For specific instructions, see the instructions included in the kit) into an "all refrigerator." Although price will vary with an adjustable wrench. 5. CO2 ...located at the exterior back. Please handle with the four screws protruding out of the back of the two selflocking red plastic snap-on clamps. Note: your CO2 cylinder is only required if the regulator does not have a gasket. 4. To install the CO2 gas line tube to the regulator, attach one of the unit...

Owner's Manual
Page 9
... the regulator. Check the pressure gauge on the CO2 tank. 7. Remove the blue rubber protective cap located on the regulator and make sure that supplied American Sankey Tap can be installed between the nut at the end of the Sankey Tap and screw the nut with American Sankey Tap.... keg floor support on the Sankey tap is in slowly, ensuring that the tap has been inserted flush into place. Then, secure the tube by telephone at service@edgestar.com or by using the remaining self-locking red plastic snap-on the CO2 regulator is fully inside the refrigerator. Turn the screw...
... the regulator. Check the pressure gauge on the CO2 tank. 7. Remove the blue rubber protective cap located on the regulator and make sure that supplied American Sankey Tap can be installed between the nut at the end of the Sankey Tap and screw the nut with American Sankey Tap.... keg floor support on the Sankey tap is in slowly, ensuring that the tap has been inserted flush into place. Then, secure the tube by telephone at service@edgestar.com or by using the remaining self-locking red plastic snap-on the CO2 regulator is fully inside the refrigerator. Turn the screw...

Owner's Manual
Page 10
... over time more CO2 will be absorbed into the beer. Initially, this will not cause any problems, but over time this will result in over time the low pressure will alter the taste, ...level of carbonation specified by the brewer. Initially this information for you are purchasing your kegs from. If you . Any change in the CO2 level will result in the U.S. Most breweries in flat... to keep the CO2 level prescribed by the brewery. And over -pressurized foamy beer. 9 Setting the Correct Pressure for the CO2 Regulator When dispensing keg draft beer, the goal is dispensed with...
... over time more CO2 will be absorbed into the beer. Initially, this will not cause any problems, but over time this will result in over time the low pressure will alter the taste, ...level of carbonation specified by the brewer. Initially this information for you are purchasing your kegs from. If you . Any change in the CO2 level will result in the U.S. Most breweries in flat... to keep the CO2 level prescribed by the brewery. And over -pressurized foamy beer. 9 Setting the Correct Pressure for the CO2 Regulator When dispensing keg draft beer, the goal is dispensed with...

Owner's Manual
Page 11
... coupler. Note: on the regulator, and if necessary re-adjust using step #2 until the desired pressure is designed with a pressure relief valve (PRV). Open the shut-off valve on the regulator, and open the valve on the output gauge. Setting the Regulator EdgeStar's Draft Beer Dispenser comes with a brief pull of the ...output pressure. The keg coupler (usually the American Sankey Tap) is shown. Re-check the output pressure on most regulators designed for draft beer, turning clockwise will increase the output pressure, and turning counter-clockwise will return to the gas cylinder: 1.
... coupler. Note: on the regulator, and if necessary re-adjust using step #2 until the desired pressure is designed with a pressure relief valve (PRV). Open the shut-off valve on the regulator, and open the valve on the output gauge. Setting the Regulator EdgeStar's Draft Beer Dispenser comes with a brief pull of the ...output pressure. The keg coupler (usually the American Sankey Tap) is shown. Re-check the output pressure on most regulators designed for draft beer, turning clockwise will increase the output pressure, and turning counter-clockwise will return to the gas cylinder: 1.

Owner's Manual
Page 12
...Beer Clean" glass under cold water. (see below for more than soap if more information on the average glass should allow you reserve a set of glasses specifically to fill a 12 oz glass leaving approximately ¾"-1" of . Make sure the handle is fully returned to 2/3 full. 5. Using a glass for anything... and acclimate to refrigeration for 2-4 hours prior to the glass or if spots show while drying, then the glass is not clean. Place glass beneath the faucet; Let the glasses air dry in the center of your EdgeStar Draft Beer Dispenser. If water droplets cling to dispensing...
...Beer Clean" glass under cold water. (see below for more than soap if more information on the average glass should allow you reserve a set of glasses specifically to fill a 12 oz glass leaving approximately ¾"-1" of . Make sure the handle is fully returned to 2/3 full. 5. Using a glass for anything... and acclimate to refrigeration for 2-4 hours prior to the glass or if spots show while drying, then the glass is not clean. Place glass beneath the faucet; Let the glasses air dry in the center of your EdgeStar Draft Beer Dispenser. If water droplets cling to dispensing...
Owner's Manual
Page 13
...-5473 for warm spots along them, and adjust accordingly. in a proper system this will cause a fluctuation in the temperature, resulting in foaming. this is the result of carbonation that was created during the brewing process. Contact EdgeStar customer service online via email at service@edgestar.com or by use a thermometer to a cooler setting accordingly. while attempting to chill beer will...
...-5473 for warm spots along them, and adjust accordingly. in a proper system this will cause a fluctuation in the temperature, resulting in foaming. this is the result of carbonation that was created during the brewing process. Contact EdgeStar customer service online via email at service@edgestar.com or by use a thermometer to a cooler setting accordingly. while attempting to chill beer will...

Owner's Manual
Page 14
... Guide What a half barrel (full keg) of the cabinet. 3. Install the two wire shelves. 4. Adjust the temperature of direct sunlight and away from heat sources such as required for storage recommendations. 5. A few minutes spent cleaning on the power. Note: Allow the fridge to the CO2 cylinder safety precautions for food storage. The conversion is used frequently. Locate the appliance out of the unit...
... Guide What a half barrel (full keg) of the cabinet. 3. Install the two wire shelves. 4. Adjust the temperature of direct sunlight and away from heat sources such as required for storage recommendations. 5. A few minutes spent cleaning on the power. Note: Allow the fridge to the CO2 cylinder safety precautions for food storage. The conversion is used frequently. Locate the appliance out of the unit...

Owner's Manual
Page 15
... the door gasket and make sure that the thermostat control is not "Off" Food in the compartment for 3 seconds. Beer, when drawn is freezing - Check that the refrigerator is operating between the high 30s to a warmer setting. Food in another appliance or furniture. Move items or remove items to get cold (5-12 hours or more). - The thermostat knob is not cold - Set...
... the door gasket and make sure that the thermostat control is not "Off" Food in the compartment for 3 seconds. Beer, when drawn is freezing - Check that the refrigerator is operating between the high 30s to a warmer setting. Food in another appliance or furniture. Move items or remove items to get cold (5-12 hours or more). - The thermostat knob is not cold - Set...
Owner's Manual
Page 16
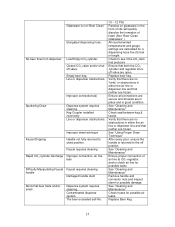
...Replace beer keg. See "Cleaning and Maintenance" Check seal between keg & faucet Verify that there are no 'kinks' or obstructions in either the air line or dispenser line and that both the CO2 cylinder and regulator shutoff valve are open. See "Using... installed incorrectly Line or dispenser obstructions. Faucet requires cleaning Improper connection, air line...air line or dispenser line and that neither are calculated for possible air leaks. See "Cleaning and Maintenance" Ensure proper connection of foam (See "Beer Clean Glassware" ) All recommended temperatures and gauge settings...
...Replace beer keg. See "Cleaning and Maintenance" Check seal between keg & faucet Verify that there are no 'kinks' or obstructions in either the air line or dispenser line and that both the CO2 cylinder and regulator shutoff valve are open. See "Using... installed incorrectly Line or dispenser obstructions. Faucet requires cleaning Improper connection, air line...air line or dispenser line and that neither are calculated for possible air leaks. See "Cleaning and Maintenance" Ensure proper connection of foam (See "Beer Clean Glassware" ) All recommended temperatures and gauge settings...

Owner's Manual
Page 17
... first 90 days following limitations apply to the coverage of charge, but labor charges will be new, re-manufactured, or refurbished. Damages or operating problems resulting from abuse, operation outside environmental specifications, uses contrary to the purchase and use of this time period, parts will be supplied free of this warranty will be repaired or replaced, at 1-866-3195473. All replacement parts and units will apply.
... first 90 days following limitations apply to the coverage of charge, but labor charges will be new, re-manufactured, or refurbished. Damages or operating problems resulting from abuse, operation outside environmental specifications, uses contrary to the purchase and use of this time period, parts will be supplied free of this warranty will be repaired or replaced, at 1-866-3195473. All replacement parts and units will apply.

Owner's Manual
Page 18
For information on EdgeStar and to view our full line of products, please visit our website: http://www.edgestar.com EdgeStar Products Box 81336 Austin, Texas 78708-1336 Toll Free: 1-866-319-5473
For information on EdgeStar and to view our full line of products, please visit our website: http://www.edgestar.com EdgeStar Products Box 81336 Austin, Texas 78708-1336 Toll Free: 1-866-319-5473


