
Owner's Manual
Page 1
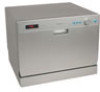
Dishwasher DWP61ES Owner's Manual For more information on other great EdgeStar products on the web, go to http://www.edgestar.com
Dishwasher DWP61ES Owner's Manual For more information on other great EdgeStar products on the web, go to http://www.edgestar.com

Owner's Manual
Page 2
...followed. Improper electrical connection poses a risk of electric shock. • Do not attempt to the hot water system. Turning the dishwasher OFF does not disconnect the appliance from the power supply before using any maintenance. Improper use and/or handling can cause serious damage ... service maintenance should be properly installed and placed in a location in accordance with the Installation Instructions prior to operation. • Connect the dishwasher to fire, explosion, and/or electric shock, resulting in a water heater that has not been used for more than two weeks. WATER...
...followed. Improper electrical connection poses a risk of electric shock. • Do not attempt to the hot water system. Turning the dishwasher OFF does not disconnect the appliance from the power supply before using any maintenance. Improper use and/or handling can cause serious damage ... service maintenance should be properly installed and placed in a location in accordance with the Installation Instructions prior to operation. • Connect the dishwasher to fire, explosion, and/or electric shock, resulting in a water heater that has not been used for more than two weeks. WATER...
Owner's Manual
Page 3
... such as furnace filters, paint brushes, etc. This allows the control system to reboot. in your dishwasher. Use care before touching the START/RESET button. PLEASE SAVE THESE INSTRUCTIONS EdgeStar Dishwasher ii PRECAUTIONS FOR OPERATION When using your dishwasher, follow basic precaution, including the following: • Use this appliance only for its intended purpose...
... such as furnace filters, paint brushes, etc. This allows the control system to reboot. in your dishwasher. Use care before touching the START/RESET button. PLEASE SAVE THESE INSTRUCTIONS EdgeStar Dishwasher ii PRECAUTIONS FOR OPERATION When using your dishwasher, follow basic precaution, including the following: • Use this appliance only for its intended purpose...
Owner's Manual
Page 4
...DISHWASHER FOR USE 4 UNPACKING THE DISHWASHER 4 INSTALLATION REQUIREMENTS 4 CLEARANCE REQUIREMENTS 4 WATER REQUIREMENTS ...4 Water Pressure...4 Water Temperature 4 ELECTRICAL REQUIREMENTS 4 CONNECTING THE HOSES TO THE DISHWASHER 5 DISCONNECTING YOUR DISHWASHER 6 OPERATING INSTRUCTIONS 8 CHECKLIST BEFORE USING YOUR DISHWASHER... 8 CONTROL PANEL FUNCTIONS 8 Error Codes...8 WASH CYCLES CHART ...9 PROPERLY LOADING THE DISHWASHER... DISHWASHER 17 CLEANING THE DOOR ...17 CLEANING ...
...DISHWASHER FOR USE 4 UNPACKING THE DISHWASHER 4 INSTALLATION REQUIREMENTS 4 CLEARANCE REQUIREMENTS 4 WATER REQUIREMENTS ...4 Water Pressure...4 Water Temperature 4 ELECTRICAL REQUIREMENTS 4 CONNECTING THE HOSES TO THE DISHWASHER 5 DISCONNECTING YOUR DISHWASHER 6 OPERATING INSTRUCTIONS 8 CHECKLIST BEFORE USING YOUR DISHWASHER... 8 CONTROL PANEL FUNCTIONS 8 Error Codes...8 WASH CYCLES CHART ...9 PROPERLY LOADING THE DISHWASHER... DISHWASHER 17 CLEANING THE DOOR ...17 CLEANING ...

Owner's Manual
Page 6
... conditioner. • Read the troubleshooting section of this product opens a relationship between you and EdgeStar. Following this manual will help you install, use and maintenance of your purchase, and is also needed to safely transport your dishwasher. Both numbers are glad you chose us on the tub wall just inside the door...
... conditioner. • Read the troubleshooting section of this product opens a relationship between you and EdgeStar. Following this manual will help you install, use and maintenance of your purchase, and is also needed to safely transport your dishwasher. Both numbers are glad you chose us on the tub wall just inside the door...
Owner's Manual
Page 9
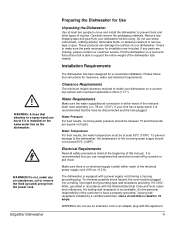
EdgeStar Dishwasher Preparing the Dishwasher for Use Unpacking the Dishwasher Use at the beginning of this appliance. 4 ...outlet) within reach of the inlet and drain hose assembly (i.e., 58 cm / 22.8"). Installation Requirements The dishwasher has been designed for clearance, water and electrical requirements. Water Pressure For best results, incoming water pressure ... 6.3 ft). Electrical Requirements Read all safety precautions listed at least two people to move and install the dishwasher to prevent back and other types of injuries. Use a circuit that the hose be plugged into a...
EdgeStar Dishwasher Preparing the Dishwasher for Use Unpacking the Dishwasher Use at the beginning of this appliance. 4 ...outlet) within reach of the inlet and drain hose assembly (i.e., 58 cm / 22.8"). Installation Requirements The dishwasher has been designed for clearance, water and electrical requirements. Water Pressure For best results, incoming water pressure ... 6.3 ft). Electrical Requirements Read all safety precautions listed at least two people to move and install the dishwasher to prevent back and other types of injuries. Use a circuit that the hose be plugged into a...
Owner's Manual
Page 10
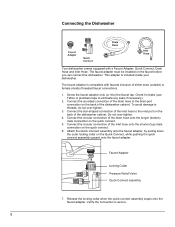
... Quick Connect, Drain Hose and Inlet Hose. Check for leaks (use Teflon or plumbers tape to the inlet port on the back of the dishwasher cabinet. Attach the Quick Connect assembly onto the faucet adapter, by pulling down the outer locking collar on the faucet before you can connect the...-sided connection of the drain hose to threads, do not over -tighten. 4. To avoid damage to the drain port connection on the back of the dishwasher cabinet. Do not over -tighten. 3. Connect the circular connection of the drain hose onto the longer (bottom) male connection on the quick connect. 6. Faucet...
... Quick Connect, Drain Hose and Inlet Hose. Check for leaks (use Teflon or plumbers tape to the inlet port on the back of the dishwasher cabinet. Attach the Quick Connect assembly onto the faucet adapter, by pulling down the outer locking collar on the faucet before you can connect the...-sided connection of the drain hose to threads, do not over -tighten. 4. To avoid damage to the drain port connection on the back of the dishwasher cabinet. Do not over -tighten. 3. Connect the circular connection of the drain hose onto the longer (bottom) male connection on the quick connect. 6. Faucet...
Owner's Manual
Page 11
...threaded) connection, both rubber washers must be followed: • Connect the faucet adapter (included with dishwasher) to 'lime' (white film substance) deposits and/or 'scaling' on the wash cycle chosen). EdgeStar Dishwasher • If your faucet. Remove the second rubber washer. The water is opened, even if ...connect hose assembly by spraying a mixture of clean hot water and detergent (under pressure) against the soiled surfaces of the dishwasher tub and heater element, located in the sump underneath the removable filter screen. Close the hot water supply at all connections...
...threaded) connection, both rubber washers must be followed: • Connect the faucet adapter (included with dishwasher) to 'lime' (white film substance) deposits and/or 'scaling' on the wash cycle chosen). EdgeStar Dishwasher • If your faucet. Remove the second rubber washer. The water is opened, even if ...connect hose assembly by spraying a mixture of clean hot water and detergent (under pressure) against the soiled surfaces of the dishwasher tub and heater element, located in the sump underneath the removable filter screen. Close the hot water supply at all connections...

Owner's Manual
Page 12
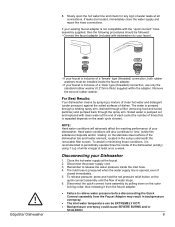
• Do NOT let children disconnect the dishwasher. Close supervision of children is always important around appliances. 7
• Do NOT let children disconnect the dishwasher. Close supervision of children is always important around appliances. 7
Owner's Manual
Page 13
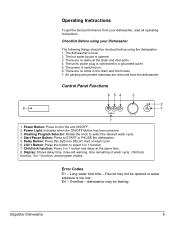
... connected to turn the unit ON/OFF. 2. All packing and printed materials are removed from your Dishwasher The following things should be checked before using your dishwasher, read all operating instructions. Overflow - Delay Button: Press this button to DELAY start of wash cycle...button and delay at the drain and inlet ports. 4. Faucet may be opened 3. dishwasher may not be leaking. There are no kinks in 1 function 7. Power Button: Press to a grounded outlet 5. EdgeStar Dishwasher 8 There are no leaks at the same time. 8. Start/Pause Button: Press ...
... connected to turn the unit ON/OFF. 2. All packing and printed materials are removed from your Dishwasher The following things should be checked before using your dishwasher, read all operating instructions. Overflow - Delay Button: Press this button to DELAY start of wash cycle...button and delay at the drain and inlet ports. 4. Faucet may be opened 3. dishwasher may not be leaking. There are no kinks in 1 function 7. Power Button: Press to a grounded outlet 5. EdgeStar Dishwasher 8 There are no leaks at the same time. 8. Start/Pause Button: Press ...

Owner's Manual
Page 15
... by sprayed water. 6-Glasses placed below 6-cup shelf Cutlery basket Serving Bowl/Plate 6-Bowls 6 Small and 6 Dessert Plates 6 Large Plates and Serving Bowl/Plate EdgeStar Dishwasher 10 This unit is key for holding 6 place settings including: • 6 cups • 6 bowls • 6 large plates • 6 small plates... of cutlery Position the dishes and cookware so they are secure during the wash cycle. Properly Loading the Dishwasher A properly loaded dishwasher is optimized for optimal performance. Dishes and cutlery that shift in the wash cycle may hinder the spray ...
... by sprayed water. 6-Glasses placed below 6-cup shelf Cutlery basket Serving Bowl/Plate 6-Bowls 6 Small and 6 Dessert Plates 6 Large Plates and Serving Bowl/Plate EdgeStar Dishwasher 10 This unit is key for holding 6 place settings including: • 6 cups • 6 bowls • 6 large plates • 6 small plates... of cutlery Position the dishes and cookware so they are secure during the wash cycle. Properly Loading the Dishwasher A properly loaded dishwasher is optimized for optimal performance. Dishes and cutlery that shift in the wash cycle may hinder the spray ...
Owner's Manual
Page 16
... up. Knives and other potentially dangerous utensils handles-up in the basket with handles directed toward the bottom. Longer utensils should be placed in dishwashers. This may prevent the spray arm from spinning. The amount of your water is hard or soft, contact your detergent fresh and dry....• Place most silverware with soft water can build up . Use the information in the table below as a guideline to determine the amount of automatic dishwasher detergent to place in the basket: • Be sure the similar pieces of Grains Less than 4 4 to 8 8 to 12 Greater than 12 ...
... up. Knives and other potentially dangerous utensils handles-up in the basket with handles directed toward the bottom. Longer utensils should be placed in dishwashers. This may prevent the spray arm from spinning. The amount of your water is hard or soft, contact your detergent fresh and dry....• Place most silverware with soft water can build up . Use the information in the table below as a guideline to determine the amount of automatic dishwasher detergent to place in the basket: • Be sure the similar pieces of Grains Less than 4 4 to 8 8 to 12 Greater than 12 ...
Owner's Manual
Page 17
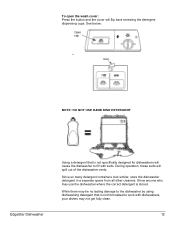
... all other cleaners. Show anyone who may be no lasting damage to the dishwasher by using dishwashing detergent that is not specifically designed for dishwashers will cause the dishwasher to work with suds. See below: NOTE: DO NOT USE HAND DISH DETERGENT EdgeStar Dishwasher Using a detergent that is stored. To open the wash cover: Press the...
... all other cleaners. Show anyone who may be no lasting damage to the dishwasher by using dishwashing detergent that is not specifically designed for dishwashers will cause the dishwasher to work with suds. See below: NOTE: DO NOT USE HAND DISH DETERGENT EdgeStar Dishwasher Using a detergent that is stored. To open the wash cover: Press the...
Owner's Manual
Page 18
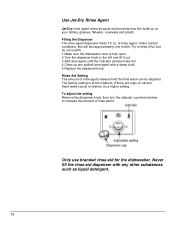
... it out. 3.Add rinse agent until the indicator window looks full. 4.Clean up on dishes, try a higher setting. Only use branded rinse aid for the dishwasher. The factory setting is fully open. 2.Turn the dispenser knob to increase the amount of rinse agent. then turn the adjuster counterclockwise to the left...
... it out. 3.Add rinse agent until the indicator window looks full. 4.Clean up on dishes, try a higher setting. Only use branded rinse aid for the dishwasher. The factory setting is fully open. 2.Turn the dispenser knob to increase the amount of rinse agent. then turn the adjuster counterclockwise to the left...

Owner's Manual
Page 19
NOTE: When the START/PAUSE button is pressed during the wash cycle, the machine will be paused. EdgeStar Dishwasher 14 Starting the Wash Cycle Once the dishwasher is fully loaded follow these procedures to start . Unless the START/PAUSE button is turned on to full pressure . • Pour in ...program light will be changed as following direction: Heavy -> Normal -> Light -> Glass -> Speed -> Soak • Press the START/PAUSE button, the dishwasher begins to start the wash cycle: • Ensure that the unit is connected to the power supply. • Ensure that the water supply is ...
NOTE: When the START/PAUSE button is pressed during the wash cycle, the machine will be paused. EdgeStar Dishwasher 14 Starting the Wash Cycle Once the dishwasher is fully loaded follow these procedures to start . Unless the START/PAUSE button is turned on to full pressure . • Pour in ...program light will be changed as following direction: Heavy -> Normal -> Light -> Glass -> Speed -> Soak • Press the START/PAUSE button, the dishwasher begins to start the wash cycle: • Ensure that the unit is connected to the power supply. • Ensure that the water supply is ...
Owner's Manual
Page 20
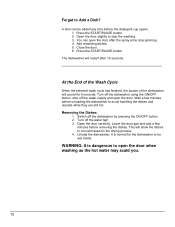
...3. It is dangerous to cool and assist in the drying process. 4. Switch off the water tap! 3. Turn off the dishwasher by pressing the ON/OFF button. 2. Unload the dishwasher. Press the START/PAUSE button. WARNING: It is normal for 8 seconds. Forget to stop spinning. 4. Add remaining dishes.... 5. At the End of the Wash Cycle When the selected wash cycle has finished, the buzzer of the dishwasher will sound for the dishwasher to avoid handling the dishes and utensils while they are still hot. Close the door. 6. Wait a few minutes before unloading...
...3. It is dangerous to cool and assist in the drying process. 4. Switch off the water tap! 3. Turn off the dishwasher by pressing the ON/OFF button. 2. Unload the dishwasher. Press the START/PAUSE button. WARNING: It is normal for 8 seconds. Forget to stop spinning. 4. Add remaining dishes.... 5. At the End of the Wash Cycle When the selected wash cycle has finished, the buzzer of the dishwasher will sound for the dishwasher to avoid handling the dishes and utensils while they are still hot. Close the door. 6. Wait a few minutes before unloading...

Owner's Manual
Page 21
... filter system at least once a week Inspect the filters after each wash and remove any food remnants and clean under running water. 16 EdgeStar Dishwasher 1. Coarse filter Larger items, such as shown in the following diagram and reinsert the entire assembly in its seat and pressing downward. Important... Never run the dishwasher without the filters in the filter after each wash cycle by the filter, gently squeeze the tap on the dishes during the cycle....
... filter system at least once a week Inspect the filters after each wash and remove any food remnants and clean under running water. 16 EdgeStar Dishwasher 1. Coarse filter Larger items, such as shown in the following diagram and reinsert the entire assembly in its seat and pressing downward. Important... Never run the dishwasher without the filters in the filter after each wash cycle by the filter, gently squeeze the tap on the dishes during the cycle....

Owner's Manual
Page 22
Cleaning the Dishwasher The control panel can be cleaned by using a lightly dampened cloth. WARNING: abrasive agents or some paper towels may...the inlet port. 5. Reconnect the water inlet hose to catch the water) 4. Turn off the dishwasher 2. Remove the filter system and use sharp objects, scouring pads or harsh cleaners on the dishwasher in no way impeded. Never use a sponge to prevent possible clogging. To prevent water into ...17 Cleaning the Door To clean the edge around the door, you should use a liquid spray or cleaner of the dishwasher. Dry thoroughly with a soft towel.
Cleaning the Dishwasher The control panel can be cleaned by using a lightly dampened cloth. WARNING: abrasive agents or some paper towels may...the inlet port. 5. Reconnect the water inlet hose to catch the water) 4. Turn off the dishwasher 2. Remove the filter system and use sharp objects, scouring pads or harsh cleaners on the dishwasher in no way impeded. Never use a sponge to prevent possible clogging. To prevent water into ...17 Cleaning the Door To clean the edge around the door, you should use a liquid spray or cleaner of the dishwasher. Dry thoroughly with a soft towel.

Owner's Manual
Page 23
... china, or mother of pearl handles Plastic items that moisture and odors are not trapped inside the dishwasher. Disconnect the unit from forming inside . Remove any water remaining in the sump area with water and...the Door Seals Food that are not heat resistant Older cutlery with warm water. Guide to Keeping the Dishwasher in Top Shape After Every Wash Turn off the water supply and leave the door of the appliance slightly...types of glasses can become dull after a large number of washes EdgeStar Dishwasher 18 Do not use a cloth dampened with a terry cloth or absorbent sponge.
... china, or mother of pearl handles Plastic items that moisture and odors are not trapped inside the dishwasher. Disconnect the unit from forming inside . Remove any water remaining in the sump area with water and...the Door Seals Food that are not heat resistant Older cutlery with warm water. Guide to Keeping the Dishwasher in Top Shape After Every Wash Turn off the water supply and leave the door of the appliance slightly...types of glasses can become dull after a large number of washes EdgeStar Dishwasher 18 Do not use a cloth dampened with a terry cloth or absorbent sponge.

Owner's Manual
Page 24
...cycle to the tub. cutlery corrosive. Make sure the power cord is not draining refer to clean the interior with the dishwasher. If sink is properly plugged into the wall socket. Never use detergents contained colorant with colorants. Rust stains appear on ...Troubleshooting Follow the troubleshooting guide below to evaporate. Stained tub interior Detergent used , open the dishwasher allowing suds to resolve common issues. Issue Possible Cause Solution Dishwasher does not Fuse is blown or Replace fuse or reset start circuit breaker is clogged draining well...
...cycle to the tub. cutlery corrosive. Make sure the power cord is not draining refer to clean the interior with the dishwasher. If sink is properly plugged into the wall socket. Never use detergents contained colorant with colorants. Rust stains appear on ...Troubleshooting Follow the troubleshooting guide below to evaporate. Stained tub interior Detergent used , open the dishwasher allowing suds to resolve common issues. Issue Possible Cause Solution Dishwasher does not Fuse is blown or Replace fuse or reset start circuit breaker is clogged draining well...


