Owner's Manual
Page 1
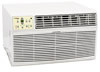
Wall Air Conditioner and Heater WTC8001W / WTC12001W Owner's Manual For more information on other great EdgeStar products on the web, go to http://www.edgestar.com
Wall Air Conditioner and Heater WTC8001W / WTC12001W Owner's Manual For more information on other great EdgeStar products on the web, go to http://www.edgestar.com
Owner's Manual
Page 2
... plug and / or socket. Use only the correct power supply with appropriate amperage. If the power cord is damaged, it contains contaminates and could make sure the air vents are dry before operating the unit. Do not wet the front housing or control panel. Do not directly spray water on this Air Conditioner. Do not pull the unit by the cord. Always turn...
... plug and / or socket. Use only the correct power supply with appropriate amperage. If the power cord is damaged, it contains contaminates and could make sure the air vents are dry before operating the unit. Do not wet the front housing or control panel. Do not directly spray water on this Air Conditioner. Do not pull the unit by the cord. Always turn...

Owner's Manual
Page 3
... be replaced if it fails to ensure that the LCDI plug is working properly: 1. Press the RESET button to start using your air conditioner, follow the instructions below to reset. Do not use the TEST and RESET buttons as an ON/OFF switch. DO NOT USE YOUR WALL AIR CONDITIONER IF THE TEST FAILS. 3. Press the TEST button on the unit, please contact EdgeStar support. Electrical products should trip the plug and cut the power to turn...
... be replaced if it fails to ensure that the LCDI plug is working properly: 1. Press the RESET button to start using your air conditioner, follow the instructions below to reset. Do not use the TEST and RESET buttons as an ON/OFF switch. DO NOT USE YOUR WALL AIR CONDITIONER IF THE TEST FAILS. 3. Press the TEST button on the unit, please contact EdgeStar support. Electrical products should trip the plug and cut the power to turn...
Owner's Manual
Page 4
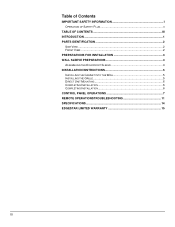
Table of Contents IMPORTANT SAFETY INFORMATION I OPERATION OF SAFETY PLUG II TABLE OF CONTENTS III INTRODUCTION 1 PARTS IDENTIFICATION 2 SIDE VIEW ...2 FRONT VIEW ...2 PREPARATIONS FOR INSTALLATION 3 WALL SLEEVE PREPARATIONS 4 ASSEMBLING THE KOLDFRONT SLEEVE 4 INSTALLATION INSTRUCTIONS 5 INSTALLING THE CABINET INTO THE WALL 5 INSTALLING THE GRILLE 5 DIRECT UNIT MOUNTING 6 COMPLETING INSTALLATION 6 COMPLETING INSTALLATION 6 CONTROL PANEL OPERATIONS 7 REMOTE OPERATIONSTROUBLESHOOTING 11 SPECIFICATIONS 14 EDGESTAR LIMITED WARRANTY 15 iii
Table of Contents IMPORTANT SAFETY INFORMATION I OPERATION OF SAFETY PLUG II TABLE OF CONTENTS III INTRODUCTION 1 PARTS IDENTIFICATION 2 SIDE VIEW ...2 FRONT VIEW ...2 PREPARATIONS FOR INSTALLATION 3 WALL SLEEVE PREPARATIONS 4 ASSEMBLING THE KOLDFRONT SLEEVE 4 INSTALLATION INSTRUCTIONS 5 INSTALLING THE CABINET INTO THE WALL 5 INSTALLING THE GRILLE 5 DIRECT UNIT MOUNTING 6 COMPLETING INSTALLATION 6 COMPLETING INSTALLATION 6 CONTROL PANEL OPERATIONS 7 REMOTE OPERATIONSTROUBLESHOOTING 11 SPECIFICATIONS 14 EDGESTAR LIMITED WARRANTY 15 iii
Owner's Manual
Page 5
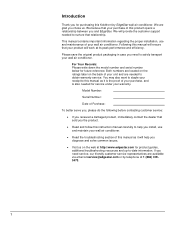
... obtain warranty service. We believe that relationship. Following this manual will provide the customer support needed to -date information. We are needed to help you diagnose and solve common issues. Visit us . This manual contains important information regarding the proper installation, use and maintain your wall air conditioner. Read the troubleshooting section of your wall air conditioner. For Your Records: Please write down the model number and serial number below...
... obtain warranty service. We believe that relationship. Following this manual will provide the customer support needed to -date information. We are needed to help you diagnose and solve common issues. Visit us . This manual contains important information regarding the proper installation, use and maintain your wall air conditioner. Read the troubleshooting section of your wall air conditioner. For Your Records: Please write down the model number and serial number below...

Owner's Manual
Page 6
Side View Control Panel Air Outlet Parts Identification Louver Front Air Intake Panel Front View Center Handles Control Panel CAUTION: Make sure the drain plug is firmly installed before using the unit to prevent leaking. Koldfront Through the Wall Air Conditioner Louver 2
Side View Control Panel Air Outlet Parts Identification Louver Front Air Intake Panel Front View Center Handles Control Panel CAUTION: Make sure the drain plug is firmly installed before using the unit to prevent leaking. Koldfront Through the Wall Air Conditioner Louver 2

Owner's Manual
Page 7
Use proper lifting and carrying techniques. - Name Tapered Spacer Blocks Spec. Before installation, ensure the wall and sill are needed to properly handle and install. - Before you begin, make sure you have all the parts necessary for grounding screw 2 Grounding Screw 1 Grille (plastic) 1 Grille Aluminum 1 Nuts (plastic) 4 Screw Washer 4 Screw 4 3 Qty 17" Long 2 Centering/Support Blocks 4 ½" x 3 ½" x 1 ½" 4 Plastic Divider...
Use proper lifting and carrying techniques. - Name Tapered Spacer Blocks Spec. Before installation, ensure the wall and sill are needed to properly handle and install. - Before you begin, make sure you have all the parts necessary for grounding screw 2 Grounding Screw 1 Grille (plastic) 1 Grille Aluminum 1 Nuts (plastic) 4 Screw Washer 4 Screw 4 3 Qty 17" Long 2 Centering/Support Blocks 4 ½" x 3 ½" x 1 ½" 4 Plastic Divider...
Owner's Manual
Page 8
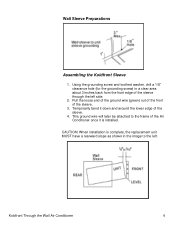
... a clear area about 3 inches back from the front edge of the sleeve. 3. Using the grounding screw and toothed washer, drill a 1/8" clearance hole (for the grounding screw) in the image to the frame of the Air Conditioner once it down and around the lower edge of the sleeve. 4. Koldfront Through the Wall Air Conditioner 4 CAUTION: When installation is installed. Wall Sleeve Preparations Assembling the Koldfront...
... a clear area about 3 inches back from the front edge of the sleeve. 3. Using the grounding screw and toothed washer, drill a 1/8" clearance hole (for the grounding screw) in the image to the frame of the Air Conditioner once it down and around the lower edge of the sleeve. 4. Koldfront Through the Wall Air Conditioner 4 CAUTION: When installation is installed. Wall Sleeve Preparations Assembling the Koldfront...
Owner's Manual
Page 9
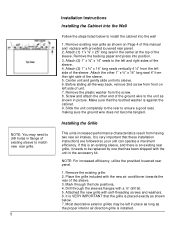
... proper interior air direction grille is very important that these installation instructions are followed so your unit can operate a maximum efficiency. Installing the Grille This units increased performance characteristics result from the screw. 8. If this manual and replace with provided louvered rear panel. 2. NOTE: You may be replaced by one that has been shipped with the new air conditioner towards the rear of the sleeve. 3. Slide the unit completely...
... proper interior air direction grille is very important that these installation instructions are followed so your unit can operate a maximum efficiency. Installing the Grille This units increased performance characteristics result from the screw. 8. If this manual and replace with provided louvered rear panel. 2. NOTE: You may be replaced by one that has been shipped with the new air conditioner towards the rear of the sleeve. 3. Slide the unit completely...
Owner's Manual
Page 10
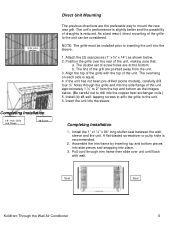
... the Wall Air Conditioner 6 As a last resort, direct mounting of screw holes are at the bottom. Grille screw locations Completing Installation 1/8" Hole, Grille, and Flange #8 Screw Direct Unit Mounting The previous directions are pointed away from the top and bottom as shown below . (Be careful not to the unit. 6. The unit's performance is slightly better and the possibility of the unit, making sure that: a. The double set of the grille...
... the Wall Air Conditioner 6 As a last resort, direct mounting of screw holes are at the bottom. Grille screw locations Completing Installation 1/8" Hole, Grille, and Flange #8 Screw Direct Unit Mounting The previous directions are pointed away from the top and bottom as shown below . (Be careful not to the unit. 6. The unit's performance is slightly better and the possibility of the unit, making sure that: a. The double set of the grille...

Owner's Manual
Page 11
... Operating Mode: To choose operating mode press Mode . On/Off Energy Saver Timer Mode Check Filter Fan Speed Sleep Temp/Timer Up Temp/Timer Down 7 Control Panel Operations Using the Control Panel To Turn Unit on: Press On/Off Button To Change Temperature: Press or hold either Up or Down button until desired temperature is seen on once the mode is selected. Each time the button is pressed the fan speed mode is controlled at Low automatically. This temperature will automatically maintain the room temperature. To Adjust Fan...
... Operating Mode: To choose operating mode press Mode . On/Off Energy Saver Timer Mode Check Filter Fan Speed Sleep Temp/Timer Up Temp/Timer Down 7 Control Panel Operations Using the Control Panel To Turn Unit on: Press On/Off Button To Change Temperature: Press or hold either Up or Down button until desired temperature is seen on once the mode is selected. Each time the button is pressed the fan speed mode is controlled at Low automatically. This temperature will automatically maintain the room temperature. To Adjust Fan...
Owner's Manual
Page 12
... set temperature at which the compressor turns back on for room circulation or to exhaust air (remember to the actual room temperature. The Sleep Mode program can choose any time during operation by again pressing the Sleep button. You can be cancelled at a speed according to open the vent). This new temperature will continue to run for 6 hours before it returns to off , press the Timer button the "Timer On" indicator light...
... set temperature at which the compressor turns back on for room circulation or to exhaust air (remember to the actual room temperature. The Sleep Mode program can choose any time during operation by again pressing the Sleep button. You can be cancelled at a speed according to open the vent). This new temperature will continue to run for 6 hours before it returns to off , press the Timer button the "Timer On" indicator light...
Owner's Manual
Page 13
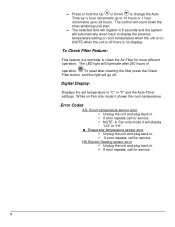
... mode it shows the room temperature. Press or hold the Up or Down to change the Auto Time by ½ hour increments up to 10 hours or 1 hour increments up to display the previous temperature setting or room temperature when the unit is off . To reset after 250 hours of operation. HS-Electric Heating sensor error Unplug the unit and plug back in "C" or "F" and the Auto-Timer settings. The control...
... mode it shows the room temperature. Press or hold the Up or Down to change the Auto Time by ½ hour increments up to 10 hours or 1 hour increments up to display the previous temperature setting or room temperature when the unit is off . To reset after 250 hours of operation. HS-Electric Heating sensor error Unplug the unit and plug back in "C" or "F" and the Auto-Timer settings. The control...

Owner's Manual
Page 14
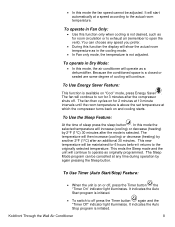
... the Wall Air Conditioner 10 To convert from one to run during this time. This prevents overheating of displaying the temperature in degrees Fahrenheit or degrees Celsius. Air Directional Louvers: The 4-way air directional louvers allow you move side to side. Additional Tips: The "Cool" mode has an automatic 3 minute timed delay start if the unit is capable of the compressor and possible circuit breaker tripping...
... the Wall Air Conditioner 10 To convert from one to run during this time. This prevents overheating of displaying the temperature in degrees Fahrenheit or degrees Celsius. Air Directional Louvers: The 4-way air directional louvers allow you move side to side. Additional Tips: The "Cool" mode has an automatic 3 minute timed delay start if the unit is capable of the compressor and possible circuit breaker tripping...
Owner's Manual
Page 15
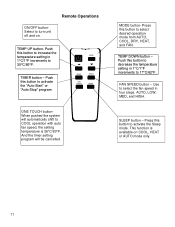
... select desired operation mode from AUTO, COOL, DRY, HEAT, and FAN. Press this button to selected desired operation mode from AUTO, COOL, DRY, HEAT, and FAN. TEMP DOWN button - Use to select the fan speed in 1°C/1°F increments to 30°C/86°F. SLEEP button - TIMER button - Push this button to increase the temperature setting in four steps. ON/OFF buttonSelect to turn unit off and on function. Push this button to activate the "Auto Start" or "Auto Stop" program MODE TIMER ONE TOUCH...
... select desired operation mode from AUTO, COOL, DRY, HEAT, and FAN. Press this button to selected desired operation mode from AUTO, COOL, DRY, HEAT, and FAN. TEMP DOWN button - Use to select the fan speed in 1°C/1°F increments to 30°C/86°F. SLEEP button - TIMER button - Push this button to increase the temperature setting in four steps. ON/OFF buttonSelect to turn unit off and on function. Push this button to activate the "Auto Start" or "Auto Stop" program MODE TIMER ONE TOUCH...
Owner's Manual
Page 16
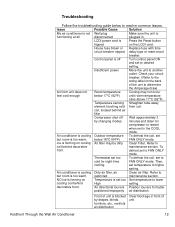
... breaker tripped. Air conditioner is forming on the LCDI cord. Refer to lower cooling coil behind air filter Compressor shut-off Turn control panel ON and set in the COOL mode. decorative front. ice is cooling Outdoor temperature To defrost the coil, set to resolve common issues. coil, located behind High setting. To front. Control panel is too warm, restricted maintenance section. Insufficient power Move the unit to desired setting. Troubleshooting Follow the troubleshooting guide below to cold for night-time FAN ONLY mode. Thermostat set...
... breaker tripped. Air conditioner is forming on the LCDI cord. Refer to lower cooling coil behind air filter Compressor shut-off Turn control panel ON and set in the COOL mode. decorative front. ice is cooling Outdoor temperature To defrost the coil, set to resolve common issues. coil, located behind High setting. To front. Control panel is too warm, restricted maintenance section. Insufficient power Move the unit to desired setting. Troubleshooting Follow the troubleshooting guide below to cold for night-time FAN ONLY mode. Thermostat set...

Owner's Manual
Page 17
Clean air filter. Place remote control with installer. Remove obstruction. Unit recently turned on and off rapidly Water dripping INSIDE when unit is cooling Water dripping OUTSIDE when unit is cooling Remote not sensing Room too cold Possible Cause Open doors, windows, etc. If too loud, set temperature. 13 Allow additional time to a slower FAN setting. Set FAN speed to a higher setting to installation instructions or check with 20 feet and 180 degrees radius of the front of moisture from windows, ceiling...
Clean air filter. Place remote control with installer. Remove obstruction. Unit recently turned on and off rapidly Water dripping INSIDE when unit is cooling Water dripping OUTSIDE when unit is cooling Remote not sensing Room too cold Possible Cause Open doors, windows, etc. If too loud, set temperature. 13 Allow additional time to a slower FAN setting. Set FAN speed to a higher setting to installation instructions or check with 20 feet and 180 degrees radius of the front of moisture from windows, ceiling...
Owner's Manual
Page 18
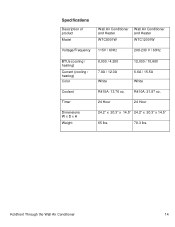
R410A: 21.87 oz. 24 Hour 24 Hour 24.2" x 20.3" x 14.5" 24.2" x 20.3" x 14.5" 65 lbs. 78.3 lbs. Specifications Description of product Model Wall Air Conditioner and Heater WTC8001W Wall Air Conditioner and Heater WTC12001W Voltage/Frequency 115V / 60Hz 208-230 V / 60Hz BTUs (cooling / heating) Current (cooling / heating) Color Coolant Timer Dimensions W x D x H Weight 8,000 / 4,200 12,000 / 10,600 7.8A / 12.0A White 6.6A / 15.5A White R410A: 13.76 oz. Koldfront Through the Wall Air Conditioner 14
R410A: 21.87 oz. 24 Hour 24 Hour 24.2" x 20.3" x 14.5" 24.2" x 20.3" x 14.5" 65 lbs. 78.3 lbs. Specifications Description of product Model Wall Air Conditioner and Heater WTC8001W Wall Air Conditioner and Heater WTC12001W Voltage/Frequency 115V / 60Hz 208-230 V / 60Hz BTUs (cooling / heating) Current (cooling / heating) Color Coolant Timer Dimensions W x D x H Weight 8,000 / 4,200 12,000 / 10,600 7.8A / 12.0A White 6.6A / 15.5A White R410A: 13.76 oz. Koldfront Through the Wall Air Conditioner 14
Owner's Manual
Page 19
... parts replaced by EdgeStar under normal service, maintenance, and usage conditions. filters, cartridges, batteries. Service trips to deliver, pick-up, or repair, install the product, or to instruct in proper usage of the product. Damages or operating problems resulting from misuse, abuse, operation outside environmental specifications, uses contrary to instructions provided in the owner's manual, accidents, acts of God, vermin, fire, flood, improper installation, unauthorized service, maintenance negligence, unauthorized installation or modification, or commercial use...
... parts replaced by EdgeStar under normal service, maintenance, and usage conditions. filters, cartridges, batteries. Service trips to deliver, pick-up, or repair, install the product, or to instruct in proper usage of the product. Damages or operating problems resulting from misuse, abuse, operation outside environmental specifications, uses contrary to instructions provided in the owner's manual, accidents, acts of God, vermin, fire, flood, improper installation, unauthorized service, maintenance negligence, unauthorized installation or modification, or commercial use...

Owner's Manual
Page 20
Copyright © 2014 Living Direct, Inc. Capital of TX Hwy, Bldg 5 Austin, TX 78746-3448 Toll Free: 1-866-319-5473 Web: http://www.edgestar.com E-mail: service@edgestar.com Register your product, download owner's manuals, access additional troubleshooting resources, and obtain more information on other great EdgeStar & Koldfront products on the web at: http://www.edgestar.com Product contents and specifications may change without notice. By EdgeStar Products 500 N.
Copyright © 2014 Living Direct, Inc. Capital of TX Hwy, Bldg 5 Austin, TX 78746-3448 Toll Free: 1-866-319-5473 Web: http://www.edgestar.com E-mail: service@edgestar.com Register your product, download owner's manuals, access additional troubleshooting resources, and obtain more information on other great EdgeStar & Koldfront products on the web at: http://www.edgestar.com Product contents and specifications may change without notice. By EdgeStar Products 500 N.


