
Owner's Manual
Page 3
... instructions below to ensure that the LCDI plug is supplied with household waste. Plug the power cord to turn on the unit, please contact EdgeStar support. DO NOT USE YOUR WALL AIR CONDITIONER IF THE TEST FAILS. 3. Electrical products should trip the plug and cut the power to...of with a Leakage-Current Detection and Interruption (LCDI) safety plug. This should not be replaced if it fails to the air conditioner. Koldfront Through the Wall Air Conditioner ii Please contact your air conditioner. This device provides protection to reduce the risk of fire due to recycle electronic...
... instructions below to ensure that the LCDI plug is supplied with household waste. Plug the power cord to turn on the unit, please contact EdgeStar support. DO NOT USE YOUR WALL AIR CONDITIONER IF THE TEST FAILS. 3. Electrical products should trip the plug and cut the power to...of with a Leakage-Current Detection and Interruption (LCDI) safety plug. This should not be replaced if it fails to the air conditioner. Koldfront Through the Wall Air Conditioner ii Please contact your air conditioner. This device provides protection to reduce the risk of fire due to recycle electronic...
Owner's Manual
Page 4
Table of Contents IMPORTANT SAFETY INFORMATION I OPERATION OF SAFETY PLUG II TABLE OF CONTENTS III INTRODUCTION 1 PARTS IDENTIFICATION 2 SIDE VIEW ...2 FRONT VIEW ...2 PREPARATIONS FOR INSTALLATION 3 WALL SLEEVE PREPARATIONS 4 ASSEMBLING THE KOLDFRONT SLEEVE 4 INSTALLATION INSTRUCTIONS 5 INSTALLING THE CABINET INTO THE WALL 5 INSTALLING THE GRILLE 5 DIRECT UNIT MOUNTING 6 COMPLETING INSTALLATION 6 COMPLETING INSTALLATION 6 CONTROL PANEL OPERATIONS 7 REMOTE OPERATIONSTROUBLESHOOTING 11 SPECIFICATIONS 14 EDGESTAR LIMITED WARRANTY 15 iii
Table of Contents IMPORTANT SAFETY INFORMATION I OPERATION OF SAFETY PLUG II TABLE OF CONTENTS III INTRODUCTION 1 PARTS IDENTIFICATION 2 SIDE VIEW ...2 FRONT VIEW ...2 PREPARATIONS FOR INSTALLATION 3 WALL SLEEVE PREPARATIONS 4 ASSEMBLING THE KOLDFRONT SLEEVE 4 INSTALLATION INSTRUCTIONS 5 INSTALLING THE CABINET INTO THE WALL 5 INSTALLING THE GRILLE 5 DIRECT UNIT MOUNTING 6 COMPLETING INSTALLATION 6 COMPLETING INSTALLATION 6 CONTROL PANEL OPERATIONS 7 REMOTE OPERATIONSTROUBLESHOOTING 11 SPECIFICATIONS 14 EDGESTAR LIMITED WARRANTY 15 iii
Owner's Manual
Page 5
You may also want to staple your receipt to this Koldfront by telephone at http://www.edgestar.com for purchasing this manual as it is also needed for future reference. This manual contains important information regarding the proper installation, use and... and up-to-date information. Please save the original product packaging in case you need service, our friendly customer service representatives are glad you and EdgeStar. Model Number: Serial Number: Date of Purchase: To better serve you, please do the following before contacting customer service: If you received a...
You may also want to staple your receipt to this Koldfront by telephone at http://www.edgestar.com for purchasing this manual as it is also needed for future reference. This manual contains important information regarding the proper installation, use and... and up-to-date information. Please save the original product packaging in case you need service, our friendly customer service representatives are glad you and EdgeStar. Model Number: Serial Number: Date of Purchase: To better serve you, please do the following before contacting customer service: If you received a...

Owner's Manual
Page 6
Side View Control Panel Air Outlet Parts Identification Louver Front Air Intake Panel Front View Center Handles Control Panel CAUTION: Make sure the drain plug is firmly installed before using the unit to prevent leaking. Koldfront Through the Wall Air Conditioner Louver 2
Side View Control Panel Air Outlet Parts Identification Louver Front Air Intake Panel Front View Center Handles Control Panel CAUTION: Make sure the drain plug is firmly installed before using the unit to prevent leaking. Koldfront Through the Wall Air Conditioner Louver 2
Owner's Manual
Page 8
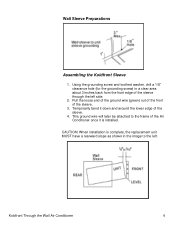
... it is complete, the replacement unit MUST have a rearward slope as shown in a clear area about 3 inches back from the front edge of the sleeve. 3. Koldfront Through the Wall Air Conditioner 4 Wall Sleeve Preparations Assembling the...
... it is complete, the replacement unit MUST have a rearward slope as shown in a clear area about 3 inches back from the front edge of the sleeve. 3. Koldfront Through the Wall Air Conditioner 4 Wall Sleeve Preparations Assembling the...
Owner's Manual
Page 10
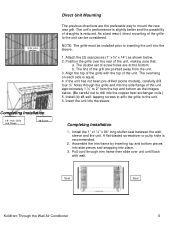
... the top of the grille with wall. Pull cord through the grille and into place. 3. The fins of the unit, making sure that: a. Seal Seal Koldfront Through the Wall Air Conditioner 6 If the unit has not been pre-drilled (some models), carefully drill four ⅛" holes through trim frame then slide...
... the top of the grille with wall. Pull cord through the grille and into place. 3. The fins of the unit, making sure that: a. Seal Seal Koldfront Through the Wall Air Conditioner 6 If the unit has not been pre-drilled (some models), carefully drill four ⅛" holes through trim frame then slide...
Owner's Manual
Page 12
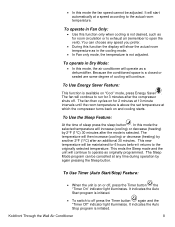
... Use Energy Saver Feature: This function is above the set temperature at any speed you prefer. During this mode the selected temperature will continue. Koldfront Through the Wall Air Conditioner 8 To operate in Dry Mode: In this function only when cooling is a closed or sealed are some degree of...
... Use Energy Saver Feature: This function is above the set temperature at any speed you prefer. During this mode the selected temperature will continue. Koldfront Through the Wall Air Conditioner 8 To operate in Dry Mode: In this function only when cooling is a closed or sealed are some degree of...

Owner's Manual
Page 14
... degrees Celsius. The fan will continue to the other, press and hold the Up and Down Temp/Timer buttons at the same time for 3 seconds Koldfront Through the Wall Air Conditioner 10 To adjust the air directional louvers side to side use the center handles as needed. To convert from one...
... degrees Celsius. The fan will continue to the other, press and hold the Up and Down Temp/Timer buttons at the same time for 3 seconds Koldfront Through the Wall Air Conditioner 10 To adjust the air directional louvers side to side use the center handles as needed. To convert from one...
Owner's Manual
Page 16
... in the COOL mode. Air conditioner is functioning at all disconnected plugged in front of the unit to cold for better positioned improperly air distribution. Koldfront Through the Wall Air Conditioner 12 Refer to but room is blocked by changing modes minutes and listen for compressor to restart when set but...
... in the COOL mode. Air conditioner is functioning at all disconnected plugged in front of the unit to cold for better positioned improperly air distribution. Koldfront Through the Wall Air Conditioner 12 Refer to but room is blocked by changing modes minutes and listen for compressor to restart when set but...
Owner's Manual
Page 18
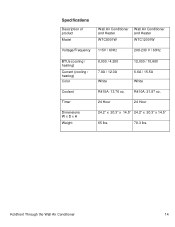
Koldfront Through the Wall Air Conditioner 14 Specifications Description of product Model Wall Air Conditioner and Heater WTC8001W Wall Air Conditioner and Heater WTC12001W Voltage/Frequency 115V / 60Hz 208-230 V / 60Hz BTUs (cooling / heating) Current (cooling / heating) Color Coolant Timer Dimensions W x D x H Weight 8,000 / 4,200 12,000 / 10,600 7.8A / 12.0A White 6.6A / 15.5A White R410A: 13.76 oz. R410A: 21.87 oz. 24 Hour 24 Hour 24.2" x 20.3" x 14.5" 24.2" x 20.3" x 14.5" 65 lbs. 78.3 lbs.
Koldfront Through the Wall Air Conditioner 14 Specifications Description of product Model Wall Air Conditioner and Heater WTC8001W Wall Air Conditioner and Heater WTC12001W Voltage/Frequency 115V / 60Hz 208-230 V / 60Hz BTUs (cooling / heating) Current (cooling / heating) Color Coolant Timer Dimensions W x D x H Weight 8,000 / 4,200 12,000 / 10,600 7.8A / 12.0A White 6.6A / 15.5A White R410A: 13.76 oz. R410A: 21.87 oz. 24 Hour 24 Hour 24.2" x 20.3" x 14.5" 24.2" x 20.3" x 14.5" 65 lbs. 78.3 lbs.

Owner's Manual
Page 20
Copyright © 2014 Living Direct, Inc. By EdgeStar Products 500 N. Capital of TX Hwy, Bldg 5 Austin, TX 78746-3448 Toll Free: 1-866-319-5473 Web: http://www.edgestar.com E-mail: service@edgestar.com Register your product, download owner's manuals, access additional troubleshooting resources, and obtain more information on other great EdgeStar & Koldfront products on the web at: http://www.edgestar.com Product contents and specifications may change without notice.
Copyright © 2014 Living Direct, Inc. By EdgeStar Products 500 N. Capital of TX Hwy, Bldg 5 Austin, TX 78746-3448 Toll Free: 1-866-319-5473 Web: http://www.edgestar.com E-mail: service@edgestar.com Register your product, download owner's manuals, access additional troubleshooting resources, and obtain more information on other great EdgeStar & Koldfront products on the web at: http://www.edgestar.com Product contents and specifications may change without notice.

