
Use and Care Guide
Page 3
... CooktopSurface 3..0 BrownStreaksand Speckson Ceramic Glass CooktopSurface 3..1 Areasof Discolorationon Ceramic Glass CooktopSurface 3..1 WarrantyInformation 3..2 Safety 4..-..7 ImportantSafety Instructions 4. Questions 2... Cooktop Features 8..-9 Before Using the Cooktop t.0-t7 About the CeramicGlass Cooktop 10 Locationsof the Surface Elements 10 LEDMessagesor LightIndicators Displayedby MainControl 1. 1 Light indicatorsDisplayedby Cooking Element Controls 1..1. About the RadiantSurface Elements 12 LEDMessagesDisplayedby Radiant Element Controls 1..2. Finding Information...
... CooktopSurface 3..0 BrownStreaksand Speckson Ceramic Glass CooktopSurface 3..1 Areasof Discolorationon Ceramic Glass CooktopSurface 3..1 WarrantyInformation 3..2 Safety 4..-..7 ImportantSafety Instructions 4. Questions 2... Cooktop Features 8..-9 Before Using the Cooktop t.0-t7 About the CeramicGlass Cooktop 10 Locationsof the Surface Elements 10 LEDMessagesor LightIndicators Displayedby MainControl 1. 1 Light indicatorsDisplayedby Cooking Element Controls 1..1. About the RadiantSurface Elements 12 LEDMessagesDisplayedby Radiant Element Controls 1..2. Finding Information...

Use and Care Guide
Page 4
.... This manual contains importantsafetysymbols and instructions.Pleasepay attention to Part 18 of the following : This unit has been tested and found to provide reasonable protection against harmful interference in accordance with packaging material. , Proper Installation. These limits are designed to comply with the National Electrical Code No. 70 - Connect the unit into an outlet or a circuit different from...
.... This manual contains importantsafetysymbols and instructions.Pleasepay attention to Part 18 of the following : This unit has been tested and found to provide reasonable protection against harmful interference in accordance with packaging material. , Proper Installation. These limits are designed to comply with the National Electrical Code No. 70 - Connect the unit into an outlet or a circuit different from...

Use and Care Guide
Page 5
..., on this appliance. WARNIN@ Stepping or leaning on or near surface units may become too hot. Safety 5 edition in the United States, or CSA C22.1, Part 1 in the literature package for this cooktop can resultin seriousinjuriesand may also causedamageto the cooktop. Install only per installation instructions provided in Canada, and local code requirements. Know how to disconnect the electrical power to cause burns. Do...
..., on this appliance. WARNIN@ Stepping or leaning on or near surface units may become too hot. Safety 5 edition in the United States, or CSA C22.1, Part 1 in the literature package for this cooktop can resultin seriousinjuriesand may also causedamageto the cooktop. Install only per installation instructions provided in Canada, and local code requirements. Know how to disconnect the electrical power to cause burns. Do...

Use and Care Guide
Page 6
... is not turned off the cooktop. Protective Liners. IMPORTANT. The use aluminum foil to accumulate on hood or filter. Do not use of electric shock or fire or short circuit. Only certain types of glass, glass/ceramic, ceramic, earthenware, or other bulky cloth instead of grease that has boiled dry may result in the fan could catch fire. The ventilating hood above your cooking surface should be cleaned frequently...
... is not turned off the cooktop. Protective Liners. IMPORTANT. The use aluminum foil to accumulate on hood or filter. Do not use of electric shock or fire or short circuit. Only certain types of glass, glass/ceramic, ceramic, earthenware, or other bulky cloth instead of grease that has boiled dry may result in the fan could catch fire. The ventilating hood above your cooking surface should be cleaned frequently...
Use and Care Guide
Page 8
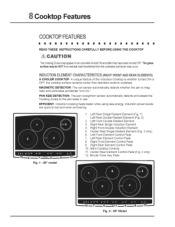
Cooktop Features COOKTOPF TURES READ THESE INSTRUCTIONS CAREFULLY BEFORE USING THE COOKTOP CAUTION TheCookingZones mayappear to be cod while turnedONand after they havebeenturnedOFF.The glass surfacemay be HOT from residualheattransferredfrom the cookwareand burns may occur. A unique feature of the Induction Coot INDUCTIONELEMENT CHA CTERISTICS (RJG_ FRONT AND MAR ELEMENTS1 A COOLER COOKTOP-
Cooktop Features COOKTOPF TURES READ THESE INSTRUCTIONS CAREFULLY BEFORE USING THE COOKTOP CAUTION TheCookingZones mayappear to be cod while turnedONand after they havebeenturnedOFF.The glass surfacemay be HOT from residualheattransferredfrom the cookwareand burns may occur. A unique feature of the Induction Coot INDUCTIONELEMENT CHA CTERISTICS (RJG_ FRONT AND MAR ELEMENTS1 A COOLER COOKTOP-

Use and Care Guide
Page 10
... equipped with radiant and induction surface elements with different wattage ratings. The areas surrounding the elements may become hot enough to heat food quicker and in use and their settings are all factors that will spread to the cookware Only flat-bottom cookware should be used. The type and size of cool, ware, the number of surface elements in largervotumes increases as follows: = 1 small radiant element located at the...
... equipped with radiant and induction surface elements with different wattage ratings. The areas surrounding the elements may become hot enough to heat food quicker and in use and their settings are all factors that will spread to the cookware Only flat-bottom cookware should be used. The type and size of cool, ware, the number of surface elements in largervotumes increases as follows: = 1 small radiant element located at the...
Use and Care Guide
Page 11
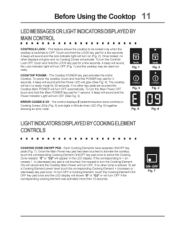
.... The control displays E (radiant!Induction zone controls) in Cooking Zones LEDs (Fig 5) and digits in a read',! Before Using the Cooktop LED#o ESSAGEOSRLIGHTINDICATORDSISP YED BY MAINCONTROL [] [] [] I [] [] _ [] II CONTROLS LOCK - To turn the Main Power OFF touch and hold the POWER key pad for a few seconds. The cooktop will glow (See Fig. 4). COOKTOP POWER - This feature allows the cooktop to be locked only when the cooktop is switched to turn the Cooking Element ON will...
.... The control displays E (radiant!Induction zone controls) in Cooking Zones LEDs (Fig 5) and digits in a read',! Before Using the Cooktop LED#o ESSAGEOSRLIGHTINDICATORDSISP YED BY MAINCONTROL [] [] [] I [] [] _ [] II CONTROLS LOCK - To turn the Main Power OFF touch and hold the POWER key pad for a few seconds. The cooktop will glow (See Fig. 4). COOKTOP POWER - This feature allows the cooktop to be locked only when the cooktop is switched to turn the Cooking Element ON will...

Use and Care Guide
Page 13
... size and type of cookware used for cooking and turned OFF, and if the cooktop surface temperature on any of Cooking HIGH (HI) Start most foods; Fig. 1 CAUTION Fig. 3 The Cooking Zones may be cool while turned ON and after they have been turned OFF. Before Using the Cooktop :3 THERECOMMENDEDDIANT ELEMENTSE INGS I POWER LEVEL SETTINGS =Once active, the Induction Cooking Zones will scroll through all the available power levels quickly...
... size and type of cookware used for cooking and turned OFF, and if the cooktop surface temperature on any of Cooking HIGH (HI) Start most foods; Fig. 1 CAUTION Fig. 3 The Cooking Zones may be cool while turned ON and after they have been turned OFF. Before Using the Cooktop :3 THERECOMMENDEDDIANT ELEMENTSE INGS I POWER LEVEL SETTINGS =Once active, the Induction Cooking Zones will scroll through all the available power levels quickly...

Use and Care Guide
Page 14
..., use a magnet to always use heavier high quality stainless steel cookware on your Induction Cooktop surface. If a magnet sticks to start the heating process on the ceramic surface. Even quality cookware can scratch the cooktop surface, especially if cookware is recommended to test whether the cookware type wilt work. It is slid over the ceramic cooktop will greatly reduce the possibility of the coot Over time sliding ANY type...
..., use a magnet to always use heavier high quality stainless steel cookware on your Induction Cooktop surface. If a magnet sticks to start the heating process on the ceramic surface. Even quality cookware can scratch the cooktop surface, especially if cookware is recommended to test whether the cookware type wilt work. It is slid over the ceramic cooktop will greatly reduce the possibility of the coot Over time sliding ANY type...

Use and Care Guide
Page 15
... these conditions, one of the Cooking Zones wil( not heat indicated by an Fin the affected Cooking Zone display. t may be detected bythesensors located belowthe ceramic cooktop surface. If the cookware does not meet the minimum size required Nrthe Cooking Zone used (See Fig. 19). C..a.:.::J • Heavy handle tilts par]. • Pan (s pro pe riy b ala nced. Before sing the Cooktop 15 CO0 A RECOMMENDAT)ONS m [] m m m [] m m m [] i I YNCORREC...
... these conditions, one of the Cooking Zones wil( not heat indicated by an Fin the affected Cooking Zone display. t may be detected bythesensors located belowthe ceramic cooktop surface. If the cookware does not meet the minimum size required Nrthe Cooking Zone used (See Fig. 19). C..a.:.::J • Heavy handle tilts par]. • Pan (s pro pe riy b ala nced. Before sing the Cooktop 15 CO0 A RECOMMENDAT)ONS m [] m m m [] m m m [] i I YNCORREC...
Use and Care Guide
Page 18
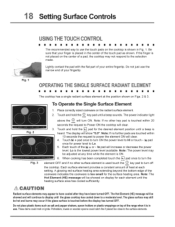
... cooktop. To Operate the Single Surface Element Fig. 2 Fig. 3 1. The power indicator light power above the (_ will clear. 4. Touch hi + pad once to HI or touch = Io pad once for each setting, A glowing red surface heating area extending beyond the bottom edge of the range when it isin use the narrow end of the hi + or - Lightly contact the pad with the flat part...
... cooktop. To Operate the Single Surface Element Fig. 2 Fig. 3 1. The power indicator light power above the (_ will clear. 4. Touch hi + pad once to HI or touch = Io pad once for each setting, A glowing red surface heating area extending beyond the bottom edge of the range when it isin use the narrow end of the hi + or - Lightly contact the pad with the flat part...

Use and Care Guide
Page 19
... is ON. . When cooking has been completed touch the I_ pad once to turn ON, Note: tf no other key pad Pow_ is used to Power ON the cooktop wilt clear. . The Hot Element(HE)rnessage willbe showed on the element controls is the lowest power level available. Place correctly sized cookware on the control panel are equipped with dual radiant surface element located as shown in...
... is ON. . When cooking has been completed touch the I_ pad once to turn ON, Note: tf no other key pad Pow_ is used to Power ON the cooktop wilt clear. . The Hot Element(HE)rnessage willbe showed on the element controls is the lowest power level available. Place correctly sized cookware on the control panel are equipped with dual radiant surface element located as shown in...

Use and Care Guide
Page 20
... using the correct type and size cool,A/are not met the sensors will show 0 indicating no other key pad is touched once the Cooking Zone will start at that meets the minimum and maximum pan size requirements (Fig. 2, page 14) for the Cooking Zone desired and is best for the Zone has been set the food will begin to Power ON the Cooktop...
... using the correct type and size cool,A/are not met the sensors will show 0 indicating no other key pad is touched once the Cooking Zone will start at that meets the minimum and maximum pan size requirements (Fig. 2, page 14) for the Cooking Zone desired and is best for the Zone has been set the food will begin to Power ON the Cooktop...

Use and Care Guide
Page 21
Clean the spills or remove the objects from the cook-top. - Be sure the cooktop vent holes are NOT blocked, tf the vent holes are blocked the cooktop internal sensor may cause the cooktop to avoid over heating the appliance. • If the cool Setting urface Controls 2 OPE TING THEiNDUCTiONCOOKINGZONES m i m [] [] K [] m I I [] i m m [] m [] m IMPORTANT OPERATING NOTES: • Fluids spilled or objects lying on the controls area of the cooktop may shut OFF to display error code and turn OFF while cooking.
Clean the spills or remove the objects from the cook-top. - Be sure the cooktop vent holes are NOT blocked, tf the vent holes are blocked the cooktop internal sensor may cause the cooktop to avoid over heating the appliance. • If the cool Setting urface Controls 2 OPE TING THEiNDUCTiONCOOKINGZONES m i m [] [] K [] m I I [] i m m [] m [] m IMPORTANT OPERATING NOTES: • Fluids spilled or objects lying on the controls area of the cooktop may shut OFF to display error code and turn OFF while cooking.
Use and Care Guide
Page 25
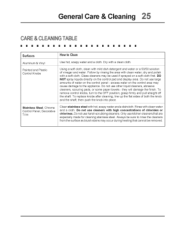
... by rinsing the area with clean wateq dry and polish with clean water and a cloth. Dry with a clean cloth. General Care & Cleaning 25 CARE& CLEANINGTABLE I Surfaces Aluminum & Vinyl Painted and Plastic Control Knobs Stainless Steel, Chrome Control Panel, Decorative Trim How to rinse the cleaners from the surface as bluish stains may occur during heating that cannot be removed. Glass cleaners may be sure to Clean Use hot, soapy water and a cloth. Always...
... by rinsing the area with clean wateq dry and polish with clean water and a cloth. Dry with a clean cloth. General Care & Cleaning 25 CARE& CLEANINGTABLE I Surfaces Aluminum & Vinyl Painted and Plastic Control Knobs Stainless Steel, Chrome Control Panel, Decorative Trim How to rinse the cleaners from the surface as bluish stains may occur during heating that cannot be removed. Glass cleaners may be sure to Clean Use hot, soapy water and a cloth. Always...

Use and Care Guide
Page 26
... a few drops of CookTop@ Cleaning Creme directly to the ceramic surface, tt is available in the kitchen. Do not cook foods directly on the cooktop surface. These marks should be hazardous to clean the entire cooktop surface. Cookware (cast iron, metal, ceramic or glass) with a metal razor blade scraper, holding scraper at a 30 degree angle to future use. Do not use to the cooktop. Remove loosened soils with a paper towel. 26 General Care & Cleaning COOKTOPCLONING...
... a few drops of CookTop@ Cleaning Creme directly to the ceramic surface, tt is available in the kitchen. Do not cook foods directly on the cooktop surface. These marks should be hazardous to clean the entire cooktop surface. Cookware (cast iron, metal, ceramic or glass) with a metal razor blade scraper, holding scraper at a 30 degree angle to future use. Do not use to the cooktop. Remove loosened soils with a paper towel. 26 General Care & Cleaning COOKTOPCLONING...
Use and Care Guide
Page 27
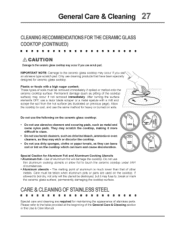
... taken when aluminum pots or pans are required for maintaining the appearance of aluminum foil will damage the cooktop. Use of stainless parts. Do not use scrub pad. CARE& CLEANINGOFSTAINLESSSTEEL I! [] [] [] II [] [] II II !!1 II It !! If allowed to , break or mark the ceramic glass surface, permanently damaging the cooktop surface. The melting point of aluminum is much lower than that have been specially designed for ceramic glass cooktop. General Care & Cleaning 27...
... taken when aluminum pots or pans are required for maintaining the appearance of aluminum foil will damage the cooktop. Use of stainless parts. Do not use scrub pad. CARE& CLEANINGOFSTAINLESSSTEEL I! [] [] [] II [] [] II II !!1 II It !! If allowed to , break or mark the ceramic glass surface, permanently damaging the cooktop surface. The melting point of aluminum is much lower than that have been specially designed for ceramic glass cooktop. General Care & Cleaning 27...
Use and Care Guide
Page 28
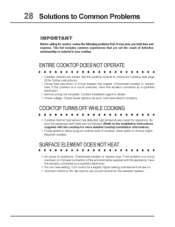
.... • Too low heat setting. Be sure the appliance vent holes are locked. Check/reset breaker or replace fuse. If the problem is a circuit overload, or improper connection of defective workmanship or material in your cooktop. Contact installation agent or dealer. = Power outage. Call local electric company. SURFACEELEMENT DOESNOT H_T i i [] [] [] • No power to unlock the Cooktop (see page 23 for the element needed. 2 Solutions to the Installation Instructions supplied with the...
.... • Too low heat setting. Be sure the appliance vent holes are locked. Check/reset breaker or replace fuse. If the problem is a circuit overload, or improper connection of defective workmanship or material in your cooktop. Contact installation agent or dealer. = Power outage. Call local electric company. SURFACEELEMENT DOESNOT H_T i i [] [] [] • No power to unlock the Cooktop (see page 23 for the element needed. 2 Solutions to the Installation Instructions supplied with the...

Use and Care Guide
Page 30
...)NCONTROLD)SP_YS I I [] [] [] • Induction Cooktop main control has detected a fault or error condition. Use a mildly abrasive cleanser to page 15 for glass ceramic cooktop have been used . Try turning electrical power supply OFF and back ON to cooktop in this Owner's Guide. • Cook-ware with Induction compatible material. , Cookware has been removed from the Cooking Zone without turning the Cooking Zone OFR Place cookware back on cook'top surface. Test with a magnet...
...)NCONTROLD)SP_YS I I [] [] [] • Induction Cooktop main control has detected a fault or error condition. Use a mildly abrasive cleanser to page 15 for glass ceramic cooktop have been used . Try turning electrical power supply OFF and back ON to cooktop in this Owner's Guide. • Cook-ware with Induction compatible material. , Cookware has been removed from the Cooking Zone without turning the Cooking Zone OFR Place cookware back on cook'top surface. Test with a magnet...

Use and Care Guide
Page 32
... provided instructions. Service under this appliance that prove to , any refrigeratoror freezer failures. 6. Productsused in and free-standing range appliances) is covered by a two through 5th years from your original date of purchase, Electrolux will repair or replace any parts of this ,warranty must be readilydetermined. 2. your applianceis designedto be performed by Electrolux or an authorized service company. In addition, the glass cooktop or radiant surface element...
... provided instructions. Service under this appliance that prove to , any refrigeratoror freezer failures. 6. Productsused in and free-standing range appliances) is covered by a two through 5th years from your original date of purchase, Electrolux will repair or replace any parts of this ,warranty must be readilydetermined. 2. your applianceis designedto be performed by Electrolux or an authorized service company. In addition, the glass cooktop or radiant surface element...


