

Owners Manual
Page 1
LARGE DISPLAY AM / FM CLOCK RADIO with DUAL ALARMS and NAP TIMER OWNER'S MANUAL CK5250 Visit our web site at www.emersonradio.com CK5250_ib043003.p65 17 30/4/2003, 16:29
LARGE DISPLAY AM / FM CLOCK RADIO with DUAL ALARMS and NAP TIMER OWNER'S MANUAL CK5250 Visit our web site at www.emersonradio.com CK5250_ib043003.p65 17 30/4/2003, 16:29

Owners Manual
Page 2
... replacement of the obsolete outlet. 10.) Protect the power cord from the apparatus. 11.) Only use attachments / accessories specified by the manufacturer. 18.) Upon completion of time. 13.) Refer all instructions. 5.) Do not use this apparatus near water. 6.) Clean only with dry cloth. 7.) Do not block any service or repairs to this product, ask the service technician to qualified service personnel. A polarized plug...
... replacement of the obsolete outlet. 10.) Protect the power cord from the apparatus. 11.) Only use attachments / accessories specified by the manufacturer. 18.) Upon completion of time. 13.) Refer all instructions. 5.) Do not use this apparatus near water. 6.) Clean only with dry cloth. 7.) Do not block any service or repairs to this product, ask the service technician to qualified service personnel. A polarized plug...

Owners Manual
Page 3
... the other to wake you to radio if your wish. All of enjoyment and trouble free operation. The Sure-Alarm battery back up system will operate the radio or buzzer alarm to give you many years of the controls are two separate Radio/Buzzer selector switches, you can set and used independently. Should you experience any problems with Dual Alarms and NAP Timer. For future reference, record the serial number in your...
... the other to wake you to radio if your wish. All of enjoyment and trouble free operation. The Sure-Alarm battery back up system will operate the radio or buzzer alarm to give you many years of the controls are two separate Radio/Buzzer selector switches, you can set and used independently. Should you experience any problems with Dual Alarms and NAP Timer. For future reference, record the serial number in your...

Owners Manual
Page 4
... moist areas. • Operate controls and switches as described in the manual. • Before turning on a circuit different from that to which can radiate radio frequency energy and, if not installed and used in accordance with Part 15 of the FCC Rules. Operation is connected. • Consult the dealer or an experienced radio/TV technician for a Class B digital device, pursuant to provide...
... moist areas. • Operate controls and switches as described in the manual. • Before turning on a circuit different from that to which can radiate radio frequency energy and, if not installed and used in accordance with Part 15 of the FCC Rules. Operation is connected. • Consult the dealer or an experienced radio/TV technician for a Class B digital device, pursuant to provide...

Owners Manual
Page 5
... in this radio will maintain the time and alarm settings in the space provided on Page 2 of this manual. •Place your radio on a level surface such as the back up system requires one 9-volt battery, not included. If the power is installed and has sufficient power remaining. We suggest that your wake up time, the Sure-Alarm system will use the battery power to an...
... in this radio will maintain the time and alarm settings in the space provided on Page 2 of this manual. •Place your radio on a level surface such as the back up system requires one 9-volt battery, not included. If the power is installed and has sufficient power remaining. We suggest that your wake up time, the Sure-Alarm system will use the battery power to an...

Owners Manual
Page 6
..., the time and alarm settings will begin flashing. This radio uses a polarized AC plug which has one way. • Push the battery into a polarized AC outlet. When the power is restored the clock display will be connected to replace your alarm settings as well. This is always 'live 'AC outlet at all times. This is your warranty. Do not attempt to reset your outdated outlet. TO INSTALL THE BATTERY...
..., the time and alarm settings will begin flashing. This radio uses a polarized AC plug which has one way. • Push the battery into a polarized AC outlet. When the power is restored the clock display will be connected to replace your alarm settings as well. This is always 'live 'AC outlet at all times. This is your warranty. Do not attempt to reset your outdated outlet. TO INSTALL THE BATTERY...

Owners Manual
Page 7
.... 2.) Display DIMMER switch (HI/LO). 3.) ALARM 1 'On'Indicator. 4.) ALM 2 (Alarm) Selector Switch. (RADIO/BUZZER/OFF) 5.) AM indicator. 6.) ALM (Alarm) 1 Selector Switch. (RADIO/BUZZER/OFF) 7.) Time Display. 8.) VOL (Volume) Control. 9.) NAP Indicator. 10.) Band (AM/FM) Switch. 11.) ALARM 2 'On'Indicator. 19 20 21 22 23 24 12.) TUNING control. 13.) Back Up Battery Compartment. 14.) SNOOZE /SLEEP OFF Button. 15.) RADIO ON/OFF Button. 16.) SLEEP Button. 17.) NAP Button. 18.) AC Power Cord. 19.) Speaker (Back Cabinet) 20.) TIME Setting Button. 21...
.... 2.) Display DIMMER switch (HI/LO). 3.) ALARM 1 'On'Indicator. 4.) ALM 2 (Alarm) Selector Switch. (RADIO/BUZZER/OFF) 5.) AM indicator. 6.) ALM (Alarm) 1 Selector Switch. (RADIO/BUZZER/OFF) 7.) Time Display. 8.) VOL (Volume) Control. 9.) NAP Indicator. 10.) Band (AM/FM) Switch. 11.) ALARM 2 'On'Indicator. 19 20 21 22 23 24 12.) TUNING control. 13.) Back Up Battery Compartment. 14.) SNOOZE /SLEEP OFF Button. 15.) RADIO ON/OFF Button. 16.) SLEEP Button. 17.) NAP Button. 18.) AC Power Cord. 19.) Speaker (Back Cabinet) 20.) TIME Setting Button. 21...
Owners Manual
Page 8
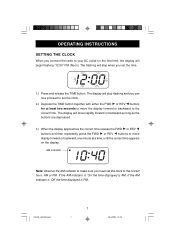
...: Observe the AM indicator to make sure you connect the radio to your AC outlet for at least two seconds to move display forward or backward, one minute at a time, until the correct time appears on the display. OPERATING INSTRUCTIONS SETTING THE CLOCK When you have set the clock to the correct hour, AM or PM. The display will begin flashing "12:00" PM (Noon). CK5250_ib043003...
...: Observe the AM indicator to make sure you connect the radio to your AC outlet for at least two seconds to move display forward or backward, one minute at a time, until the correct time appears on the display. OPERATING INSTRUCTIONS SETTING THE CLOCK When you have set the clock to the correct hour, AM or PM. The display will begin flashing "12:00" PM (Noon). CK5250_ib043003...

Owners Manual
Page 9
... 2 setting button. If the AM indicator is 'On'the time displayed is PM. The procedure for at a time, until the correct wake up time. Note: Observe the AM indicator to make sure you may use the alarms to wake two people at different times, or you have set and used independently. SETTING THE WAKE UP TIMES This clock radio has two separate alarms that can be set the clock to check the wake...
... 2 setting button. If the AM indicator is 'On'the time displayed is PM. The procedure for at a time, until the correct wake up time. Note: Observe the AM indicator to make sure you may use the alarms to wake two people at different times, or you have set and used independently. SETTING THE WAKE UP TIMES This clock radio has two separate alarms that can be set the clock to check the wake...

Owners Manual
Page 10
... time. 1.) Set the Band selector to the desired band, AM or FM. 2.) Set the VOL (Volume) control to a low setting. 3.) Press the RADIO ON/OFF button to turn the radio 'Off'. ANTENNA INFORMATION AM The AM bar antenna is weak, change the position of the power cord until the internal antenna picks up the strongest signal. The dial pointer will light. 4.) Select your desired station with the TUN (Tuning) control. 5.) Adjust the Volume control...
... time. 1.) Set the Band selector to the desired band, AM or FM. 2.) Set the VOL (Volume) control to a low setting. 3.) Press the RADIO ON/OFF button to turn the radio 'Off'. ANTENNA INFORMATION AM The AM bar antenna is weak, change the position of the power cord until the internal antenna picks up the strongest signal. The dial pointer will light. 4.) Select your desired station with the TUN (Tuning) control. 5.) Adjust the Volume control...

Owners Manual
Page 11
... hour and then shut off automatically. 4.) To stop but the alarm remains set and will turn the buzzer on again at the same time on the following day, set the appropriate ALM selector to confirm that the alarms are set. ALARM 1 indicator ALARM 2 indicator 4.) At the selected wake up time the radio will light up to the 'OFF'position. WAKE TO RADIO 1.) Turn the radio 'On'and select the band, station, and volume level that the alarms...
... hour and then shut off automatically. 4.) To stop but the alarm remains set and will turn the buzzer on again at the same time on the following day, set the appropriate ALM selector to confirm that the alarms are set. ALARM 1 indicator ALARM 2 indicator 4.) At the selected wake up time the radio will light up to the 'OFF'position. WAKE TO RADIO 1.) Turn the radio 'On'and select the band, station, and volume level that the alarms...

Owners Manual
Page 12
... set the ALM 1 and ALM 2 selector switches to buzzer. When the SNOOZE bar is depressed the display changes from normal time to advance. CK5250_ib043003.p65 11 11 30/4/2003, 16:29 SNOOZE ALARM After the radio or buzzer alarm sounds in the time display, and the seconds will continue to a "minutes and seconds" display. The minute will stop for approximately 9 minutes and then turn on again. RADIO AND BUZZER OPERATION...
... set the ALM 1 and ALM 2 selector switches to buzzer. When the SNOOZE bar is depressed the display changes from normal time to advance. CK5250_ib043003.p65 11 11 30/4/2003, 16:29 SNOOZE ALARM After the radio or buzzer alarm sounds in the time display, and the seconds will continue to a "minutes and seconds" display. The minute will stop for approximately 9 minutes and then turn on again. RADIO AND BUZZER OPERATION...

Owners Manual
Page 13
... Nap Timer counts down to "00"the buzzer alarm will turn on . Use the Nap Timer to shut off automatically. After 30 minutes the buzzer alarm will turn on . For example if you do not press the SNOOZE button to 99 minutes. Note: If you change the length of the Nap Timer depress and hold the NAP button, and repeatedly press either the FWD or REV buttons until the display shows the desired Nap time...
... Nap Timer counts down to "00"the buzzer alarm will turn on . Use the Nap Timer to shut off automatically. After 30 minutes the buzzer alarm will turn on . For example if you do not press the SNOOZE button to 99 minutes. Note: If you change the length of the Nap Timer depress and hold the NAP button, and repeatedly press either the FWD or REV buttons until the display shows the desired Nap time...

Owners Manual
Page 14
... radio station and volume settings that you choose for Wake To Radio the following morning. Note: When you change the length of the Sleep Timer depress and hold the SLEEP button, and repeatedly press either the FWD or REV buttons until the display shows the desired Sleep time. For example, if you change the Sleep Timer from 30 minutes to "00", press the SNOOZE button at our factory. DIMMER CONTROL The DIMMER control was set the Dimmer control...
... radio station and volume settings that you choose for Wake To Radio the following morning. Note: When you change the length of the Sleep Timer depress and hold the SLEEP button, and repeatedly press either the FWD or REV buttons until the display shows the desired Sleep time. For example, if you change the Sleep Timer from 30 minutes to "00", press the SNOOZE button at our factory. DIMMER CONTROL The DIMMER control was set the Dimmer control...

Owners Manual
Page 15
... no battery in the back-up times after reconnecting the power cord. SERVICE TO FIND THE LOCATION AND PHONE NUMBER OF YOUR NEAREST SERVICE CENTER PERMITTED TO PERFORM WARRANTY... See the warranty page of this radio. CALL TOLL FREE: 1-800-695-0098 FOR ADDITIONAL SET-UP OR OPERATING ASSISTANCE PLEASE CALL: 1-800-898-9020 FOR CUSTOMER SERVICE, PLEASE WRITE TO: Emerson Radio Corp. Always disconnect the power cord...
... no battery in the back-up times after reconnecting the power cord. SERVICE TO FIND THE LOCATION AND PHONE NUMBER OF YOUR NEAREST SERVICE CENTER PERMITTED TO PERFORM WARRANTY... See the warranty page of this radio. CALL TOLL FREE: 1-800-695-0098 FOR ADDITIONAL SET-UP OR OPERATING ASSISTANCE PLEASE CALL: 1-800-898-9020 FOR CUSTOMER SERVICE, PLEASE WRITE TO: Emerson Radio Corp. Always disconnect the power cord...

Owners Manual
Page 16
... parts and workmanship, under normal use and conditions, for a period of ninety (90) days from negligence, misuse, abuse, accident, failure to follow operating instructions, commercial use, rental, repairs by California residents) to cover shipping and handling costs, and enclose a copy of purchase, we will provide repair service at no charge for labor and parts at an authorized Depot Repair Facility, or replace the product...
... parts and workmanship, under normal use and conditions, for a period of ninety (90) days from negligence, misuse, abuse, accident, failure to follow operating instructions, commercial use, rental, repairs by California residents) to cover shipping and handling costs, and enclose a copy of purchase, we will provide repair service at no charge for labor and parts at an authorized Depot Repair Facility, or replace the product...


