

Owners Manual
Page 2
... power source as indicated. 14.) Use replacement parts as vases shall be placed on or pinched particularly at the bottom enclosure of time. 10.) Refer all instructions. RISK OF ELECTRIC SHOCK lateral triangle is intended to alert the user to qualified service personnel. IMPORTANT SAFETY INSTRUCTIONS 1.) Read these instructions. Follow all servicing to the presence of the polarized or grounding-type plug...
... power source as indicated. 14.) Use replacement parts as vases shall be placed on or pinched particularly at the bottom enclosure of time. 10.) Refer all instructions. RISK OF ELECTRIC SHOCK lateral triangle is intended to alert the user to qualified service personnel. IMPORTANT SAFETY INSTRUCTIONS 1.) Read these instructions. Follow all servicing to the presence of the polarized or grounding-type plug...
Owners Manual
Page 3
... this Manual, you experience any problems with the operation of this product, please refer to the final consumer. The Emerson brand is always the chance that some problem may occur because of rough handling during shipment to the retail store or to the instructions for purchasing this Emerson audio product. Our engineers have included many useful and convenient features in perfect working...
... this Manual, you experience any problems with the operation of this product, please refer to the final consumer. The Emerson brand is always the chance that some problem may occur because of rough handling during shipment to the retail store or to the instructions for purchasing this Emerson audio product. Our engineers have included many useful and convenient features in perfect working...

Owners Manual
Page 4
... equipment generates, uses, and can be sure to first disconnect the power cord and remove cords connected to other stereo equipment that radiates too much heat, places lacking ventilation or dusty areas, places subject to constant vibration and/or humid or moist areas. • Operate controls and switches as described in the manual. • Before turning on the power, make certain that...
... equipment generates, uses, and can be sure to first disconnect the power cord and remove cords connected to other stereo equipment that radiates too much heat, places lacking ventilation or dusty areas, places subject to constant vibration and/or humid or moist areas. • Operate controls and switches as described in the manual. • Before turning on the power, make certain that...

Owners Manual
Page 5
...antenna on the back cabinet and extend it to its full length. • Unwind the AC power cord and extend it to its full length. • Place the unit on a stable, level surface such as a table, desk, shelf, etc within easy reach of an AC outlet, out of direct...operate the controls. Using the original carton and packing materials is equipped with non-skid rubber 'feet'to prevent the product from moving when you place the product on fine wooden furniture. Protect Your Furniture This model is the only way to safely repack the unit for service. PREPARATION FOR USE Unpacking And Set...
...antenna on the back cabinet and extend it to its full length. • Unwind the AC power cord and extend it to its full length. • Place the unit on a stable, level surface such as a table, desk, shelf, etc within easy reach of an AC outlet, out of direct...operate the controls. Using the original carton and packing materials is equipped with non-skid rubber 'feet'to prevent the product from moving when you place the product on fine wooden furniture. Protect Your Furniture This model is the only way to safely repack the unit for service. PREPARATION FOR USE Unpacking And Set...

Owners Manual
Page 7
... a power failure with a weak or exhausted battery in their alarm clocks, clock radios, and smoke detectors too, at the beginning and end of Alkaline battery for longest life and best performance. We recommend that it is completely wrong you install a well-known brand of Daylight Saving Time. Reset the clock and replace the battery as soon as possible. Battery Back Up System This unit uses a single 9-Volt battery...
... a power failure with a weak or exhausted battery in their alarm clocks, clock radios, and smoke detectors too, at the beginning and end of Alkaline battery for longest life and best performance. We recommend that it is completely wrong you install a well-known brand of Daylight Saving Time. Reset the clock and replace the battery as soon as possible. Battery Back Up System This unit uses a single 9-Volt battery...

Owners Manual
Page 9
...SLEEP Button. 2.) PROGRAM Button. 3.) STOP Button. 4.) VOLUME Control. 5.) FUNCTION (RADIO/CD/BUZZER) Selector Switch. 6.) CD compartment. 7.) AC Power Cord. 8.) AUX IN Jack. 9.) FM Wire Antenna. 10.) BAND (FM ST./AM) Selector Switch. 11.) TUNING Control. 12.) CD Door CLOSE Position. 13.) CD OPEN Button. 14.) TIME Setting Button. 15.) POWER On/Off Button. 16.) ALARM 2 Setting Button. 17.) SNOOZE Button. 18.) ALARM 1 Setting Button. 19.) P•MODE Button. 20.) PLAY/PAUSE Button. 21.) CD Skip Reverse Search/MINUTE Button. 22.) CD Skip Forward Search/HOUR Button. 23.) Speakers. 24.) ALM (Alarm...
...SLEEP Button. 2.) PROGRAM Button. 3.) STOP Button. 4.) VOLUME Control. 5.) FUNCTION (RADIO/CD/BUZZER) Selector Switch. 6.) CD compartment. 7.) AC Power Cord. 8.) AUX IN Jack. 9.) FM Wire Antenna. 10.) BAND (FM ST./AM) Selector Switch. 11.) TUNING Control. 12.) CD Door CLOSE Position. 13.) CD OPEN Button. 14.) TIME Setting Button. 15.) POWER On/Off Button. 16.) ALARM 2 Setting Button. 17.) SNOOZE Button. 18.) ALARM 1 Setting Button. 19.) P•MODE Button. 20.) PLAY/PAUSE Button. 21.) CD Skip Reverse Search/MINUTE Button. 22.) CD Skip Forward Search/HOUR Button. 23.) Speakers. 24.) ALM (Alarm...

Owners Manual
Page 10
... ALM 1 ALM 2 CKD9902_041707.p65 9 9 17/4/2007, 11:05 ALM 1 ALM 2 IMPORTANT NOTES !! Do not use an outlet that is controlled by a wall switch. • When the unit is plugged in for the first time the display will change to set the hour. Make sure to your AC outlet. OPERATING INSTRUCTIONS Setting The Time Of Day • Connect the power cord to use an outlet that is always 'live'.
... ALM 1 ALM 2 CKD9902_041707.p65 9 9 17/4/2007, 11:05 ALM 1 ALM 2 IMPORTANT NOTES !! Do not use an outlet that is controlled by a wall switch. • When the unit is plugged in for the first time the display will change to set the hour. Make sure to your AC outlet. OPERATING INSTRUCTIONS Setting The Time Of Day • Connect the power cord to use an outlet that is always 'live'.

Owners Manual
Page 11
... turn the respective Alarm time 'Off'. The Alarm time is set the wake up hour. ALM 1 ALM 2 The ALM 1 or ALM 2 indicator comes 'On'. 2.) Press the HOUR button to set . The ALM 1 or ALM 2 indicator will change from the respective time of day to set and used independently. 1.) Press the ALARM 1 or ALARM 2 button once. Set correctly for AM or PM. 3.) Press the MINUTE button to wake up time and begin PM flashing. Setting The Wake...
... turn the respective Alarm time 'Off'. The Alarm time is set the wake up hour. ALM 1 ALM 2 The ALM 1 or ALM 2 indicator comes 'On'. 2.) Press the HOUR button to set . The ALM 1 or ALM 2 indicator will change from the respective time of day to set and used independently. 1.) Press the ALARM 1 or ALARM 2 button once. Set correctly for AM or PM. 3.) Press the MINUTE button to wake up time and begin PM flashing. Setting The Wake...

Owners Manual
Page 12
PROGRAM REPEAT RANDOM POWER FM STEREO PM ALM 1 ALM 2 4.) Adjust the VOLUME control to the desired level. 5.) When you find the direction that provides the best reception. Set the BAND selector (on left side panel) to find the position that provides the best reception for the desired station. or AM. 3.) Turn the TUNING control to RADIO position. FM Make sure the FM lead wire antenna is inside the cabinet...
PROGRAM REPEAT RANDOM POWER FM STEREO PM ALM 1 ALM 2 4.) Adjust the VOLUME control to the desired level. 5.) When you find the direction that provides the best reception. Set the BAND selector (on left side panel) to find the position that provides the best reception for the desired station. or AM. 3.) Turn the TUNING control to RADIO position. FM Make sure the FM lead wire antenna is inside the cabinet...

Owners Manual
Page 13
...POWER button to begin playback. CKD9902_041707.p65 12 12 17/4/2007, 11:05 PROGRAM REPEAT RANDOM POWER FM STEREO PM ALM 1 ALM 2 6.) Press the PLAY/PAUSE button to switch the unit 'On'. PROGRAM REPEAT RANDOM POWER FM STEREO PM ALM 1 ALM 2 After a few seconds, and then the display returns to the correct time. Note: If the disc... player. The POWER indicator comes 'On'. 2.) Set the FUNCTION selector to the CD position. 3.) Press the CD OPEN button to open the CD door. 4.) Place your disc on the spindle, press CLOSE to close the CD door. 5.) Two dashes "- -"flash while the player ...
...POWER button to begin playback. CKD9902_041707.p65 12 12 17/4/2007, 11:05 PROGRAM REPEAT RANDOM POWER FM STEREO PM ALM 1 ALM 2 6.) Press the PLAY/PAUSE button to switch the unit 'On'. PROGRAM REPEAT RANDOM POWER FM STEREO PM ALM 1 ALM 2 After a few seconds, and then the display returns to the correct time. Note: If the disc... player. The POWER indicator comes 'On'. 2.) Set the FUNCTION selector to the CD position. 3.) Press the CD OPEN button to open the CD door. 4.) Place your disc on the spindle, press CLOSE to close the CD door. 5.) Two dashes "- -"flash while the player ...

Owners Manual
Page 14
The track number flashes briefly and the sound stops, but the disc continues to locate a specific musical passage. While the track number is automatically reduced during playback press the PLAY/PAUSE button. High Speed Music Search You can search rapidly forward or backward within a track to spin. Note: The volume level is still flashing press the PLAY/PAUSE button. To Start Playback From A Specific Track Load your disc. After...
The track number flashes briefly and the sound stops, but the disc continues to locate a specific musical passage. While the track number is automatically reduced during playback press the PLAY/PAUSE button. High Speed Music Search You can search rapidly forward or backward within a track to spin. Note: The volume level is still flashing press the PLAY/PAUSE button. To Start Playback From A Specific Track Load your disc. After...

Owners Manual
Page 16
PROGRAM REPEAT RANDOM POWER FM STEREO PM ALM 1 ALM 2 After each track has played once the player stops automatically. To cancel random playback at random and playback begins on a disc in the display for a few seconds. PROGRAM REPEAT RANDOM POWER FM STEREO PM ALM 1 ALM 2 3.) Press the PLAY/PAUSE button. CKD9902_041707.p65 15 15 17/4/2007, 11:05 Random Playback To listen to the tracks on that...
PROGRAM REPEAT RANDOM POWER FM STEREO PM ALM 1 ALM 2 After each track has played once the player stops automatically. To cancel random playback at random and playback begins on a disc in the display for a few seconds. PROGRAM REPEAT RANDOM POWER FM STEREO PM ALM 1 ALM 2 3.) Press the PLAY/PAUSE button. CKD9902_041707.p65 15 15 17/4/2007, 11:05 Random Playback To listen to the tracks on that...

Owners Manual
Page 17
... select the next track to be programmed. The desired track number flashes on the display. PROGRAM REPEAT RANDOM POWER FM STEREO PM ALM 1 ALM 2 PROGRAM REPEAT RANDOM POWER FM STEREO PM ALM 1 ALM 2 5.) Press the or buttons to select the next track to be done while the player is in the Stop mode. Note: Programming can only be programmed, and press the PROGRAM button to enter the track in the...
... select the next track to be programmed. The desired track number flashes on the display. PROGRAM REPEAT RANDOM POWER FM STEREO PM ALM 1 ALM 2 PROGRAM REPEAT RANDOM POWER FM STEREO PM ALM 1 ALM 2 5.) Press the or buttons to select the next track to be done while the player is in the Stop mode. Note: Programming can only be programmed, and press the PROGRAM button to enter the track in the...
Owners Manual
Page 19
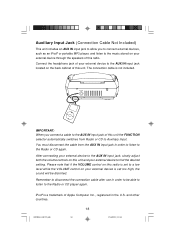
... note that if the VOLUME control on this radio is set to the music stored on your external device through the speakers of this radio. iPod® is not included. Auxiliary Input Jack (Connection Cable Not Included) This unit includes an AUX IN input jack to allow you connect a cable to the AUX IN input jack of this unit the FUNCTION selector automatically switches from the AUX IN input jack in order to...
... note that if the VOLUME control on this radio is set to the music stored on your external device through the speakers of this radio. iPod® is not included. Auxiliary Input Jack (Connection Cable Not Included) This unit includes an AUX IN input jack to allow you connect a cable to the AUX IN input jack of this unit the FUNCTION selector automatically switches from the AUX IN input jack in order to...

Owners Manual
Page 20
... day. 4.) To stop the buzzer immediately, press the POWER button. PROGRAM REPEAT RANDOM POWER FM STEREO PM ALM 1 ALM 2 3.) At the selected wake up time(s) if necessary. Adjust the wake up time the electronic Buzzer turns 'On'. Alarm Operation This unit gives you the option of waking to correct time. The Buzzer stops and the alarm resets itself for 60 minutes and then turn 'Off'. will apply to BUZZER position. 2.) Press the ALARM 1 and/or ALARM 2 buttons. Wake To Buzzer 1.) Set the FUNCTION...
... day. 4.) To stop the buzzer immediately, press the POWER button. PROGRAM REPEAT RANDOM POWER FM STEREO PM ALM 1 ALM 2 3.) At the selected wake up time(s) if necessary. Adjust the wake up time the electronic Buzzer turns 'On'. Alarm Operation This unit gives you the option of waking to correct time. The Buzzer stops and the alarm resets itself for 60 minutes and then turn 'Off'. will apply to BUZZER position. 2.) Press the ALARM 1 and/or ALARM 2 buttons. Wake To Buzzer 1.) Set the FUNCTION...

Owners Manual
Page 21
... flashes. Set the BAND selector to RADIO position. Wake To Radio 1.) Set the FUNCTION selector to FM ST. or AM, and tune to the desired station. 2.) Adjust the VOLUME level then press POWER button to turn 'Off'. The respective ALM indicator disappears. The Radio stops and resets itself for few seconds, then returns to turn 'Off'. 3.) Press the ALARM 1 and/or ALARM 2 buttons. The respective Alarm time flashes for the following day. 6.) To cancel the alarm...
... flashes. Set the BAND selector to RADIO position. Wake To Radio 1.) Set the FUNCTION selector to FM ST. or AM, and tune to the desired station. 2.) Adjust the VOLUME level then press POWER button to turn 'Off'. The respective ALM indicator disappears. The Radio stops and resets itself for few seconds, then returns to turn 'Off'. 3.) Press the ALARM 1 and/or ALARM 2 buttons. The respective Alarm time flashes for the following day. 6.) To cancel the alarm...

Owners Manual
Page 22
... the ALARM 1 and/or ALARM 2 buttons. Snooze operation can press the SNOOZE button for few extra minutes sleep. Snooze/Repeat Alarm After the alarm turns on again. The alarm will not turn to correct time. The ALM 1, ALM 2 or both indicators come on in the morning, then press the POWER button to turn 'Off'and reset itself for the following day. 5.) To stop the CD immediately, press the POWER button. The respective Alarm time flashes for a few...
... the ALARM 1 and/or ALARM 2 buttons. Snooze operation can press the SNOOZE button for few extra minutes sleep. Snooze/Repeat Alarm After the alarm turns on again. The alarm will not turn to correct time. The ALM 1, ALM 2 or both indicators come on in the morning, then press the POWER button to turn 'Off'and reset itself for the following day. 5.) To stop the CD immediately, press the POWER button. The respective Alarm time flashes for a few...

Owners Manual
Page 23
... sure the FUNCTION selector is set to the BUZZER position. The Radio or CD player will hear when the alarm turns 'On'in the morning. • Press the SLEEP button to select the desired amount of time, stop the Radio or CD player before you will continue until the sleep timer counts down to "00", press the POWER button to turn the power 'On'. Adjust the volume to the correct time. CKD9902_041707...
... sure the FUNCTION selector is set to the BUZZER position. The Radio or CD player will hear when the alarm turns 'On'in the morning. • Press the SLEEP button to select the desired amount of time, stop the Radio or CD player before you will continue until the sleep timer counts down to "00", press the POWER button to turn the power 'On'. Adjust the volume to the correct time. CKD9902_041707...

Owners Manual
Page 25
... Volume. Compact Disc Player CD Player will not play. CALL TOLL FREE: 1-800-695-0098 FOR ADDITIONAL SET-UP OR OPERATING ASSISTANCE PLEASE CALL: 1-800-898-9020 FOR CUSTOMER SERVICE, PLEASE WRITE TO: Emerson Radio Corp., Consumer Affairs Dept., 5101 Statesman Drive, Irving, TX 75063. Retune the AM or FM broadcast station. Disc is not installed or installed incorrectly. CKD9902_041707.p65 24 24 17/4/2007, 11:06 TROUBLESHOOTING GUIDE...
... Volume. Compact Disc Player CD Player will not play. CALL TOLL FREE: 1-800-695-0098 FOR ADDITIONAL SET-UP OR OPERATING ASSISTANCE PLEASE CALL: 1-800-898-9020 FOR CUSTOMER SERVICE, PLEASE WRITE TO: Emerson Radio Corp., Consumer Affairs Dept., 5101 Statesman Drive, Irving, TX 75063. Retune the AM or FM broadcast station. Disc is not installed or installed incorrectly. CKD9902_041707.p65 24 24 17/4/2007, 11:06 TROUBLESHOOTING GUIDE...

Owners Manual
Page 26
...SPECIFIC LEGAL RIGHTS, AND YOU MAY ALSO HAVE OTHER RIGHTS WHICH VARY FROM STATE TO STATE. Model No: CKD9902 Serial Number: CKD9902_041707.p65 25 25 17/4/2007, 11:06 warrants manufacturing defects in the U.S. For repair or replacement, pack your unit to Emerson Radio Corp. AU898M The Serial Number...number when calling to follow operating instructions, commercial use and conditions, for labor and parts at no charge for a period of ninety (90) days from negligence, misuse, abuse, accident, failure to request customer service. With your check or money order payable to : Emerson Radio...
...SPECIFIC LEGAL RIGHTS, AND YOU MAY ALSO HAVE OTHER RIGHTS WHICH VARY FROM STATE TO STATE. Model No: CKD9902 Serial Number: CKD9902_041707.p65 25 25 17/4/2007, 11:06 warrants manufacturing defects in the U.S. For repair or replacement, pack your unit to Emerson Radio Corp. AU898M The Serial Number...number when calling to follow operating instructions, commercial use and conditions, for labor and parts at no charge for a period of ninety (90) days from negligence, misuse, abuse, accident, failure to request customer service. With your check or money order payable to : Emerson Radio...


