

Owners Manual
Page 2
... bottom enclosure of the polarized or grounding-type plug. PERSONNEL. A polarized plug has two blades with the apparatus. Use only power source as indicated. 14.) Use replacement parts as vases shall be mounted to qualified service personnel. The lightning flash with dry cloth. 4.) Do not block any heat sources such as power-supply cord or plug is provided for long periods of electric shock...
... bottom enclosure of the polarized or grounding-type plug. PERSONNEL. A polarized plug has two blades with the apparatus. Use only power source as indicated. 14.) Use replacement parts as vases shall be mounted to qualified service personnel. The lightning flash with dry cloth. 4.) Do not block any heat sources such as power-supply cord or plug is provided for long periods of electric shock...
Owners Manual
Page 3
... flashing "12:00" display on time, every time. This means that will automatically set itself to put a new 9-volt battery in . The SmartSet® resets itself for school, again. And if that you are late for work, or for those changes automatically through Friday when you have to remember to the correct 'Year', 'Month', 'Date', 'Day', and 'Time'as soon as you plug it will adjust...
... flashing "12:00" display on time, every time. This means that will automatically set itself to put a new 9-volt battery in . The SmartSet® resets itself for school, again. And if that you are late for work, or for those changes automatically through Friday when you have to remember to the correct 'Year', 'Month', 'Date', 'Day', and 'Time'as soon as you plug it will adjust...
Owners Manual
Page 4
..., uses, and can be sure to first disconnect the AC power cord. Operation is subject to the following measures: • Reorient or relocate the receiving antenna. • Increase the separation between the equipment and receiver. • Connect the equipment into an outlet on the power, make certain that the power cord is properly installed. • When moving the set, be determined by turning...
..., uses, and can be sure to first disconnect the AC power cord. Operation is subject to the following measures: • Reorient or relocate the receiving antenna. • Increase the separation between the equipment and receiver. • Connect the equipment into an outlet on the power, make certain that the power cord is properly installed. • When moving the set, be determined by turning...
Owners Manual
Page 5
...operate the controls. The original carton and packing material is equipped with non-skid rubber 'feet' to prevent the product from the back or bottom of the cabinet. • Note the serial number on the bottom of your radio and write this number in to provide the best FM reception. It must be returned for service...or vibration. • Unwind the AC power cord and extend it to be fully extended to this manual. • Place your radio on fine wooden furniture. P R E PAR AT I O N F O R U S E UNPACKING AND SET UP • Remove the radio from the carton and remove all packing ...
...operate the controls. The original carton and packing material is equipped with non-skid rubber 'feet' to prevent the product from the back or bottom of the cabinet. • Note the serial number on the bottom of your radio and write this number in to provide the best FM reception. It must be returned for service...or vibration. • Unwind the AC power cord and extend it to be fully extended to this manual. • Place your radio on fine wooden furniture. P R E PAR AT I O N F O R U S E UNPACKING AND SET UP • Remove the radio from the carton and remove all packing ...
Owners Manual
Page 6
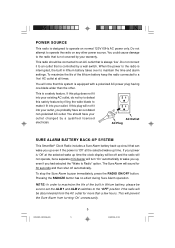
... alarm settings. This will sound for more than the other power source. This radio should have an out-dated non-polarized AC outlet. When the power to the radio is 'Off'at all times. AC Outlet AC Plug SURE ALARM BATTERY BACK-UP SYSTEM This SmartSet® Clock Radio includes a Sure Alarm battery back-up circuit that is 'Off'at the selected wake up time the clock display will turn 'On'automatically...
... alarm settings. This will sound for more than the other power source. This radio should have an out-dated non-polarized AC outlet. When the power to the radio is 'Off'at all times. AC Outlet AC Plug SURE ALARM BATTERY BACK-UP SYSTEM This SmartSet® Clock Radio includes a Sure Alarm battery back-up circuit that is 'Off'at the selected wake up time the clock display will turn 'On'automatically...

Owners Manual
Page 7
LOCATION OF CONTROLS AND INDICATORS FRONT PANEL 4 5 3 6 2 7 1 8 TOP PANEL 14 13 12 11 10 9 M ON TH /DATE TIME TIME ZO NE ALM 1 ALM 2 ALM MODE DOWN UP YEAR SET SLEEP SNOOZE SLEEP OFF 15 16 17 18 19 20 21 LEFT SIDE PANEL RIGHT SIDE PANEL ALM 1 RADIO BUZZER OFF ALM 2 RADIO BUZZER OFF DIMMER HI LO 24 25 23 26 22 27 CKS3029_080106.p65 6 6 1/8/2006, 9:25
LOCATION OF CONTROLS AND INDICATORS FRONT PANEL 4 5 3 6 2 7 1 8 TOP PANEL 14 13 12 11 10 9 M ON TH /DATE TIME TIME ZO NE ALM 1 ALM 2 ALM MODE DOWN UP YEAR SET SLEEP SNOOZE SLEEP OFF 15 16 17 18 19 20 21 LEFT SIDE PANEL RIGHT SIDE PANEL ALM 1 RADIO BUZZER OFF ALM 2 RADIO BUZZER OFF DIMMER HI LO 24 25 23 26 22 27 CKS3029_080106.p65 6 6 1/8/2006, 9:25

Owners Manual
Page 8
.... 7.) Day LED Indicators. 8.) Back Up Battery Compartment (Bottom Cabinet). TOP PANEL 9.) RADIO ON/OFF Button. 10.) MONTH/DATE Setting Button. 11.) TIME Setting Button. 12.) TIME ZONE Button. 13.) AC Power Cord (Back Cabinet). 14.) Speaker (Back Cabinet). 15.) ALM (Alarm) 1 setting Button. 16.) ALM (Alarm) 2 setting Button. 17.) ALM (Alarm) MODE (Weekdays/Weekends/Everyday Alarm) Button. 18.) DOWN SET Button. 19.) UP SET Button. 20.) SLEEP Button (Sleep To Music Timer). 21.) SNOOZE (SLEEP OFF) Button. LEFT SIDE PANEL 22.) Display DIMMER (HI/LO) Switch . 23.) ALM (Alarm) 2 (RADIO/BUZZER/OFF...
.... 7.) Day LED Indicators. 8.) Back Up Battery Compartment (Bottom Cabinet). TOP PANEL 9.) RADIO ON/OFF Button. 10.) MONTH/DATE Setting Button. 11.) TIME Setting Button. 12.) TIME ZONE Button. 13.) AC Power Cord (Back Cabinet). 14.) Speaker (Back Cabinet). 15.) ALM (Alarm) 1 setting Button. 16.) ALM (Alarm) 2 setting Button. 17.) ALM (Alarm) MODE (Weekdays/Weekends/Everyday Alarm) Button. 18.) DOWN SET Button. 19.) UP SET Button. 20.) SLEEP Button (Sleep To Music Timer). 21.) SNOOZE (SLEEP OFF) Button. LEFT SIDE PANEL 22.) Display DIMMER (HI/LO) Switch . 23.) ALM (Alarm) 2 (RADIO/BUZZER/OFF...
Owners Manual
Page 9
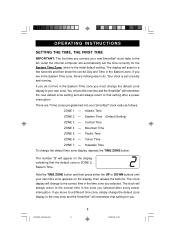
Central Time ZONE 4 - Yukon Time ZONE 7 - Atlantic Time ZONE 2 - Pacific Time ZONE 6 - The clock display will automatically set correctly and running. O P E R AT I N G I N S T R U C T I O N S SETTING THE TIME, THE FIRST TIME IMPORTANT: The first time you connect your new SmartSet® clock radio to the AC outlet the internal computer will change to the correct time in the time zone you selected. Mountain Time ZONE 5 - The number "2" will remember that setting for you. If you selected after a power interruption There are 7 time zones programmed into...
Central Time ZONE 4 - Yukon Time ZONE 7 - Atlantic Time ZONE 2 - Pacific Time ZONE 6 - The clock display will automatically set correctly and running. O P E R AT I N G I N S T R U C T I O N S SETTING THE TIME, THE FIRST TIME IMPORTANT: The first time you connect your new SmartSet® clock radio to the AC outlet the internal computer will change to the correct time in the time zone you selected. Mountain Time ZONE 5 - The number "2" will remember that setting for you. If you selected after a power interruption There are 7 time zones programmed into...

Owners Manual
Page 10
.../DATE button the display returns to the correct time. When you release the MONTH/DATE and TIME buttons the display returns to the correct time. The display changes from time to Month and Date (mm/dd). YEAR DISPLAY To see the correct date at any time, depress the MONTH/DATE button. The display changes from time to year. CKS3029_080106.p65 9 9 1/8/2006, 9:25 DAYLIGHT SAVING AND LEAP YEAR ADJUSTMENTS All Daylight Saving and Leap Year adjustments are made automatically...
.../DATE button the display returns to the correct time. When you release the MONTH/DATE and TIME buttons the display returns to the correct time. The display changes from time to Month and Date (mm/dd). YEAR DISPLAY To see the correct date at any time, depress the MONTH/DATE button. The display changes from time to year. CKS3029_080106.p65 9 9 1/8/2006, 9:25 DAYLIGHT SAVING AND LEAP YEAR ADJUSTMENTS All Daylight Saving and Leap Year adjustments are made automatically...
Owners Manual
Page 11
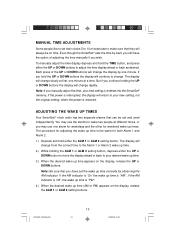
... 2 setting button, depress either the UP or DOWN button to move the display ahead or back to your desired wake up time. 3.) When the desired wake up times. ADJUSTING THE WAKE UP TIMES Your SmartSet® clock radio has two separate alarms that can be on time. CKS3029_080106.p65 10 10 1/8/2006, 9:25 Each press of adjusting the time manually if you may use one minute. If the power is...
... 2 setting button, depress either the UP or DOWN button to move the display ahead or back to your desired wake up time. 3.) When the desired wake up times. ADJUSTING THE WAKE UP TIMES Your SmartSet® clock radio has two separate alarms that can be on time. CKS3029_080106.p65 10 10 1/8/2006, 9:25 Each press of adjusting the time manually if you may use one minute. If the power is...
Owners Manual
Page 12
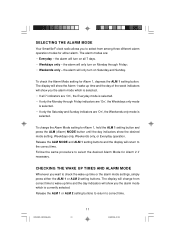
... alarm modes are 'On', the Everyday mode is selected. • If all 7 days. • Weekdays only - Release the ALM MODE and ALM 1 setting buttons and the display will turn on all 7 indicators are : • Everyday - To check the Alarm Mode setting for either the ALM 1 or ALM 2 setting buttons. SELECTING THE ALARM MODE Your SmartSet® clock radio allows you to select from correct time to wake up time or the alarm mode settings...
... alarm modes are 'On', the Everyday mode is selected. • If all 7 days. • Weekdays only - Release the ALM MODE and ALM 1 setting buttons and the display will turn on all 7 indicators are : • Everyday - To check the Alarm Mode setting for either the ALM 1 or ALM 2 setting buttons. SELECTING THE ALARM MODE Your SmartSet® clock radio allows you to select from correct time to wake up time or the alarm mode settings...
Owners Manual
Page 13
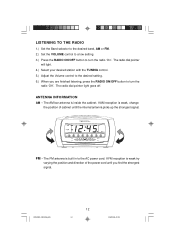
... 12 12 1/8/2006, 9:25 LISTENING TO THE RADIO 1.) Set the Band selector to the desired band, AM or FM. 2.) Set the VOLUME control to a low setting. 3.) Press the RADIO ON/OFF button to turn the radio 'Off'. If FM reception is weak, change the position of the power cord until the internal antenna picks up the strongest signal. If AM reception is weak try varying the position and...
... 12 12 1/8/2006, 9:25 LISTENING TO THE RADIO 1.) Set the Band selector to the desired band, AM or FM. 2.) Set the VOLUME control to a low setting. 3.) Press the RADIO ON/OFF button to turn the radio 'Off'. If FM reception is weak, change the position of the power cord until the internal antenna picks up the strongest signal. If AM reception is weak try varying the position and...
Owners Manual
Page 14
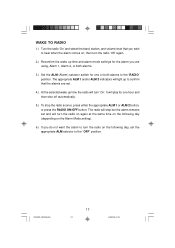
.... The radio will light up time the radio will turn 'On'. The appropriate ALM 1 and/or ALM 2 indicators will stop the radio sooner, press either the appropriate ALM 1 or ALM 2 button, or press the RADIO ON/OFF button. CKS3029_080106.p65 13 13 1/8/2006, 9:25 WAKE TO RADIO 1.) Turn the radio 'On'and select the band, station, and volume level that the alarms are using, Alarm 1, Alarm 2, or both alarms to the 'RADIO' position...
.... The radio will light up time the radio will turn 'On'. The appropriate ALM 1 and/or ALM 2 indicators will stop the radio sooner, press either the appropriate ALM 1 or ALM 2 button, or press the RADIO ON/OFF button. CKS3029_080106.p65 13 13 1/8/2006, 9:25 WAKE TO RADIO 1.) Turn the radio 'On'and select the band, station, and volume level that the alarms are using, Alarm 1, Alarm 2, or both alarms to the 'RADIO' position...
Owners Manual
Page 15
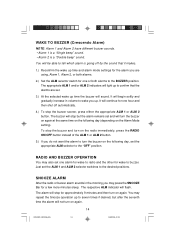
... the alarm to turn on the Alarm Mode setting). To stop for approximately 9 minutes and then turn the buzzer on the following day (depending on again. The alarm will continue for one hour and then shut off by the sound that the alarms are using, Alarm 1, Alarm 2, or both alarms. 2.) Set the ALM selector switch for one or both alarms to seven times if desired, but the alarm remains set and will flash. RADIO AND BUZZER OPERATION...
... the alarm to turn on the Alarm Mode setting). To stop for approximately 9 minutes and then turn the buzzer on the following day (depending on again. The alarm will continue for one hour and then shut off by the sound that the alarms are using, Alarm 1, Alarm 2, or both alarms. 2.) Set the ALM selector switch for one or both alarms to seven times if desired, but the alarm remains set and will flash. RADIO AND BUZZER OPERATION...

Owners Manual
Page 16
..."and the radio will hear if you change the display to the desired sleep time, up to 90 minutes and then shut off automatically. 1.) Press the SLEEP button. Note: When you set the Dimmer control to the LO (Low) position. IMPORTANT: Remember that the station and volume settings you choose for the Sleep To Music operation are the same settings you press the SLEEP button the sleep timer will shut off , hold the SLEEP button and...
..."and the radio will hear if you change the display to the desired sleep time, up to 90 minutes and then shut off automatically. 1.) Press the SLEEP button. Note: When you set the Dimmer control to the LO (Low) position. IMPORTANT: Remember that the station and volume settings you choose for the Sleep To Music operation are the same settings you press the SLEEP button the sleep timer will shut off , hold the SLEEP button and...

Owners Manual
Page 17
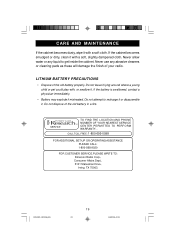
... the amount of time before replacement. IMPORTANT: Leave the radio power cord connected to the cabinet. A number of factors, such as, the length of time between the date the radio was manufactured, and you should change the battery proceed as it in the cabinet. 6.) Turn the radio right side up to be replaced. During this initial storage period, the lithium battery is 'Off'. 7.) Save these instructions. Once you...
... the amount of time before replacement. IMPORTANT: Leave the radio power cord connected to the cabinet. A number of factors, such as, the length of time between the date the radio was manufactured, and you should change the battery proceed as it in the cabinet. 6.) Turn the radio right side up to be replaced. During this initial storage period, the lithium battery is 'Off'. 7.) Save these instructions. Once you...
Owners Manual
Page 18
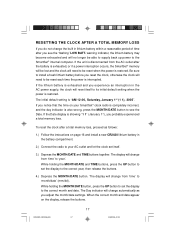
... release the buttons. 4.) Depress the MONTH/DATE button. The Day indicator will change automatically as follows: 1.) Follow the instructions on page 16 and install a new CR2430 lithium battery in the AC power supply, the clock will change from 'time'to the correct month and date. If you experience an interruption in the battery compartment. 2.) Connect the radio to your SmartSet® clock radio is completely incorrect, and the day indicator is...
... release the buttons. 4.) Depress the MONTH/DATE button. The Day indicator will change automatically as follows: 1.) Follow the instructions on page 16 and install a new CR2430 lithium battery in the AC power supply, the clock will change from 'time'to the correct month and date. If you experience an interruption in the battery compartment. 2.) Connect the radio to your SmartSet® clock radio is completely incorrect, and the day indicator is...
Owners Manual
Page 19
... observing the AM indicator. 6.) After you experience. The SmartSet® clock memory is now reset and the new lithium battery will maintain it for the next 5 to 8 years, depending on the number and duration of the power outages you set the display to the correct time. Be sure to reset your wake up times, and alarm mode settings, and sleep timer settings as well. Make final adjustments if necessary.
... observing the AM indicator. 6.) After you experience. The SmartSet® clock memory is now reset and the new lithium battery will maintain it for the next 5 to 8 years, depending on the number and duration of the power outages you set the display to the correct time. Be sure to reset your wake up times, and alarm mode settings, and sleep timer settings as well. Make final adjustments if necessary.
Owners Manual
Page 20
... of the old battery properly. If the cabinet becomes smudged or dirty, clean it with a soft, slightly dampened cloth. CALL TOLL FREE: 1-800-695-0098 FOR ADDITIONAL SET-UP OR OPERATING ASSISTANCE PLEASE CALL: 1-800-898-9020 FOR CUSTOMER SERVICE,PLEASE WRITE TO: Emerson Radio Corp., Consumer Affairs Dept., 5101 Statesman Drive, Irving, TX 75063. Never use any liquid...
... of the old battery properly. If the cabinet becomes smudged or dirty, clean it with a soft, slightly dampened cloth. CALL TOLL FREE: 1-800-695-0098 FOR ADDITIONAL SET-UP OR OPERATING ASSISTANCE PLEASE CALL: 1-800-898-9020 FOR CUSTOMER SERVICE,PLEASE WRITE TO: Emerson Radio Corp., Consumer Affairs Dept., 5101 Statesman Drive, Irving, TX 75063. Never use any liquid...
Owners Manual
Page 21
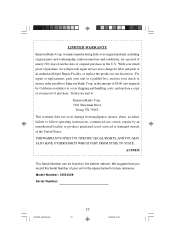
... material, including original parts and workmanship, under normal use , rental, repairs by California residents) to Emerson Radio Corp. THIS WARRANTY GIVES YOU SPECIFIC LEGAL RIGHTS, AND YOU MAY ALSO HAVE OTHER RIGHTS WHICH VARY FROM STATE TO STATE. Model Number: CKS3029 Serial Number: CKS3029_080106.p65 20 20 1/8/2006, 9:25 For repair or replacement, pack your unit to follow operating instructions, commercial use and conditions, for...
... material, including original parts and workmanship, under normal use , rental, repairs by California residents) to Emerson Radio Corp. THIS WARRANTY GIVES YOU SPECIFIC LEGAL RIGHTS, AND YOU MAY ALSO HAVE OTHER RIGHTS WHICH VARY FROM STATE TO STATE. Model Number: CKS3029 Serial Number: CKS3029_080106.p65 20 20 1/8/2006, 9:25 For repair or replacement, pack your unit to follow operating instructions, commercial use and conditions, for...


