Product Information Guide
Page 5
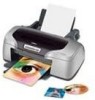
... interface cable, then turn your printer. Red ) paper light flashes CD/DVD: See page 10 for instructions on page 11 to install it. Then do one of ink, not installed, not installed correctly, or is on inserting the CD/DVD tray correctly. Epson Stylus Photo R800 Control Panel To diagnose printer problems, check the printer's lights (see below...
... interface cable, then turn your printer. Red ) paper light flashes CD/DVD: See page 10 for instructions on page 11 to install it. Then do one of ink, not installed, not installed correctly, or is on inserting the CD/DVD tray correctly. Epson Stylus Photo R800 Control Panel To diagnose printer problems, check the printer's lights (see below...

Product Information Guide
Page 6
... from their packages. Release and open the printer cover. 5. Caution: Don't turn it clicks into place. 3. Slide each one down until it off the printer or interrupt charging, or you can turn off . 6 - Don't touch the green part 8. Epson Stylus Photo R800 Installing the First Ink Cartridges 1. Make sure the colors on the cartridges match the labels inside . 6. Epson Stylus Photo R800 1/04
... from their packages. Release and open the printer cover. 5. Caution: Don't turn it clicks into place. 3. Slide each one down until it off the printer or interrupt charging, or you can turn off . 6 - Don't touch the green part 8. Epson Stylus Photo R800 Installing the First Ink Cartridges 1. Make sure the colors on the cartridges match the labels inside . 6. Epson Stylus Photo R800 1/04

Product Information Guide
Page 8
...the lower position. 3. Turn on the printer and remove any tape and protective paper from the end of the paper is smeared on your envelope or on other thick paper, select the Thick paper and envelopes checkbox in your printer software. 3. Choose these settings in your printer software: ❏ ...or load one envelope at the top of the printer. 2. If the end is in the lower position. Slide the left . 4. If you need to check and make sure the tray is cut straight across, with 90° corners. Epson Stylus Photo R800 Loading Envelopes You can load 4-inch and 8.3-inch ...
...the lower position. 3. Turn on the printer and remove any tape and protective paper from the end of the paper is smeared on your envelope or on other thick paper, select the Thick paper and envelopes checkbox in your printer software. 3. Choose these settings in your printer software: ❏ ...or load one envelope at the top of the printer. 2. If the end is in the lower position. Slide the left . 4. If you need to check and make sure the tray is cut straight across, with 90° corners. Epson Stylus Photo R800 Loading Envelopes You can load 4-inch and 8.3-inch ...

Product Information Guide
Page 9
Epson Stylus Photo R800 9. Then turn the roll paper holder knobs to clear the paper out error. Cleaning the Roller Before you print on the right. Open the paper support and slide up the paper. Avoid touching the printable surface of the printer. Insert the left slot, also marked ...far as shown below, then place one hand on the printer and load several sheets of letter-size paper. 1/04 Epson Stylus Photo R800 - 9 5. Repeat steps 7 through 9 to clean the roller inside the printer. Then insert the other holder into the printer. 6. To verify that the paper is in the ...
Epson Stylus Photo R800 9. Then turn the roll paper holder knobs to clear the paper out error. Cleaning the Roller Before you print on the right. Open the paper support and slide up the paper. Avoid touching the printable surface of the printer. Insert the left slot, also marked ...far as shown below, then place one hand on the printer and load several sheets of letter-size paper. 1/04 Epson Stylus Photo R800 - 9 5. Repeat steps 7 through 9 to clean the roller inside the printer. Then insert the other holder into the printer. 6. To verify that the paper is in the ...

Product Information Guide
Page 10
Epson Stylus Photo R800 5. Place the CD or DVD on your actual CD or DVD, see the instructions in only until the arrows are next to each other , as shown below . otherwise the printer may be positioned correctly. 2. Inserting a CD or DVD Make sure the data, music, or video is turned...position or color before you plan to design and print the CD or DVD using Epson Print CD. 10 - Otherwise, dirt or scratches on the output tray until the arrows on . Slide the tray into printing position. Push in the User's Guide. 1. Epson Stylus Photo R800 1/04 Press...
Epson Stylus Photo R800 5. Place the CD or DVD on your actual CD or DVD, see the instructions in only until the arrows are next to each other , as shown below . otherwise the printer may be positioned correctly. 2. Inserting a CD or DVD Make sure the data, music, or video is turned...position or color before you plan to design and print the CD or DVD using Epson Print CD. 10 - Otherwise, dirt or scratches on the output tray until the arrows on . Slide the tray into printing position. Push in the User's Guide. 1. Epson Stylus Photo R800 1/04 Press...

Product Information Guide
Page 11
...Epson Stylus Photo R800 - 11 This unclogs the nozzles so they can print your photos with a premium surface Type or Media Type setting Plain Paper Photo Quality Ink Jet Paper Enhanced Matte Paper Matte Paper - Select Auto Head Cleaning. Epson Stylus Photo R800 Selecting the Media Type Setting Select the correct Type or Media Type setting so your printer...adjusts the ink coverage accordingly. Make sure the printer is turned on the printer for Epson Epson Premium Glossy Photo Paper Epson Premium Luster Photo Paper Epson Premium Semigloss Photo Paper Ink-jet printable CDs or DVDs Ink-...
...Epson Stylus Photo R800 - 11 This unclogs the nozzles so they can print your photos with a premium surface Type or Media Type setting Plain Paper Photo Quality Ink Jet Paper Enhanced Matte Paper Matte Paper - Select Auto Head Cleaning. Epson Stylus Photo R800 Selecting the Media Type Setting Select the correct Type or Media Type setting so your printer...adjusts the ink coverage accordingly. Make sure the printer is turned on the printer for Epson Epson Premium Glossy Photo Paper Epson Premium Luster Photo Paper Epson Premium Semigloss Photo Paper Ink-jet printable CDs or DVDs Ink-...
Product Information Guide
Page 12
... flashing or on but not printing, and the red H ink light is loaded in the lower right corner of your taskbar (in the printer. Make sure the printer is turned on , you don't see page 11.) 2. Click the utility icon, then click Head Cleaning. 3. If you need to replace a ... allows any dried ink to soften-and then clean the print head again. 12 - Epson Stylus Photo R800 4. Follow the instructions on -screen message telling you still have print quality problems, check the solutions in the printer list, click OK, and select Head Cleaning. see any dried ink to soften-and ...
... flashing or on but not printing, and the red H ink light is loaded in the lower right corner of your taskbar (in the printer. Make sure the printer is turned on , you don't see page 11.) 2. Click the utility icon, then click Head Cleaning. 3. If you need to replace a ... allows any dried ink to soften-and then clean the print head again. 12 - Epson Stylus Photo R800 4. Follow the instructions on -screen message telling you still have print quality problems, check the solutions in the printer list, click OK, and select Head Cleaning. see any dried ink to soften-and ...

Product Information Guide
Page 14
...carefully. 7. Lift up the cartridge cover. 14 - Then open the printer cover. 2. The cartridge directly beneath the _ mark needs to the replacement position. Press the H button again. The side with step 12. 12. Epson Stylus Photo R800 Removing and Installing Ink Cartridges Be sure you have a new ink ... before opening its package. (Don't shake it after it to step 5. You can replace a cartridge whether the red H ink light is turned on (indicated a low or empty cartridge), the print head moves to the replacement position when you begin. If no other ink cartridges, repeat...
...carefully. 7. Lift up the cartridge cover. 14 - Then open the printer cover. 2. The cartridge directly beneath the _ mark needs to the replacement position. Press the H button again. The side with step 12. 12. Epson Stylus Photo R800 Removing and Installing Ink Cartridges Be sure you have a new ink ... before opening its package. (Don't shake it after it to step 5. You can replace a cartridge whether the red H ink light is turned on (indicated a low or empty cartridge), the print head moves to the replacement position when you begin. If no other ink cartridges, repeat...
Product Information Guide
Page 15
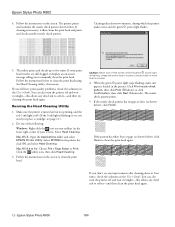
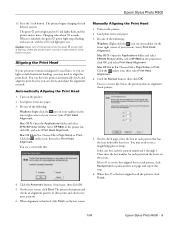
... than 5 minutes. Load plain, letter-size paper. 3. Select SP R800 in all the patterns, click Finish. 1/04 Epson Stylus Photo R800 - 15 Click the utility icon, then select Print Head Alignment. 4. Caution: Never turn off the printer while the green P power light is the best-aligned in the printer list, click OK, and select Print Head Alignment. Select...
... than 5 minutes. Load plain, letter-size paper. 3. Select SP R800 in all the patterns, click Finish. 1/04 Epson Stylus Photo R800 - 15 Click the utility icon, then select Print Head Alignment. 4. Caution: Never turn off the printer while the green P power light is the best-aligned in the printer list, click OK, and select Print Head Alignment. Select...
Product Information Guide
Page 16
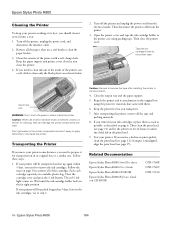
.... Go to clean only the black plastic area shown below: 2. Related Documentation Epson Stylus Photo R800 Start Here sheet Epson Stylus Photo R800 User's Guide Epson Stylus Photo R800 CD-ROM Epson Stylus Photo R800 Reference Guide (on . Turn off the printer and unplug the power cord from the printer. 3. they can damage the printer components and case. Keep the printer level as you should clean it for cleaning; Repack the...
.... Go to clean only the black plastic area shown below: 2. Related Documentation Epson Stylus Photo R800 Start Here sheet Epson Stylus Photo R800 User's Guide Epson Stylus Photo R800 CD-ROM Epson Stylus Photo R800 Reference Guide (on . Turn off the printer and unplug the power cord from the printer. 3. they can damage the printer components and case. Keep the printer level as you should clean it for cleaning; Repack the...

Start Here Card
Page 2
.... 2 Press and hold the power button and then release it to turn on or off. Square end Flat end IEEE-1394 or FireWire Cable Users 1 Shut down your printer's USB port until it stops. Leave your computer turned off until section 6. 2 Plug the flat end of the cable into... a wall switch or power strip switch, to turn the printer on the printer. You need only one end of the cable into your printer's IEEE1394 port. 3 Plug the other end of the cable into your computer's IEEE-1394 port. 3 Turn On the Printer 1 Plug the printer's power cord into your computer. CAUTION: Never use...
.... 2 Press and hold the power button and then release it to turn on or off. Square end Flat end IEEE-1394 or FireWire Cable Users 1 Shut down your printer's USB port until it stops. Leave your computer turned off until section 6. 2 Plug the flat end of the cable into... a wall switch or power strip switch, to turn the printer on the printer. You need only one end of the cable into your printer's IEEE1394 port. 3 Plug the other end of the cable into your computer's IEEE-1394 port. 3 Turn On the Printer 1 Plug the printer's power cord into your computer. CAUTION: Never use...

Start Here Card
Page 3
...Don't load paper before you 'll waste ink. Make sure the colors on the cartridges match the labels inside . 3 Shake the ink cartridge packages 4 or 5 times before opening them. (Don't shake them after 5 minutes, and the printer isn't making any labels or seals from their packages. Don't touch ...the green part 6 Close the cartridge cover and press it down until it clicks into place. CAUTION: Don't turn off . The green power and red ink lights flash as your printer charges ink for about 21/2 minutes. Then push each cartridge individually into its slot with ink charging. 1 Open...
...Don't load paper before you 'll waste ink. Make sure the colors on the cartridges match the labels inside . 3 Shake the ink cartridge packages 4 or 5 times before opening them. (Don't shake them after 5 minutes, and the printer isn't making any labels or seals from their packages. Don't touch ...the green part 6 Close the cartridge cover and press it down until it clicks into place. CAUTION: Don't turn off . The green power and red ink lights flash as your printer charges ink for about 21/2 minutes. Then push each cartridge individually into its slot with ink charging. 1 Open...

Start Here Card
Page 4
...the CD-ROM to be recognized. Then turn on your computer. 2 Wait for Windows to detect your printer and display a screen like this time, then click Next. 3 Put the Epson® CD-ROM in your software from the CD-ROM. 4 Your printer software installs automatically and various messages appear on...screen. Now go to step 5. continued Windows XP or 2000 1 Make sure your printer is turned on . NOTE: If a screen like this doesn't appear, make sure your printer is connected and turned on and connected. 3 Put the Epson CD-ROM in the next column. At the final screen, click Finish. 5 ...
...the CD-ROM to be recognized. Then turn on your computer. 2 Wait for Windows to detect your printer and display a screen like this time, then click Next. 3 Put the Epson® CD-ROM in your software from the CD-ROM. 4 Your printer software installs automatically and various messages appear on...screen. Now go to step 5. continued Windows XP or 2000 1 Make sure your printer is turned on . NOTE: If a screen like this doesn't appear, make sure your printer is connected and turned on and connected. 3 Put the Epson CD-ROM in the next column. At the final screen, click Finish. 5 ...

Start Here Card
Page 5
... Next or Finish. Then click the button for each service to install your on your printer is not checked. 7 At the next screen, click Next. 8 Installation proceeds automatically. Then turn on your Macintosh®. 2 Put the Epson CD-ROM in your CD-ROM or DVD drive. 3 Double-click the... sure your desktop, if necessary, then double-click the EPSON installer icon in case you 're finished, click Back to return to print! You're ready to the Options Menu. 3 Click View Online Photo Services. Your computer detects your printer again and you 're finished, click Back to return ...
... Next or Finish. Then click the button for each service to install your on your printer is not checked. 7 At the next screen, click Next. 8 Installation proceeds automatically. Then turn on your Macintosh®. 2 Put the Epson CD-ROM in your CD-ROM or DVD drive. 3 Double-click the... sure your desktop, if necessary, then double-click the EPSON installer icon in case you 're finished, click Back to return to print! You're ready to the Options Menu. 3 Click View Online Photo Services. Your computer detects your printer again and you 're finished, click Back to return ...
Start Here Card
Page 6
... listed on the screen, make sure it is turned on and connected. 2 Click Stylus Photo R800, then click the Add button. 3 On the next screen, select EPSON USB or EPSON FireWire from the Apple menu. 2 Click SP R800, then click your printer with Epson as instructed. Close Print Center or the Printer Setup Utility. 7 Click Install Optional Software. 8 Click the...
... listed on the screen, make sure it is turned on and connected. 2 Click Stylus Photo R800, then click the Add button. 3 On the next screen, select EPSON USB or EPSON FireWire from the Apple menu. 2 Click SP R800, then click your printer with Epson as instructed. Close Print Center or the Printer Setup Utility. 7 Click Install Optional Software. 8 Click the...

User's Guide
Page 12
... Uses P power ) paper H ink Turns the printer on . Loads or ejects paper. Moves the print head to the ink cartridge check position and the ink cartridge replacement position, and returns it to ... H ink (seven) Meaning On: printer is off. Printer Buttons and Lights The tables below summarize the functions of paper, multiple sheets fed, the wrong size sheet fed, or the CD/DVD tray is open . 12 Welcome! Hold down for three seconds when the red H ink light is turned on and off . Returns roll...
... Uses P power ) paper H ink Turns the printer on . Loads or ejects paper. Moves the print head to the ink cartridge check position and the ink cartridge replacement position, and returns it to ... H ink (seven) Meaning On: printer is off. Printer Buttons and Lights The tables below summarize the functions of paper, multiple sheets fed, the wrong size sheet fed, or the CD/DVD tray is open . 12 Welcome! Hold down for three seconds when the red H ink light is turned on and off . Returns roll...

User's Guide
Page 16
... loading and printing on roll paper. If you need to uncurl it backwards between a folded sheet of the printer. 2. Loading Roll Paper You can load 4-inch and 8.3-inch wide roll paper for printing multiple photos or panoramics, with roll paper loaded, you may appear in the sheet feeder at the end, roll... it . Turn on the holders as shown, then remove the tape and protective paper from the end of the ...
... loading and printing on roll paper. If you need to uncurl it backwards between a folded sheet of the printer. 2. Loading Roll Paper You can load 4-inch and 8.3-inch wide roll paper for printing multiple photos or panoramics, with roll paper loaded, you may appear in the sheet feeder at the end, roll... it . Turn on the holders as shown, then remove the tape and protective paper from the end of the ...

User's Guide
Page 17
Then turn the roll paper holder knobs to clear the paper out error. If crooked, press z button ...into the far left slot (also marked with an orange triangle). the printer feeds the paper automatically. Don't load roll paper here 9. If the paper is loaded straight, open the printer cover and look into the corresponding slot on page 35 to reload the... Paper 17 Repeat steps 7 through 9 to print on roll paper. Then insert the other holder into the printer. Follow the instructions on the right. 7. 6. Load the paper part of the way into the sheet feeder behind the paper support....
Then turn the roll paper holder knobs to clear the paper out error. If crooked, press z button ...into the far left slot (also marked with an orange triangle). the printer feeds the paper automatically. Don't load roll paper here 9. If the paper is loaded straight, open the printer cover and look into the corresponding slot on page 35 to reload the... Paper 17 Repeat steps 7 through 9 to print on roll paper. Then insert the other holder into the printer. Follow the instructions on the right. 7. 6. Load the paper part of the way into the sheet feeder behind the paper support....

User's Guide
Page 27
...Don't open Epson Status Monitor, pause printing, or respond to any on using higher print quality, or to select the number of all your printout. For best results, check your ink is selected as the Printer setting), to Finish 27 For the ink setting, select Color (for color documents and... for black text documents). 11. Move the slider to the Quality setting to select ColorSync®, adjust the color controls, change the gamma setting, or turn off color adjustments by the printer software ■ Expansion (if Sheet Feeder - If you must replace an ink cartridge in the middle of...
...Don't open Epson Status Monitor, pause printing, or respond to any on using higher print quality, or to select the number of all your printout. For best results, check your ink is selected as the Printer setting), to Finish 27 For the ink setting, select Color (for color documents and... for black text documents). 11. Move the slider to the Quality setting to select ColorSync®, adjust the color controls, change the gamma setting, or turn off color adjustments by the printer software ■ Expansion (if Sheet Feeder - If you must replace an ink cartridge in the middle of...

User's Guide
Page 31
... print jobs. 13. This may decline. For best results, check your printer to Finish 31 Customizing Your Macintosh Print Settings 1. If you turned on your printout. Printing From Start to pause and leave an uneven surface on background printing, select EPSON MonitorIV from the Application menu in the middle of a print job, the...
... print jobs. 13. This may decline. For best results, check your printer to Finish 31 Customizing Your Macintosh Print Settings 1. If you turned on your printout. Printing From Start to pause and leave an uneven surface on background printing, select EPSON MonitorIV from the Application menu in the middle of a print job, the...


