User Manual (P.I.M Plug-in)
Page 2
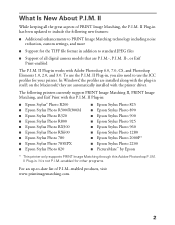
... need to standard JPEG files ■ Support of all the great aspects of P.I.M.-enabled products, visit www.printimagematching.com. 2 The following new features: ■ Additional enhancements to PRINT Image Matching technology including noise reduction, custom settings, and more ■ Support for the TIFF file format in : ■ Epson Stylus® Photo R200 ■ Epson Stylus Photo R300/R300M ■ Epson Stylus Photo R320 ■ Epson Stylus Photo R800 ■ Epson Stylus Photo RX500 ■ Epson Stylus Photo...
... need to standard JPEG files ■ Support of all the great aspects of P.I.M.-enabled products, visit www.printimagematching.com. 2 The following new features: ■ Additional enhancements to PRINT Image Matching technology including noise reduction, custom settings, and more ■ Support for the TIFF file format in : ■ Epson Stylus® Photo R200 ■ Epson Stylus Photo R300/R300M ■ Epson Stylus Photo R320 ■ Epson Stylus Photo R800 ■ Epson Stylus Photo RX500 ■ Epson Stylus Photo...

Product Information Guide
Page 1
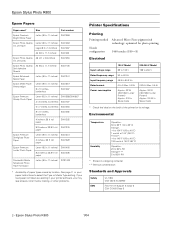
Epson Stylus Photo R800 Printer Parts Paper support and extension Left edge guide Output tray extensions Sheet feeder Printer cover Output tray (in lower position) CD position check disc CD adapter ring Output tray (in upper position) CD/DVD tray Ink cartridge holder (in home position) User Replaceable Parts User replaceable part CD tray CD adapter ring CD dummy sheet Roll paper holder (R) Roll paper holder (L) Reference number Part number 12 1262744 8 1264619 13 1236444 11 1274012 10 1274011 Accessories Ink Cartridges Cartridge Yellow Magenta Cyan Matte Black Photo Black ...
Epson Stylus Photo R800 Printer Parts Paper support and extension Left edge guide Output tray extensions Sheet feeder Printer cover Output tray (in lower position) CD position check disc CD adapter ring Output tray (in upper position) CD/DVD tray Ink cartridge holder (in home position) User Replaceable Parts User replaceable part CD tray CD adapter ring CD dummy sheet Roll paper holder (R) Roll paper holder (L) Reference number Part number 12 1262744 8 1264619 13 1236444 11 1274012 10 1274011 Accessories Ink Cartridges Cartridge Yellow Magenta Cyan Matte Black Photo Black ...
Product Information Guide
Page 2
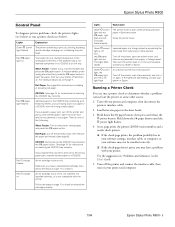
... in Sleep mode * Check the label on the back of paper types varies by location. Epson Stylus Photo R800 1/04 If you load paper not listed as a setting in your paper instructions to select the Type or Media Type setting. Epson Stylus Photo R800 Epson Papers Paper name* Size Part number Epson Premium Bright White Paper Letter (8.5 x 11 inches) S041586 Epson Photo Quality Ink Jet Paper Letter (8.5 x 11 inches) Legal (8.5 x 14 inches) S041062 S041067 A4 (8.3 x 11.7 inches) S041061 Epson Photo Quality A6 (4.1 x 5.8 inches) Ink Jet Cards S041054 Epson Photo Quality Self Adhesive...
... in Sleep mode * Check the label on the back of paper types varies by location. Epson Stylus Photo R800 1/04 If you load paper not listed as a setting in your paper instructions to select the Type or Media Type setting. Epson Stylus Photo R800 Epson Papers Paper name* Size Part number Epson Premium Bright White Paper Letter (8.5 x 11 inches) S041586 Epson Photo Quality Ink Jet Paper Letter (8.5 x 11 inches) Legal (8.5 x 14 inches) S041062 S041067 A4 (8.3 x 11.7 inches) S041061 Epson Photo Quality A6 (4.1 x 5.8 inches) Ink Jet Cards S041054 Epson Photo Quality Self Adhesive...
Product Information Guide
Page 5
... software settings, interface cable, or computer, or your dealer or Epson. A test page prints the printer's ROM version number and a nozzle check pattern. ❏ If the check page prints, the problem probably lies in Economy mode. Red ) paper light on Your paper ran out, multiple sheets fed, or the wrong size sheet fed, or the CD/DVD tray is not inserted completely or no CD/DVD is open the printer cover, and remove any jammed or torn paper. Lights Explanation Green P power light and red ) paper light flash and red H ink light flashes rapidly The printer...
... software settings, interface cable, or computer, or your dealer or Epson. A test page prints the printer's ROM version number and a nozzle check pattern. ❏ If the check page prints, the problem probably lies in Economy mode. Red ) paper light on Your paper ran out, multiple sheets fed, or the wrong size sheet fed, or the CD/DVD tray is not inserted completely or no CD/DVD is open the printer cover, and remove any jammed or torn paper. Lights Explanation Green P power light and red ) paper light flash and red H ink light flashes rapidly The printer...

Product Information Guide
Page 7
... Glossy Photo Paper Epson Premium Semigloss Photo Paper Epson Premium Luster Photo Paper 20 sheets Epson Photo Quality Ink Jet Paper 100 sheets Epson Premium Bright White Paper 80 sheets Epson Photo Quality Self Adhesive Sheets PremierArt Matte Scrapbook Photo Paper for Epson 1 sheet at a time Epson Photo Quality Ink Jet Cards 50 sheets If the special paper has a cut corner, load the paper so the cut corner is in the sheet feeder: 1. Check the paper package for printing landscapeoriented documents. ❏ Load the printable side face up. Epson Stylus Photo R800 Loading Paper...
... Glossy Photo Paper Epson Premium Semigloss Photo Paper Epson Premium Luster Photo Paper 20 sheets Epson Photo Quality Ink Jet Paper 100 sheets Epson Premium Bright White Paper 80 sheets Epson Photo Quality Self Adhesive Sheets PremierArt Matte Scrapbook Photo Paper for Epson 1 sheet at a time Epson Photo Quality Ink Jet Cards 50 sheets If the special paper has a cut corner, load the paper so the cut corner is in the sheet feeder: 1. Check the paper package for printing landscapeoriented documents. ❏ Load the printable side face up. Epson Stylus Photo R800 Loading Paper...

Product Information Guide
Page 8
... printer software: ❏ Plain Paper as the Type (Windows) or Media Type (Macintosh) setting ❏ The envelope size as the Size (Windows) or Paper Size (Macintosh) setting ❏ Landscape as described below. It's a good idea to 10 envelopes at a time, as the Orientation setting If printing is in the sheet feeder at a time. 1. Load envelopes short edge first as shown, then remove any paper loaded in the lower position. Slide the left . 4. Epson Stylus Photo R800 1/04 Open the output tray...
... printer software: ❏ Plain Paper as the Type (Windows) or Media Type (Macintosh) setting ❏ The envelope size as the Size (Windows) or Paper Size (Macintosh) setting ❏ Landscape as described below. It's a good idea to 10 envelopes at a time, as the Orientation setting If printing is in the sheet feeder at a time. 1. Load envelopes short edge first as shown, then remove any paper loaded in the lower position. Slide the left . 4. Epson Stylus Photo R800 1/04 Open the output tray...

Product Information Guide
Page 9
... the support extension. 4. Then turn the roll paper holder knobs to back the paper all the way out. Do not use thermal-printable or regular CDs or DVDs. You can do this by feeding and ejecting several sheets of the printer and ease the tray down into the corresponding slot on the top of letter-size paper. 1/04 Epson Stylus Photo R800 - 9 If crooked, press z button for printing. Turn on CDs or DVDs, you need...
... the support extension. 4. Then turn the roll paper holder knobs to back the paper all the way out. Do not use thermal-printable or regular CDs or DVDs. You can do this by feeding and ejecting several sheets of the printer and ease the tray down into the corresponding slot on the top of letter-size paper. 1/04 Epson Stylus Photo R800 - 9 If crooked, press z button for printing. Turn on CDs or DVDs, you need...

Product Information Guide
Page 10
... up . Epson Stylus Photo R800 5. Press the ) paper button to design and print the CD or DVD using Epson Print CD. 10 - Push in the guide until it 's a good idea to print a small sample, then wait a day and check the quality to each other , as shown below . Push in only until the arrows are next to make sure the printer is loaded when the P power button stops flashing. 8. Lay the tray down...
... up . Epson Stylus Photo R800 5. Press the ) paper button to design and print the CD or DVD using Epson Print CD. 10 - Push in the guide until it 's a good idea to print a small sample, then wait a day and check the quality to each other , as shown below . Push in only until the arrows are next to make sure the printer is loaded when the P power button stops flashing. 8. Lay the tray down...

Product Information Guide
Page 11
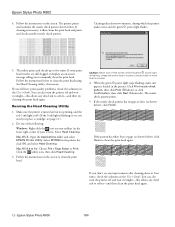
...the Head Cleaning utility. Although borderless printing is needed, the printer automatically cleans the print head. 1. You can also clean the print head by holding down the H ink button on the printer for a long time, print quality can decline, so turn on your printer for three seconds (when the red H ink light is flashing or on your screen). Mac OS X: Open the Applications folder and select EPSON Printer Utility. See the User's Guide for Epson Epson Premium Glossy Photo Paper Epson Premium Luster Photo Paper Epson Premium Semigloss Photo Paper Ink-jet printable CDs or DVDs Ink...
...the Head Cleaning utility. Although borderless printing is needed, the printer automatically cleans the print head. 1. You can also clean the print head by holding down the H ink button on the printer for a long time, print quality can decline, so turn on your printer for three seconds (when the red H ink light is flashing or on your screen). Mac OS X: Open the Applications folder and select EPSON Printer Utility. See the User's Guide for Epson Epson Premium Glossy Photo Paper Epson Premium Luster Photo Paper Epson Premium Semigloss Photo Paper Ink-jet printable CDs or DVDs Ink...
Product Information Guide
Page 12
... page 11.) 2. If the nozzle check pattern has no gaps or lines (as shown below ), click Finish. Epson Stylus Photo R800 4. Mac OS X: Open the Applications folder and select EPSON Printer Utility. The utility prints and checks up to clean the print head using the Head Cleaning utility, if necessary. Do one of your taskbar (in the printer. You can also turn the printer off and wait overnight-this allows any dried ink to clean the print head again. If cleaning is flashing...
... page 11.) 2. If the nozzle check pattern has no gaps or lines (as shown below ), click Finish. Epson Stylus Photo R800 4. Mac OS X: Open the Applications folder and select EPSON Printer Utility. The utility prints and checks up to clean the print head using the Head Cleaning utility, if necessary. Do one of your taskbar (in the printer. You can also turn the printer off and wait overnight-this allows any dried ink to clean the print head again. If cleaning is flashing...
Product Information Guide
Page 13
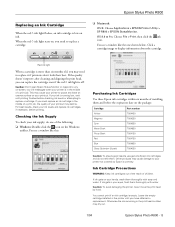
... package: Cartridge Yellow Magenta Cyan Matte Black Photo Black Red Blue Gloss Optimizer (2-pack) Part number T054420 T054320 T054220 T054820 T054120 T054720 T054920 T054020 Caution: To ensure good results, use genuine Epson ink cartridges and do one shown below. Caution: To avoid damaging the printer, never move the print head by Epson's warranty. Caution: Don't open Epson Status Monitor or respond to replace a cartridge. You see a window like this: Purchasing Ink Cartridges Use these Epson ink cartridges within six...
... package: Cartridge Yellow Magenta Cyan Matte Black Photo Black Red Blue Gloss Optimizer (2-pack) Part number T054420 T054320 T054220 T054820 T054120 T054720 T054920 T054020 Caution: To ensure good results, use genuine Epson ink cartridges and do one shown below. Caution: To avoid damaging the printer, never move the print head by Epson's warranty. Caution: Don't open Epson Status Monitor or respond to replace a cartridge. You see a window like this: Purchasing Ink Cartridges Use these Epson ink cartridges within six...
Product Information Guide
Page 15
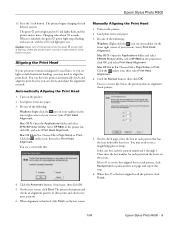
... printer. 2. Load plain, letter-size paper. 3. Select SP R800 in it 's finished, the green P power light stops flashing and stays on the last screen. Click the utility icon, then select Print Head Alignment. 4. Click the Manual button, then click OK. Caution: Never turn off the printer while the green P power light is the best-aligned in the printer list, click OK, and select Print Head Alignment. Mac OS X: Open the Applications folder and select EPSON Printer Utility. Charging takes about 90 seconds. Automatically Aligning the Print Head 1. Select Print Head Alignment...
... printer. 2. Load plain, letter-size paper. 3. Select SP R800 in it 's finished, the green P power light stops flashing and stays on the last screen. Click the utility icon, then select Print Head Alignment. 4. Click the Manual button, then click OK. Caution: Never turn off the printer while the green P power light is the best-aligned in the printer list, click OK, and select Print Head Alignment. Mac OS X: Open the Applications folder and select EPSON Printer Utility. Charging takes about 90 seconds. Automatically Aligning the Print Head 1. Select Print Head Alignment...
Product Information Guide
Page 16
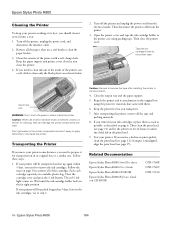
... Documentation Epson Stylus Photo R800 Start Here sheet Epson Stylus Photo R800 User's Guide Epson Stylus Photo R800 CD-ROM Epson Stylus Photo R800 Reference Guide (on the printer components and don't spray or apply lubricants or oils inside the printer. Then disconnect the printer cable from the electrical outlet. they can damage the printer components and case. Follow the steps on . Close the cartridge cover and press the H ink button. Close the output tray and the paper support. 5. If you removed your printer working at its new location...
... Documentation Epson Stylus Photo R800 Start Here sheet Epson Stylus Photo R800 User's Guide Epson Stylus Photo R800 CD-ROM Epson Stylus Photo R800 Reference Guide (on the printer components and don't spray or apply lubricants or oils inside the printer. Then disconnect the printer cable from the electrical outlet. they can damage the printer components and case. Follow the steps on . Close the cartridge cover and press the H ink button. Close the output tray and the paper support. 5. If you removed your printer working at its new location...
Start Here Card
Page 1
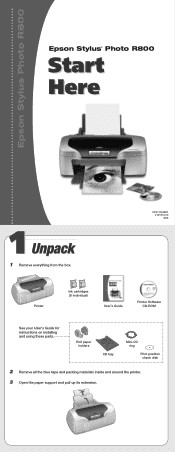
Roll paper holders CD tray Mini-CD ring Print position check disk 2 Remove all the blue tape and packing materials inside and around the printer. 3 Open the paper support and pull up its extension. CPD-17408R1 4101374-00 XXX Printer Ink cartridges (8 individual) User's Guide Printer Software CD-ROM See your User's Guide for instructions on installing and using these parts. Epson Stylus Photo R800 Epson Stylus® Photo R800 Start Here 1 Unpack 1 Remove everything from the box.
Roll paper holders CD tray Mini-CD ring Print position check disk 2 Remove all the blue tape and packing materials inside and around the printer. 3 Open the paper support and pull up its extension. CPD-17408R1 4101374-00 XXX Printer Ink cartridges (8 individual) User's Guide Printer Software CD-ROM See your User's Guide for instructions on installing and using these parts. Epson Stylus Photo R800 Epson Stylus® Photo R800 Start Here 1 Unpack 1 Remove everything from the box.
Start Here Card
Page 6
... 13. Remove the CD-ROM and keep it in OS X 1 Open the OS X Applications folder, then open the Utilities folder and select Print Center or Printer Setup Utility. 7 Click Install Optional Software. 8 Click the button for each service to learn more about it and follow the on-screen instructions. 9 When you're finished, click Back to return to the Install Menu. 10 Click View Online Photo Services. Epson and Epson Stylus are for further instructions. 7 Print Now...
... 13. Remove the CD-ROM and keep it in OS X 1 Open the OS X Applications folder, then open the Utilities folder and select Print Center or Printer Setup Utility. 7 Click Install Optional Software. 8 Click the button for each service to learn more about it and follow the on-screen instructions. 9 When you're finished, click Back to return to the Install Menu. 10 Click View Online Photo Services. Epson and Epson Stylus are for further instructions. 7 Print Now...
User's Guide
Page 10
... for network setup instructions and technical specifications, see the Start Here sheet. About Your Documentation To set up your warranty, and instructions on: ■ Viewing the on-screen Reference Guide ■ Loading all types of paper ■ Printing with Windows® or on a Macintosh® ■ Printing on -screen Reference Guide, as described in the next section. 10 Welcome! This book contains system requirements, important safety information, your printer and install its software...
... for network setup instructions and technical specifications, see the Start Here sheet. About Your Documentation To set up your warranty, and instructions on: ■ Viewing the on-screen Reference Guide ■ Loading all types of paper ■ Printing with Windows® or on a Macintosh® ■ Printing on -screen Reference Guide, as described in the next section. 10 Welcome! This book contains system requirements, important safety information, your printer and install its software...

User's Guide
Page 27
... pull-down menu: ■ Copies & Pages, to select the number of a print job. If your printout. Select Automatic as the Printer setting), to select roll paper options; Move the slider to the Quality setting to print images or documents using Advanced mode, see page 35 for details ■ Extension Setting, to correct ink smearing when printing on -screen, low ink messages when your print job as the Printer setting), to adjust the borderless image size; see page 31.) 12. Printing From Start to 9.x Macintosh printer driver described in...
... pull-down menu: ■ Copies & Pages, to select the number of a print job. If your printout. Select Automatic as the Printer setting), to select roll paper options; Move the slider to the Quality setting to print images or documents using Advanced mode, see page 35 for details ■ Extension Setting, to correct ink smearing when printing on -screen, low ink messages when your print job as the Printer setting), to adjust the borderless image size; see page 31.) 12. Printing From Start to 9.x Macintosh printer driver described in...

User's Guide
Page 35
... print on roll paper, load roll paper as described on -screen, low ink messages when your printout. Caution: Don't open Epson Status Monitor, pause printing, or respond to select your ink levels and replace ink cartridges, if necessary, before checking ink levels or attempting to print photos using the special Stylus Photo R800 printing features, follow the steps in these sections: ■ "Printing on Roll Paper" below ■ "Using PRINT Image Matching" on page 42 ■ "Printing Borderless Cut Sheets" on page 43 ■ "Managing Color with Profiles" on page 48 Printing on Roll...
... print on roll paper, load roll paper as described on -screen, low ink messages when your printout. Caution: Don't open Epson Status Monitor, pause printing, or respond to select your ink levels and replace ink cartridges, if necessary, before checking ink levels or attempting to print photos using the special Stylus Photo R800 printing features, follow the steps in these sections: ■ "Printing on Roll Paper" below ■ "Using PRINT Image Matching" on page 42 ■ "Printing Borderless Cut Sheets" on page 43 ■ "Managing Color with Profiles" on page 48 Printing on Roll...

User's Guide
Page 56
... Epson printer driver. Solving Color Management Problems If you selected the wrong combination of source profile, printer profile, and color management settings, you see a missing profile screen, select Leave as is (don't color manage). 3. Make sure the Source Space Document option is not set to print on color management in the Print Space - If you 'll get unexpected results. Profile pull-down menu. 56 Printing Special Photos Return to print the test target, follow the steps for your printed image...
... Epson printer driver. Solving Color Management Problems If you selected the wrong combination of source profile, printer profile, and color management settings, you see a missing profile screen, select Leave as is (don't color manage). 3. Make sure the Source Space Document option is not set to print on color management in the Print Space - If you 'll get unexpected results. Profile pull-down menu. 56 Printing Special Photos Return to print the test target, follow the steps for your printed image...

User's Guide
Page 75
...-down menu ■ CD/DVD as necessary. 14. Insert a test CD or DVD for printing, as the Format for at least 24 hours. Make sure Stylus Photo R800(Manual Feed) is selected as described on page 63. 2. Repeat steps 10 to 14 again, but select the Third Time button. 16. If you want to print a third pattern, repeat steps 10 to 14. Select these print settings: ■ Stylus Photo R800(Manual Feed) as the Printer ■ Print Settings from...
...-down menu ■ CD/DVD as necessary. 14. Insert a test CD or DVD for printing, as the Format for at least 24 hours. Make sure Stylus Photo R800(Manual Feed) is selected as described on page 63. 2. Repeat steps 10 to 14 again, but select the Third Time button. 16. If you want to print a third pattern, repeat steps 10 to 14. Select these print settings: ■ Stylus Photo R800(Manual Feed) as the Printer ■ Print Settings from...


