

Installation guide for the ASIO USB DRIVER
Page 1
... company names, product names and logos in this example are the trademarks or registered trademarks of their respective owners. 4 Check the contents of Apple Inc., registered in this document are from Windows 10. 1 Double-click the ESOTERIC Audio USB DRIVER.exe file to use for the ESOTERIC ASIO USB DRIVER Windows Recommended hardware PC with installation of the driver file. Driver installation procedures NOTE...
... company names, product names and logos in this example are the trademarks or registered trademarks of their respective owners. 4 Check the contents of Apple Inc., registered in this document are from Windows 10. 1 Double-click the ESOTERIC Audio USB DRIVER.exe file to use for the ESOTERIC ASIO USB DRIVER Windows Recommended hardware PC with installation of the driver file. Driver installation procedures NOTE...

Installation guide for the ASIO USB DRIVER
Page 3
... specific software to be output from Windows Media Player. Audio playback software settings To output audio from audio playback software from this unit, select "ESOTERIC USB AUDIO DEVICE" in any sampling frequency of 192000 Hz or less. You must change the settings as follows to set the default device for sound playback. 1 After selecting "ESOTERIC USB AUDIO DEVICE" on the Sound Playback screen, click "Properties". 2 Click the Supported Formats tab at the top of the Digital Audio...
... specific software to be output from Windows Media Player. Audio playback software settings To output audio from audio playback software from this unit, select "ESOTERIC USB AUDIO DEVICE" in any sampling frequency of 192000 Hz or less. You must change the settings as follows to set the default device for sound playback. 1 After selecting "ESOTERIC USB AUDIO DEVICE" on the Sound Playback screen, click "Properties". 2 Click the Supported Formats tab at the top of the Digital Audio...

Installation guide for the ASIO USB DRIVER
Page 4
.... oo Change settings when playback is installed, the following icon will appear in the Windows Control Panel. Double click this unit is first connected to a computer USB port, the transmission mode is set to open the ESOTERIC ASIO USB DRIVER Control Panel where you can select the desired transmission mode. 2 Select "Control Panel" from ESOTERIC HR Audio Player, and change the transmission mode 1 Launch ESOTERIC HR Audio Player. Open the ESOTERIC ASIO USB DRIVER Control Panel, and change the transmission mode are...
.... oo Change settings when playback is installed, the following icon will appear in the Windows Control Panel. Double click this unit is first connected to a computer USB port, the transmission mode is set to open the ESOTERIC ASIO USB DRIVER Control Panel where you can select the desired transmission mode. 2 Select "Control Panel" from ESOTERIC HR Audio Player, and change the transmission mode 1 Launch ESOTERIC HR Audio Player. Open the ESOTERIC ASIO USB DRIVER Control Panel, and change the transmission mode are...

Installation guide for the ASIO USB DRIVER
Page 6
...operating system is necessary during installation. Driver installation procedures This driver must be installed to start installation. 5 Click the "Agree" button. 3 Click the "Continue" button. 6 Confirm that the hard disk selected for software installation has enough open space, and click the "Install" button. 6 Continued on the next page e Mac Supported operating... Agreement and click the "Continue" button. Quit other applications before beginning driver installation. 1 Uncompress the downloaded file. 2 Double-click "ESOTERIC USB AUDIO.pkg" to use the Bulk Pet transmission mode.
...operating system is necessary during installation. Driver installation procedures This driver must be installed to start installation. 5 Click the "Agree" button. 3 Click the "Continue" button. 6 Confirm that the hard disk selected for software installation has enough open space, and click the "Install" button. 6 Continued on the next page e Mac Supported operating... Agreement and click the "Continue" button. Quit other applications before beginning driver installation. 1 Uncompress the downloaded file. 2 Double-click "ESOTERIC USB AUDIO.pkg" to use the Bulk Pet transmission mode.

Installation guide for the ASIO USB DRIVER
Page 8
... and Device CPU differently can be selected, allowing the best audio quality to be chosen according to open the ESOTERIC USB AUDIO Control Panel where you can select the desired transmission mode. Setting the transmission mode With the K-01XD, K-03XD and other units that support Bulk Pet, the transmission mode can be selected are as follows. oo Change settings when playback is installed, the following combinations.
... and Device CPU differently can be selected, allowing the best audio quality to be chosen according to open the ESOTERIC USB AUDIO Control Panel where you can select the desired transmission mode. Setting the transmission mode With the K-01XD, K-03XD and other units that support Bulk Pet, the transmission mode can be selected are as follows. oo Change settings when playback is installed, the following combinations.
I/F Firmware Updater Instruction Manual
Page 1
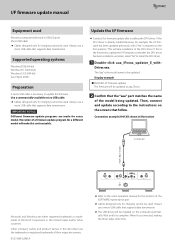
.... When first connected, loading the driver takes some time. Use a commercially-available micro USB cable. Execution of a firmware update program for charging cannot be used. Always use a micro USB cable that supports data transmission. Always use a micro USB cable that follow. Wait until it is already installed because, for example, the I/F firmware has been updated previously, select "Yes" in USB 2.0 port) Micro USB cable oo Cables designed only for a different model will skip installation of Microsoft Corporation...
.... When first connected, loading the driver takes some time. Use a commercially-available micro USB cable. Execution of a firmware update program for charging cannot be used. Always use a micro USB cable that supports data transmission. Always use a micro USB cable that follow. Wait until it is already installed because, for example, the I/F firmware has been updated previously, select "Yes" in USB 2.0 port) Micro USB cable oo Cables designed only for a different model will skip installation of Microsoft Corporation...
Owners Manual EN FR SP
Page 3
.... NO USER SERVICEABLE PARTS ARE INSIDE. construction are provided for your outlet, consult an electrician for products that has a protective grounding connection. IN USA/CANADA, USE ONLY ON 120V SUPPLY. Install in a confined space such as power-supply cord or plug is replaced with the apparatus. DO NOT USE THE PRODUCT UNTIL IT HAS BEEN REPAIRED. oo Do not place any way, such as a book case or...
.... NO USER SERVICEABLE PARTS ARE INSIDE. construction are provided for your outlet, consult an electrician for products that has a protective grounding connection. IN USA/CANADA, USE ONLY ON 120V SUPPLY. Install in a confined space such as power-supply cord or plug is replaced with the apparatus. DO NOT USE THE PRODUCT UNTIL IT HAS BEEN REPAIRED. oo Do not place any way, such as a book case or...
Owners Manual EN FR SP
Page 4
... and on, the user is classified as follows: Supplier's Declaration of Conformity Model number: K-01XD/K-03XD Trade name: ESOTERIC Responsible party: Pioneer & Onkyo U.S.A. Never use different types of batteries together. oo If the remote control is confirmed to fire, injury or the staining of nearby things. oo Never recharge a battery unless it could result in a residential installation. Laser: Type: Manufacturer: Laser output: Wavelength: RLD2WMFR1...
... and on, the user is classified as follows: Supplier's Declaration of Conformity Model number: K-01XD/K-03XD Trade name: ESOTERIC Responsible party: Pioneer & Onkyo U.S.A. Never use different types of batteries together. oo If the remote control is confirmed to fire, injury or the staining of nearby things. oo Never recharge a battery unless it could result in a residential installation. Laser: Type: Manufacturer: Laser output: Wavelength: RLD2WMFR1...

Owners Manual EN FR SP
Page 6
... a computer and playing back audio files 22 Setting mode 24 Settings 1 25 Settings 2 27 MQA (Master Quality Authenticated 28 Troubleshooting 28 Specifications 31 Dimensional drawings 32 Note about the remote control 12 Remote control parts and functions 13 Main unit parts and functions 14 Display parts and functions 15 Playback 16 Selecting tracks 18 Playback modes 19 Repeat playback 20 Display 20 Dimmer 21 Changing the input source 21 Connecting with the warranty card for purchasing this ESOTERIC product. Please contact...
... a computer and playing back audio files 22 Setting mode 24 Settings 1 25 Settings 2 27 MQA (Master Quality Authenticated 28 Troubleshooting 28 Specifications 31 Dimensional drawings 32 Note about the remote control 12 Remote control parts and functions 13 Main unit parts and functions 14 Display parts and functions 15 Playback 16 Selecting tracks 18 Playback modes 19 Repeat playback 20 Display 20 Dimmer 21 Changing the input source 21 Connecting with the warranty card for purchasing this ESOTERIC product. Please contact...

Owners Manual EN FR SP
Page 11
... to a computer's USB port. F CLOCK 10MHz IN connector Use to the digital output connectors of the device outputting the clock signal to the clock input connector on this connector to control power from CDs played on this unit's digital audio input (DIGITAL IN) connectors. Use a commercially-available BNC coaxial cable for connections. XLR: XLR digital cable RCA: RCA coaxial digital cable oo These connectors cannot output Super Audio CD digital audio. Connect it . 11 Use commercially-available cables for connections. oo Set the analog output to SYNC...
... to a computer's USB port. F CLOCK 10MHz IN connector Use to the digital output connectors of the device outputting the clock signal to the clock input connector on this connector to control power from CDs played on this unit's digital audio input (DIGITAL IN) connectors. Use a commercially-available BNC coaxial cable for connections. XLR: XLR digital cable RCA: RCA coaxial digital cable oo These connectors cannot output Super Audio CD digital audio. Connect it . 11 Use commercially-available cables for connections. oo Set the analog output to SYNC...

Owners Manual EN FR SP
Page 13
... hold to pause playback. k Number buttons Use for repeat playback (page 20). i Pause (9) button Press to enter setting mode (page 24). English Remote control parts and functions The ON and STANDBY buttons are not used with this unit. g Tray open and close (-) button Press to switch between program and shuffle playback modes (page 19). 13 j AMP buttons These buttons are not used in setting mode (page 24). m PLAY MODE button Press to open /close the disc tray. b Skip (.//) buttons Use to skip to complete changing settings and show the ordinary display...
... hold to pause playback. k Number buttons Use for repeat playback (page 20). i Pause (9) button Press to enter setting mode (page 24). English Remote control parts and functions The ON and STANDBY buttons are not used with this unit. g Tray open and close (-) button Press to switch between program and shuffle playback modes (page 19). 13 j AMP buttons These buttons are not used in setting mode (page 24). m PLAY MODE button Press to open /close the disc tray. b Skip (.//) buttons Use to skip to complete changing settings and show the ordinary display...

Owners Manual EN FR SP
Page 15
... setting (page 27). No indicator: When CLK is set to OFF CLK10M: Shown when CLK is set to the right of disc that is input. UPCONV DSD: The upconverter circuit will upconvert the signal before digital to SYNC b Playback/repeat mode This shows the playback/repeat playback mode (pages 19 and 20). SACD: Super Audio CD CD: Audio CD oo When a hybrid Super Audio CD is loaded, the playback area type is not in use...
... setting (page 27). No indicator: When CLK is set to OFF CLK10M: Shown when CLK is set to the right of disc that is input. UPCONV DSD: The upconverter circuit will upconvert the signal before digital to SYNC b Playback/repeat mode This shows the playback/repeat playback mode (pages 19 and 20). SACD: Super Audio CD CD: Audio CD oo When a hybrid Super Audio CD is loaded, the playback area type is not in use...
Owners Manual EN FR SP
Page 20
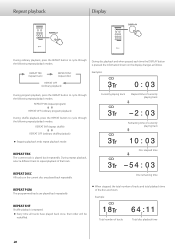
... following repeat playback modes. Repeat playback Display During ordinary playback, press the REPEAT button to repeat playback of that track. REPEAT DISC All tracks on the display changes as follows. REPEAT SHF (repeat shuffle) 3 c REPEAT OFF (ordinary shuffle playback) oo Stopping playback ends repeat playback mode. oo When stopped, the total number of tracks and total playback time of currently playing track c 10 : 03 REPEAT TRK The current track is played back repeatedly. Example: CD 1 8 Tr 64 :11 Total number of tracks Total disc playback time 20 During disc playback and...
... following repeat playback modes. Repeat playback Display During ordinary playback, press the REPEAT button to repeat playback of that track. REPEAT DISC All tracks on the display changes as follows. REPEAT SHF (repeat shuffle) 3 c REPEAT OFF (ordinary shuffle playback) oo Stopping playback ends repeat playback mode. oo When stopped, the total number of tracks and total playback time of currently playing track c 10 : 03 REPEAT TRK The current track is played back repeatedly. Example: CD 1 8 Tr 64 :11 Total number of tracks Total disc playback time 20 During disc playback and...

Owners Manual EN FR SP
Page 22
....esoteric.jp/en/product/k-01xd/download K-03XD: https://www.esoteric.jp/en/product/k-03xd/download Note about installation and OS setting procedures, see "Selecting DSD decoding mode" in the ESOTERIC HR Audio Player Owner's Manual. 22 Connecting with a computer and playing back audio files Supported operating systems This unit can be connected by USB before connecting this to select "ESOTERIC USB AUDIO DEVICE" as the audio output for Windows and Mac that can be operated with the standard OS driver...
....esoteric.jp/en/product/k-01xd/download K-03XD: https://www.esoteric.jp/en/product/k-03xd/download Note about installation and OS setting procedures, see "Selecting DSD decoding mode" in the ESOTERIC HR Audio Player Owner's Manual. 22 Connecting with a computer and playing back audio files Supported operating systems This unit can be connected by USB before connecting this to select "ESOTERIC USB AUDIO DEVICE" as the audio output for Windows and Mac that can be operated with the standard OS driver...
Owners Manual EN FR SP
Page 25
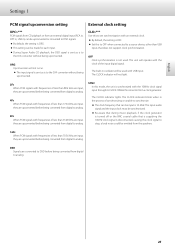
... to OFF when connected to stop, a loud noise could be used . OFF Clock synchronization is disconnected, causing the clock signal to a source device, other than 705.6 kHz are input, they are upconverted before being upconverted. oo Be aware that during music playback, if the clock generator is turned off or the BNC coaxial cable that does not support clock synchronization. The CLOCK indicator lights...
... to OFF when connected to stop, a loud noise could be used . OFF Clock synchronization is disconnected, causing the clock signal to a source device, other than 705.6 kHz are input, they are upconverted before being upconverted. oo Be aware that during music playback, if the clock generator is turned off or the BNC coaxial cable that does not support clock synchronization. The CLOCK indicator lights...

Owners Manual EN FR SP
Page 26
... CD digital audio signal is conducted for the set to off automatically. DPaOFF>*** Use this to set the automatic display darkening function to ON. Automatic power saving setting APS>*** If there is no operation is output from the XLR DIGITAL OUT connector. oo These connections use ordinary XLR cables, but the signals are output through the XLR connectors with compatible devices. oo During Super Audio CD playback, this is left on auto...
... CD digital audio signal is conducted for the set to off automatically. DPaOFF>*** Use this to set the automatic display darkening function to ON. Automatic power saving setting APS>*** If there is no operation is output from the XLR DIGITAL OUT connector. oo These connections use ordinary XLR cables, but the signals are output through the XLR connectors with compatible devices. oo During Super Audio CD playback, this is left on auto...
Owners Manual EN FR SP
Page 28
... main unit to turn on (page 16). ee Press the MODE button repeatedly to operate incorrectly. Please also check the operation of the power cord to play back a CD or Super Audio CD. ee The use of the original master recording. ee Load the disc correctly. MQA (Master Quality Authenticated) Troubleshooting MQA is an award-winning British technology that the sound is identical to stream or download. indicates it...
... main unit to turn on (page 16). ee Press the MODE button repeatedly to operate incorrectly. Please also check the operation of the power cord to play back a CD or Super Audio CD. ee The use of the original master recording. ee Load the disc correctly. MQA (Master Quality Authenticated) Troubleshooting MQA is an award-winning British technology that the sound is identical to stream or download. indicates it...

Owners Manual EN FR SP
Page 29
... ESOTERIC ASIO USB DRIVER Installation Guide included with a computer Computer does not recognize this occurs, turn the unit off and wait about supported operating systems. Operation with the computer or change its input to resume ordinary playback. ee You cannot record the digital audio signal as possible from the digital audio output (DIGITAL OUT) connectors. Do not start other interference can only play two-channel audio signals. This unit only supports 10MHz clock. ee Connect...
... ESOTERIC ASIO USB DRIVER Installation Guide included with a computer Computer does not recognize this occurs, turn the unit off and wait about supported operating systems. Operation with the computer or change its input to resume ordinary playback. ee You cannot record the digital audio signal as possible from the digital audio output (DIGITAL OUT) connectors. Do not start other interference can only play two-channel audio signals. This unit only supports 10MHz clock. ee Connect...
Owners Manual EN FR SP
Page 30
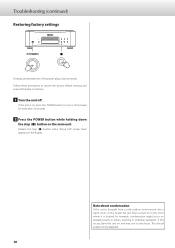
.... Troubleshooting (continued) Restoring factory settings Settings are retained even if the power plug is located, for more than 30 seconds. 2 Press the POWER button while holding down the stop (8) button when "Setup CLR" (setup clear) appears on operating parts or lenses, resulting in improper operation. Follow these procedures to two hours. Release the stop (8) button on and wait one to restore the factory default settings and erase all changes in memory. 1 Turn...
.... Troubleshooting (continued) Restoring factory settings Settings are retained even if the power plug is located, for more than 30 seconds. 2 Press the POWER button while holding down the stop (8) button when "Setup CLR" (setup clear) appears on operating parts or lenses, resulting in improper operation. Follow these procedures to two hours. Release the stop (8) button on and wait one to restore the factory default settings and erase all changes in memory. 1 Turn...

Owners Manual EN FR SP
Page 31
... be input (±10 ppm 10 MHz External control input RS-232C 1 Trigger (TRIG 1 (3.5mm mono mini jack) Input level 12 V, 55 mA General Power supply Model for Europe AC 220-240 V, 50/60 Hz Model for USA/Canada AC 120 V, 60 Hz Model for Korea AC 220 V, 60 Hz Model for remote control (AA) × 2 Felt pads × 3 Owner's manual (this Owner's Manual might differ slightly from production models. 31...
... be input (±10 ppm 10 MHz External control input RS-232C 1 Trigger (TRIG 1 (3.5mm mono mini jack) Input level 12 V, 55 mA General Power supply Model for Europe AC 220-240 V, 50/60 Hz Model for USA/Canada AC 120 V, 60 Hz Model for Korea AC 220 V, 60 Hz Model for remote control (AA) × 2 Felt pads × 3 Owner's manual (this Owner's Manual might differ slightly from production models. 31...