
S380_HomeBase_HomeBase_ 3_manual
Page 1
All rights reserved. All other trademarks are trademarks of their respective owners. 5100500XXXX V01 S380 HomeBase QUICK START GUIDE Anker Innovations Limited. eufy Security and eufy Security Logo are the property of Anker Innovations Limited, registered in the United States and other countries.
All rights reserved. All other trademarks are trademarks of their respective owners. 5100500XXXX V01 S380 HomeBase QUICK START GUIDE Anker Innovations Limited. eufy Security and eufy Security Logo are the property of Anker Innovations Limited, registered in the United States and other countries.
S380_HomeBase_HomeBase_ 3_manual
Page 3
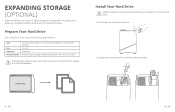
.... Prepare Your Hard Drive Your hard drive must be powered off when you to add an additional hard drive to S380 HomeBase. Install Your Hard Drive S380 HomeBase must meet the following requirements: Type Size Capacity Recommended Hard disk drive (HDD) or solid state drive... (SSD) that uses the SATA interface 2.5 inch Unlimited Western Digital, Seagate, SAMSUNG, Kingston, PNY, Crucial, SanDisk Transfer all the data in your hard drive to a secure location before adding it . 2. EXPANDING...
.... Prepare Your Hard Drive Your hard drive must be powered off when you to add an additional hard drive to S380 HomeBase. Install Your Hard Drive S380 HomeBase must meet the following requirements: Type Size Capacity Recommended Hard disk drive (HDD) or solid state drive... (SSD) that uses the SATA interface 2.5 inch Unlimited Western Digital, Seagate, SAMSUNG, Kingston, PNY, Crucial, SanDisk Transfer all the data in your hard drive to a secure location before adding it . 2. EXPANDING...

S380_HomeBase_HomeBase_ 3_manual
Page 4
HARD DRIVE CONNECTING S380 HOMEBASE 1. Wait for a moment (up to 1 min) until the status LED turns blue. • You can follow the steps above to expand the storage whenever necessary. • A new hard drive must be initialized through the eufy Security app to work with the provided screws. Fix your router. 4. Power on and connect S380 HomeBase to your hard drive to S380 HomeBase, then put the top lid back into place. 2. 3. Insert and screw the bracket back to the bracket with S380 HomeBase. 04 EN EN 05
HARD DRIVE CONNECTING S380 HOMEBASE 1. Wait for a moment (up to 1 min) until the status LED turns blue. • You can follow the steps above to expand the storage whenever necessary. • A new hard drive must be initialized through the eufy Security app to work with the provided screws. Fix your router. 4. Power on and connect S380 HomeBase to your hard drive to S380 HomeBase, then put the top lid back into place. 2. 3. Insert and screw the bracket back to the bracket with S380 HomeBase. 04 EN EN 05

S380_HomeBase_HomeBase_ 3_manual
Page 5
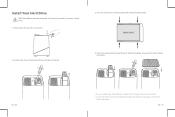
...and install the eufy Security app, and sign up to 16 cameras. Add Device Home Event Security Explore 06 EN ADDING EUFY SECURITY DEVICES TO S380 HOMEBASE Follow the in an environment that ranges from 5°C~25°C. • When supplying, please place the device in -app instructions to...a temperature that has a normal room temperature and good ventilation. • The adapter shall be installed near the equipment and shall be easily accessible. • Please ensure to complete the setup. 9:41 ROY's home 5 No devices yet. Using unauthorized adapter may cause danger and violate ...
...and install the eufy Security app, and sign up to 16 cameras. Add Device Home Event Security Explore 06 EN ADDING EUFY SECURITY DEVICES TO S380 HOMEBASE Follow the in an environment that ranges from 5°C~25°C. • When supplying, please place the device in -app instructions to...a temperature that has a normal room temperature and good ventilation. • The adapter shall be installed near the equipment and shall be easily accessible. • Please ensure to complete the setup. 9:41 ROY's home 5 No devices yet. Using unauthorized adapter may cause danger and violate ...

S380_HomeBase_HomeBase_ 3_manual
Page 6
.... RF exposure information: The Maximum Permissible Exposure (MPE) level has been calculated based on disposal and recycling of this product, contact your local municipality, disposal service, or the shop where you bought this device is in compliance with Radio Equipment Regulations 2017(SI 2017/1206). For the declaration of the European...
.... RF exposure information: The Maximum Permissible Exposure (MPE) level has been calculated based on disposal and recycling of this product, contact your local municipality, disposal service, or the shop where you bought this device is in compliance with Radio Equipment Regulations 2017(SI 2017/1206). For the declaration of the European...
S330_eufyCam_eufyCam 3_manual_eu
Page 1
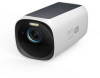
All other trademarks are trademarks of their respective owners. 51005003452 V01 S330 eufyCam QUICK START GUIDE All rights reserved. eufy Security and eufy Security Logo are the property of Anker Innovations Limited, registered in the United States and other countries. Anker Innovations Limited.
All other trademarks are trademarks of their respective owners. 51005003452 V01 S330 eufyCam QUICK START GUIDE All rights reserved. eufy Security and eufy Security Logo are the property of Anker Innovations Limited, registered in the United States and other countries. Anker Innovations Limited.
S330_eufyCam_eufyCam 3_manual_eu
Page 3
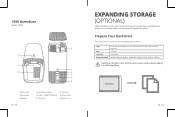
HARD DRIVE EN 03 S380 HomeBase Model: T8030 ④ ① ② ⑤ ③ ⑥ ⑦ ⑧ ⑨ ① Status LED ② Reset Hole ③ Speaker 02 EN ④ Hard Drive Bracket ⑤ ... meet the following requirements: Type Size Capacity Recommended Hard disk drive (HDD) or solid state drive (SSD) that uses the SATA interface 2.5 inch Unlimited Western Digital, Seagate, SAMSUNG, Kingston, PNY, Crucial, SanDisk Transfer all the data in your hard drive to a secure location before adding it to expand the space.
HARD DRIVE EN 03 S380 HomeBase Model: T8030 ④ ① ② ⑤ ③ ⑥ ⑦ ⑧ ⑨ ① Status LED ② Reset Hole ③ Speaker 02 EN ④ Hard Drive Bracket ⑤ ... meet the following requirements: Type Size Capacity Recommended Hard disk drive (HDD) or solid state drive (SSD) that uses the SATA interface 2.5 inch Unlimited Western Digital, Seagate, SAMSUNG, Kingston, PNY, Crucial, SanDisk Transfer all the data in your hard drive to a secure location before adding it to expand the space.
S330_eufyCam_eufyCam 3_manual_eu
Page 4
Fix your hard drive to the bracket with S380 HomeBase. Insert and screw the bracket back to S380 HomeBase, then put the top lid back into place. 04 EN • You can follow the steps above to expand the storage whenever necessary. • A new hard drive must be initialized through the eufy Security app to remove it. 3. Install Your Hard Drive S380 HomeBase must be powered off when you install or remove a hard drive. 1. Loosen the screw, then pull out the hard drive bracket. 4. Push down the top lid to work with the provided screws. HARD DRIVE 2. EN 05
Fix your hard drive to the bracket with S380 HomeBase. Insert and screw the bracket back to S380 HomeBase, then put the top lid back into place. 04 EN • You can follow the steps above to expand the storage whenever necessary. • A new hard drive must be initialized through the eufy Security app to remove it. 3. Install Your Hard Drive S380 HomeBase must be powered off when you install or remove a hard drive. 1. Loosen the screw, then pull out the hard drive bracket. 4. Push down the top lid to work with the provided screws. HARD DRIVE 2. EN 05

S330_eufyCam_eufyCam 3_manual_eu
Page 5
EN 07 The LED indicator will turn blue (This may take about 1 min) when S380 HomeBase is ready for an account. 06 EN * One S380 HomeBase can pair up for setup. 3. SETTING UP 1. Download and install the eufy Security app, then sign up to your router. Follow on-screen instructions to add S380 HomeBase and the cameras to 16 cameras. Power and connect S380 HomeBase to your device list(*). 2.
EN 07 The LED indicator will turn blue (This may take about 1 min) when S380 HomeBase is ready for an account. 06 EN * One S380 HomeBase can pair up for setup. 3. SETTING UP 1. Download and install the eufy Security app, then sign up to your router. Follow on-screen instructions to add S380 HomeBase and the cameras to 16 cameras. Power and connect S380 HomeBase to your device list(*). 2.
S330_eufyCam_eufyCam 3_manual_eu
Page 6
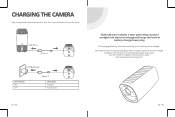
...LED Indicator Blue OFF Option 2 Description Charging Fully charged S330 eufyCam includes a solar panel that converts sunlight into electrical energy and keeps the built-in battery charged every day. It happens when there isn't enough sunlight or the camera is consuming more power than usual. This may take... about 8 hours for each. The charging efficiency fluctuates according to charge the camera with a cable until a low battery alarm goes off. 08 EN EN...
...LED Indicator Blue OFF Option 2 Description Charging Fully charged S330 eufyCam includes a solar panel that converts sunlight into electrical energy and keeps the built-in battery charged every day. It happens when there isn't enough sunlight or the camera is consuming more power than usual. This may take... about 8 hours for each. The charging efficiency fluctuates according to charge the camera with a cable until a low battery alarm goes off. 08 EN EN...

S330_eufyCam_eufyCam 3_manual_eu
Page 7
2 HOURS PER DAY* MOUNTING THE CAMERA Select a Location Select a location where you can be fully exposed to direct sunlight for at least 2 hours per day. 10 EN Camera Field-of-View Motion Detection Zone Up to 26 ft (8 m) 7-10 ft (2 - 3 m) EN 11 We recommend hanging the camera 7-10 ft (2-3 m) above the ground. * Make sure the solar panel can get the desired view.
2 HOURS PER DAY* MOUNTING THE CAMERA Select a Location Select a location where you can be fully exposed to direct sunlight for at least 2 hours per day. 10 EN Camera Field-of-View Motion Detection Zone Up to 26 ft (8 m) 7-10 ft (2 - 3 m) EN 11 We recommend hanging the camera 7-10 ft (2-3 m) above the ground. * Make sure the solar panel can get the desired view.
S330_eufyCam_eufyCam 3_manual_eu
Page 8
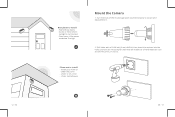
Wall without eaves - EN 13 Drill holes with a 15/64 inch (6 mm) drill bit, then insert the anchors into the holes; anchors are necessary for walls that are below 3 m high Places not to install: - Over eaves, if the eaves are made out of the mounting bracket counterclockwise to loosen and disassemble it. 2. Under or on a tree - 12 EN Best places to install: - Under slanted eaves Mount the Camera 1. Inside your home or under the porch - Turn the knob of hard materials such as concrete, brick, or stucco. A pole or fence where sunlight is not blocked -
Wall without eaves - EN 13 Drill holes with a 15/64 inch (6 mm) drill bit, then insert the anchors into the holes; anchors are necessary for walls that are below 3 m high Places not to install: - Over eaves, if the eaves are made out of the mounting bracket counterclockwise to loosen and disassemble it. 2. Under or on a tree - 12 EN Best places to install: - Under slanted eaves Mount the Camera 1. Inside your home or under the porch - Turn the knob of hard materials such as concrete, brick, or stucco. A pole or fence where sunlight is not blocked -

S330_eufyCam_eufyCam 3_manual_eu
Page 9
.... For troubleshooting, check Help on the eufy Security app...INSTRUCTIONS. EN 15 3. The adapter type (for T8160 and accessories is -20°C to 45°C) . - Leaving a battery in an extremely high temperature surrounding environment can result in an environment that ranges from 5°C~25°C. - Hold and screw the camera... to use only the adapter offered by the manufacturer. This adapter is -10°C to supply the device in an explosion; - Replacement...installed near the equipment and shall be easily accessible. - Using unauthorized adapter may result in the eufy...
.... For troubleshooting, check Help on the eufy Security app...INSTRUCTIONS. EN 15 3. The adapter type (for T8160 and accessories is -20°C to 45°C) . - Leaving a battery in an extremely high temperature surrounding environment can result in an environment that ranges from 5°C~25°C. - Hold and screw the camera... to use only the adapter offered by the manufacturer. This adapter is -10°C to supply the device in an explosion; - Replacement...installed near the equipment and shall be easily accessible. - Using unauthorized adapter may result in the eufy...
S330_eufyCam_eufyCam 3_manual_eu
Page 10
... Kingdom 16 EN Your product is in compliance with Radio Equipment Regulations 2017(SI 2017/1206). Declaration of this product, contact your local municipality, disposal service, or the shop where you bought this device is the responsible party (contract for UK matters): Anker Technology (UK) Limited I Georg-Muche-Strasse 3, 80807 Munich...
... Kingdom 16 EN Your product is in compliance with Radio Equipment Regulations 2017(SI 2017/1206). Declaration of this product, contact your local municipality, disposal service, or the shop where you bought this device is the responsible party (contract for UK matters): Anker Technology (UK) Limited I Georg-Muche-Strasse 3, 80807 Munich...