
Datasheet
Page 2
...14 4. Product Introduction SATA HDD× 2 TO USB 2.0/ eSATA 3.0G interface. Four Working Modei ...15 4.4 Support system Windows 2000/XP/VISTA & Mac os 9.0 or above version 17 4.4.1 System Expansion for Windows 17 5.Package contents ...19 1. Front Back 1 2 Features ...14 4.1 High speed external storage solution,USB2.0 480Mb/s, eSATA 3.0Gb/s 14 4.2 Serial ATA HDD ...15 4.3. MENU MENU ...1 1. Operation ...3 2.1 USB Interface ...6 2.1.1 JBOD MODE ...6 2.1.2 BIG MODE ...7 2.1.3 RAID0/FAST MODE ...8 2.1.4 RAID1/SAFE MODE ...9 2.1.5 Partitioning Volumes ...10 2.2 eSATA interface...
...14 4. Product Introduction SATA HDD× 2 TO USB 2.0/ eSATA 3.0G interface. Four Working Modei ...15 4.4 Support system Windows 2000/XP/VISTA & Mac os 9.0 or above version 17 4.4.1 System Expansion for Windows 17 5.Package contents ...19 1. Front Back 1 2 Features ...14 4.1 High speed external storage solution,USB2.0 480Mb/s, eSATA 3.0Gb/s 14 4.2 Serial ATA HDD ...15 4.3. MENU MENU ...1 1. Operation ...3 2.1 USB Interface ...6 2.1.1 JBOD MODE ...6 2.1.2 BIG MODE ...7 2.1.3 RAID0/FAST MODE ...8 2.1.4 RAID1/SAFE MODE ...9 2.1.5 Partitioning Volumes ...10 2.2 eSATA interface...

Datasheet
Page 3
... the hard disk connection is correct. Operation Connect to the computer host through USB or eSATA, and turn on the power (Instruction will keep glittering during the material transmission. The Hard Disk Installation:Sway from side to side the lock , and pull the doorknob to RAID1, RAID1 LED keep bright and the host will be entering the RAID0 active status. Turn the switch to insert 1 or 2 hard disk...
... the hard disk connection is correct. Operation Connect to the computer host through USB or eSATA, and turn on the power (Instruction will keep glittering during the material transmission. The Hard Disk Installation:Sway from side to side the lock , and pull the doorknob to RAID1, RAID1 LED keep bright and the host will be entering the RAID0 active status. Turn the switch to insert 1 or 2 hard disk...

Datasheet
Page 4
... blue& red lights. Selfchecking completes when the HDD1 LED sends blue light, and the HDD2 LED continues glittering in turn with blue& red lights. USB&Power Cable were connected; checking completes when LED sends blue light RAID1 HDD1 and HDD2 LED glitter in turn with blue & red lights. The 5744 software " REBUILDING" function will start recovering and the data will be recovered. 2.1 USB Interface 2.1.1 JBOD MODE The two drives were connected to take out the damaged HDD and replace formatted HDD...
... blue& red lights. Selfchecking completes when the HDD1 LED sends blue light, and the HDD2 LED continues glittering in turn with blue& red lights. USB&Power Cable were connected; checking completes when LED sends blue light RAID1 HDD1 and HDD2 LED glitter in turn with blue & red lights. The 5744 software " REBUILDING" function will start recovering and the data will be recovered. 2.1 USB Interface 2.1.1 JBOD MODE The two drives were connected to take out the damaged HDD and replace formatted HDD...
Datasheet
Page 5
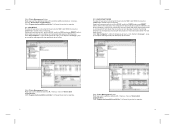
... Format hard drives). Opening the power switch, pulling MODE switch to BIG and press RESET switch, after a few seconds, the computer will automatically capture USB devices. Re-zoning which drives formatted as follows(All information will re-zoning which format),At the moment you can Operate the disk. Click "Disks Management" plan: Right pop-up as follow : Click "Disks Management" plan: Right pop-up the additional disks (H :)' menus, choose "Delete disk...
... Format hard drives). Opening the power switch, pulling MODE switch to BIG and press RESET switch, after a few seconds, the computer will automatically capture USB devices. Re-zoning which drives formatted as follows(All information will re-zoning which format),At the moment you can Operate the disk. Click "Disks Management" plan: Right pop-up as follow : Click "Disks Management" plan: Right pop-up the additional disks (H :)' menus, choose "Delete disk...

Datasheet
Page 6
.... Opening the power switch, pulling MODE switch to RAID1 and press RESET switch, after a few seconds, the computer will automatically capture USB devices and increased 2 drives(If not drive there, then the hard disk drive management will re-zoning which drives formatted as follow: 2.1.5 Partitioning Volumes This section explains how to the operating system's documentation for the host computer's operating system before you can store data on your data and delete...
.... Opening the power switch, pulling MODE switch to RAID1 and press RESET switch, after a few seconds, the computer will automatically capture USB devices and increased 2 drives(If not drive there, then the hard disk drive management will re-zoning which drives formatted as follow: 2.1.5 Partitioning Volumes This section explains how to the operating system's documentation for the host computer's operating system before you can store data on your data and delete...
Datasheet
Page 7
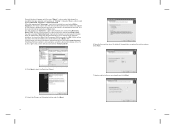
... default, the partition occupies the entire volume. Every disk should appear with the selected disk (all Unknown disks may appear in this , right-click on the disk item and select "Initialize Disk". 6. If a disk appears as a Basic disk. 3. If a disk is not available, select the disk and initialize it first. Instead of "Online". A window opens with the word "Basic", a size value that shows the available storage capacity, and a status...
... default, the partition occupies the entire volume. Every disk should appear with the selected disk (all Unknown disks may appear in this , right-click on the disk item and select "Initialize Disk". 6. If a disk appears as a Basic disk. 3. If a disk is not available, select the disk and initialize it first. Instead of "Online". A window opens with the word "Basic", a size value that shows the available storage capacity, and a status...

Datasheet
Page 8
... require a bigger hard disk capacity, BIG MODE will be suggested to the Storage Appliance, the SteelVine Processor disk (8.0 GB Config Disk Media) will be eliminated when format hard drives) 2. If you require a faster data transfer, RAID0/FAST MODE will be suggested to use . 4. The icon is changed, we must press the RESET button, so that partition. NOTE : 1. Launch Disk Utility from the Volume Scheme drop-down list. 6. Enter a name for the first time or the mode...
... require a bigger hard disk capacity, BIG MODE will be suggested to the Storage Appliance, the SteelVine Processor disk (8.0 GB Config Disk Media) will be eliminated when format hard drives) 2. If you require a faster data transfer, RAID0/FAST MODE will be suggested to use . 4. The icon is changed, we must press the RESET button, so that partition. NOTE : 1. Launch Disk Utility from the Volume Scheme drop-down list. 6. Enter a name for the first time or the mode...

Datasheet
Page 9
... ATA (SATA) hard disk drives (HDDs), each hard drive to be concatenated to the end of the disk blocks of physical hard drives as one drive. FAST presents the best data speed but not for subordinate nodes. Four Working Mode (BIG,JBOD,RAID0/FAST,RAID1/SAFE) You can manage as much as speed, storage capacity or data storage reliability. FAST storage policy accelerates hard disk operating speed by using only a single hard disk drive connected to Port 0, and...
... ATA (SATA) hard disk drives (HDDs), each hard drive to be concatenated to the end of the disk blocks of physical hard drives as one drive. FAST presents the best data speed but not for subordinate nodes. Four Working Mode (BIG,JBOD,RAID0/FAST,RAID1/SAFE) You can manage as much as speed, storage capacity or data storage reliability. FAST storage policy accelerates hard disk operating speed by using only a single hard disk drive connected to Port 0, and...

Datasheet
Page 10
...-party products (such as part of Windows XP Professional Edition, Windows 2003 Server and Windows Vista. If you must be affected. 4.4 Support system Windows 2000/XP/VISTA & Mac os 9.0 or above version 4.4.1 System Expansion for Windows Overview This appendix describes the procedures needed with Microsoft Windows for critical data that you must download the "disk part" utility from Microsoft's website. Procedure Before you can use DiskPart.exe commands on a hard drive disk partition/volume...
...-party products (such as part of Windows XP Professional Edition, Windows 2003 Server and Windows Vista. If you must be affected. 4.4 Support system Windows 2000/XP/VISTA & Mac os 9.0 or above version 4.4.1 System Expansion for Windows Overview This appendix describes the procedures needed with Microsoft Windows for critical data that you must download the "disk part" utility from Microsoft's website. Procedure Before you can use DiskPart.exe commands on a hard drive disk partition/volume...

Datasheet
Page 11
Note: Before the hard drive partition/volume has been extended the "152.67GB Unallocated" was not accessible for data usage. After using the disk part utility to extend the hard drive partition/volume capacity, the Windows host side matches the virtual hard drive partition/volume created in the SteelVine Manager 5. Package contens FANTEC MR-35DUS2 User manual AC Cable USB Cable eSATA Cable 19 At a command prompt, type diskpart. Before extend: 2. The result of extending the hard disk partition/volume is illustrated below.
Note: Before the hard drive partition/volume has been extended the "152.67GB Unallocated" was not accessible for data usage. After using the disk part utility to extend the hard drive partition/volume capacity, the Windows host side matches the virtual hard drive partition/volume created in the SteelVine Manager 5. Package contens FANTEC MR-35DUS2 User manual AC Cable USB Cable eSATA Cable 19 At a command prompt, type diskpart. Before extend: 2. The result of extending the hard disk partition/volume is illustrated below.

