Manual
Page 1
FANTEC SQ-X2RU3e 2x 3.5" SATA HDD USB3.0 eSATA User Manual Important: All data will be deleted if you change the Raid Mode. Backup the HDD(s) before switching the RAID mode.
FANTEC SQ-X2RU3e 2x 3.5" SATA HDD USB3.0 eSATA User Manual Important: All data will be deleted if you change the Raid Mode. Backup the HDD(s) before switching the RAID mode.
Manual
Page 2
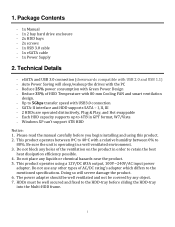
... chemical hazards near the product. 5. Package Contents - 1x Manual - 1x 2 bay hard drive enclosure - 2x HDD bays - 2x screws - 1x USB 3.0 cable - 1x eSATA cable - 1x Power Supply 2. eSATA and USB 3.0 connection (downwards compatible with the PC - Be sure the unit is operating in GPT format, W7/Vista - Each HDD capacity supports up to the HDD-tray before you begin installing and using a 12V/DC @3A output, 100V~240V/AC input power adapter. Do not place any...
... chemical hazards near the product. 5. Package Contents - 1x Manual - 1x 2 bay hard drive enclosure - 2x HDD bays - 2x screws - 1x USB 3.0 cable - 1x eSATA cable - 1x Power Supply 2. eSATA and USB 3.0 connection (downwards compatible with the PC - Be sure the unit is operating in GPT format, W7/Vista - Each HDD capacity supports up to the HDD-tray before you begin installing and using a 12V/DC @3A output, 100V~240V/AC input power adapter. Do not place any...

Manual
Page 3
3. FAN Speed Control Control wheel Turn the wheel to the PC at the same time, the PC will recognize eSATA. About the Device Hardware Overview Power DC input Receptor for the provided Power Adapter - 12V DC, 100-240V AC, 50-60Hz PC connection interface USB 3.0 eSATA Connect USB 3.0 Cable to computer Connect eSATA Cable to computer Note: When connecting eSATA and USB3.0 to control the fan speed 2
3. FAN Speed Control Control wheel Turn the wheel to the PC at the same time, the PC will recognize eSATA. About the Device Hardware Overview Power DC input Receptor for the provided Power Adapter - 12V DC, 100-240V AC, 50-60Hz PC connection interface USB 3.0 eSATA Connect USB 3.0 Cable to computer Connect eSATA Cable to computer Note: When connecting eSATA and USB3.0 to control the fan speed 2

Manual
Page 4
Front / Back View Power LED HDD1 LED HDD2 LED Tray lock HDD Tray Power jack (DC12V) Raid reset USB3.0 FAN Speed control RAID Switch Power on/off switch eSATA 3
Front / Back View Power LED HDD1 LED HDD2 LED Tray lock HDD Tray Power jack (DC12V) Raid reset USB3.0 FAN Speed control RAID Switch Power on/off switch eSATA 3
Manual
Page 5
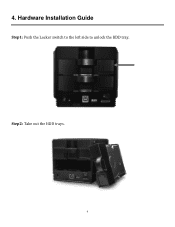
Step2: Take out the HDD trays. 4 4. Hardware Installation Guide Step1: Push the Locker switch to the left side to unlock the HDD tray.
Step2: Take out the HDD trays. 4 4. Hardware Installation Guide Step1: Push the Locker switch to the left side to unlock the HDD tray.
Manual
Page 6
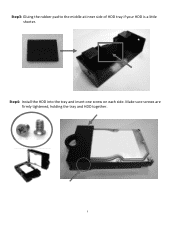
Make sure screws are firmly tightened, holding the tray and HDD together. 5 Step3: Gluing the rubber pad to the middle at inner side of HDD tray if your HDD is a little shorter. Step4: Install the HDD into the tray and insert one screw on each side.
Make sure screws are firmly tightened, holding the tray and HDD together. 5 Step3: Gluing the rubber pad to the middle at inner side of HDD tray if your HDD is a little shorter. Step4: Install the HDD into the tray and insert one screw on each side.

Manual
Page 7
Step6: Push the switch to the right side to lock the HDD tray. 6 Step5: Slide the HDD tray into the case.
Step6: Push the switch to the right side to lock the HDD tray. 6 Step5: Slide the HDD tray into the case.
Manual
Page 8
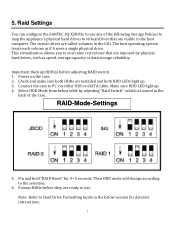
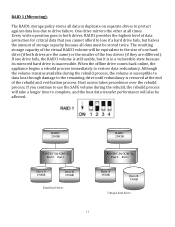
... HDD mode will change according to PC via either USB or eSATA cable. The virtual drives are imposed by adjusting "Raid Switch", which is located at the back of the following Storage Policies to map the appliance's physical hard drives to Hard Drive Formatting Guide in the GUI. Power on the case. 2. Select HDD Mode from below session for 3~5 seconds. RAID-Mode-Settings 5. The host operating system treats each volume as speed, storage capacity or data storage reliability...
... HDD mode will change according to PC via either USB or eSATA cable. The virtual drives are imposed by adjusting "Raid Switch", which is located at the back of the following Storage Policies to map the appliance's physical hard drives to Hard Drive Formatting Guide in the GUI. Power on the case. 2. Select HDD Mode from below session for 3~5 seconds. RAID-Mode-Settings 5. The host operating system treats each volume as speed, storage capacity or data storage reliability...

Manual
Page 9
JBOD MODE(Single): The normal Mode (Just a Bunch of Disks) storage policy enables each physical drive is for a standalone (non-cascaded) Storage Processor or the top-level node of a cascaded configuration, but not for subordinate nodes. In a JBOD configuration, each hard drive to be seen separately as one drive. Volume A Volume B FANTEC SQ-X2RU3e Port 0 Port 1 Drive A Drive B Equal hard drives Volume A Volume B FANTEC SQ-X2RU3e Port 0 Port 1 Drive A Drive B Unequal hard drives 8 JBOD storage policy is directly exposed.
JBOD MODE(Single): The normal Mode (Just a Bunch of Disks) storage policy enables each physical drive is for a standalone (non-cascaded) Storage Processor or the top-level node of a cascaded configuration, but not for subordinate nodes. In a JBOD configuration, each hard drive to be seen separately as one drive. Volume A Volume B FANTEC SQ-X2RU3e Port 0 Port 1 Drive A Drive B Equal hard drives Volume A Volume B FANTEC SQ-X2RU3e Port 0 Port 1 Drive A Drive B Unequal hard drives 8 JBOD storage policy is directly exposed.
Manual
Page 10
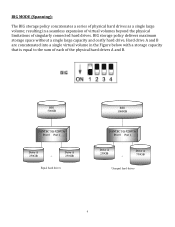
... beyond the physical limitations of singularly connected hard drives. BIG storage policy delivers maximum storage space without a single large capacity and costly hard drive. BIG MODE (Spanning): The BIG storage policy concatenates a series of the physical hard drives A and B. BIG 500GB FANTEC SQ-X2RU3e Port 0 Port 1 Drive A Drive A 250GB + 250GB Equal hard drives BIG 1000GB FANTEC SQ-X2RU3e Port 0 Port 1 Drive A Drive A 250GB + 750GB Unequal hard drives 9 resulting in the Figure below with a storage capacity that is equal to the...
... beyond the physical limitations of singularly connected hard drives. BIG storage policy delivers maximum storage space without a single large capacity and costly hard drive. BIG MODE (Spanning): The BIG storage policy concatenates a series of the physical hard drives A and B. BIG 500GB FANTEC SQ-X2RU3e Port 0 Port 1 Drive A Drive A 250GB + 250GB Equal hard drives BIG 1000GB FANTEC SQ-X2RU3e Port 0 Port 1 Drive A Drive A 250GB + 750GB Unequal hard drives 9 resulting in the Figure below with a storage capacity that is equal to the...
Manual
Page 11
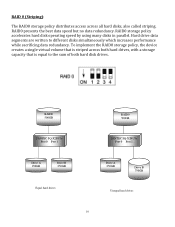
RAID0 storage policy accelerates hard disk operating speed by using many disks in parallel. RAID0 500GB FANTEC SQ-X2RU3e Port 0 Port 1 Drive A 250GB Drive B 250GB Equal hard drives RAID0 500GB FANTEC SQ-X2RU3e Port 0 Port 1 Drive A 250GB Drive B 750GB Unequal hard drives 10 To implement the RAID0 storage policy, the device creates a single virtual volume that is striped across all hard disks, also called striping. RAID 0 (Striping): The RAID0 storage policy distributes access across both hard drives, with a storage capacity that is equal to different disks simultaneously...
RAID0 storage policy accelerates hard disk operating speed by using many disks in parallel. RAID0 500GB FANTEC SQ-X2RU3e Port 0 Port 1 Drive A 250GB Drive B 250GB Equal hard drives RAID0 500GB FANTEC SQ-X2RU3e Port 0 Port 1 Drive A 250GB Drive B 750GB Unequal hard drives 10 To implement the RAID0 storage policy, the device creates a single virtual volume that is striped across all hard disks, also called striping. RAID 0 (Striping): The RAID0 storage policy distributes access across both hard drives, with a storage capacity that is equal to different disks simultaneously...
Manual
Page 12
... a longer time to complete, and the host data transfer performance will be equivalent to lose if a hard drive fails, but it is in duplicate on separate drives to protect against data loss due to restore data redundancy. The resulting storage capacity of the rebuild and verification process. RAID1 250GB FANTEC SQ-X2RU3e Port 0 Port 1 Drive A 250GB Drive B 250GB Equal hard drives RAID1 250GB FANTEC SQ-X2RU3e Port 0 Port 1 Drive A 250GB Drive B 750GB Unequal hard drives 11 RAID 1 (Mirroring): The RAID1 storage policy...
... a longer time to complete, and the host data transfer performance will be equivalent to lose if a hard drive fails, but it is in duplicate on separate drives to protect against data loss due to restore data redundancy. The resulting storage capacity of the rebuild and verification process. RAID1 250GB FANTEC SQ-X2RU3e Port 0 Port 1 Drive A 250GB Drive B 250GB Equal hard drives RAID1 250GB FANTEC SQ-X2RU3e Port 0 Port 1 Drive A 250GB Drive B 750GB Unequal hard drives 11 RAID 1 (Mirroring): The RAID1 storage policy...
Manual
Page 13
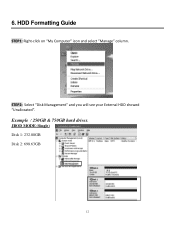
HDD Formatting Guide STEP1: Right-click on "My Computer" icon and select "Manage" column. STEP2: Select "Disk Management" and you will see your External HDD showed "Unallocated". Example:250GB & 750GB hard drives. JBOD MODE (Single) Disk 1: 232.88GB Disk 2: 698.63GB 12 6.
HDD Formatting Guide STEP1: Right-click on "My Computer" icon and select "Manage" column. STEP2: Select "Disk Management" and you will see your External HDD showed "Unallocated". Example:250GB & 750GB hard drives. JBOD MODE (Single) Disk 1: 232.88GB Disk 2: 698.63GB 12 6.

Manual
Page 15
RAID 1 MODE Disk 1: Capacity = 232.88 = 232.88 (GB) STEP3: Right-click the circled block and select "Initialize Disk" 14
RAID 1 MODE Disk 1: Capacity = 232.88 = 232.88 (GB) STEP3: Right-click the circled block and select "Initialize Disk" 14

Manual
Page 16
STEP4: Press "OK" button to initialize the hard drive. STEP5: Right-click on the "Unallocated" block and select "New Partition". 15
STEP4: Press "OK" button to initialize the hard drive. STEP5: Right-click on the "Unallocated" block and select "New Partition". 15
Manual
Page 17
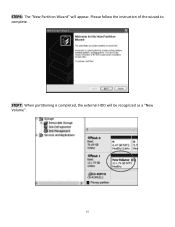
Please follow the instruction of the wizard to complete. STEP6: The "New Partition Wizard" will be recognized as a "New Volume". 16 STEP7: When partitioning is completed, the external HDD will appear.
Please follow the instruction of the wizard to complete. STEP6: The "New Partition Wizard" will be recognized as a "New Volume". 16 STEP7: When partitioning is completed, the external HDD will appear.
Manual
Page 18
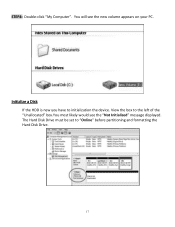
The Hard Disk Drive must be set to initialization the device. Initialize a Disk If the HDD is new you have to "Online" before partitioning and formatting the Hard Disk Drive. 17 You will see the "Not Initialized" message displayed. View the box to the left of the "Unallocated" box.You most likely would see the new volume appears on your PC. STEP8: Double-click "My Computer".
The Hard Disk Drive must be set to initialization the device. Initialize a Disk If the HDD is new you have to "Online" before partitioning and formatting the Hard Disk Drive. 17 You will see the "Not Initialized" message displayed. View the box to the left of the "Unallocated" box.You most likely would see the new volume appears on your PC. STEP8: Double-click "My Computer".
Manual
Page 19
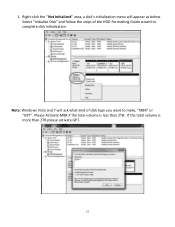
Right-click the "Not Initialized" area, a disk's initialization menu will ask what kind of the HDD Formatting Guide wizard to make, "MBR" or "GPT". If the total volume is less than 2TB please activate GPT. 18 Please Activate MBR if the total volume is more than 2TB. Select "Initialize Disk" and follow the steps of disk type you want to complete disk initialization. 1. Note: Windows Vista and 7 will appear as below.
Right-click the "Not Initialized" area, a disk's initialization menu will ask what kind of the HDD Formatting Guide wizard to make, "MBR" or "GPT". If the total volume is less than 2TB please activate GPT. 18 Please Activate MBR if the total volume is more than 2TB. Select "Initialize Disk" and follow the steps of disk type you want to complete disk initialization. 1. Note: Windows Vista and 7 will appear as below.
Manual
Page 20
... peripheral are used to change the HDD a. About HDD Capacity Support Installing HDD(s) over 2TB is powered on . (USB connection is proposed.) c. Press Raid Reset button only when the device is complete when LED rapid blinking stops. HDD mode adjustment is powered on until main power is shut down and all files before HDD mode changes since such practice requires HDD reformatting. procedure how to utilize the application. Note About HDD Mode Reset the device is recommended that Power LED remains constantly...
... peripheral are used to change the HDD a. About HDD Capacity Support Installing HDD(s) over 2TB is powered on . (USB connection is proposed.) c. Press Raid Reset button only when the device is complete when LED rapid blinking stops. HDD mode adjustment is powered on until main power is shut down and all files before HDD mode changes since such practice requires HDD reformatting. procedure how to utilize the application. Note About HDD Mode Reset the device is recommended that Power LED remains constantly...
Manual
Page 21
... Mode(Single) to the right-most, +) is set at all time. Fan synchronizes along with manual fan speed control for efficient heat dissipation, it is strongly recommended that max speed (adjusting to connect 2 HDDs correctly. If eSATA host(PC) doesn't support hot swappable plug and play function, Please try following procedure: a. About USB & eSATA Connectivity The equipped USB3.0 port is downward compatible...
... Mode(Single) to the right-most, +) is set at all time. Fan synchronizes along with manual fan speed control for efficient heat dissipation, it is strongly recommended that max speed (adjusting to connect 2 HDDs correctly. If eSATA host(PC) doesn't support hot swappable plug and play function, Please try following procedure: a. About USB & eSATA Connectivity The equipped USB3.0 port is downward compatible...
