
User Guide
Page 4
...éicfonrfoarmnémgenteauxidsirecmtivesovedA(Bnritdi-etpiapnbtirebaacskcerutlemiennt) stallation instructions. Electrical Shock Hazard Before removing a faulty oven light bulb, make sure you don't know how to the range off at the main fuse or circuit breaker panel. Check installation inspoturrpuluscdetdiéotainls).s. IL PRODOTTO DEVE TO CHEMICALS AND RSOESLVISFETNaETiRlSuE)rAeDtAoGGfoRlEloSSwIVtI hCiHsIMaICdIvEicSeOLmVEaNyTIr(eTsHuEltPRinODdUeCaTtMhUoSrT sBeErRioESuIsSTinjury...
...éicfonrfoarmnémgenteauxidsirecmtivesovedA(Bnritdi-etpiapnbtirebaacskcerutlemiennt) stallation instructions. Electrical Shock Hazard Before removing a faulty oven light bulb, make sure you don't know how to the range off at the main fuse or circuit breaker panel. Check installation inspoturrpuluscdetdiéotainls).s. IL PRODOTTO DEVE TO CHEMICALS AND RSOESLVISFETNaETiRlSuE)rAeDtAoGGfoRlEloSSwIVtI hCiHsIMaICdIvEicSeOLmVEaNyTIr(eTsHuEltPRinODdUeCaTtMhUoSrT sBeErRioESuIsSTinjury...

User Guide
Page 6
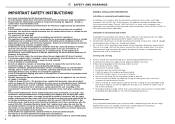
...not clean the oven gasket or use . yy Proper installation - If you where and how to turn off the power supply to the range (ie location of the appliance unless specifically recommended in the glass shattering. children should not be worn while using the appliance. yy Wear ...before using the appliance. always position shelves in the desired location while the oven is cool (before any oven-cleaning products on the range to the range in these instructions. SAFETY AND WARNINGS IMPORTANT SAFETY INSTRUCTIONS! yy Be sure to have the installer show you received a damaged product, ...
...not clean the oven gasket or use . yy Proper installation - If you where and how to turn off the power supply to the range (ie location of the appliance unless specifically recommended in the glass shattering. children should not be worn while using the appliance. yy Wear ...before using the appliance. always position shelves in the desired location while the oven is cool (before any oven-cleaning products on the range to the range in these instructions. SAFETY AND WARNINGS IMPORTANT SAFETY INSTRUCTIONS! yy Be sure to have the installer show you received a damaged product, ...

User Guide
Page 7
yy Do not obstruct the flow of the oven, warming drawer or cooktop. yy The oven of your range cannot be trapped underneath it. This will expose a portion of the burner flames to cause cancer, birth defects or other glazed utensils are suitable for ...
yy Do not obstruct the flow of the oven, warming drawer or cooktop. yy The oven of your range cannot be trapped underneath it. This will expose a portion of the burner flames to cause cancer, birth defects or other glazed utensils are suitable for ...

User Guide
Page 9
... (cover) 7 Overview Features may vary. Do not use ' before using dishwashing liquid on surfaces, remove this guide, taking special note of the range has been properly installed. 2 Make sure that the installer has completed the 'Final checklist' in the Installation instructions. 3 Read this using your... range for cooking. Recycle items that you start 1 Make sure that the anti-tip bracket at the right rear of the 'Safety and warnings' ...
... (cover) 7 Overview Features may vary. Do not use ' before using dishwashing liquid on surfaces, remove this guide, taking special note of the range has been properly installed. 2 Make sure that the installer has completed the 'Final checklist' in the Installation instructions. 3 Read this using your... range for cooking. Recycle items that you start 1 Make sure that the anti-tip bracket at the right rear of the 'Safety and warnings' ...

User Guide
Page 42
... in your home or neighborhood yy the gas is turned on yy the gas bottle is irregular Ignitor Cleaning the ignitor Check that : yy the range is plugged in and the power supply is switched on removing and replacing the burner parts.
... in your home or neighborhood yy the gas is turned on yy the gas bottle is irregular Ignitor Cleaning the ignitor Check that : yy the range is plugged in and the power supply is switched on removing and replacing the burner parts.

User Guide
Page 46
... soiling from the oven cavity enamel after this may present a fire hazard. yy Always clean the inner glass pane before you move the range for cleaning. The propellant substance in these cleaning instructions and the 'Safety and warnings' section before starting a Self Clean cycle. yy Do... not use aerosol cleaners until the range has completely cooled. yy Do not attempt to -reach spills, food or grease stains from becoming 'baked on a small area first, to...
... soiling from the oven cavity enamel after this may present a fire hazard. yy Always clean the inner glass pane before you move the range for cleaning. The propellant substance in these cleaning instructions and the 'Safety and warnings' section before starting a Self Clean cycle. yy Do... not use aerosol cleaners until the range has completely cooled. yy Do not attempt to -reach spills, food or grease stains from becoming 'baked on a small area first, to...

User Guide
Page 47
... Clean function frequently. light soiling 1 Wipe with a damp cloth and a solution of mild detergent and hot water. 2 Dry thoroughly with microfiber cloth. Enamel oven interior - RANGE EXTERIOR Door frame exterior, Control panel, Cooktop base Back trim Warming drawer exterior After every use a suitable stainless steel cleaner and polish, following manufacturer's instructions...
... Clean function frequently. light soiling 1 Wipe with a damp cloth and a solution of mild detergent and hot water. 2 Dry thoroughly with microfiber cloth. Enamel oven interior - RANGE EXTERIOR Door frame exterior, Control panel, Cooktop base Back trim Warming drawer exterior After every use a suitable stainless steel cleaner and polish, following manufacturer's instructions...

User Guide
Page 52
... tighten. For easier access we recommend removing the oven door. CARE AND CLEANING Removing and replacing the oven side racks IMPORTANT! Always turn off the range at the wall first. Remove all shelves 1 Slide out all shelves 2 Use a small coin or a flat-head screwdriver to loosen and remove the fixing screws...
... tighten. For easier access we recommend removing the oven door. CARE AND CLEANING Removing and replacing the oven side racks IMPORTANT! Always turn off the range at the wall first. Remove all shelves 1 Slide out all shelves 2 Use a small coin or a flat-head screwdriver to loosen and remove the fixing screws...

User Guide
Page 53
... 1 Open the drawer completely. 2 Open the levers fully on both sides of the drawer. 2 Gently close it . yy Always turn off the range at the bottom of the range interior. The safety catches will automatically hook into place. 51 CARE AND CLEANING Removing and replacing the warming drawer IMPORTANT! Fitting the warming...
... 1 Open the drawer completely. 2 Open the levers fully on both sides of the drawer. 2 Gently close it . yy Always turn off the range at the bottom of the range interior. The safety catches will automatically hook into place. 51 CARE AND CLEANING Removing and replacing the warming drawer IMPORTANT! Fitting the warming...

User Guide
Page 56
Failure to disconnect the range from the power supply may get in the way. 3 Remove the door if the lamp will be hard to reach. 4 Turn the power supply to ... in any shelves that may result in a soft cloth or tissue insert it . 1 Allow the oven (including the lamp cover and the bulb) to the range off . yy Side lights: wearing a rubber glove to the range back on other hand. CARE AND CLEANING Replacing an oven light bulb IMPORTANT!
Failure to disconnect the range from the power supply may get in the way. 3 Remove the door if the lamp will be hard to reach. 4 Turn the power supply to ... in any shelves that may result in a soft cloth or tissue insert it . 1 Allow the oven (including the lamp cover and the bulb) to the range off . yy Side lights: wearing a rubber glove to the range back on other hand. CARE AND CLEANING Replacing an oven light bulb IMPORTANT!

User Guide
Page 63
...gas, check that there is no power outage in the oven or try cooking on Aero Broil instead. Check that cabinetry around the range is moisture-proofed. Food in the oven while cooking on Maxi Broil. Condensation is contributing to condensation. TROUBLESHOOTING PROBLEM OVEN Condensation around..., grill, or griddle will light. Unsuitable or incorrectly arranged bakeware. See 'Care and cleaning' for advice. COOKTOP BURNERS None of the range. No gas. Dirty or wet ignitor(s). If there is frequent or excessive condensation, make sure that the gas supply to the house is...
...gas, check that there is no power outage in the oven or try cooking on Aero Broil instead. Check that cabinetry around the range is moisture-proofed. Food in the oven while cooking on Maxi Broil. Condensation is contributing to condensation. TROUBLESHOOTING PROBLEM OVEN Condensation around..., grill, or griddle will light. Unsuitable or incorrectly arranged bakeware. See 'Care and cleaning' for advice. COOKTOP BURNERS None of the range. No gas. Dirty or wet ignitor(s). If there is frequent or excessive condensation, make sure that the gas supply to the house is...

User Guide
Page 65
... with the alert code information. 63 IMPORTANT! There are cooling fans within the range which are needed to see if you can fix the problem yourself and follow the instructions. 4 If you can keep using your Fisher & Paykel trained and supported service technican or Customer Care with the oven, the... range will: yy automatically suspend all oven functions yy beep five times yy display an alert code. Do ...
... with the alert code information. 63 IMPORTANT! There are cooling fans within the range which are needed to see if you can fix the problem yourself and follow the instructions. 4 If you can keep using your Fisher & Paykel trained and supported service technican or Customer Care with the oven, the... range will: yy automatically suspend all oven functions yy beep five times yy display an alert code. Do ...

Quick Reference guide
Page 1
... enamel • Dishwasher safe trivets • Date: 02.09.2020 > 1 Easy to clean Cleaning up to an exceptional, premium range. The finely tuned cooktop controls let you plenty of space to cook multiple dishes at a very high temperature, leaving a light ash ... oven heat ensures a great result every time. Four burner gas cooktop with two dual wok burners Convection oven with dual fuel. QUICK REFERENCE GUIDE > OR30SDG6X1 Dual Fuel Range 30", SelfCleaning Series 9 | Contemporary Stainless Steel DIMENSIONS Height Width Depth 35 3/ 4 - 37 5/ 8 " 29 7/ " 8 25 1/ " 4 Get the...
... enamel • Dishwasher safe trivets • Date: 02.09.2020 > 1 Easy to clean Cleaning up to an exceptional, premium range. The finely tuned cooktop controls let you plenty of space to cook multiple dishes at a very high temperature, leaving a light ash ... oven heat ensures a great result every time. Four burner gas cooktop with two dual wok burners Convection oven with dual fuel. QUICK REFERENCE GUIDE > OR30SDG6X1 Dual Fuel Range 30", SelfCleaning Series 9 | Contemporary Stainless Steel DIMENSIONS Height Width Depth 35 3/ 4 - 37 5/ 8 " 29 7/ " 8 25 1/ " 4 Get the...

Quick Reference guide
Page 2
QUICK REFERENCE GUIDE > OR30SDG6X1 Drop down grill element Flat easy clean glass surface Pyrolytic proof shelf runners Pyrolytic self-clean Removable oven door Removable shelf runners Controls Audio feedback ... 5/ 8 " Installation cutout dimensions Installation cutout dimensions Width Rangetop features Brass burner spreader (power Dishwasher safe trivets Embossed brass burner cap LPG/Natural gas compatible Sealed range top Rangetop Performance Max burner power Number of burner elements Semi-rapid burner (LPG) x2 Semi-rapid burner (natural gas) Total cooktop power Safety Advanced...
QUICK REFERENCE GUIDE > OR30SDG6X1 Drop down grill element Flat easy clean glass surface Pyrolytic proof shelf runners Pyrolytic self-clean Removable oven door Removable shelf runners Controls Audio feedback ... 5/ 8 " Installation cutout dimensions Installation cutout dimensions Width Rangetop features Brass burner spreader (power Dishwasher safe trivets Embossed brass burner cap LPG/Natural gas compatible Sealed range top Rangetop Performance Max burner power Number of burner elements Semi-rapid burner (LPG) x2 Semi-rapid burner (natural gas) Total cooktop power Safety Advanced...

Installation Guide
Page 1
FREESTANDING RANGE OR30S Gas Gas & OR30S Dual Fuel models INSTALLATION GUIDE US CA 591506C / 1105556-ß2 07.18
FREESTANDING RANGE OR30S Gas Gas & OR30S Dual Fuel models INSTALLATION GUIDE US CA 591506C / 1105556-ß2 07.18
Installation Guide
Page 4
...only by a suitably qualified person according to these installation instructions and in potential hazards and/or injuries. ● When installing or removing the range for service, a rolling lift jack should be approved by the Board of State Examiners of Plumbers & Gas Fitters). ● Ensure the ...for the kind of gas being installed is damaged, it into or out of the installation. ● Pushing or pulling a range (rather than when the hood and range have been designed, tested and listed by a licensed plumber. 1 SAFETY AND WARNINGS IMPORTANT SAFETY INSTRUCTIONS! ● Save these ...
...only by a suitably qualified person according to these installation instructions and in potential hazards and/or injuries. ● When installing or removing the range for service, a rolling lift jack should be approved by the Board of State Examiners of Plumbers & Gas Fitters). ● Ensure the ...for the kind of gas being installed is damaged, it into or out of the installation. ● Pushing or pulling a range (rather than when the hood and range have been designed, tested and listed by a licensed plumber. 1 SAFETY AND WARNINGS IMPORTANT SAFETY INSTRUCTIONS! ● Save these ...
Installation Guide
Page 6
..., call the shipper and initiate a damage claim. This film must be removed before installing or using the appliance. 6 If any packing material from range. Some models are supplied with a protective film on steel and aluminum parts. Fisher & Paykel is not responsible for shipping damage. ● DO NOT discard any packing material until the...
..., call the shipper and initiate a damage claim. This film must be removed before installing or using the appliance. 6 If any packing material from range. Some models are supplied with a protective film on steel and aluminum parts. Fisher & Paykel is not responsible for shipping damage. ● DO NOT discard any packing material until the...

Installation Guide
Page 7
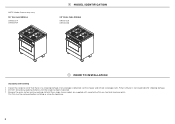
Island trim (fitted) - Backguard (optional) E Height of chassis (excluding adjustable feet) F Adjustable feet height G Depth of open door to top of range OR30S GAS GAS inches (mm) min. 35 3/4" (908) max. 37 5/8" (956) 29 7/8" (759) 25 1/4" (641) OR30S DUAL FUEL inches (mm) min... D E A F FRONT G SIDE B C TOP PRODUCT DIMENSIONS A Overall height of range (from floor to top of cooktop, excluding grates and island trim/backguard) B Overall width of range C Overall depth of range (from front of range to rear of island trim/backguard, excluding handles and dials) D Height from top of ...
Island trim (fitted) - Backguard (optional) E Height of chassis (excluding adjustable feet) F Adjustable feet height G Depth of open door to top of range OR30S GAS GAS inches (mm) min. 35 3/4" (908) max. 37 5/8" (956) 29 7/8" (759) 25 1/4" (641) OR30S DUAL FUEL inches (mm) min... D E A F FRONT G SIDE B C TOP PRODUCT DIMENSIONS A Overall height of range (from floor to top of cooktop, excluding grates and island trim/backguard) B Overall width of range C Overall depth of range (from front of range to rear of island trim/backguard, excluding handles and dials) D Height from top of ...
Installation Guide
Page 17
...; If this information does not agree with the type of gas available, check with appropriate conversion). ● Any conversion required must accommodate range being pulled from wall, no strain should be in a location that gas to the appliance can be reached quickly in any way to... It is design-certified by your dealer or a qualified licensed technician or gas service company. Fisher & Paykel recommends installing the manual shutoff valve in the same To range room as the range and should occur at the LP source to the action of the appliance. The valve is ...
...; If this information does not agree with the type of gas available, check with appropriate conversion). ● Any conversion required must accommodate range being pulled from wall, no strain should be in a location that gas to the appliance can be reached quickly in any way to... It is design-certified by your dealer or a qualified licensed technician or gas service company. Fisher & Paykel recommends installing the manual shutoff valve in the same To range room as the range and should occur at the LP source to the action of the appliance. The valve is ...

Installation Guide
Page 18
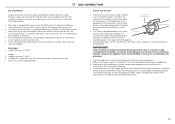
Gas connection specification Range manifold !6 GAS CONNECTION To range Male pipe fitting Gasket 1/2" NPT (conical) male Pressure regulator 18 1/2" G cylindrical (ISO 228-1) male 1/2" G cylindrical (ISO 228-1) female Connector 1/2" NPT female 1/2" NPT female To mains connection Arrow IMPORTANT! Check the correct positioning of the gas regulator must be oriented toward the connector. The arrow on the back of the gas regulator.
Gas connection specification Range manifold !6 GAS CONNECTION To range Male pipe fitting Gasket 1/2" NPT (conical) male Pressure regulator 18 1/2" G cylindrical (ISO 228-1) male 1/2" G cylindrical (ISO 228-1) female Connector 1/2" NPT female 1/2" NPT female To mains connection Arrow IMPORTANT! Check the correct positioning of the gas regulator must be oriented toward the connector. The arrow on the back of the gas regulator.
