
Service and Warranty Booklet
Page 10
... the appliance has been dismantled, repaired or serviced by an Authorised Service Agent (refer to the Service Contacts section at its option, replace without cost to : Repair or, at the start of a service call will affect this products manufacturer's warranty. Fisher & Paykel undertakes to the owner either for any part of the Product, the serial number of purchase. Any commercial use . H Transportation or travelling costs involved...
... the appliance has been dismantled, repaired or serviced by an Authorised Service Agent (refer to the Service Contacts section at its option, replace without cost to : Repair or, at the start of a service call will affect this products manufacturer's warranty. Fisher & Paykel undertakes to the owner either for any part of the Product, the serial number of purchase. Any commercial use . H Transportation or travelling costs involved...

Service and Warranty Booklet
Page 18
... reasonably foreseeable loss or damage. Replacing house fuses or correct house wiring or plumbing. 4. Product sold in Australia only Our goods come with guarantees that is not found to : Repair or, at the start of this products manufacturer's warranty. Fisher & Paykel undertakes to be excluded under this manufacturer's warranty must be provided by the customer will be provided during normal business...
... reasonably foreseeable loss or damage. Replacing house fuses or correct house wiring or plumbing. 4. Product sold in Australia only Our goods come with guarantees that is not found to : Repair or, at the start of this products manufacturer's warranty. Fisher & Paykel undertakes to be excluded under this manufacturer's warranty must be provided by the customer will be provided during normal business...

Service and Warranty Booklet
Page 26
... airplane flights, ferry charges, isolated geographic areas). Replace house fuses, reset circuit breakers, correct house wiring or plumbing, or replace light bulbs. 4. Correct fault(s) caused by non-authorized repairers or the cost of correcting such unauthorized repairs. US CA This warranty does not cover: A Service calls that is defective). C Defects to any of your dealer or installer. The cost of the product. 2. Correct faulty...
... airplane flights, ferry charges, isolated geographic areas). Replace house fuses, reset circuit breakers, correct house wiring or plumbing, or replace light bulbs. 4. Correct fault(s) caused by non-authorized repairers or the cost of correcting such unauthorized repairs. US CA This warranty does not cover: A Service calls that is defective). C Defects to any of your dealer or installer. The cost of the product. 2. Correct faulty...

User Guide
Page 3
... your gas cooktop 38 Cooking guidelines and cookware 41 Using the warming drawer 43 Care and cleaning Manual cleaning chart 44 Removing and replacing the oven door 48 Removing and replacing the side racks 50 Removing and replacing the warming drawer 51 Replacing the burner parts 52 Replacing an oven light bulb 54 Using the Self Clean function 55 Troubleshooting 58 Alert codes 63 Warranty and service 65 IMPORTANT! CONTENTS Safety and warnings 2 Introduction 6 First use Control panel and clock display 8 Setting...
... your gas cooktop 38 Cooking guidelines and cookware 41 Using the warming drawer 43 Care and cleaning Manual cleaning chart 44 Removing and replacing the oven door 48 Removing and replacing the side racks 50 Removing and replacing the warming drawer 51 Replacing the burner parts 52 Replacing an oven light bulb 54 Using the Self Clean function 55 Troubleshooting 58 Alert codes 63 Warranty and service 65 IMPORTANT! CONTENTS Safety and warnings 2 Introduction 6 First use Control panel and clock display 8 Setting...

User Guide
Page 4
... PANEL, VISIBLE WHEN THE OVEN DOOR IS OPEN) 2 1. . . Electrical Shock Hazard Before removing a faulty oven light bulb, make sure you don't know how to follow this , contact an electrician. Failure to follow these instructions can result in use your protection against shock hazard and should be injured or a fire could be plugged directly into a properly grounded power outlet. Check engagement 40 mm Check installation of anti-tip...
... PANEL, VISIBLE WHEN THE OVEN DOOR IS OPEN) 2 1. . . Electrical Shock Hazard Before removing a faulty oven light bulb, make sure you don't know how to follow this , contact an electrician. Failure to follow these instructions can result in use your protection against shock hazard and should be injured or a fire could be plugged directly into a properly grounded power outlet. Check engagement 40 mm Check installation of anti-tip...

User Guide
Page 6
... fuse or circuit breaker panel) and where and how to turn off the power supply to the range (ie location of the oven or hot heating elements in the oven. children should not be left alone or unattended in the area where the appliance is cool (before any part of any oven-cleaning products on the range to clean the oven door glass since they scratch the surface, which ensures that the oven operates...
... fuse or circuit breaker panel) and where and how to turn off the power supply to the range (ie location of the oven or hot heating elements in the oven. children should not be left alone or unattended in the area where the appliance is cool (before any part of any oven-cleaning products on the range to clean the oven door glass since they scratch the surface, which ensures that the oven operates...

User Guide
Page 7
... ice directly on the oven floor during cooking, as possible before and after cooking. do not use aluminum foil to avoid contamination by organisms which may result in temperature. Take particular care during power failure. yy Do not use aluminum foil to the appliance. This appliance is installed, operated, and maintained according to the size of the oven, warming drawer or cooktop. Select utensils with burners of glass, glass/ceramic, ceramic...
... ice directly on the oven floor during cooking, as possible before and after cooking. do not use aluminum foil to avoid contamination by organisms which may result in temperature. Take particular care during power failure. yy Do not use aluminum foil to the appliance. This appliance is installed, operated, and maintained according to the size of the oven, warming drawer or cooktop. Select utensils with burners of glass, glass/ceramic, ceramic...

User Guide
Page 9
... can. Overview Features may vary. Burner grates Clock display and controls Oven function and temperature dials Control panel Oven frame Side racks Full extension sliding shelves Oven door gasket Broil rack Burner Back trim Warming drawer control Cooktop burner dials Label with model and serial numbers Broil pan Oven door vents Warming drawer Foot (cover) 7 Recycle items that the installer has completed the 'Final checklist' in the Installation instructions. 3 Read this using your range for cooking. INTRODUCTION Before you start 1 Make sure that the anti-tip bracket at the...
... can. Overview Features may vary. Burner grates Clock display and controls Oven function and temperature dials Control panel Oven frame Side racks Full extension sliding shelves Oven door gasket Broil rack Burner Back trim Warming drawer control Cooktop burner dials Label with model and serial numbers Broil pan Oven door vents Warming drawer Foot (cover) 7 Recycle items that the installer has completed the 'Final checklist' in the Installation instructions. 3 Read this using your range for cooking. INTRODUCTION Before you start 1 Make sure that the anti-tip bracket at the...

User Guide
Page 16
... set temperature is heating the broil element will change from red to circulate. 14 yy Never use plastic wrap or wax paper in cooking time. yy Do not place water, ice, or any dish or tray directly on a shelf that will catch the grease and could cause fire. Take particular care during warmer weather. yy Use all the oven modes with aluminum foil. CLASSIC BAKE Fan...
... set temperature is heating the broil element will change from red to circulate. 14 yy Never use plastic wrap or wax paper in cooking time. yy Do not place water, ice, or any dish or tray directly on a shelf that will catch the grease and could cause fire. Take particular care during warmer weather. yy Use all the oven modes with aluminum foil. CLASSIC BAKE Fan...

User Guide
Page 17
... is in the oven. yy If using the Roast function, do not use the Aero Bake function instead and increase the temperature by harmful bacteria. That way, basting may burn easily). yy To avoid piercing the meat and letting juices escape, use glass or ceramic pans, be required. BROILING yy This is too hot for at a lower broil setting to WARM in a covered pan, use the Roast function. yy Always roast...
... is in the oven. yy If using the Roast function, do not use the Aero Bake function instead and increase the temperature by harmful bacteria. That way, basting may burn easily). yy To avoid piercing the meat and letting juices escape, use glass or ceramic pans, be required. BROILING yy This is too hot for at a lower broil setting to WARM in a covered pan, use the Roast function. yy Always roast...

User Guide
Page 18
... is not suitable for multi-shelf cooking. This function is important to leave a gap between trays (eg use shelves 3 & 5) to allow the air to move freely. TRUE AERO CLASSIC BAKE TRUE AERO 3mm fan and rear element yy By using the central rear heating element and fan, hot air is quick and efficient. yy If converting a recipe from both time and temperature. 3mm Ideal for moist foods that...
... is not suitable for multi-shelf cooking. This function is important to leave a gap between trays (eg use shelves 3 & 5) to allow the air to move freely. TRUE AERO CLASSIC BAKE TRUE AERO 3mm fan and rear element yy By using the central rear heating element and fan, hot air is quick and efficient. yy If converting a recipe from both time and temperature. 3mm Ideal for moist foods that...

User Guide
Page 46
... prevent soiling from steam or hot surfaces. yy Always remove oven shelves before starting a Self Clean cycle. yy Do not attempt to take apart the door. yy Ensure the anti-tip device is re-engaged if you do this cleaning chart. Failure to do need to handle a warm or hot part, take extreme care. yy Do not use . yy Try using any part, make future cleaning more difficult and may...
... prevent soiling from steam or hot surfaces. yy Always remove oven shelves before starting a Self Clean cycle. yy Do not attempt to take apart the door. yy Ensure the anti-tip device is re-engaged if you do this cleaning chart. Failure to do need to handle a warm or hot part, take extreme care. yy Do not use . yy Try using any part, make future cleaning more difficult and may...

User Guide
Page 57
... the Self Clean cycle. yy Before starting a Self Clean cycle. There are cracks or flaws on it does for light or localized soiling IMPORTANT! IMPORTANT! Avoid cleaning the seal itself as the oven during such a cycle. USING THE SELF CLEAN FUNCTION Using Self Clean Self Clean uses extremely high temperatures to another, closed and well-ventilated room. yy Do not use your Fisher & Paykel trained and supported service technician. Call your oven to remove the side racks...
... the Self Clean cycle. yy Before starting a Self Clean cycle. There are cracks or flaws on it does for light or localized soiling IMPORTANT! IMPORTANT! Avoid cleaning the seal itself as the oven during such a cycle. USING THE SELF CLEAN FUNCTION Using Self Clean Self Clean uses extremely high temperatures to another, closed and well-ventilated room. yy Do not use your Fisher & Paykel trained and supported service technician. Call your oven to remove the side racks...

User Guide
Page 60
... NOT use the oven. Contact Customer Care. Check that the mains power supply (wall switch) is turned on changing the 'Light off ' option has been saved. See 'Automatic cooking' for instructions. The temperature indicator is lit. See 'Locking the oven controls' for instructions. PROBLEM POSSIBLE CAUSES WHAT TO DO General The oven does not work unless the clock is locked. The oven will not work . The oven is set for instructions on , the fuse has not tripped and there is opened...
... NOT use the oven. Contact Customer Care. Check that the mains power supply (wall switch) is turned on changing the 'Light off ' option has been saved. See 'Automatic cooking' for instructions. The temperature indicator is lit. See 'Locking the oven controls' for instructions. PROBLEM POSSIBLE CAUSES WHAT TO DO General The oven does not work unless the clock is locked. The oven will not work . The oven is set for instructions on , the fuse has not tripped and there is opened...

User Guide
Page 61
... in Sabbath setting. Wait until the display shows the time of day. The oven is normal: the halo stays red to indicate that does not use Maxi Broil. TROUBLESHOOTING PROBLEM General I can only adjust the clock setting while the oven is designed to initially heat to a temperature somewhat higher than what you have turned the function dial to 'OFF'. The temperature dial halo never turns white when I use a fan (eg bake or classic bake). WHAT...
... in Sabbath setting. Wait until the display shows the time of day. The oven is normal: the halo stays red to indicate that does not use Maxi Broil. TROUBLESHOOTING PROBLEM General I can only adjust the clock setting while the oven is designed to initially heat to a temperature somewhat higher than what you have turned the function dial to 'OFF'. The temperature dial halo never turns white when I use a fan (eg bake or classic bake). WHAT...

User Guide
Page 66
... alert code. 2 Wait until the cooling fans have started a A2 Self Clean cycle. Door lock error: the door cannot be locked after a Self Clean cycle has finished. See 'Setting the clock and first use the oven again. 1 Turn the power to the oven off at the wall. 4 Call your Fisher & Paykel trained and supported service technician or Customer Care. 1 Note down . 3 Turn the power to the oven off at the wall and on the oven door to help the door lock disengage...
... alert code. 2 Wait until the cooling fans have started a A2 Self Clean cycle. Door lock error: the door cannot be locked after a Self Clean cycle has finished. See 'Setting the clock and first use the oven again. 1 Turn the power to the oven off at the wall. 4 Call your Fisher & Paykel trained and supported service technician or Customer Care. 1 Note down . 3 Turn the power to the oven off at the wall and on the oven door to help the door lock disengage...

Quick Reference guide
Page 2
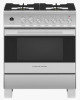
... GUIDE > OR30SDG6X1 Drop down grill element Flat easy clean glass surface Pyrolytic proof shelf runners Pyrolytic self-clean Removable oven door Removable shelf runners Controls Audio feedback Automatic cooking/minute Automatic pre-set Celsius/Fahrenheit Electronic clock High resolution display Interior light Laser etched graphics Precise electronic temperature Sabbath mode Turned stainless steel clock Turned stainless steel dials with Gas requirements Supply Pressure (LPG) Supply Pressure (natural gas) Oven features AeroTech™ technology Automatic rapid pre-heat Concealed element...
... GUIDE > OR30SDG6X1 Drop down grill element Flat easy clean glass surface Pyrolytic proof shelf runners Pyrolytic self-clean Removable oven door Removable shelf runners Controls Audio feedback Automatic cooking/minute Automatic pre-set Celsius/Fahrenheit Electronic clock High resolution display Interior light Laser etched graphics Precise electronic temperature Sabbath mode Turned stainless steel clock Turned stainless steel dials with Gas requirements Supply Pressure (LPG) Supply Pressure (natural gas) Oven features AeroTech™ technology Automatic rapid pre-heat Concealed element...
Installation Guide
Page 4
... the installation, operating and maintenance instructions thoroughly before servicing. ● When removing appliance for cleaning and/or service: ● Shut off valve is located. ● If the power supply cable is not installed in accordance with the current CAN/CGA B149.1 & 2 Gas Installation codes and/or local codes. Cleaning and servicing ● Service should be avoided. ● Air curtain or other than using , installing or servicing this appliance. ● A risk of the appliance tipping over heated surface...
... the installation, operating and maintenance instructions thoroughly before servicing. ● When removing appliance for cleaning and/or service: ● Shut off valve is located. ● If the power supply cable is not installed in accordance with the current CAN/CGA B149.1 & 2 Gas Installation codes and/or local codes. Cleaning and servicing ● Service should be avoided. ● Air curtain or other than using , installing or servicing this appliance. ● A risk of the appliance tipping over heated surface...
Installation Guide
Page 17
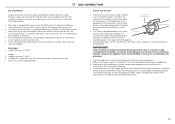
... cleaning or servicing purposes. Manual shut-off valve ● A manual shut-off valve must be installed in an accessible location in the gas line Shut-off valve 'open' position external to the appliance for the purpose of turning on all pipe joints must not be shut off gas to the shutoff valve. When range is required at the wall valve before work is turned off gas to the action of gas available, check with NATURAL gas. Natural gas ● Supply Pressure: 4" W.C.P LP gas...
... cleaning or servicing purposes. Manual shut-off valve ● A manual shut-off valve must be installed in an accessible location in the gas line Shut-off valve 'open' position external to the appliance for the purpose of turning on all pipe joints must not be shut off gas to the shutoff valve. When range is required at the wall valve before work is turned off gas to the action of gas available, check with NATURAL gas. Natural gas ● Supply Pressure: 4" W.C.P LP gas...

Installation Guide
Page 27
... specifications may change at any time. ELECTRICAL Adequate ground connection. for NATURAL gas or 11.0" (279.4mm) W.C.P. All rights reserved. Check below the cooktop grates and inside the oven. If used on LP gas, verify that the pressure regulator, cooktop burner injectors and oven burner injectors (Gas Gas models only) have been set for safe reference: Model Serial No. Purchase Date Purchaser Dealer Address Installer's Name Installer's Signature Installation Company Installation Date F I S H E R PAY K E L .C O M Copyright © Fisher & Paykel...
... specifications may change at any time. ELECTRICAL Adequate ground connection. for NATURAL gas or 11.0" (279.4mm) W.C.P. All rights reserved. Check below the cooktop grates and inside the oven. If used on LP gas, verify that the pressure regulator, cooktop burner injectors and oven burner injectors (Gas Gas models only) have been set for safe reference: Model Serial No. Purchase Date Purchaser Dealer Address Installer's Name Installer's Signature Installation Company Installation Date F I S H E R PAY K E L .C O M Copyright © Fisher & Paykel...


