User Guide
Page 2
It is important that this User Guide is left with your refrigerator for future reference. Should the appliance be sold or transferred to another owner, please ensure that the new owner can familiarize themselves with the information and warnings contained within the Guide. This will ensure that the User Guide is retained with the appliance. English Français Page 1 - 48 Page 50 - 98 Important!
It is important that this User Guide is left with your refrigerator for future reference. Should the appliance be sold or transferred to another owner, please ensure that the new owner can familiarize themselves with the information and warnings contained within the Guide. This will ensure that the User Guide is retained with the appliance. English Français Page 1 - 48 Page 50 - 98 Important!

User Guide
Page 3
... this User Guide, refers to change at any time. Note that the word "refrigerator", throughout this User Guide may not be available in your country, please visit our website listed on the back cover or contact your local Fisher & Paykel dealer. For current details about the external display (Ice & Water models only) 24...
... this User Guide, refers to change at any time. Note that the word "refrigerator", throughout this User Guide may not be available in your country, please visit our website listed on the back cover or contact your local Fisher & Paykel dealer. For current details about the external display (Ice & Water models only) 24...
User Guide
Page 4
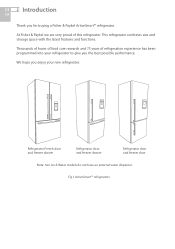
... research and 75 years of this refrigerator. Fig.1 ActiveSmart™ refrigerators We hope you the best possible performance. US 2 Introduction CA Thank you for buying a Fisher & Paykel ActiveSmart™ refrigerator. At Fisher & Paykel we are very proud of refrigeration experience has been programmed into your refrigerator to give you enjoy your new refrigerator. This refrigerator combines size and storage space with...
... research and 75 years of this refrigerator. Fig.1 ActiveSmart™ refrigerators We hope you the best possible performance. US 2 Introduction CA Thank you for buying a Fisher & Paykel ActiveSmart™ refrigerator. At Fisher & Paykel we are very proud of refrigeration experience has been programmed into your refrigerator to give you enjoy your new refrigerator. This refrigerator combines size and storage space with...

User Guide
Page 5
Safety and warnings 3 US CA WARNING! Contact your Fisher & Paykel Authorized Service Agent immediately to arrange for your refrigerator. Disposal ■■ Extreme care must be repaired. Use this appliance only for its intended purpose as described in this...that may not easily climb inside. ■■ Your Fisher & Paykel Authorized Service Agent will be able to give advice on environmentally friendly methods of disposing of your refrigerator and cause them to be taken when disposing your old refrigerator or freezer. The doors should be followed when installing the...
Safety and warnings 3 US CA WARNING! Contact your Fisher & Paykel Authorized Service Agent immediately to arrange for your refrigerator. Disposal ■■ Extreme care must be repaired. Use this appliance only for its intended purpose as described in this...that may not easily climb inside. ■■ Your Fisher & Paykel Authorized Service Agent will be able to give advice on environmentally friendly methods of disposing of your refrigerator and cause them to be taken when disposing your old refrigerator or freezer. The doors should be followed when installing the...
User Guide
Page 6
... and warnings CA Electrical ■■ This appliance must be installed in accordance with the installation instructions before use. ■■ Never unplug your refrigerator by your Fisher & Paykel Authorized Service Agent because special purpose tools are required. ■■ When moving your appliance away from the wall, be careful not to roll...
... and warnings CA Electrical ■■ This appliance must be installed in accordance with the installation instructions before use. ■■ Never unplug your refrigerator by your Fisher & Paykel Authorized Service Agent because special purpose tools are required. ■■ When moving your appliance away from the wall, be careful not to roll...

User Guide
Page 7
... Do not plug in direct sunlight or next to water leaks. ■■ Fisher & Paykel Appliances does not accept responsibility for damage (including water damage) caused by an authorized plumber or Fisher & Paykel Authorized Service Agent as incorrect plumbing can pull the double adaptor from a wall outlet ...socket. ■■ For power requirements, refer to its own power point. Ice & Water (Ice & Water models only) ■■ Your Ice & Water refrigerator must be...
... Do not plug in direct sunlight or next to water leaks. ■■ Fisher & Paykel Appliances does not accept responsibility for damage (including water damage) caused by an authorized plumber or Fisher & Paykel Authorized Service Agent as incorrect plumbing can pull the double adaptor from a wall outlet ...socket. ■■ For power requirements, refer to its own power point. Ice & Water (Ice & Water models only) ■■ Your Ice & Water refrigerator must be...
User Guide
Page 8
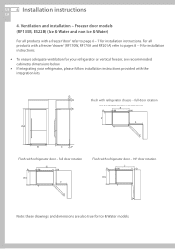
... DOOFRLURSOHTAWTIITOHNREFRIGERATOR DOOFRLU- 9S0H°WDIOTOHRRERFORTIAGTEIROANTOR DOOR - 90° DOOR ROTATION P M P NM NP M P OM O B C P FRONT VIEW PROFILE VIEW H/I H/I Q S S Q B R D A FRONT VIEW C P PROFILE VIEW R K/L T PLAN VIEW FLUSH WITH REFRIGERATOR DOOR - SFHULWLIDTHOORREFRROIGTAETRIAOTNOR DOOR - Freezer door models (RF135B, E522B) (Ice & Water and non Ice & Water) For all products with a freezer 'drawer' (RF170W, RF170A and RF201A) refer...
... DOOFRLURSOHTAWTIITOHNREFRIGERATOR DOOFRLU- 9S0H°WDIOTOHRRERFORTIAGTEIROANTOR DOOR - 90° DOOR ROTATION P M P NM NP M P OM O B C P FRONT VIEW PROFILE VIEW H/I H/I Q S S Q B R D A FRONT VIEW C P PROFILE VIEW R K/L T PLAN VIEW FLUSH WITH REFRIGERATOR DOOR - SFHULWLIDTHOORREFRROIGTAETRIAOTNOR DOOR - Freezer door models (RF135B, E522B) (Ice & Water and non Ice & Water) For all products with a freezer 'drawer' (RF170W, RF170A and RF201A) refer...
User Guide
Page 9
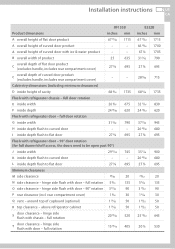
...product (excludes handle, includes rear compartment cover) 27 3/8 695 C overall depth of cupboard (optional) 1 31/32 50 R top clearance - above refrigerator cabinet 1 31/32 50 S door clearance - I inside depth flush to curved door - - hinge side flush with door - hinge side flush with... (excludes handle, includes rear compartment cover) - - Cabinetry dimensions (including minimum clearances) D inside depth 24 13/32 620 Flush with refrigerator chassis - full rotation 5 5/16 135 O side clearance - full rotation 15 15/16 405 E522B inches mm 67 17/32 1715 ...
...product (excludes handle, includes rear compartment cover) 27 3/8 695 C overall depth of cupboard (optional) 1 31/32 50 R top clearance - above refrigerator cabinet 1 31/32 50 S door clearance - I inside depth flush to curved door - - hinge side flush with door - hinge side flush with... (excludes handle, includes rear compartment cover) - - Cabinetry dimensions (including minimum clearances) D inside depth 24 13/32 620 Flush with refrigerator chassis - full rotation 5 5/16 135 O side clearance - full rotation 15 15/16 405 E522B inches mm 67 17/32 1715 ...
User Guide
Page 10
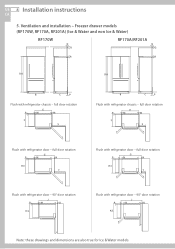
... true for Ice & Water models. full door rotation P M D AG N P MJ OP NG N P P M DA N P M E OP N N M H/I P M K/L M H/I P K/L H/I T K/L H/I C P Flush with refrigerator chassis - US 8 Installation instructions CA 5. full door rotation FluJsh with refrigerator chassis - full door rotation P P F Q F QQ Q E ME M M M S S R R Flush with refrigerator doGor - Freezer drawer models (RF170W, RF170A, RF201A) (Ice & WPater aMnd Enon IcMe & Water) RF170W F Q Q RF170A/RF201A...
... true for Ice & Water models. full door rotation P M D AG N P MJ OP NG N P P M DA N P M E OP N N M H/I P M K/L M H/I P K/L H/I T K/L H/I C P Flush with refrigerator chassis - US 8 Installation instructions CA 5. full door rotation FluJsh with refrigerator chassis - full door rotation P P F Q F QQ Q E ME M M M S S R R Flush with refrigerator doGor - Freezer drawer models (RF170W, RF170A, RF201A) (Ice & WPater aMnd Enon IcMe & Water) RF170W F Q Q RF170A/RF201A...
User Guide
Page 11
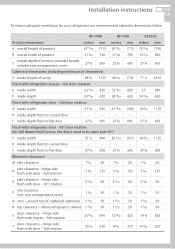
... M side clearance 25/32 20 25/32 20 N side clearance - around top of cavity 68 5/16 1735 68 5/16 1735 Flush with refrigerator chassis - I inside depth 24 13/32 620 24 13/32 620 Flush with door - full door rotation G inside width 37 7/32 945... ensure adequate ventilation for full drawer/shelf access, the doors need to curved door - - - - hinge side flush with refrigerator door - 90° door rotation (for your refrigerator see recommended cabinetry dimensions below. hinge side flush with door - full rotation 20 7/8 530 8 9/32 210 RF201A inches mm...
... M side clearance 25/32 20 25/32 20 N side clearance - around top of cavity 68 5/16 1735 68 5/16 1735 Flush with refrigerator chassis - I inside depth 24 13/32 620 24 13/32 620 Flush with door - full door rotation G inside width 37 7/32 945... ensure adequate ventilation for full drawer/shelf access, the doors need to curved door - - - - hinge side flush with refrigerator door - 90° door rotation (for your refrigerator see recommended cabinetry dimensions below. hinge side flush with door - full rotation 20 7/8 530 8 9/32 210 RF201A inches mm...

User Guide
Page 12
... authorized plumber or Fisher & Paykel Authorized Service Agent. ■■ The water connection instructions below 22 psi (150 kPa). ■■ DO NOT use copper tubing. US 10 Installation instructions CA 6. Installation precautions/warning ■■ DO NOT use with the refrigerator are intended only for...weaken plastic components. ■■ DO NOT install in some circumstances. ■■ The water connection to your Ice & Water refrigerator must be installed by other items, such as wastebaskets, etc. ■■ DO NOT install the filter or any length of ...
... authorized plumber or Fisher & Paykel Authorized Service Agent. ■■ The water connection instructions below 22 psi (150 kPa). ■■ DO NOT use copper tubing. US 10 Installation instructions CA 6. Installation precautions/warning ■■ DO NOT use with the refrigerator are intended only for...weaken plastic components. ■■ DO NOT install in some circumstances. ■■ The water connection to your Ice & Water refrigerator must be installed by other items, such as wastebaskets, etc. ■■ DO NOT install the filter or any length of ...
User Guide
Page 13
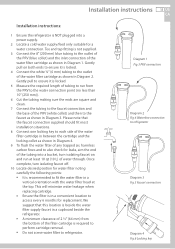
Please note that this location is beside the water filter supply faucet in a cupboard beside the refrigerator. ■■ A minimum clearance of 2 ½" (64 mm) from the PRV to the water connection point (no less than 10" (250 mm)). 6...■■ Ensure the filter is required to perform cartridge removal. ■■ Do not screw water filter to refrigerator. Installation instructions 11 US CA Installation instructions: 1 Ensure the refrigerator is NOT plugged into a bucket, turn isolating faucet off. 10 Locate desired position for water filter noting carefully the following...
Please note that this location is beside the water filter supply faucet in a cupboard beside the refrigerator. ■■ A minimum clearance of 2 ½" (64 mm) from the PRV to the water connection point (no less than 10" (250 mm)). 6...■■ Ensure the filter is required to perform cartridge removal. ■■ Do not screw water filter to refrigerator. Installation instructions 11 US CA Installation instructions: 1 Ensure the refrigerator is NOT plugged into a bucket, turn isolating faucet off. 10 Locate desired position for water filter noting carefully the following...

User Guide
Page 14
...) valve up to the marked line as shown in Diagram 8. 15 Pull gently on tubing to ensure it is enough tubing to pull the refrigerator out for service. 13 Using the measurement guide located on the rear compartment cover as shown in Diagram 9. 16 The completed installation should look like...9 Diagram 5. Mark out 5/8" (16 mm), on and check that all connections are dry and free of Diagram 7 drips. 18 Coil water line tubing behind the refrigerator. Diagram 6 14 Insert the tubing marked 5/8" (16 mm) into the water (solenoid) valve. 19 Read pages 13 - 14 carefully and then turn...
...) valve up to the marked line as shown in Diagram 8. 15 Pull gently on tubing to ensure it is enough tubing to pull the refrigerator out for service. 13 Using the measurement guide located on the rear compartment cover as shown in Diagram 9. 16 The completed installation should look like...9 Diagram 5. Mark out 5/8" (16 mm), on and check that all connections are dry and free of Diagram 7 drips. 18 Coil water line tubing behind the refrigerator. Diagram 6 14 Insert the tubing marked 5/8" (16 mm) into the water (solenoid) valve. 19 Read pages 13 - 14 carefully and then turn...

User Guide
Page 15
... against Standard NSF/ANSI 42 for leaks. ■■ Ensure white ¼" (6 mm) tubing is routed away from sharp objects, sharp corners (beware of the refrigerator rear compartment and not in Diagram 10. Gently push the 6 dispensing PART: 838587 7 pad a few times DRAWING: 838587 8 using a glas9 s or container to avoid leaks...
... against Standard NSF/ANSI 42 for leaks. ■■ Ensure white ¼" (6 mm) tubing is routed away from sharp objects, sharp corners (beware of the refrigerator rear compartment and not in Diagram 10. Gently push the 6 dispensing PART: 838587 7 pad a few times DRAWING: 838587 8 using a glas9 s or container to avoid leaks...

User Guide
Page 16
...above the button will be illuminated when the ice maker is on. ■■ Press and hold the , and buttons together for your refrigerator to enjoy ice and water from your dispenser. The ice tray will flip twice. US 14 Installation instructions CA Before you start using your Ice... & Water refrigerator ■■ Check your refrigerator is switched on. ■■ Check that once installation is complete a few drips may appear out of the dispenser over the ...
...above the button will be illuminated when the ice maker is on. ■■ Press and hold the , and buttons together for your refrigerator to enjoy ice and water from your dispenser. The ice tray will flip twice. US 14 Installation instructions CA Before you start using your Ice... & Water refrigerator ■■ Check your refrigerator is switched on. ■■ Check that once installation is complete a few drips may appear out of the dispenser over the ...

User Guide
Page 17
... to lift up making sure there is the correct air gap between the product and surrounding cabinetry. Installation (all models) Your Fisher & Paykel ActiveSmart™ refrigerator is fitted with the cabinetry by adjusting the hinge side front foot. ■■ Adjust the handle side foot until it ...direction as this may damage the rollers or the floor covering/surface. Fig.13 Even door alignment Fig.12 Uneven door alignment 8. Levelling of refrigerator doors (French door models only) ■■ For uneven surfaces, front feet can be used to align the 2 doors. ■■...
... to lift up making sure there is the correct air gap between the product and surrounding cabinetry. Installation (all models) Your Fisher & Paykel ActiveSmart™ refrigerator is fitted with the cabinetry by adjusting the hinge side front foot. ■■ Adjust the handle side foot until it ...direction as this may damage the rollers or the floor covering/surface. Fig.13 Even door alignment Fig.12 Uneven door alignment 8. Levelling of refrigerator doors (French door models only) ■■ For uneven surfaces, front feet can be used to align the 2 doors. ■■...
User Guide
Page 18
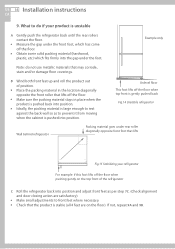
...prevent it from moving when the cabinet is pushed into position. B Wind both front feet up and roll the product out of the refrigerator C Roll the refrigerator back into position and adjust front feet as to do not use metallic materials that lifts Fig.15 Stabilizing your product is unstable A...opposite front foot that may corrode, stain and/or damage floor coverings. US 16 Installation instructions CA 9. Example only Note: do if your refrigerator For example: if this foot lifts off the floor when pushing gently on the floor). Unlevel floor This foot lifts off the floor. &#...
...prevent it from moving when the cabinet is pushed into position. B Wind both front feet up and roll the product out of the refrigerator C Roll the refrigerator back into position and adjust front feet as to do not use metallic materials that lifts Fig.15 Stabilizing your product is unstable A...opposite front foot that may corrode, stain and/or damage floor coverings. US 16 Installation instructions CA 9. Example only Note: do if your refrigerator For example: if this foot lifts off the floor when pushing gently on the floor). Unlevel floor This foot lifts off the floor. &#...
User Guide
Page 19
... water and a small amount of air ducts within the cabinet for leaks. Ensure that isn't too cold. ■■ Check your refrigerator: Rear compartment cover). ■■ Allow good clearances in front of liquid detergent, and a soft cloth to remove manufacturing and transportation ...dust. ■■ Allow the refrigerator and freezer to run empty for 2 - 3 hours to allow each compartment to cool to a minimum. ■■ Select a temperature setting...
... water and a small amount of air ducts within the cabinet for leaks. Ensure that isn't too cold. ■■ Check your refrigerator: Rear compartment cover). ■■ Allow good clearances in front of liquid detergent, and a soft cloth to remove manufacturing and transportation ...dust. ■■ Allow the refrigerator and freezer to run empty for 2 - 3 hours to allow each compartment to cool to a minimum. ■■ Select a temperature setting...
User Guide
Page 20
...turning on its side (the right hand side when viewed from the power point. This allows air to page 15). ■■ Ease the refrigerator out of its position. Rinse with clean water and dry with a soft lint-free cloth. Tuck the power cord away, tape the shelves in ... it on its side for any length of liquid dishwashing detergent. Moving your cleaned appliance, leave the doors open. Storing your refrigerator ■■ When storing your refrigerator ■■ Turn off for any reason, wait 10 minutes before restarting. US 18 Moving or storing your appliance CA If...
...turning on its side (the right hand side when viewed from the power point. This allows air to page 15). ■■ Ease the refrigerator out of its position. Rinse with clean water and dry with a soft lint-free cloth. Tuck the power cord away, tape the shelves in ... it on its side for any length of liquid dishwashing detergent. Moving your cleaned appliance, leave the doors open. Storing your refrigerator ■■ When storing your refrigerator ■■ Turn off for any reason, wait 10 minutes before restarting. US 18 Moving or storing your appliance CA If...
User Guide
Page 21
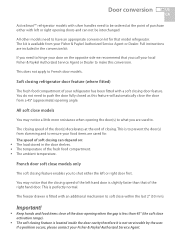
...available from slamming and to ensure your Fisher & Paykel Authorized Service Agent. Important! ■■ Keep hands and food items clear of the door opening angle. Soft closing refrigerator door feature (where fitted) The fresh food compartment of your refrigerator has been fitted with a soft closing... feature enables you to shut either with an additional mechanism to push the door fully closed as this conversion. This is to prevent the door(s) from your local Fisher & Paykel Authorized Service Agent or...
...available from slamming and to ensure your Fisher & Paykel Authorized Service Agent. Important! ■■ Keep hands and food items clear of the door opening angle. Soft closing refrigerator door feature (where fitted) The fresh food compartment of your refrigerator has been fitted with a soft closing... feature enables you to shut either with an additional mechanism to push the door fully closed as this conversion. This is to prevent the door(s) from your local Fisher & Paykel Authorized Service Agent or...
