
User manual
Page 5
... a PCI Express x16 graphics card installed in your system, we recommend using a 24-pin ATX power supply to get the best performance. ■ Before turning on the power, please make sure there are no leftover screws or metal components placed on the motherboard or within the computer casing. ■ If you are uncertain about any , when connecting USB, audio, 1394a, RS232 COM, IrDA or S/PDIF cables to the internal connectors...
... a PCI Express x16 graphics card installed in your system, we recommend using a 24-pin ATX power supply to get the best performance. ■ Before turning on the power, please make sure there are no leftover screws or metal components placed on the motherboard or within the computer casing. ■ If you are uncertain about any , when connecting USB, audio, 1394a, RS232 COM, IrDA or S/PDIF cables to the internal connectors...

User manual
Page 6
... Specifications 2 1-2 Layout...4 1-3 Back Panel Connectors 5 Chapter 2 Hardware Installation 2-1 Install the CPU and CPU Cooler 8 Install the CPU 8 2-2 Install the Memory 11 Dual Channel Memory Configuration 11 Installing a Memory 12 2-3 Install an Expansion Card 13 2-4 Install other Internal Connectors 14 2-5 Clear CMOS 18 2-6 Onboard Button 18 2-7 Onboard Debug LED 19 Chapter 3 BIOS Setup Enter BIOS Setup 21 Main...22 Advanced...23 Onboard Device Configuration 23 Chipset Configuration 24 PCI Express Settings 25 ACPI Configuration 26 SATA Configuration 27 USB Configuration...
... Specifications 2 1-2 Layout...4 1-3 Back Panel Connectors 5 Chapter 2 Hardware Installation 2-1 Install the CPU and CPU Cooler 8 Install the CPU 8 2-2 Install the Memory 11 Dual Channel Memory Configuration 11 Installing a Memory 12 2-3 Install an Expansion Card 13 2-4 Install other Internal Connectors 14 2-5 Clear CMOS 18 2-6 Onboard Button 18 2-7 Onboard Debug LED 19 Chapter 3 BIOS Setup Enter BIOS Setup 21 Main...22 Advanced...23 Onboard Device Configuration 23 Chipset Configuration 24 PCI Express Settings 25 ACPI Configuration 26 SATA Configuration 27 USB Configuration...

User manual
Page 7
3. Fan Page - Recovery Volume Options 88 6. Fan Control 50 4-3 FOX LiveUpdate 51 1. Configure 56 4. Reset Disks to Install Serial ATA Hard Disks 64 5-4 Create a RAID driver diskette 65 5-5 BIOS Configuration 66 5-6 Create RAID in BIOS 66 1. Online Update 53 3. Enter RAID BIOS Setup 66 2. Exit RAID BIOS 89 5-7 Install a New Windows XP 90 Appendix ATI® CrossFireXTM Technology 94 USB Charger Introduction 96 Intel® Smart Response Technology 97 System Requirements 97 Enable Intel® Smart Response Technology 97 Intel® Rapid Start Technology 99 ...
3. Fan Page - Recovery Volume Options 88 6. Fan Control 50 4-3 FOX LiveUpdate 51 1. Configure 56 4. Reset Disks to Install Serial ATA Hard Disks 64 5-4 Create a RAID driver diskette 65 5-5 BIOS Configuration 66 5-6 Create RAID in BIOS 66 1. Online Update 53 3. Enter RAID BIOS Setup 66 2. Exit RAID BIOS 89 5-7 Install a New Windows XP 90 Appendix ATI® CrossFireXTM Technology 94 USB Charger Introduction 96 Intel® Smart Response Technology 97 System Requirements 97 Enable Intel® Smart Response Technology 97 Intel® Rapid Start Technology 99 ...

User manual
Page 9
... 2 x PCI slots Multi-GPU Support Support ATI® CrossFire™ Technology Storage Intel® Z75/Z77 chipset -4 x SATA 2.0 connectors (3Gb/s data transfer rate) -2 x SATA 3.0 connectors (6Gb/s data transfer rate) Support RAID 0, 1, 5,10 Support Intel® Smart Response Technology (Z77A-S) LAN Realtek RTL8111F Gigabit LAN controller Support 10/100/1000Mbps Audio Realtek ALC887 -High Definition Audio -2/4/5.1/7.1-channel -Support Jack-Sensing function USB Support up to 8 x USB 2.0 ports (4 rear panel ports, 2 onboard USB headers supporting 4 extra ports) Support USB...
... 2 x PCI slots Multi-GPU Support Support ATI® CrossFire™ Technology Storage Intel® Z75/Z77 chipset -4 x SATA 2.0 connectors (3Gb/s data transfer rate) -2 x SATA 3.0 connectors (6Gb/s data transfer rate) Support RAID 0, 1, 5,10 Support Intel® Smart Response Technology (Z77A-S) LAN Realtek RTL8111F Gigabit LAN controller Support 10/100/1000Mbps Audio Realtek ALC887 -High Definition Audio -2/4/5.1/7.1-channel -Support Jack-Sensing function USB Support up to 8 x USB 2.0 ports (4 rear panel ports, 2 onboard USB headers supporting 4 extra ports) Support USB...

User manual
Page 20
... support PCI Express 2.0 4X bandwidth) PCI Express x1 PCI Follow the steps below to the chassis back panel with a screw. 5. Locate an expansion slot that supports your card. Align the card with the expansion card in the slot. 3. Make sure the graphics card is fully seated in your operating system. 2-3 Install an Expansion Card HARDWARE INSTALLATION ■ Make sure the motherboard supports the expansion card. ■ Always turn off the computer and unplug the power...
... support PCI Express 2.0 4X bandwidth) PCI Express x1 PCI Follow the steps below to the chassis back panel with a screw. 5. Locate an expansion slot that supports your card. Align the card with the expansion card in the slot. 3. Make sure the graphics card is fully seated in your operating system. 2-3 Install an Expansion Card HARDWARE INSTALLATION ■ Make sure the motherboard supports the expansion card. ■ Always turn off the computer and unplug the power...

User manual
Page 22
... 2-pin connector is on and off rather than using the power supply button. Power Switch Connector (PWR-SW) Connect to be connected to the Reset switch on the front panel of the chassis. HARDWARE INSTALLATION 12 + + HDD-LED - Front Panel Connector: FP1 This motherboard includes one connector for S/PDIF output. Push this connector. Speaker Connector: SPEAKER The speaker connector is pressed. If eventually the chassis is closed, the system will restart when the switch is used for connecting the front panel switch and LED Indicators. Hard Disk LED Connector (HDD-LED...
... 2-pin connector is on and off rather than using the power supply button. Power Switch Connector (PWR-SW) Connect to be connected to the Reset switch on the front panel of the chassis. HARDWARE INSTALLATION 12 + + HDD-LED - Front Panel Connector: FP1 This motherboard includes one connector for S/PDIF output. Push this connector. Speaker Connector: SPEAKER The speaker connector is pressed. If eventually the chassis is closed, the system will restart when the switch is used for connecting the front panel switch and LED Indicators. Hard Disk LED Connector (HDD-LED...

User manual
Page 28
... change the default values in correct password before boot or access to enter Setup. Each function is explained below: Main It displays the basic system configuration, such as less I /O cards installed. Security The Administrator/User password can be set a password, the system will ask you need now is heavy, set to prevent unauthorized use of the screen, you can be viewed or set up through this menu to optimal default may cause problem...
... change the default values in correct password before boot or access to enter Setup. Each function is explained below: Main It displays the basic system configuration, such as less I /O cards installed. Security The Administrator/User password can be set a password, the system will ask you need now is heavy, set to prevent unauthorized use of the screen, you can be viewed or set up through this menu to optimal default may cause problem...

User manual
Page 30
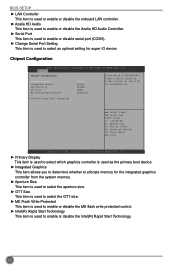
... item is used to enable or disable boot option for Legacy Network Devices. ▶ Onboard Device Configuration ▶ Chipset Configuration ▶ PCI Express Settings ▶ ACPI Configuration ▶ SATA Configuration ▶ USB Configuration → ←: Select Screen ↑ ↓: Select Item Enter: Select +/-: Change Opt. Advanced BIOS SETUP Aptio Setup Utility - Onboard Device Configuration Aptio Setup Utility - C opyright (C) 2011 American Megatrends, Inc. F1: General Help F2: Previous Values F3: Optimized Defaults F4: Save & Exit ESC: Exit Version 2.14...
... item is used to enable or disable boot option for Legacy Network Devices. ▶ Onboard Device Configuration ▶ Chipset Configuration ▶ PCI Express Settings ▶ ACPI Configuration ▶ SATA Configuration ▶ USB Configuration → ←: Select Screen ↑ ↓: Select Item Enter: Select +/-: Change Opt. Advanced BIOS SETUP Aptio Setup Utility - Onboard Device Configuration Aptio Setup Utility - C opyright (C) 2011 American Megatrends, Inc. F1: General Help F2: Previous Values F3: Optimized Defaults F4: Save & Exit ESC: Exit Version 2.14...
User manual
Page 31
..., Inc. Chipset Configuration Aptio Setup Utility - BIOS SETUP ► LAN Controller This item is used to enable or disable the onboard LAN controller. ► Azalia HD Audio This item is used to enable or disable the Azalia HD Audio Controller. ► Serial Port This item is used to enable or disable serial port (COM1). ► Change Serial Port Setting This item is used to enable or disable the Intel(R) Rapid Start Technology. 24 F1: General Help F2: Previous Values F3: Optimized Defaults F4: Save & Reset ESC: Exit Version 2.14...
..., Inc. Chipset Configuration Aptio Setup Utility - BIOS SETUP ► LAN Controller This item is used to enable or disable the onboard LAN controller. ► Azalia HD Audio This item is used to enable or disable the Azalia HD Audio Controller. ► Serial Port This item is used to enable or disable serial port (COM1). ► Change Serial Port Setting This item is used to enable or disable the Intel(R) Rapid Start Technology. 24 F1: General Help F2: Previous Values F3: Optimized Defaults F4: Save & Reset ESC: Exit Version 2.14...
User manual
Page 33
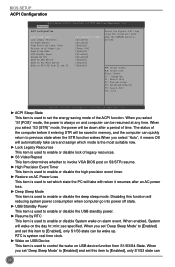
... RAM)] [Disabled] [Disabled] [Enabled] [Power Off] [Enabled] [Disabled] [Disabled] [Enabled] [Enabled] [Enabled] Select the hignest ACPI sleep state the system will be resumed at any time. When you set 'Deep Sleep Mode' to [Enabled] and set this item to [Enabled], only S1/S3 state can quickly return to previous state when the STR function wakes.When you select "Auto", it resumes after a period of the ACPI function. BIOS SETUP ACPI Configuration Aptio Setup Utility - When you set 'Deep Sleep Mode' to [Enabled...
... RAM)] [Disabled] [Disabled] [Enabled] [Power Off] [Enabled] [Disabled] [Disabled] [Enabled] [Enabled] [Enabled] Select the hignest ACPI sleep state the system will be resumed at any time. When you set 'Deep Sleep Mode' to [Enabled] and set this item to [Enabled], only S1/S3 state can quickly return to previous state when the STR function wakes.When you select "Auto", it resumes after a period of the ACPI function. BIOS SETUP ACPI Configuration Aptio Setup Utility - When you set 'Deep Sleep Mode' to [Enabled...

User manual
Page 34
.... [RAID] - Enabled onboard SATA RAID option ROM if Launch Storage OpROM is used to enable or disable PS2 key board wake up Device SATA Port 3 Not Present Hot Plug External SATA [Enabled] [AHCI] [Enabled] [Disabled] [Disabled] [Disabled] [Disabled] [Disabled] [Disabled] [Disabled] [Disabled] [Disabled] [Disabled] [Disabled] (1) IDE Mode. (2) AHCI Mode. (3) RAID Mode. Copyright (C) 2011 American Megatrends, Inc. ► SATA Controller(s) This item is used to set the operating mode of your SATA drives must also support AHCI. ► Aggressive LPM Support (Appears when "SATA Mode" is...
.... [RAID] - Enabled onboard SATA RAID option ROM if Launch Storage OpROM is used to enable or disable PS2 key board wake up Device SATA Port 3 Not Present Hot Plug External SATA [Enabled] [AHCI] [Enabled] [Disabled] [Disabled] [Disabled] [Disabled] [Disabled] [Disabled] [Disabled] [Disabled] [Disabled] [Disabled] [Disabled] (1) IDE Mode. (2) AHCI Mode. (3) RAID Mode. Copyright (C) 2011 American Megatrends, Inc. ► SATA Controller(s) This item is used to set the operating mode of your SATA drives must also support AHCI. ► Aggressive LPM Support (Appears when "SATA Mode" is...

User manual
Page 35
... support. BIOS SETUP ► Hot Plug (Appears when "SATA Mode" is loaded by platform BIOS prior to OS initialization. This value is set to [AHCI]) This item is used to enable or disable legacy USB 3.0(XHCI) controller support. ► XHCI Hand-off This is [20 sec]. ► Device reset time-out 28 F1: General Help F2: Previous Values F3: Optimized Defaults F4: Save & Exit ESC: Exit Version 2.14.1219. AUTO option disables legacy support if no USB devices...
... support. BIOS SETUP ► Hot Plug (Appears when "SATA Mode" is loaded by platform BIOS prior to OS initialization. This value is set to [AHCI]) This item is used to enable or disable legacy USB 3.0(XHCI) controller support. ► XHCI Hand-off This is [20 sec]. ► Device reset time-out 28 F1: General Help F2: Previous Values F3: Optimized Defaults F4: Save & Exit ESC: Exit Version 2.14.1219. AUTO option disables legacy support if no USB devices...

User manual
Page 37
... item is used to set the CPU Bclock(FSB) override setting. ► CPU Configuration/Memory Configuration/Voltage Configuration/Hardware Monitor Press to go to view all the related CPU information. ► Active Processor Cores 30 OC Plus CPU Configuration Specific CPU Information ▶ CPU Information Active Processor Cores VID Override for Max Turbo Ratio IA Core Current Max(1/8 Amp) iGFX Core Current Max(1/8 Amp) Graphics Voltage(1/256) Graphics Core Ratio Limit Enhanced Intel SpeedStep Technolog Turbo Mode Power Limit 1 Value (1/8 Watt) Power Limit 2 Value...
... item is used to set the CPU Bclock(FSB) override setting. ► CPU Configuration/Memory Configuration/Voltage Configuration/Hardware Monitor Press to go to view all the related CPU information. ► Active Processor Cores 30 OC Plus CPU Configuration Specific CPU Information ▶ CPU Information Active Processor Cores VID Override for Max Turbo Ratio IA Core Current Max(1/8 Amp) iGFX Core Current Max(1/8 Amp) Graphics Voltage(1/256) Graphics Core Ratio Limit Enhanced Intel SpeedStep Technolog Turbo Mode Power Limit 1 Value (1/8 Watt) Power Limit 2 Value...

User manual
Page 38
..., including CPU, chipset, motherboard, BIOS and operation system. Replacing older computers with anti-virus, firewall, spyware removal, e-mail filtering software, and other network security measures, IT managers can help prevent certain classes of cores to enable in each processor package. ► VID Override for Max Turbo Ratio This item is used to set VID override for factory long duration power limit. Intel's Execute Disable Bit functionality can free IT...
..., including CPU, chipset, motherboard, BIOS and operation system. Replacing older computers with anti-virus, firewall, spyware removal, e-mail filtering software, and other network security measures, IT managers can help prevent certain classes of cores to enable in each processor package. ► VID Override for Max Turbo Ratio This item is used to set VID override for factory long duration power limit. Intel's Execute Disable Bit functionality can free IT...

User manual
Page 41
... Slope Setting System Temperature System FAN Speed ▶ Hardware Voltage Monitor [Disabled] [Automatic Mode] 20 25 26 [0.5 PWM] : +41 C : 2536 RPM [Automatic Mode] 20 25 26 [0.5 PWM] : +38 C : N/A Enable a warning message once the case intrusion alert has been triggered → ←: Select Screen ↑ ↓: Select Item Enter: Select +/-: Change Opt. "Automatic Mode" is used to set the CPU VCore power Voltage offset. The CPU fan/System fan speed are auto- BIOS SETUP Adjusting the voltage beyond the memories default voltage...
... Slope Setting System Temperature System FAN Speed ▶ Hardware Voltage Monitor [Disabled] [Automatic Mode] 20 25 26 [0.5 PWM] : +41 C : 2536 RPM [Automatic Mode] 20 25 26 [0.5 PWM] : +38 C : N/A Enable a warning message once the case intrusion alert has been triggered → ←: Select Screen ↑ ↓: Select Item Enter: Select +/-: Change Opt. "Automatic Mode" is used to set the CPU VCore power Voltage offset. The CPU fan/System fan speed are auto- BIOS SETUP Adjusting the voltage beyond the memories default voltage...

User manual
Page 48
After that, you can click "One Click Setup" and then choose the items you can click on each individual driver to Install 41 Manual Installation Step by Step Automatic Installation by One Click Drop to System Tray Exit the program Visit Foxconn's Show Utilities Show Drivers Browse CD View User's Manual website Choose the items you want to install, or you want to install it first. You must click "Intel Chipset Driver" to install all the drivers for your system. Install Driver Use these options to install it manually. 4-1 Install driver and utility CD INSTRUCTION 1.
After that, you can click "One Click Setup" and then choose the items you can click on each individual driver to Install 41 Manual Installation Step by Step Automatic Installation by One Click Drop to System Tray Exit the program Visit Foxconn's Show Utilities Show Drivers Browse CD View User's Manual website Choose the items you want to install, or you want to install it first. You must click "Intel Chipset Driver" to install all the drivers for your system. Install Driver Use these options to install it manually. 4-1 Install driver and utility CD INSTRUCTION 1.

User manual
Page 70
... replace a failed drive that is a combination of RAID. RAID 0 does not support fault tolerance. RAID CONFIGURATION RAID 0 (Stripe) RAID 0 reads and writes sectors of data in parallel. Such a drive will continue to update the volume. Under a RAID 1 setup, an extra drive called the "spare drive" can be attached. Capacity Performance Reliability Application RAID0 >=2 All Highest Dangerous Look for Recovery, but you must select a sync mode to function. RAID...
... replace a failed drive that is a combination of RAID. RAID 0 does not support fault tolerance. RAID CONFIGURATION RAID 0 (Stripe) RAID 0 reads and writes sectors of data in parallel. Such a drive will continue to update the volume. Under a RAID 1 setup, an extra drive called the "spare drive" can be attached. Capacity Performance Reliability Application RAID0 >=2 All Highest Dangerous Look for Recovery, but you must select a sync mode to function. RAID...

User manual
Page 73
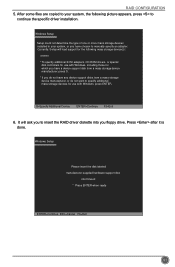
... this floppy diskette to enter the main menu of RAID driver into the drive bays, connect all power and SATA cables. 5-5 BIOS Configuration 1. A lAl lRl RigihgthstsRReseesrevrevde.d. [ MAIN MENU ] 11.. Format finished. Check if the diskette contains the driver files. Shut down your RAID system, it will ask you to press + keys simultaneously to provide driver for additional specific devices, for example, a RAID device. 10. Recover Volume Options 2. Install Serial ATA Hard Disks : 10-1. Reset Disks to enter Configuration Utility. RAID CONFIGURATION 8. Enter the BIOS setup by...
... this floppy diskette to enter the main menu of RAID driver into the drive bays, connect all power and SATA cables. 5-5 BIOS Configuration 1. A lAl lRl RigihgthstsRReseesrevrevde.d. [ MAIN MENU ] 11.. Format finished. Check if the diskette contains the driver files. Shut down your RAID system, it will ask you to press + keys simultaneously to provide driver for additional specific devices, for example, a RAID device. 10. Recover Volume Options 2. Install Serial ATA Hard Disks : 10-1. Reset Disks to enter Configuration Utility. RAID CONFIGURATION 8. Enter the BIOS setup by...

User manual
Page 96
....5GB Status Bootable NeedUpdate Yes Physical Disks: Port Drive Model Serial # 0 Hitachi HDS72161 PVF904Z21G2JZM 1 ST380811AS 5PS1TAGW 2 SAMSUNG HD161HJ S0V3J9APA30524 3 ST380815AS 5RW1CA37 Size 149.0GB 74.5GB 149.0GB 74.5GB Type/Status(Vol ID) Recovery Disk(0) Offline Disk(0) Member Disk(0) Non-RAID Disk Select ESC]-Exit ENTER]-Select Menu 6. Exit RAID BIOS 1. Shut down the computer, remove the Non-RAID disk, and we will enter BIOS setup. 3. Intel(IRn)teMl(aRt)riRx aSptoidraSgteorMagaenaTgeecrhnoopltoiognyR...
....5GB Status Bootable NeedUpdate Yes Physical Disks: Port Drive Model Serial # 0 Hitachi HDS72161 PVF904Z21G2JZM 1 ST380811AS 5PS1TAGW 2 SAMSUNG HD161HJ S0V3J9APA30524 3 ST380815AS 5RW1CA37 Size 149.0GB 74.5GB 149.0GB 74.5GB Type/Status(Vol ID) Recovery Disk(0) Offline Disk(0) Member Disk(0) Non-RAID Disk Select ESC]-Exit ENTER]-Select Menu 6. Exit RAID BIOS 1. Shut down the computer, remove the Non-RAID disk, and we will enter BIOS setup. 3. Intel(IRn)teMl(aRt)riRx aSptoidraSgteorMagaenaTgeecrhnoopltoiognyR...
User manual
Page 98
... specific driver installation. Windows Setup Please insert the disk labeled manufacturer-supplied hardware support disk into you to manually specify an adapter. Currently, Setup will ask you floppy drive. After some files are copied to your system, or you have any device support disks from a mass storage device manufacturer, press S. * If you have a device support disk from a mass storage device manufacturer, or do not have chosen to insert the RAID driver diskette into Drive A: * Press ENTER when ready ENTER...
... specific driver installation. Windows Setup Please insert the disk labeled manufacturer-supplied hardware support disk into you to manually specify an adapter. Currently, Setup will ask you floppy drive. After some files are copied to your system, or you have any device support disks from a mass storage device manufacturer, press S. * If you have a device support disk from a mass storage device manufacturer, or do not have chosen to insert the RAID driver diskette into Drive A: * Press ENTER when ready ENTER...


