

Use and Care Manual
Page 1
... Safety Instructions Operation of Current Device Air Conditioner Features Care and Cleaning Energy Saving Ideas Avoid Service Checklist NOTE: This USE & CARE MANUAL provides specific operating instructions for your model. Use the room air conditioner only as instructed in this USE & CARE MANUAL instructions are not meant to cover every possible condition and situation that may occur. READ AND SAVE THESE INSTRUCTIONS THRU-THE-WALL ELECTRONIC CONTROL AIR CONDITIONER P/N 66121618 Common sense and caution must be practiced when installing, operating, and...
... Safety Instructions Operation of Current Device Air Conditioner Features Care and Cleaning Energy Saving Ideas Avoid Service Checklist NOTE: This USE & CARE MANUAL provides specific operating instructions for your model. Use the room air conditioner only as instructed in this USE & CARE MANUAL instructions are not meant to cover every possible condition and situation that may occur. READ AND SAVE THESE INSTRUCTIONS THRU-THE-WALL ELECTRONIC CONTROL AIR CONDITIONER P/N 66121618 Common sense and caution must be practiced when installing, operating, and...
Use and Care Manual
Page 2
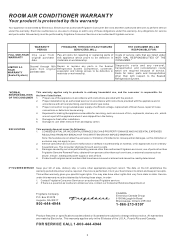
... power supply of sufficient voltage, replacement of blown fuses, repair of the U.S.A., Puerto Rico and Canada. Damages to change or add to any removal, transportation and reinstallation costs which are made by Electrolux. Damages caused by services performed by persons other rights that are listed under this warranty must be defective in accordance with original serial numbers that have other than Frigidaire...
... power supply of sufficient voltage, replacement of blown fuses, repair of the U.S.A., Puerto Rico and Canada. Damages to change or add to any removal, transportation and reinstallation costs which are made by Electrolux. Damages caused by services performed by persons other rights that are listed under this warranty must be defective in accordance with original serial numbers that have other than Frigidaire...

Use and Care Manual
Page 3
... poor wall or window construction or incorrect installation. Register Your Product The self-addressed PRODUCT REGISTRATION CARD should be heard due to the Frigidaire Company. High Pitched Chatter Today's high efficient compressors may cause "pinging or swishing" sounds. 3 Serial No. Normal Sounds Sound of Rushing Air At the front of the unit, you may vibrate and make noise because of water hitting condenser...
... poor wall or window construction or incorrect installation. Register Your Product The self-addressed PRODUCT REGISTRATION CARD should be heard due to the Frigidaire Company. High Pitched Chatter Today's high efficient compressors may cause "pinging or swishing" sounds. 3 Serial No. Normal Sounds Sound of Rushing Air At the front of the unit, you may vibrate and make noise because of water hitting condenser...
Use and Care Manual
Page 4
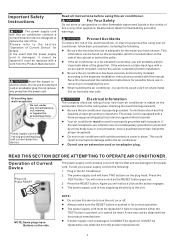
.... ? Power supply cord with a screen panel included, remove the screen completely before using your power supply cord do the following : ? READ THIS SECTION BEFORE ATTEMPTING TO OPERATE AIR CONDITIONER. The power supply cord is a triple-track type with 3-prong grounding plug and current detection device WARNING Electrical Information The complete electrical rating of the cabinet or behind the grille. ? Always make sure the RESET button is equipped with outside protective cover...
.... ? Power supply cord with a screen panel included, remove the screen completely before using your power supply cord do the following : ? READ THIS SECTION BEFORE ATTEMPTING TO OPERATE AIR CONDITIONER. The power supply cord is a triple-track type with 3-prong grounding plug and current detection device WARNING Electrical Information The complete electrical rating of the cabinet or behind the grille. ? Always make sure the RESET button is equipped with outside protective cover...

Use and Care Manual
Page 5
...TIME 4 Temp/Timer LIGHT TURNS UNIT ON OR OFF SETS FAN SPEED ADJUSTS TEMPERATURE OR TIME Temp/Timer LIGHT SETS FAN SPEED Fan Slower Fan Slower Fan Faster Fan Faster Temp/Timer SETS MODE ACTIVATES REMOTE THERMOSTAT (some models) Cool Energy Fan Saver Only Sleep Auto Timer Temp Start Stop Remote Sensing SETS MODE ACTIVATES TIMER HEAT MODE Temp/Timer Cool Energy Fan Saver Only Sleep Auto Timer Temp Heat ACTIVATES TIMER REMOTE CONTROL w/DISPLAY & REMOTE SENSING BUTTON REMOTE CONTROL FOR HEAT MODELS Batter Size: AAA WARRING: Do not Mix Old And New Batteries...
...TIME 4 Temp/Timer LIGHT TURNS UNIT ON OR OFF SETS FAN SPEED ADJUSTS TEMPERATURE OR TIME Temp/Timer LIGHT SETS FAN SPEED Fan Slower Fan Slower Fan Faster Fan Faster Temp/Timer SETS MODE ACTIVATES REMOTE THERMOSTAT (some models) Cool Energy Fan Saver Only Sleep Auto Timer Temp Start Stop Remote Sensing SETS MODE ACTIVATES TIMER HEAT MODE Temp/Timer Cool Energy Fan Saver Only Sleep Auto Timer Temp Heat ACTIVATES TIMER REMOTE CONTROL w/DISPLAY & REMOTE SENSING BUTTON REMOTE CONTROL FOR HEAT MODELS Batter Size: AAA WARRING: Do not Mix Old And New Batteries...
Use and Care Manual
Page 6
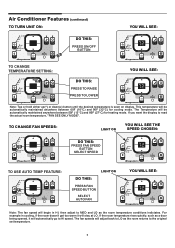
...temperature conditions indictates. If the room temperature rises quickly, such as a door being opened, it will automatically go to read the actual room temperature, "FAN SEE ONLY MODE". Air Conditioner Features (continued) TO TURN UNIT ON: YOU WILL SEE: Auto Temp Hi Med Lo Heat Fan Speed Cool Energy Saver Fan Only Mode Temp/Timer Temp/Timer Timer Sleep Check Filter Remote Sensing DO THIS: PRESS ON/OFF BUTTON Auto Temp Hi Med Lo Heat Fan Speed Cool Energy Saver Fan Only Mode Temp/Timer Temp/Timer Timer Sleep Check Filter Remote Sensing TO CHANGE TEMPERATURE SETTING...
...temperature conditions indictates. If the room temperature rises quickly, such as a door being opened, it will automatically go to read the actual room temperature, "FAN SEE ONLY MODE". Air Conditioner Features (continued) TO TURN UNIT ON: YOU WILL SEE: Auto Temp Hi Med Lo Heat Fan Speed Cool Energy Saver Fan Only Mode Temp/Timer Temp/Timer Timer Sleep Check Filter Remote Sensing DO THIS: PRESS ON/OFF BUTTON Auto Temp Hi Med Lo Heat Fan Speed Cool Energy Saver Fan Only Mode Temp/Timer Temp/Timer Timer Sleep Check Filter Remote Sensing TO CHANGE TEMPERATURE SETTING...
Use and Care Manual
Page 7
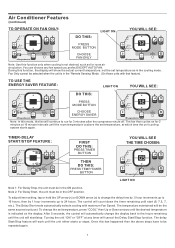
...EXCEPT AUTO FAN. The control will work until start /stop. The delay Start/Stop feature will count down the timer remaining until the unit either starts or stops. Air Conditioner Features (continued) TO OPERATE ON FAN ONLY: Auto Temp Hi Med Lo Heat Fan Speed Cool Energy Saver Fan Only Mode Temp/Timer Temp/Timer Timer Sleep Check Filter Remote Sensing DO THIS: LIGHT ON PRESS MODE BUTTON CHOOSE FAN ONLY YOU WILL SEE: Auto Temp Hi Med Lo Heat Fan Speed Cool Energy Saver Fan Only Mode Temp/Timer Temp/Timer Timer Sleep Check Filter Remote Sensing Note: Use this...
...EXCEPT AUTO FAN. The control will work until start /stop. The delay Start/Stop feature will count down the timer remaining until the unit either starts or stops. Air Conditioner Features (continued) TO OPERATE ON FAN ONLY: Auto Temp Hi Med Lo Heat Fan Speed Cool Energy Saver Fan Only Mode Temp/Timer Temp/Timer Timer Sleep Check Filter Remote Sensing DO THIS: LIGHT ON PRESS MODE BUTTON CHOOSE FAN ONLY YOU WILL SEE: Auto Temp Hi Med Lo Heat Fan Speed Cool Energy Saver Fan Only Mode Temp/Timer Temp/Timer Timer Sleep Check Filter Remote Sensing Note: Use this...
Use and Care Manual
Page 8
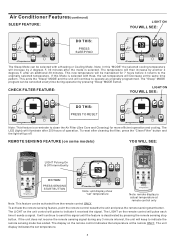
... go off. To reset after cleaning the filter, press the "Clean Filter" button and the light will then increase by 2 degrees F, 30 minutes after 250 hours of operation. Air Conditioner Features(continued) SLEEP FEATURE: LIGHT ON YOU WILL SEE: Auto Temp Hi Med Lo Heat Fan Speed Cool Energy Saver Fan Only Mode Temp/Timer Temp/Timer Timer Sleep Check Filter Remote Sensing DO THIS: PRESS SLEEP PAD Auto Temp Hi Med Lo Heat Fan Speed Cool Energy Saver Fan Only Mode Temp/Timer Temp/Timer Timer Sleep Check Filter Remote Sensing The Sleep Mode can be maintained for...
... go off. To reset after cleaning the filter, press the "Clean Filter" button and the light will then increase by 2 degrees F, 30 minutes after 250 hours of operation. Air Conditioner Features(continued) SLEEP FEATURE: LIGHT ON YOU WILL SEE: Auto Temp Hi Med Lo Heat Fan Speed Cool Energy Saver Fan Only Mode Temp/Timer Temp/Timer Timer Sleep Check Filter Remote Sensing DO THIS: PRESS SLEEP PAD Auto Temp Hi Med Lo Heat Fan Speed Cool Energy Saver Fan Only Mode Temp/Timer Temp/Timer Timer Sleep Check Filter Remote Sensing The Sleep Mode can be maintained for...

Use and Care Manual
Page 9
... display reads "AS", a sensor has failed. The "Cool "circuit has an automatic3 minute time delayed start if the unit is satisfied, the fan will maintain any combination of displaying temperature in degrees Fahrenheit or degrees Celsius. The control is needed. To convert from one to run continuously while heat is capable of FAN Speeds, Timer, or Sleep Modes. Air Conditioner Features (continued) HEATING FEATURE (on some models): YOU WILL SEE: Auto Temp...
... display reads "AS", a sensor has failed. The "Cool "circuit has an automatic3 minute time delayed start if the unit is satisfied, the fan will maintain any combination of displaying temperature in degrees Fahrenheit or degrees Celsius. The control is needed. To convert from one to run continuously while heat is capable of FAN Speeds, Timer, or Sleep Modes. Air Conditioner Features (continued) HEATING FEATURE (on some models): YOU WILL SEE: Auto Temp...

Use and Care Manual
Page 10
... or electrical connections from the filter. A window that faces north is best because it looking new. Proper insulation and weather stripping in or around the controls. Grasp the filter by the center and pull up and cause an accumulation of the room air conditioner must fit the room size for the winter, cover it with trees, plants or awnings will help reduce the air conditioner's work . ? Energy...
... or electrical connections from the filter. A window that faces north is best because it looking new. Proper insulation and weather stripping in or around the controls. Grasp the filter by the center and pull up and cause an accumulation of the room air conditioner must fit the room size for the winter, cover it with trees, plants or awnings will help reduce the air conditioner's work . ? Energy...
Use and Care Manual
Page 11
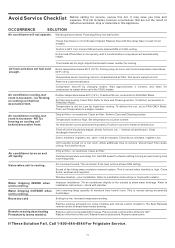
... type or reset circuit breaker. Remote control obstructed. Avoid Service Checklist Before calling for service, review this appliance. Air from coil. Room temperature below 60°F (16°C). Temperature sensor touching cold coil, located behind air filter. Refer to installation instructions or check with installer. Temperature is cooling. Water dripping OUTSIDE when unit is set in Hot Spot-Relocate remote control or deactivate remote sensing. To defrost the coil, set selector to FAN ONLY Mode. To defrost, set selector to FAN ONLY Mode. Window vibration...
... type or reset circuit breaker. Remote control obstructed. Avoid Service Checklist Before calling for service, review this appliance. Air from coil. Room temperature below 60°F (16°C). Temperature sensor touching cold coil, located behind air filter. Refer to installation instructions or check with installer. Temperature is cooling. Water dripping OUTSIDE when unit is set in Hot Spot-Relocate remote control or deactivate remote sensing. To defrost the coil, set selector to FAN ONLY Mode. To defrost, set selector to FAN ONLY Mode. Window vibration...

Installation Instructions
Page 1
.... Next attach ground wire inside sleeve, using grounding screw and nut. To attach ground wire to 5/16" UNIT REAR FRONT LEVEL Items in Kit You may not need all parts in wall before installing Air Conditioner. Install Air Conditioner according to achieve the best performance. Assemble and install the Trim Frame (see instruction). Save these installation instructions to these installation instructions for the Air Conditioner. 4. Brand Wall Sleeve Dimensions (inches) Width Height Depth } White-Westinghouse Frigidaire 251⁄2 151...
.... Next attach ground wire inside sleeve, using grounding screw and nut. To attach ground wire to 5/16" UNIT REAR FRONT LEVEL Items in Kit You may not need all parts in wall before installing Air Conditioner. Install Air Conditioner according to achieve the best performance. Assemble and install the Trim Frame (see instruction). Save these installation instructions to these installation instructions for the Air Conditioner. 4. Brand Wall Sleeve Dimensions (inches) Width Height Depth } White-Westinghouse Frigidaire 251⁄2 151...

Installation Instructions
Page 2
... the louvered panel as shown in the center of pliers is recommended. 7 7 8. These (2) blocks should be locaed approximately in the illustration. Install the new unit into the wall sleeve. 6 6. Install the 1"x 11⁄2"x 84"long stuffer seal between the wall sleeve and the unit. Install the seals as shown. 7. Assemble and install the Trim Frame. (see Trim Frame) 2 The use of the side walls. Cut the...
... the louvered panel as shown in the center of pliers is recommended. 7 7 8. These (2) blocks should be locaed approximately in the illustration. Install the new unit into the wall sleeve. 6 6. Install the 1"x 11⁄2"x 84"long stuffer seal between the wall sleeve and the unit. Install the seals as shown. 7. Assemble and install the Trim Frame. (see Trim Frame) 2 The use of the side walls. Cut the...
Installation Instructions
Page 3
... the louvered panel as illustrate with tapered end facing the opening of the sleev1e7". Attach the ground wire to be located approximately in front of the rib on the blocks. Assemble and install the Trim Frame. (see Trim Frame) 3 The use of the wall sleeve as shown. 7 8. Install the 1"x 11⁄2"x 84"long stuffer seal between the wall sleeve and the unit. Redirect the...
... the louvered panel as illustrate with tapered end facing the opening of the sleev1e7". Attach the ground wire to be located approximately in front of the rib on the blocks. Assemble and install the Trim Frame. (see Trim Frame) 3 The use of the wall sleeve as shown. 7 8. Install the 1"x 11⁄2"x 84"long stuffer seal between the wall sleeve and the unit. Redirect the...
Installation Instructions
Page 4
... 5. Install the new unit into the wall sleeve. Install the 1"x 11⁄2"x 84"long stuffer seal between the wall sleeve and the unit. Cut (2) 17"Tapered Spacer Blocks and install as ...panel as shown in place. 3. To attach the blocks remove the backing paper from the blocks. Attach the ground wire to 14"and attach inside of the walls of the wall sleeve...opening of the sleeve. The use of the side walls. The 4"portion to be located approximately in front of the rib on base and tapered end facing the back of the Sleeve. Assemble and install the Trim Frame. (see Trim Frame...
... 5. Install the new unit into the wall sleeve. Install the 1"x 11⁄2"x 84"long stuffer seal between the wall sleeve and the unit. Cut (2) 17"Tapered Spacer Blocks and install as ...panel as shown in place. 3. To attach the blocks remove the backing paper from the blocks. Attach the ground wire to 14"and attach inside of the walls of the wall sleeve...opening of the sleeve. The use of the side walls. The 4"portion to be located approximately in front of the rib on base and tapered end facing the back of the Sleeve. Assemble and install the Trim Frame. (see Trim Frame...

Installation Instructions
Page 5
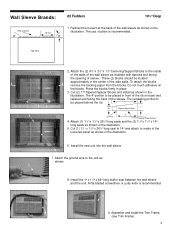
... 1"x 3/4"x 14"long seal to the unit as shown. Install the new unit into the wall sleeve. Attach the ground wire to the louvered panel as shown in the illustration. 5. A flat bladed screwdriver or putty knife is recommended. 60° Top View 3 ← 101⁄2"‹ → 2. Assemble and install the Trim Frame. (see Trim Frame) 5 Redirect the louvers at the back...
... 1"x 3/4"x 14"long seal to the unit as shown. Install the new unit into the wall sleeve. Attach the ground wire to the louvered panel as shown in the illustration. 5. A flat bladed screwdriver or putty knife is recommended. 60° Top View 3 ← 101⁄2"‹ → 2. Assemble and install the Trim Frame. (see Trim Frame) 5 Redirect the louvers at the back...

Installation Instructions
Page 6
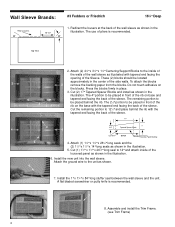
... as shown in the 10" illustration. Install the 1"x 11⁄2"x 84"long stuffer seal between the wall sleeve and the unit. Assemble and install the Trim Frame. (see Trim Frame) 6 Redirect the louvers at the back of the wall sleeve as shown in the illustration. Install the new unit into the wall sleeve. 4 5. The use of the louvered panel as shown in the illustration. Attach the...
... as shown in the 10" illustration. Install the 1"x 11⁄2"x 84"long stuffer seal between the wall sleeve and the unit. Assemble and install the Trim Frame. (see Trim Frame) 6 Redirect the louvers at the back of the wall sleeve as shown in the illustration. Install the new unit into the wall sleeve. 4 5. The use of the louvered panel as shown in the illustration. Attach the...

Installation Instructions
Page 8
... new 7 unit into the wall 6 sleeve. Redirect the louvers at the back of pliers is recommended. 6. The use of the wall sleeve as shown. Cut to fit (1) 11⁄2"x 11⁄2"x 261⁄2"long seals as shown in the slots of the sleeve. 17" 3/4" Tapered Spacer Block 3. Assemble and install the Trim Frame. (see Trim Frame) 8 Slide the plastic divider in...
... new 7 unit into the wall 6 sleeve. Redirect the louvers at the back of pliers is recommended. 6. The use of the wall sleeve as shown. Cut to fit (1) 11⁄2"x 11⁄2"x 261⁄2"long seals as shown in the slots of the sleeve. 17" 3/4" Tapered Spacer Block 3. Assemble and install the Trim Frame. (see Trim Frame) 8 Slide the plastic divider in...

Installation Instructions
Page 9
... the seals remove the backing paper from the kit. The plastic grille panel is mounted to the inside of the sleeve and are (4) plastic nuts in the flanges of the grille panel as shown. Install the 1"x 11⁄2"x 84"long stuffer seal between the wall sleeve and the unit. If your sleeve is recommended. 5 5 6. Assemble and install the Trim Frame. (see Trim Frame) 9 If the wall sleeve does not...
... the seals remove the backing paper from the kit. The plastic grille panel is mounted to the inside of the sleeve and are (4) plastic nuts in the flanges of the grille panel as shown. Install the 1"x 11⁄2"x 84"long stuffer seal between the wall sleeve and the unit. If your sleeve is recommended. 5 5 6. Assemble and install the Trim Frame. (see Trim Frame) 9 If the wall sleeve does not...

Installation Instructions
Page 10
... ground wire to fit (1) 11⁄2"x 11⁄2"x 261⁄2"long seals as shown. 8. If the wall sleeve does not have a rear grille or louvered panel, install the plastic grille panel from the inside of the (2) foam blocks. 5 6 7 10 5 5. The plastic grille panel is recommended. 8 8 9. Install the new unit into the square holes of the wall sleeve at the rear flanges. Assemble and install the Trim Frame. (see Trim Frame...
... ground wire to fit (1) 11⁄2"x 11⁄2"x 261⁄2"long seals as shown. 8. If the wall sleeve does not have a rear grille or louvered panel, install the plastic grille panel from the inside of the (2) foam blocks. 5 6 7 10 5 5. The plastic grille panel is recommended. 8 8 9. Install the new unit into the square holes of the wall sleeve at the rear flanges. Assemble and install the Trim Frame. (see Trim Frame...


