Installation Instructions (All Languages)
Page 1
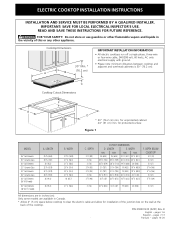
....7) 5 3/4 (14.6) 5 3/4 (14.6) 5 (12.7) 5 7/8 (14.9) 3 (7.6) 32 3/4 (83.2) 34 1/4 (87) 19 (48.3) 20 (50.8) 5 (12.7) All dimensions are available in the vicinity of the cooktop. C Cooktop Cutout Dimensions F E D * 30" (76.2 cm) min. ELECTRIC COOKTOP INSTALLATION INSTRUCTIONS INSTALLATION AND SERVICE MUST BE PERFORMED BY A QUALIFIED INSTALLER. IMPORTANT: SAVE FOR LOCAL ELECTRICAL INSPECTOR'S USE. pages 7-13 Français - pages 1-6 1 Español - MAX. 20 1/2 (52.1) 20 1/2 (52.1) 20...
....7) 5 3/4 (14.6) 5 3/4 (14.6) 5 (12.7) 5 7/8 (14.9) 3 (7.6) 32 3/4 (83.2) 34 1/4 (87) 19 (48.3) 20 (50.8) 5 (12.7) All dimensions are available in the vicinity of the cooktop. C Cooktop Cutout Dimensions F E D * 30" (76.2 cm) min. ELECTRIC COOKTOP INSTALLATION INSTRUCTIONS INSTALLATION AND SERVICE MUST BE PERFORMED BY A QUALIFIED INSTALLER. IMPORTANT: SAVE FOR LOCAL ELECTRICAL INSPECTOR'S USE. pages 7-13 Français - pages 1-6 1 Español - MAX. 20 1/2 (52.1) 20 1/2 (52.1) 20...

Installation Instructions (All Languages)
Page 2
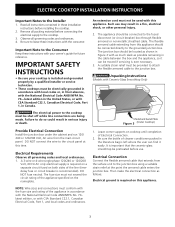
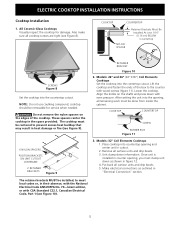
... Box * Letters on front page except for G, H and J. ELECTRIC COOKTOP INSTALLATION INSTRUCTIONS Overhead Cabinet Should Not Exceed a Maximum Depth of Cutout and Nearest Combustible Surface Above Countertop 18" (45.7 cm) D 10" ( 25.4 cm) F E 25" Min. (63.5 cm Min.) H Min. Approximate Location of burns or fire by Not Less Than 1/8" Flame Retardant Millboard Covered With Not Less Than No. 28 MGS Sheet Steel, 0.015" (0.4 mm) Stainless Steel...
... Box * Letters on front page except for G, H and J. ELECTRIC COOKTOP INSTALLATION INSTRUCTIONS Overhead Cabinet Should Not Exceed a Maximum Depth of Cutout and Nearest Combustible Surface Above Countertop 18" (45.7 cm) D 10" ( 25.4 cm) F E 25" Min. (63.5 cm Min.) H Min. Approximate Location of burns or fire by Not Less Than 1/8" Flame Retardant Millboard Covered With Not Less Than No. 28 MGS Sheet Steel, 0.015" (0.4 mm) Stainless Steel...
Installation Instructions (All Languages)
Page 3
... to the Installer 1. DO NOT connect the wire to the circuit panel at the point the armored cable enters the junction box. The fuse size must be connected directly to the cooktop. 3. Leave corner supports on cooktop until completion of the appliance specified on the nameplate. 1. Such use . A suitable strain relief must not exceed the circuit rating of Electrical Connection. 2. Electrical Requirements Observe all packing material before connecting the electrical supply to...
... to the Installer 1. DO NOT connect the wire to the circuit panel at the point the armored cable enters the junction box. The fuse size must be connected directly to the cooktop. 3. Leave corner supports on cooktop until completion of the appliance specified on the nameplate. 1. Such use . A suitable strain relief must not exceed the circuit rating of Electrical Connection. 2. Electrical Requirements Observe all packing material before connecting the electrical supply to...
Installation Instructions (All Languages)
Page 4
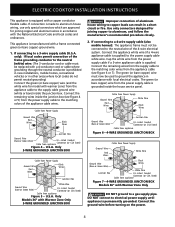
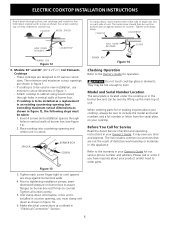
... with warmer zone) from appliance Figure 7 - 4-WIRE GROUNDED JUNCTION BOX Models 36" with local electrical codes. only): If local codes permit connection of the appliance cable wires. The green (or bare copper) wire must be used to the supply cable ground wire (white or bare) inside the house service panel. Use only connectors designed for joining copper and aluminum wires in accordance with Warmer Zone Only WARNING...
... with warmer zone) from appliance Figure 7 - 4-WIRE GROUNDED JUNCTION BOX Models 36" with local electrical codes. only): If local codes permit connection of the appliance cable wires. The green (or bare copper) wire must be used to the supply cable ground wire (white or bare) inside the house service panel. Use only connectors designed for joining copper and aluminum wires in accordance with Warmer Zone Only WARNING...
Installation Instructions (All Languages)
Page 5
... and drip bowls. 3. Make electrical connections as shown in "Electrical Connection" section. Place cooktop into the contertop cutout. Models: 26" and 36" (36"X18") Coil Elements Cooktops Set the cooktop into countertop opening , all cooktop screws are tight (see Figure 9). RETAINER BRACKET Figure 10 2. Lower the cooktop. After setting the unit into the countertop cutout. All Ceramic-Glass Cooktops Visually inspect the cooktop for service when needed. WARNING Do not remove the nylon spacers on...
... and drip bowls. 3. Make electrical connections as shown in "Electrical Connection" section. Place cooktop into the contertop cutout. Models: 26" and 36" (36"X18") Coil Elements Cooktops Set the cooktop into countertop opening , all cooktop screws are tight (see Figure 9). RETAINER BRACKET Figure 10 2. Lower the cooktop. After setting the unit into the countertop cutout. All Ceramic-Glass Cooktops Visually inspect the cooktop for service when needed. WARNING Do not remove the nylon spacers on...
Installation Instructions (All Languages)
Page 6
... Do not touch cooktop glass or elements. COOKTOP COUNTERTOP HOLD DOWN RETAINER COUNTERTOP BURNER BOX Figure 12 4. Unit clamp down , insert bracket with screws as shown. When ordering parts for or making inquires about your Owner's Guide for Service Read the Avoid Service Checklist and operating instructions in counter opening, you have inquiries about your cooktop, always be hot enough to include the model and serial numbers and a lot number or letter from...
... Do not touch cooktop glass or elements. COOKTOP COUNTERTOP HOLD DOWN RETAINER COUNTERTOP BURNER BOX Figure 12 4. Unit clamp down , insert bracket with screws as shown. When ordering parts for or making inquires about your Owner's Guide for Service Read the Avoid Service Checklist and operating instructions in counter opening, you have inquiries about your cooktop, always be hot enough to include the model and serial numbers and a lot number or letter from...
Complete Owner's Guide (English)
Page 1
... 2 Product Registration 2 Important Safety Instructions 3-4 Selecting Surface Cooking Utensils 5 Specialty Pans & Trivets 5 Canning Tips & Information 6 Setting Surface Controls 6 Indicator Lights (Coil Elements Models 6 Ceramic Glass Cooktop (Some Models 7-10 Types of Heating Units Used 7 Hot Surface Indicator Light 7 Warm Zone Feature 8 Special Caution for Aluminum Foil and Aluminum Cooking Utensils 9 Things to Remember 9 Use and Care of Glass Surface 9-10 General Cleaning 11-12 Avoid Service Checklist 13-14 Notes 15 Warranty 16 318200612 (0511) Rev.
... 2 Product Registration 2 Important Safety Instructions 3-4 Selecting Surface Cooking Utensils 5 Specialty Pans & Trivets 5 Canning Tips & Information 6 Setting Surface Controls 6 Indicator Lights (Coil Elements Models 6 Ceramic Glass Cooktop (Some Models 7-10 Types of Heating Units Used 7 Hot Surface Indicator Light 7 Warm Zone Feature 8 Special Caution for Aluminum Foil and Aluminum Cooking Utensils 9 Things to Remember 9 Use and Care of Glass Surface 9-10 General Cleaning 11-12 Avoid Service Checklist 13-14 Notes 15 Warranty 16 318200612 (0511) Rev.
Complete Owner's Guide (English)
Page 2
... la P/N 318204004. Box 212378 Augusta, GA 30917 This Owner's Guide contains general operating instructions for several models. Note: The instructions appearing in completely, signed and returned to properly operate and care for your cooktop and feature information for your cooktop. Common sense and caution must be filled in this appliance. Place it where it can be required. Record Your Model and Serial Numbers Record in...
... la P/N 318204004. Box 212378 Augusta, GA 30917 This Owner's Guide contains general operating instructions for several models. Note: The instructions appearing in completely, signed and returned to properly operate and care for your cooktop and feature information for your cooktop. Common sense and caution must be filled in this appliance. Place it where it can be required. Record Your Model and Serial Numbers Record in...
Complete Owner's Guide (English)
Page 3
... the hood, turn fan on or near surface units may be stored near surface units. Select utensils having flat bottoms large enough to the appliance at the circuit breaker or fuse box in the cabinets above the appliance. latest edition in the United States, or CSA C22.1, Part 1 in the literature package for future reference. Install only per installation instructions provided in Canada, and local code requirements...
... the hood, turn fan on or near surface units may be stored near surface units. Select utensils having flat bottoms large enough to the appliance at the circuit breaker or fuse box in the cabinets above the appliance. latest edition in the United States, or CSA C22.1, Part 1 in the literature package for future reference. Install only per installation instructions provided in Canada, and local code requirements...
Complete Owner's Guide (English)
Page 4
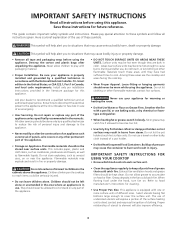
... ignite, or a pan that has pans or bowls during normal operation. • Never Leave Surface Units Unattended. Heating elements clean themselves during cooking may subject wiring or components boiled dry may result in temperature. Surface heating elements should break, cleaning solutions and spillovers may penetrate the broken cooktop and create a risk of protective liners or aluminum foil may melt. Check the manufacturer's recommendations for range top service...
... ignite, or a pan that has pans or bowls during normal operation. • Never Leave Surface Units Unattended. Heating elements clean themselves during cooking may subject wiring or components boiled dry may result in temperature. Surface heating elements should break, cleaning solutions and spillovers may penetrate the broken cooktop and create a risk of protective liners or aluminum foil may melt. Check the manufacturer's recommendations for range top service...
Complete Owner's Guide (English)
Page 5
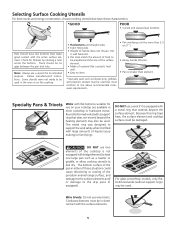
... • Curved and warped pan bottoms. Pans should be used . Wire trivets: Do not use a utensil for flatness by more than 2.5 cm (1"). • Heavy handle tilts pan. • Pan is equipped with the entire surface element. For glass smoothtop models, only flat bottomed woks (without support rings) may be used in the oven or on your cooktop are available in either of the pan in most cookshop or...
... • Curved and warped pan bottoms. Pans should be used . Wire trivets: Do not use a utensil for flatness by more than 2.5 cm (1"). • Heavy handle tilts pan. • Pan is equipped with the entire surface element. For glass smoothtop models, only flat bottomed woks (without support rings) may be used in the oven or on your cooktop are available in either of the pan in most cookshop or...
Complete Owner's Guide (English)
Page 6
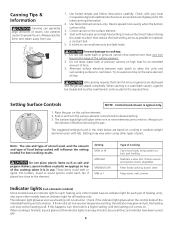
... of Cooking Start most foods, bring the water to a boil; Heat is spread more elements are based on the surface element. 4. Safe canning requires that extend more than one or more evenly when the bottom surface is best to reduce the time it is finished, a quick glance at the indicator lights in and turn the element off before removing the pan. Setting Surface Controls NOTE: Control knob shown is set to...
... of Cooking Start most foods, bring the water to a boil; Heat is spread more elements are based on the surface element. 4. Safe canning requires that extend more than one or more evenly when the bottom surface is best to reduce the time it is finished, a quick glance at the indicator lights in and turn the element off before removing the pan. Setting Surface Controls NOTE: Control knob shown is set to...
Complete Owner's Guide (English)
Page 7
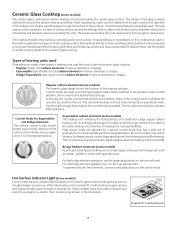
... Elements The surface control knobs shown below may be heating. Heat power levels are used Depending on the ceramic glass cooktop that glows as soon as difficult cleaning will affect the amount of a small and a large regular radiant heating unit. for larger pan such as shown in use the larger graduations on the same heating unit, therefore increasing the cooktop flexibility. Other models have an indicator light located on model, three types of heating units used...
... Elements The surface control knobs shown below may be heating. Heat power levels are used Depending on the ceramic glass cooktop that glows as soon as difficult cleaning will affect the amount of a small and a large regular radiant heating unit. for larger pan such as shown in use the larger graduations on the same heating unit, therefore increasing the cooktop flexibility. Other models have an indicator light located on model, three types of heating units used...
Complete Owner's Guide (English)
Page 8
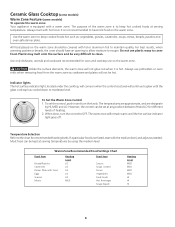
... lid or aluminum foil to OFF. If a particular food is set the control, push in and turn the control to maintain quality. However, the control can be covered with the medium level, and adjust as cookware and plates will continue to glow until the hot surface indicator light goes off. Use only dishware, utensils and cookware recommended for oven and cooktop use plastic warp to clean. All...
... lid or aluminum foil to OFF. If a particular food is set the control, push in and turn the control to maintain quality. However, the control can be covered with the medium level, and adjust as cookware and plates will continue to glow until the hot surface indicator light goes off. Use only dishware, utensils and cookware recommended for oven and cooktop use plastic warp to clean. All...
Complete Owner's Guide (English)
Page 9
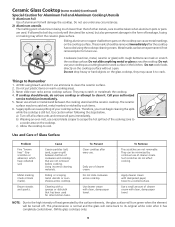
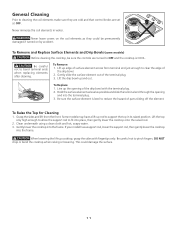
... to future use of cleaner cream. Sliding aluminum or copper clad bottom pans on the cooktop surface. Do not slide anything metal or glass across cooktop surface. b) Wearing an oven mitt, use your authorized service technician immediately. 5. Using incorrect cleaning materials. To Remove Tiny scratches are not removed before cooking. Use a small amount of cleaner cream with dampened paper towel to scrape the hot spill out of Glass Surface Problem Fine "brown lines" (tiny...
... to future use of cleaner cream. Sliding aluminum or copper clad bottom pans on the cooktop surface. Do not slide anything metal or glass across cooktop surface. b) Wearing an oven mitt, use your authorized service technician immediately. 5. Using incorrect cleaning materials. To Remove Tiny scratches are not removed before cooking. Use a small amount of cleaner cream with dampened paper towel to scrape the hot spill out of Glass Surface Problem Fine "brown lines" (tiny...
Complete Owner's Guide (English)
Page 10
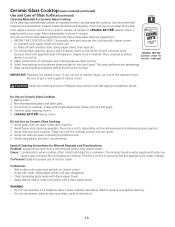
Ceramic Glass Cooktop (some models) (continued) Use and Care of cleaner cream. Cleaner cream should be hazardous. More are available in (a and b). 3. a) Dampen clean paper towel and clean unit. Start with single-edged razor blade, held at a 30° angle. 4. Select heat settings and cookware large enough for ceramic cooktops) 4. IMPORTANT Regularly use ammonia. Never mix cleaning products! Non-impregnated plastic and nylon pads. 3. Avoid using bleach...
Ceramic Glass Cooktop (some models) (continued) Use and Care of cleaner cream. Cleaner cream should be hazardous. More are available in (a and b). 3. a) Dampen clean paper towel and clean unit. Start with single-edged razor blade, held at a 30° angle. 4. Select heat settings and cookware large enough for ceramic cooktops) 4. IMPORTANT Regularly use ammonia. Never mix cleaning products! Non-impregnated plastic and nylon pads. 3. Avoid using bleach...
Complete Owner's Guide (English)
Page 11
... only. To Replace 1. Be careful not to bend terminal ends when replacing elements after cleaning. Never leave covers on by accident. Lift up cooktop, grasp the sides with the terminal plug. 2. Be careful not to pinch fingers. Gently slide the surface element out of pans sliding off the element. Be sure the surface element is COOL. Lift the top only high enough to allow the support rod to reduce...
... only. To Replace 1. Be careful not to bend terminal ends when replacing elements after cleaning. Never leave covers on by accident. Lift up cooktop, grasp the sides with the terminal plug. 2. Be careful not to pinch fingers. Gently slide the surface element out of pans sliding off the element. Be sure the surface element is COOL. Lift the top only high enough to allow the support rod to reduce...

Complete Owner's Guide (English)
Page 12
... Ceramic-Glass Cooktop in the dishwasher. Before cleaning the control panel, turn all cleaners or the porcelain may be used carefully on a cool element can be removed by soaking the drip bowls for 30 to squeeze excess water from the cloth before operating cooktop. To remove surface elements and drip bowls, follow the instructions under General Cleaning. For more difficult soils and built-up the flat sides of both the knob...
... Ceramic-Glass Cooktop in the dishwasher. Before cleaning the control panel, turn all cleaners or the porcelain may be used carefully on a cool element can be removed by soaking the drip bowls for 30 to squeeze excess water from the cloth before operating cooktop. To remove surface elements and drip bowls, follow the instructions under General Cleaning. For more difficult soils and built-up the flat sides of both the knob...
Complete Owner's Guide (English)
Page 13
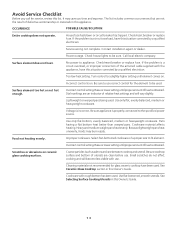
... pans heat unevenly, foods may save you call for glass ceramic cooktop have this Owner's Guide. 13 Scratches or abrasions on . Use flat-bottomed, smooth utensils. If the problem is on. Power outage. Call local electric company. Check/reset breaker or replace fuse. Incorrect control is a circuit overload, have this list. Voltage is obtained. Select flat-bottomed cookware of relative heat settings and will become less visible with rough bottom has been used...
... pans heat unevenly, foods may save you call for glass ceramic cooktop have this Owner's Guide. 13 Scratches or abrasions on . Use flat-bottomed, smooth utensils. If the problem is on. Power outage. Call local electric company. Check/reset breaker or replace fuse. Incorrect control is a circuit overload, have this list. Voltage is obtained. Select flat-bottomed cookware of relative heat settings and will become less visible with rough bottom has been used...

Complete Owner's Guide (English)
Page 16
.... Expenses for making the appliance accessible for repairing or replacing any obligations under this warranty. Service calls to repair or replace appliance light bulbs, air filters, water filters, other consumables, or knobs, handles, or other appropriate payment record to use of parts other than genuine Electrolux parts or parts obtained from persons other than authorized service companies; In Canada, your appliance is warranted by Electrolux Major Appliances...
.... Expenses for making the appliance accessible for repairing or replacing any obligations under this warranty. Service calls to repair or replace appliance light bulbs, air filters, water filters, other consumables, or knobs, handles, or other appropriate payment record to use of parts other than genuine Electrolux parts or parts obtained from persons other than authorized service companies; In Canada, your appliance is warranted by Electrolux Major Appliances...


