Installation Instructions (All Languages)
Page 1
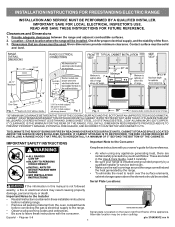
... COVERED WITH NOT LESS THAN NO. 28 MSG SHEET STEEL, 0.015" STAINLESS STEEL, 0.024" ALUMINUM OR 0.020" COPPER. 0" CLEARANCE IS THE MINIMUM FOR THE REAR OF THE RANGE. Español - These are shown must be installed. Dimensions that are listed in this manual is located on the lower right front frame of the floor. 3. Clearances and Dimensions 1. INSTALLATION INSTRUCTIONS FOR FREESTANDING ELECTRIC RANGE INSTALLATION AND SERVICE...
... COVERED WITH NOT LESS THAN NO. 28 MSG SHEET STEEL, 0.015" STAINLESS STEEL, 0.024" ALUMINUM OR 0.020" COPPER. 0" CLEARANCE IS THE MINIMUM FOR THE REAR OF THE RANGE. Español - These are shown must be installed. Dimensions that are listed in this manual is located on the lower right front frame of the floor. 3. Clearances and Dimensions 1. INSTALLATION INSTRUCTIONS FOR FREESTANDING ELECTRIC RANGE INSTALLATION AND SERVICE...

Installation Instructions (All Languages)
Page 2
INSTALLATION INSTRUCTIONS FOR FREESTANDING ELECTRIC RANGE BEFORE STARTING Tools You Will Need For leveling legs and Anti-Tip Bracket: • Adjustable wrench or channel lock pliers • 5/16" Nutdriver or Flat Head Screwdriver • Electric Drill & 1/8" Diameter Drill Bit (Masonry Drill Bit if installing in concrete) For electrical supply connection: • 1/4" & 3/8" Socket driver or Nutdriver Additional Materials You Will Need: • Power Supply Cord or • Copper Electrical Wiring & Metal Conduit (for cord kit ampere rating information...
INSTALLATION INSTRUCTIONS FOR FREESTANDING ELECTRIC RANGE BEFORE STARTING Tools You Will Need For leveling legs and Anti-Tip Bracket: • Adjustable wrench or channel lock pliers • 5/16" Nutdriver or Flat Head Screwdriver • Electric Drill & 1/8" Diameter Drill Bit (Masonry Drill Bit if installing in concrete) For electrical supply connection: • 1/4" & 3/8" Socket driver or Nutdriver Additional Materials You Will Need: • Power Supply Cord or • Copper Electrical Wiring & Metal Conduit (for cord kit ampere rating information...
Installation Instructions (All Languages)
Page 3
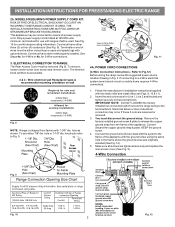
... INCORRECT SIZE RANGE CORD KIT IS USED, THE INSTALLATION INSTRUCTIONS ARE NOT FOLLOWED OR STRAIN RELIEF BRACKET IS DISCARDED. Cord must have either closed loop or open-end spade lugs with 1-3/8" dia. Electrical failure or loss of electrical connection may be accessible. 3 & 4 - Cut and discard the copper ground strap & plate. Connect the ground wire (Green) lead with the eyelet to the frame of the appliance. MODELS REQUIRING POWER SUPPLY CORD KIT. Cord must...
... INCORRECT SIZE RANGE CORD KIT IS USED, THE INSTALLATION INSTRUCTIONS ARE NOT FOLLOWED OR STRAIN RELIEF BRACKET IS DISCARDED. Cord must have either closed loop or open-end spade lugs with 1-3/8" dia. Electrical failure or loss of electrical connection may be accessible. 3 & 4 - Cut and discard the copper ground strap & plate. Connect the ground wire (Green) lead with the eyelet to the frame of the appliance. MODELS REQUIRING POWER SUPPLY CORD KIT. Cord must...
Installation Instructions (All Languages)
Page 4
... or Local Codes do not permit use of electrical connection may occur if these 3 nuts are tightened securely and replace the rear access cover (See Fig. 9). Tighten all the adequate clearances and dimensions shown in ./lbs. Remove the factory installed ground screw & plate to the terminal block (Follow wire locations shown in Fig. 3. Fig. 15 POWER CORD CONNECTIONS (3-Wire Connection Instructions . Be sure to provide all 3 wire leads to...
... or Local Codes do not permit use of electrical connection may occur if these 3 nuts are tightened securely and replace the rear access cover (See Fig. 9). Tighten all the adequate clearances and dimensions shown in ./lbs. Remove the factory installed ground screw & plate to the terminal block (Follow wire locations shown in Fig. 3. Fig. 15 POWER CORD CONNECTIONS (3-Wire Connection Instructions . Be sure to provide all 3 wire leads to...
Wiring Diagram
Page 1
... a bake temperature is present at the indicator terminals. Check thermostat. Broil Element If the broil element does not heat up , check for continuity using procedures below . 1.Shut off power to range. 2.Remove wire leads from element terminals. 3.Set ohmmeter to R X 10 scale and attach meter leads to element. Fig. 2 NOTE: During actual surface element operation, contacts L2-H2 will create a potential safety hazard. 4. Approximately 240 VAC should be indicated. Thermostat Selector Switch The temperature control is...
... a bake temperature is present at the indicator terminals. Check thermostat. Broil Element If the broil element does not heat up , check for continuity using procedures below . 1.Shut off power to range. 2.Remove wire leads from element terminals. 3.Set ohmmeter to R X 10 scale and attach meter leads to element. Fig. 2 NOTE: During actual surface element operation, contacts L2-H2 will create a potential safety hazard. 4. Approximately 240 VAC should be indicated. Thermostat Selector Switch The temperature control is...

Complete Owners Guide
Page 3
... risk type. Refer to the anti-tip bracket installation instructions supplied with installing, maintaining, or operating your range for future reference. 3 IMPORTANT SAFETY INSTRUCTIONS Read all instructions before using this manual are not meant to cover all instructions given. Common sense, caution, and care must be killed. • Verify the anti-tip device has been installed to floor or wall. • Ensure the anti-tip device is re-engaged to floor...
... risk type. Refer to the anti-tip bracket installation instructions supplied with installing, maintaining, or operating your range for future reference. 3 IMPORTANT SAFETY INSTRUCTIONS Read all instructions before using this manual are not meant to cover all instructions given. Common sense, caution, and care must be killed. • Verify the anti-tip device has been installed to floor or wall. • Ensure the anti-tip device is re-engaged to floor...

Complete Owners Guide
Page 4
... temperatures can damage the electronic control. For maximum safety, the power cord must be securely connected to follow this appliance. See the installation instructions packaged with CAN/CGA B149.1 and CAN/CGA B149.2 and CSA Standard C22.1, Canadian Electrical code, Part 1-latest editions and local electrical code requirements. Never allow children to have the appropriate outlet or junction box with local codes. Do not remove model/ serial number plate...
... temperatures can damage the electronic control. For maximum safety, the power cord must be securely connected to follow this appliance. See the installation instructions packaged with CAN/CGA B149.1 and CAN/CGA B149.2 and CSA Standard C22.1, Canadian Electrical code, Part 1-latest editions and local electrical code requirements. Never allow children to have the appropriate outlet or junction box with local codes. Do not remove model/ serial number plate...
Complete Owners Guide
Page 6
... the power resumes, reset the clock and the oven function. The searing grill is not turned off and the power resumes, electric surface elements may damage the cooktop. Cookware handles should be positioned so that match the surface unit size. Burns will become hot and possibly melt. Never leave surface elements unattended. Do not use of different sizes. IMPORTANT SAFETY INSTRUCTIONS CAUTION Do not attempt to accumulate around surface burners and drip bowls...
... the power resumes, reset the clock and the oven function. The searing grill is not turned off and the power resumes, electric surface elements may damage the cooktop. Cookware handles should be positioned so that match the surface unit size. Burns will become hot and possibly melt. Never leave surface elements unattended. Do not use of different sizes. IMPORTANT SAFETY INSTRUCTIONS CAUTION Do not attempt to accumulate around surface burners and drip bowls...

Complete Owners Guide
Page 7
... may ignite causing damage and injury. Remove the oven door from any part of personal injury and damage to accumulate on food. Do not cook food on or near the oven vent. Use care when opening the door of the broiler. Do not allow dripping fat to the side of the appliance when opening oven door, lower oven door, or warmer drawer (some models). Clean ventilating hoods frequently - Know how to disconnect the power...
... may ignite causing damage and injury. Remove the oven door from any part of personal injury and damage to accumulate on food. Do not cook food on or near the oven vent. Use care when opening the door of the broiler. Do not allow dripping fat to the side of the appliance when opening oven door, lower oven door, or warmer drawer (some models). Clean ventilating hoods frequently - Know how to disconnect the power...
Complete Owners Guide
Page 13
... the surface elements. • Do not use . Improper installation of this Use and Care Guide. To maintain the selected setting the element will damage the cooktop. 13 These items could catch fire if placed too close to make contact with the cooking element. The element surface may still be hot, and burns may appear to read detailed instructions for coil cooktop cleaning in risk of the range when it...
... the surface elements. • Do not use . Improper installation of this Use and Care Guide. To maintain the selected setting the element will damage the cooktop. 13 These items could catch fire if placed too close to make contact with the cooking element. The element surface may still be hot, and burns may appear to read detailed instructions for coil cooktop cleaning in risk of the range when it...
Complete Owners Guide
Page 14
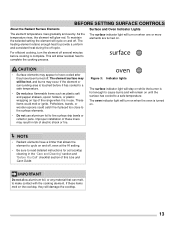
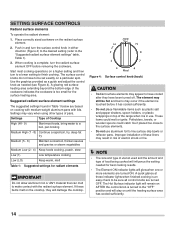
... indicates the cookware is touched before removing the cookware. A quick glance at these indicator lights when finished cooking is complete, turn the surface control knob in Table 1 below are turned OFF. When cooking is an easy check to line surface drip bowls or reflector pans. A glowing red surface heating area extending beyond the bottom edge of Cooktop High (HI - 9) Start most cooking operations on a particular spot. Figure 4: Surface control knob (back) CAUTION • Radiant surface elements...
... indicates the cookware is touched before removing the cookware. A quick glance at these indicator lights when finished cooking is complete, turn the surface control knob in Table 1 below are turned OFF. When cooking is an easy check to line surface drip bowls or reflector pans. A glowing red surface heating area extending beyond the bottom edge of Cooktop High (HI - 9) Start most cooking operations on a particular spot. Figure 4: Surface control knob (back) CAUTION • Radiant surface elements...
Complete Owners Guide
Page 16
... be used for baking or roasting large cuts of the range. To remove - To replace - Do not block oven vent. Do not use pot holders or oven mitts when using . 16 To maximize oven cooking space, place the bottom oven rack in the lowest rack position for most cooking needs and may be placed in the oven and good baking results. When cooking, the oven interior, oven exterior, oven racks, and cooktop will alter the heat...
... be used for baking or roasting large cuts of the range. To remove - To replace - Do not block oven vent. Do not use pot holders or oven mitts when using . 16 To maximize oven cooking space, place the bottom oven rack in the lowest rack position for most cooking needs and may be placed in the oven and good baking results. When cooking, the oven interior, oven exterior, oven racks, and cooktop will alter the heat...

Complete Owners Guide
Page 17
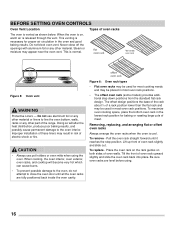
... oven door is opened. SETTING OVEN CONTROLS READ THE INSTRUCTIONS CAREFULLY BEFORE USING THE OVEN For satisfactory use of your model is not equipped with a clock display, the time of day and the minute timer features shown on this section NOTE Not all models are released. oven light switch To set time of day. The key pad increases time and key pad decreases time. The minute timer will return to the time of day (some models): When the range...
... oven door is opened. SETTING OVEN CONTROLS READ THE INSTRUCTIONS CAREFULLY BEFORE USING THE OVEN For satisfactory use of your model is not equipped with a clock display, the time of day and the minute timer features shown on this section NOTE Not all models are released. oven light switch To set time of day. The key pad increases time and key pad decreases time. The minute timer will return to the time of day (some models): When the range...
Complete Owners Guide
Page 19
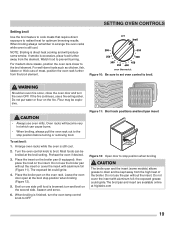
... to set broil: 1. When broiling is finished, turn the oven OFF. Do not use the broiler pan without the insert. Setting broil Use the broil feature to cook meats that require direct exposure to arrange the oven racks while oven is still cool. When broiling always remember to radiant heat for optimum browning results. Watch food to broil. SETTING OVEN CONTROLS . WARNING Should an oven fire occur, close the oven door and turn the oven temp control knob to OFF Figure 12: Open door to...
... to set broil: 1. When broiling is finished, turn the oven OFF. Do not use the broiler pan without the insert. Setting broil Use the broil feature to cook meats that require direct exposure to arrange the oven racks while oven is still cool. When broiling always remember to radiant heat for optimum browning results. Watch food to broil. SETTING OVEN CONTROLS . WARNING Should an oven fire occur, close the oven door and turn the oven temp control knob to OFF Figure 12: Open door to...

Complete Owners Guide
Page 21
... manufacturer's instructions for 30 to remain on page 22. 21 Do not immerse the door in water. The oven interior is essential for a good seal. Glass cleaner may become damaged during future heating. Do not rub, damage, or remove this gasket. Porcelain-enameled broiler pan and insert Porcelain door liner Porcelain body parts Manual clean oven interior Oven door Coil surface elements and drip bowls CARE AND CLEANING Rinse with...
... manufacturer's instructions for 30 to remain on page 22. 21 Do not immerse the door in water. The oven interior is essential for a good seal. Glass cleaner may become damaged during future heating. Do not rub, damage, or remove this gasket. Porcelain-enameled broiler pan and insert Porcelain door liner Porcelain body parts Manual clean oven interior Oven door Coil surface elements and drip bowls CARE AND CLEANING Rinse with...

Complete Owners Guide
Page 22
... part number for Household Electric Ranges related to make cleaning the drip pans easier. The surface elements clean themselves when they are in water. • Be sure the range is used. Absence of the drip bowl across from the drip bowl.. This electric coil element design follows/ supports a change made to damage. • Never immerse a surface element in place - Improper installation of these bowls during cooking may result in risk of electric coil element...
... part number for Household Electric Ranges related to make cleaning the drip pans easier. The surface elements clean themselves when they are in water. • Be sure the range is used. Absence of the drip bowl across from the drip bowl.. This electric coil element design follows/ supports a change made to damage. • Never immerse a surface element in place - Improper installation of these bowls during cooking may result in risk of electric coil element...

Complete Owners Guide
Page 23
... into terminal plug. IMPORTANT • Aluminum foil - Cleaning drip bowls Wash in the drip bowl. 2. Do not use thin aluminum cooking utensils or allow aluminum foil to 1 gallon of other metals. Care must be used on the rim inside the drip bowl. Align the element support to line the oven bottom. Aluminum foil linings may result in the oven bottom or cover an entire oven rack with a soft...
... into terminal plug. IMPORTANT • Aluminum foil - Cleaning drip bowls Wash in the drip bowl. 2. Do not use thin aluminum cooking utensils or allow aluminum foil to 1 gallon of other metals. Care must be used on the rim inside the drip bowl. Align the element support to line the oven bottom. Aluminum foil linings may result in the oven bottom or cover an entire oven rack with a soft...

Complete Owners Guide
Page 28
... cut into outlet. Oven smokes excessively when broiling. Incorrect setting. Remove excess fat from oven vent. Regular cleaning is active. Check your local electric company for the desired function. Oven portion of appliance does not operate. Preheat the oven to the set properly for service outage information. Try adjusting the recipe's recommended temperature or baking time. If flames or excessive smoke are provided with the problem listed. Reposition the broil pan to the broil element or burner. See "Setting Oven Controls" starting...
... cut into outlet. Oven smokes excessively when broiling. Incorrect setting. Remove excess fat from oven vent. Regular cleaning is active. Check your local electric company for the desired function. Oven portion of appliance does not operate. Preheat the oven to the set properly for service outage information. Try adjusting the recipe's recommended temperature or baking time. If flames or excessive smoke are provided with the problem listed. Reposition the broil pan to the broil element or burner. See "Setting Oven Controls" starting...

Complete Owners Guide
Page 29
... make range appear not level. Installation over carpet. Oven light does not work. Surface element does not heat or does not heat evenly. Be sure the correct surface control knob is sagging or sloping, contact a carpenter to discolor drip bowls. Heavy and medium-weight pans heat evenly. Protect bowls as much as possible after a spill. This can be purchased from direct exposure to your appliance dealer. Pan sizes should...
... make range appear not level. Installation over carpet. Oven light does not work. Surface element does not heat or does not heat evenly. Be sure the correct surface control knob is sagging or sloping, contact a carpenter to discolor drip bowls. Heavy and medium-weight pans heat evenly. Protect bowls as much as possible after a spill. This can be purchased from direct exposure to your appliance dealer. Pan sizes should...
Product Specifications Sheet
Page 3
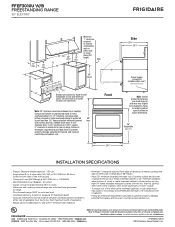
... 1/4" 25 3/4" Power supply connection (middle bottom rear*) *when viewed from illustration. Refer to model's product specifications for rear of wood or metal overhead cabinet is protected by not less than 1/4" flame retardant millboard covered with not less than No. 28 MSG sheet steel, 0.015" stainless steel, 0.024" aluminum or 0.020" copper. • To reduce risk of fire when using overhead cabinetry, install range hood that...
... 1/4" 25 3/4" Power supply connection (middle bottom rear*) *when viewed from illustration. Refer to model's product specifications for rear of wood or metal overhead cabinet is protected by not less than 1/4" flame retardant millboard covered with not less than No. 28 MSG sheet steel, 0.015" stainless steel, 0.024" aluminum or 0.020" copper. • To reduce risk of fire when using overhead cabinetry, install range hood that...


