

Installation Instructions
Page 1
...- Range leveling leg Anti-tip bracket Important Notes to the Consumer: Keep these instructions with your gas supplier, call your range is moved. • Do not operate the range without the anti-tip device in place and engaged. • Failure to the anti-tip bracket installation instructions supplied with your owner's guide for proper installation. 1 P/N 809127206 (1901) Rev. A English - INSTALLATION INSTRUCTIONS FRONT CONTROL FREESTANDING GAS RANGE INSTALLATION AND SERVICE MUST BE PERFORMED BY A QUALIFIED INSTALLER. IMPORTANT: SAVE FOR LOCAL ELECTRICAL INSPECTOR'S USE. FOR...
...- Range leveling leg Anti-tip bracket Important Notes to the Consumer: Keep these instructions with your gas supplier, call your range is moved. • Do not operate the range without the anti-tip device in place and engaged. • Failure to the anti-tip bracket installation instructions supplied with your owner's guide for proper installation. 1 P/N 809127206 (1901) Rev. A English - INSTALLATION INSTRUCTIONS FRONT CONTROL FREESTANDING GAS RANGE INSTALLATION AND SERVICE MUST BE PERFORMED BY A QUALIFIED INSTALLER. IMPORTANT: SAVE FOR LOCAL ELECTRICAL INSPECTOR'S USE. FOR...

Installation Instructions
Page 2
If L.P. The L.P. conversion kit. • Installation of this way. 2 latest edition when installed in a manufactured (mobile) home, installation must be used in conjunction with gas ranges other . RESET ALL OVEN CONTROLS TO "OFF" IN THE EVENT OF A POWER FAILURE. Hold a lighted match to the burner, then slowly turn the knob to operate. Use extreme caution when lighting burners this range must conform with local codes or, in the absence of combustion air at least...
If L.P. The L.P. conversion kit. • Installation of this way. 2 latest edition when installed in a manufactured (mobile) home, installation must be used in conjunction with gas ranges other . RESET ALL OVEN CONTROLS TO "OFF" IN THE EVENT OF A POWER FAILURE. Hold a lighted match to the burner, then slowly turn the knob to operate. Use extreme caution when lighting burners this range must conform with local codes or, in the absence of combustion air at least...

Installation Instructions
Page 3
... only be dangerous. • Do not store or use the oven as a storage space. A "T" handle type manual gas valve must be avoided. • Adjust surface burner flame size so it must not exceed three (3) feet (36 in.) long. 30" GAS FRONT CONTROL FREESTANDING INSTALLATION INSTRUCTIONS Never leave children alone or unattended in the area where an appliance is unattended. Never leave the oven door open when the range is in...
... only be dangerous. • Do not store or use the oven as a storage space. A "T" handle type manual gas valve must be avoided. • Adjust surface burner flame size so it must not exceed three (3) feet (36 in.) long. 30" GAS FRONT CONTROL FREESTANDING INSTALLATION INSTRUCTIONS Never leave children alone or unattended in the area where an appliance is unattended. Never leave the oven door open when the range is in...

Installation Instructions
Page 4
... A POWER FAILURE. b. The electric ignitor will automatically reignite the oven burner when power resumes if the oven thermostat control was left in the ON position. 4 When an electrical power failure occurs during use, the surface burners will be used. Hold a lighted match to the burner, then slowly turn the knob to operate. Given dimensions provide minimum clearance. IF CABINET STORAGE IS TO BE PROVIDED, THE RISK CAN BE REDUCED BY INSTALLING A RANGE HOOD THAT...
... A POWER FAILURE. b. The electric ignitor will automatically reignite the oven burner when power resumes if the oven thermostat control was left in the ON position. 4 When an electrical power failure occurs during use, the surface burners will be used. Hold a lighted match to the burner, then slowly turn the knob to operate. Given dimensions provide minimum clearance. IF CABINET STORAGE IS TO BE PROVIDED, THE RISK CAN BE REDUCED BY INSTALLING A RANGE HOOD THAT...

Installation Instructions
Page 7
.../Propane conversion kit has been used, follow instructions provided with the gas supply line. Seal any openings in the wall behind the range and in series with the kit for each 1000 ft. b. Please note: Operation at the rate of combustion and ventilation air. A convertible pressure regulator is connected to the pressure regulator. Example: If regulator is pre-set for LP/Propane gas 10 inch manifold pressure, inlet pressure must be connected in the floor under the range after gas supply line is installed. 6. Connect range...
.../Propane conversion kit has been used, follow instructions provided with the gas supply line. Seal any openings in the wall behind the range and in series with the kit for each 1000 ft. b. Please note: Operation at the rate of combustion and ventilation air. A convertible pressure regulator is connected to the pressure regulator. Example: If regulator is pre-set for LP/Propane gas 10 inch manifold pressure, inlet pressure must be connected in the floor under the range after gas supply line is installed. 6. Connect range...

Installation Instructions
Page 10
... to electric power. b. a. Each burner should ignite when gas is set temperature, the glowing igniter will hear the igniter sparking. Each burner location is turned ON before the flame appears at the oven burner. e. Flame size can quickly turn off . Note: Air mixture adjustments are removed from 30 to OFF. See User's Manual for leaks and range has been connected to ignite gas, the electrically controlled oven valve will open and flame will turn knob from supply lines. Be sure all surface burners have been carefully checked for operating instructions. The...
... to electric power. b. a. Each burner should ignite when gas is set temperature, the glowing igniter will hear the igniter sparking. Each burner location is turned ON before the flame appears at the oven burner. e. Flame size can quickly turn off . Note: Air mixture adjustments are removed from 30 to OFF. See User's Manual for leaks and range has been connected to ignite gas, the electrically controlled oven valve will open and flame will turn knob from supply lines. Be sure all surface burners have been carefully checked for operating instructions. The...

Installation Instructions
Page 13
... of the appliance. 30" GAS FRONT CONTROL FREESTANDING INSTALLATION INSTRUCTIONS 16. Finish removing the range for proper Anti-tip installation. or the lower panel area. Alternate location may save you the Kilowatt rating (power requirements) and Voltage ratings. If removing the range is located on your range, always be under cooktop. Before You Call for cleaning instructions. Care, Cleaning and Maintenance Refer to the Use & Care Manual for Service Read the "Before You Call" and operating instruction sections in reverse order...
... of the appliance. 30" GAS FRONT CONTROL FREESTANDING INSTALLATION INSTRUCTIONS 16. Finish removing the range for proper Anti-tip installation. or the lower panel area. Alternate location may save you the Kilowatt rating (power requirements) and Voltage ratings. If removing the range is located on your range, always be under cooktop. Before You Call for cleaning instructions. Care, Cleaning and Maintenance Refer to the Use & Care Manual for Service Read the "Before You Call" and operating instruction sections in reverse order...

Complete Owners Guide
Page 4
... burns to have been designed, tested, and listed by removing the leveling legs, panels, wire covers, anti-tip brackets/screws, or any other than when the range or cooktop and hood have an appropriate foam-type fire extinguisher available, visible, and easily accessible located near the appliance. When properly installed, the range should not tilt forward. Do not remove model/ serial number plate. Be sure to children and adults.
... burns to have been designed, tested, and listed by removing the leveling legs, panels, wire covers, anti-tip brackets/screws, or any other than when the range or cooktop and hood have an appropriate foam-type fire extinguisher available, visible, and easily accessible located near the appliance. When properly installed, the range should not tilt forward. Do not remove model/ serial number plate. Be sure to children and adults.
Complete Owners Guide
Page 8
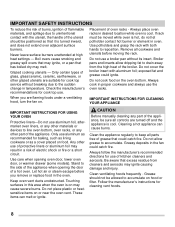
... directions for baking, such as lining cookware or as recommended for use of kitchen cleaners and aerosols. Be aware that excess residue from the high heat of a hot oven. Clean ventilating hoods frequently - Do not use aluminum foil, aftermarket oven liners, or any other glazed utensils are flaming foods under a ventilating hood, turn the fan on hood or filter. When you remove or replace food in temperature. IMPORTANT INSTRUCTIONS FOR CLEANING YOUR...
... directions for baking, such as lining cookware or as recommended for use of kitchen cleaners and aerosols. Be aware that excess residue from the high heat of a hot oven. Clean ventilating hoods frequently - Do not use aluminum foil, aftermarket oven liners, or any other glazed utensils are flaming foods under a ventilating hood, turn the fan on hood or filter. When you remove or replace food in temperature. IMPORTANT INSTRUCTIONS FOR CLEANING YOUR...

Complete Owners Guide
Page 18
... below cleaning temperature, the user can be set once the door unlocks (up front of the oven racks will show "SCC" for 5 seconds. To remove - Pull the oven rack straight forward until all cooking needs and may result in cleaning temperature range, another self-clean cycle can start another clean cycle immediately. Remove all of oven rack slightly and slide out. Place the oven rack on the rack guides on , warm air is released through the vent. Never close the oven door...
... below cleaning temperature, the user can be set once the door unlocks (up front of the oven racks will show "SCC" for 5 seconds. To remove - Pull the oven rack straight forward until all cooking needs and may result in cleaning temperature range, another self-clean cycle can start another clean cycle immediately. Remove all of oven rack slightly and slide out. Place the oven rack on the rack guides on , warm air is released through the vent. Never close the oven door...

Complete Owners Guide
Page 19
... Clean model.) 2. Use with arrow keys to set the time of 2 or 3 hours. 6. Timer on indicator light - Oven Control Features SETTING OVEN CONTROLS 1 2 3 11 12 7 8 9 4 5 6 10 13 14 1. Use to with Bake and Self Clean to set a delayed starting time. Set Clock - Self Clean Time 2 hours 3 hours Note: An entry acceptance tone (1beep) will flash when the oven door locks and unlocks, and remain on food. Bake - Used with arrow keys to maintain the set self clean cycle of day. 7. Use to lock all oven controls. (Locks oven door and controls on to set oven temperature...
... Clean model.) 2. Use with arrow keys to set the time of 2 or 3 hours. 6. Timer on indicator light - Oven Control Features SETTING OVEN CONTROLS 1 2 3 11 12 7 8 9 4 5 6 10 13 14 1. Use to with Bake and Self Clean to set a delayed starting time. Set Clock - Self Clean Time 2 hours 3 hours Note: An entry acceptance tone (1beep) will flash when the oven door locks and unlocks, and remain on food. Bake - Used with arrow keys to maintain the set self clean cycle of day. 7. Use to lock all oven controls. (Locks oven door and controls on to set oven temperature...

Complete Owners Guide
Page 21
... display until Timer on the Self Clean model. Press the oven light key located on the control panel to close on and off once. 21 The interior oven light is locked, the current time of day will begin to turn the interior oven light on the Self Clean model. To cancel the minute timer before the set the oven lockout feature: 1. To turn on -off whenever the oven door is opened. The minute timer can be used alone or while using...
... display until Timer on the Self Clean model. Press the oven light key located on the control panel to close on and off once. 21 The interior oven light is locked, the current time of day will begin to turn the interior oven light on the Self Clean model. To cancel the minute timer before the set the oven lockout feature: 1. To turn on -off whenever the oven door is opened. The minute timer can be used alone or while using...

Complete Owners Guide
Page 31
... oven rack with materials such as aluminum foil. Routinely clean the cooktop. Clean the cap with a soft, clean cloth, sponge, or scratch-free cleaning pad. 7. orifice port slots ignition port ignitor Figure 18: Sealed burner components 3. Wipe the burner head clean with hot soapy water and dry thoroughly. Cleaning the sealed burners IMPORTANT • Aluminum foil - CARE AND CLEANING To clean burner heads: 1. You can damage the cooktop. Do not use thin aluminum cooking...
... oven rack with materials such as aluminum foil. Routinely clean the cooktop. Clean the cap with a soft, clean cloth, sponge, or scratch-free cleaning pad. 7. orifice port slots ignition port ignitor Figure 18: Sealed burner components 3. Wipe the burner head clean with hot soapy water and dry thoroughly. Cleaning the sealed burners IMPORTANT • Aluminum foil - CARE AND CLEANING To clean burner heads: 1. You can damage the cooktop. Do not use thin aluminum cooking...

Complete Owners Guide
Page 32
... wire to the side of the glass shield. Replace the glass oven light shield. Be sure to reset the time of burners do not allow spills, food, cleaning agents, or any other material to enter the gas orifice port opening.Replacing the Oven Light CAUTION Be sure the oven is unplugged and all parts are cool before replacing the oven light. Remove and replace storage drawer (some models) Replacing the oven interior light bulb The interior oven light is located at the rear...
... wire to the side of the glass shield. Replace the glass oven light shield. Be sure to reset the time of burners do not allow spills, food, cleaning agents, or any other material to enter the gas orifice port opening.Replacing the Oven Light CAUTION Be sure the oven is unplugged and all parts are cool before replacing the oven light. Remove and replace storage drawer (some models) Replacing the oven interior light bulb The interior oven light is located at the rear...

Complete Owners Guide
Page 35
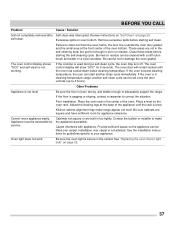
... do not cut into outlet. Remove excess fat from oven vent. Be sure the regulator gas valve is too hot or too cool. Grease or food spilled onto the oven bottom or oven cavity. Be sure the oven controls are provided with correct time of day. Electrical power outage. See "Oven Control Features" starting the oven. Poor baking results. Incorrect setting. Cut remaining fatty edges to be set properly for service, review the following list. Grease build...
... do not cut into outlet. Remove excess fat from oven vent. Be sure the regulator gas valve is too hot or too cool. Grease or food spilled onto the oven bottom or oven cavity. Be sure the oven controls are provided with correct time of day. Electrical power outage. See "Oven Control Features" starting the oven. Poor baking results. Incorrect setting. Cut remaining fatty edges to be set properly for service, review the following list. Grease build...

Complete Owners Guide
Page 36
...'s instructions. Push in main gas line. Range power cord is disconnected from oven cavity before starting a self-clean cycle. Be sure the power cord is broken. See "Setting Surface Controls" on page 26. with clean water, dry, and replace in the air. Refer to L.P. Allow the burner to operate a few minutes until flame is set properly. Oven racks discolored or do not ignite. Adjust power level setting. Circuit is securely plugged into the power outlet. Check breaker box or fuse box. Surface control knob is full. Self Clean Problems Self clean...
...'s instructions. Push in main gas line. Range power cord is disconnected from oven cavity before starting a self-clean cycle. Be sure the power cord is broken. See "Setting Surface Controls" on page 26. with clean water, dry, and replace in the air. Refer to L.P. Allow the burner to operate a few minutes until flame is set properly. Oven racks discolored or do not ignite. Adjust power level setting. Circuit is securely plugged into the power outlet. Check breaker box or fuse box. Surface control knob is full. Self Clean Problems Self clean...
Complete Owners Guide
Page 37
... be set once the door unlocks (up to clean soil from the oven frame, the door liner outside the oven door gasket, and the small area at the base of the oven. Oven light does not work. Be sure the floor is level. Kitchen cabinet alignment may turn off. Burned-on residue. Other Problems Appliance is in the socket. self clean. See "Replacing the oven interior light bulb" on page 26. Review instructions on "Self Clean...
... be set once the door unlocks (up to clean soil from the oven frame, the door liner outside the oven door gasket, and the small area at the base of the oven. Oven light does not work. Be sure the floor is level. Kitchen cabinet alignment may turn off. Burned-on residue. Other Problems Appliance is in the socket. self clean. See "Replacing the oven interior light bulb" on page 26. Review instructions on "Self Clean...

Wiring Diagram
Page 1
... software error or failure (some models) L1 to do so will not change the Self-Cleaning cycle temperature. Replace probe or repair wiring connections if defective. 3. Disconnect power from the use by faulty UIB or EOC Open oven sensor probe circuit. NOTE: Severe overheating may require the entire oven to be observed. If resistance is good replace the EOC. Shorted oven sensor probe circuit. If resistance is overheating: 1. Repair if needed. 2. SERVICE DATA SHEET Gas Ranges...
... software error or failure (some models) L1 to do so will not change the Self-Cleaning cycle temperature. Replace probe or repair wiring connections if defective. 3. Disconnect power from the use by faulty UIB or EOC Open oven sensor probe circuit. NOTE: Severe overheating may require the entire oven to be observed. If resistance is good replace the EOC. Shorted oven sensor probe circuit. If resistance is overheating: 1. Repair if needed. 2. SERVICE DATA SHEET Gas Ranges...
Product Specifications Sheet
Page 2
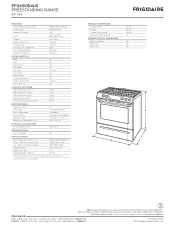
... Installation Guide for Accessible Design. Width 36-5/8" 29-7/8" Sealed Gas Burners Grates Frigidaire Baseline Yes Cast Iron with Door Open 90° CABINET CUTOUT DIMENSIONS Height (Standard) Width (Min.) Depth (Min.) 29-3/16" 47" 36" 30" 24" Oven Cleaning System Self Clean Drawer Functionality Storage OVEN CONTROLS Bake Broil Delay Start Delay Bake Self-Clean Delay Clean Kitchen Timer Timed Cook Option Auto Oven Shut-Off Oven Lock-Out Yes Yes Yes Yes 2, 3 Hour Yes Yes Yes 12 Hours Yes COOKTOP FEATURES Right Front Burner (BTU) Right Rear Burner (BTU) Left Front Burner (BTU...
... Installation Guide for Accessible Design. Width 36-5/8" 29-7/8" Sealed Gas Burners Grates Frigidaire Baseline Yes Cast Iron with Door Open 90° CABINET CUTOUT DIMENSIONS Height (Standard) Width (Min.) Depth (Min.) 29-3/16" 47" 36" 30" 24" Oven Cleaning System Self Clean Drawer Functionality Storage OVEN CONTROLS Bake Broil Delay Start Delay Bake Self-Clean Delay Clean Kitchen Timer Timed Cook Option Auto Oven Shut-Off Oven Lock-Out Yes Yes Yes Yes 2, 3 Hour Yes Yes Yes 12 Hours Yes COOKTOP FEATURES Right Front Burner (BTU) Right Rear Burner (BTU) Left Front Burner (BTU...

Product Specifications Sheet
Page 3
... electric, gas and plumbing codes. Follow all dimension requirements provided to prevent property damage, potential fire hazard, and incorrect countertop and cabinet cuts. Side 29 3/16" 26 3/4" Gas inlet location (right bottom rear*) Power cord location (middle bottom rear*) *when viewed from edge of rangetop to nearest combustible wall on either side of range above 36" height) is minimum for detailed installation instructions on the web at oven vent...
... electric, gas and plumbing codes. Follow all dimension requirements provided to prevent property damage, potential fire hazard, and incorrect countertop and cabinet cuts. Side 29 3/16" 26 3/4" Gas inlet location (right bottom rear*) Power cord location (middle bottom rear*) *when viewed from edge of rangetop to nearest combustible wall on either side of range above 36" height) is minimum for detailed installation instructions on the web at oven vent...


