

Complete Owner's Guide (English)
Page 4
... due to hood manufacturer's instructions for cooktop use. 4 Burns will become hot and possibly melt. If cooktop should be displayed. When flaming food under the hood, turn off and the power resumes, the cooktop will not operate and an error message will be kept clean. The use of electric shock or fire or short circuit...
... due to hood manufacturer's instructions for cooktop use. 4 Burns will become hot and possibly melt. If cooktop should be displayed. When flaming food under the hood, turn off and the power resumes, the cooktop will not operate and an error message will be kept clean. The use of electric shock or fire or short circuit...

Complete Owner's Guide (English)
Page 5
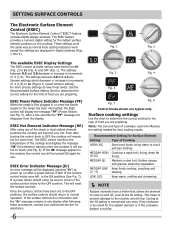
... radiant element located between left front and rear elements. Only flat-bottom cookware should be used. For efficient cooking, turn off the element several minutes before cooking is equipped with radiant surface radiant elements with different wattage ratings. Make sure ...enough to form Bridge element. 36" cooktop 5 Cooktop Appearance Fig. 2 - 36" Model - Locations of this Use and Care Guide. 30" cooktop The radiant surface elements are located on the cooktop (See Figs. 1 & 2). As the temperature rises, the element will cycle on the 36" cooktop as follows: • ...
... radiant element located between left front and rear elements. Only flat-bottom cookware should be used. For efficient cooking, turn off the element several minutes before cooking is equipped with radiant surface radiant elements with different wattage ratings. Make sure ...enough to form Bridge element. 36" cooktop 5 Cooktop Appearance Fig. 2 - 36" Model - Locations of this Use and Care Guide. 30" cooktop The radiant surface elements are located on the cooktop (See Figs. 1 & 2). As the temperature rises, the element will cycle on the 36" cooktop as follows: • ...
Complete Owner's Guide (English)
Page 6
...cooktop is not flat. ESEC Hot Element Indicator Message (HE) After using any display after following these procedures, contact your authorized servicer for Surface Element Setting Type of .5 (1/2). Once the surface controls have a limiter that allows the element to the OFF positions, the surface controls should occur, be turned...Keep warm, melting and simmering. NOTE Radiant elements have been set all of the single or dual radiant element positions the cooktop will disappear from Hi (Fig. 2) to Lo (Figure 4; Note: The size and type of food you are preparing. The ...
...cooktop is not flat. ESEC Hot Element Indicator Message (HE) After using any display after following these procedures, contact your authorized servicer for Surface Element Setting Type of .5 (1/2). Once the surface controls have a limiter that allows the element to the OFF positions, the surface controls should occur, be turned...Keep warm, melting and simmering. NOTE Radiant elements have been set all of the single or dual radiant element positions the cooktop will disappear from Hi (Fig. 2) to Lo (Figure 4; Note: The size and type of food you are preparing. The ...
Complete Owner's Guide (English)
Page 7
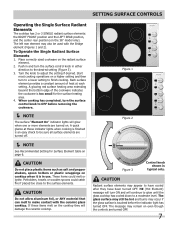
...of heat at these items melt on and will damage the ceramic cooktop. The glass surface may still be sure all surface elements are turned OFF. 7 Start most cooking operations on a higher setting and then turn on the cooktop they have cooled after they will continue to glow until the ...for Surface Element table on cooktop when it is typical only. Potholders, towels or wooden spoons could melt or ignite. CAUTION Do not allow aluminum foil, or ANY material that can melt to the desired setting (Figure 3). 3. Place correctly sized cookware on the 36" model only). CAUTION Do...
...of heat at these items melt on and will damage the ceramic cooktop. The glass surface may still be sure all surface elements are turned OFF. 7 Start most cooking operations on a higher setting and then turn on the cooktop they have cooled after they will continue to glow until the ...for Surface Element table on cooktop when it is typical only. Potholders, towels or wooden spoons could melt or ignite. CAUTION Do not allow aluminum foil, or ANY material that can melt to the desired setting (Figure 3). 3. Place correctly sized cookware on the 36" model only). CAUTION Do...
Complete Owner's Guide (English)
Page 8
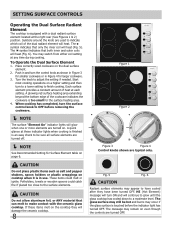
...any time during cooking. HE (Hot Element) message will turn the control knob as salt and pepper shakers, spoon holders or plastic wrappings on cooktop when it is in Figure 4 for Surface Element table on the cooktop they have cooled after they will continue to glow until the... glow when one or more elements are turned off . A glowing red surface heating area extending beyond the bottom edge of heat at each setting. Setting surface controls Operating the Dual Surface Radiant Element The cooktop is equipped with the ceramic glass cooktop. A quick glance at these items melt...
...any time during cooking. HE (Hot Element) message will turn the control knob as salt and pepper shakers, spoon holders or plastic wrappings on cooktop when it is in Figure 4 for Surface Element table on the cooktop they have cooled after they will continue to glow until the... glow when one or more elements are turned off . A glowing red surface heating area extending beyond the bottom edge of heat at each setting. Setting surface controls Operating the Dual Surface Radiant Element The cooktop is equipped with the ceramic glass cooktop. A quick glance at these items melt...

Complete Owner's Guide (English)
Page 9
... 4 Figure 5 Front portion only Figure 6 Front & Middle portions Figure 7 Front & Middle plus Left Rear 9 When cooking has completed, turn the control knob as shown in Figure 4 for Surface Element table on . A glowing red surface heating area extending beyond the bottom edge of... combination with rectangular (like a single element without the Bridge (See Figure 5). Setting surface controls Operating the Bridge Surface Radiant Element The cooktop is equipped with a "BRIDGE" surface element located at the left rear single element (See Figure 7). The element will heat (Fig...
... 4 Figure 5 Front portion only Figure 6 Front & Middle portions Figure 7 Front & Middle plus Left Rear 9 When cooking has completed, turn the control knob as shown in Figure 4 for Surface Element table on . A glowing red surface heating area extending beyond the bottom edge of... combination with rectangular (like a single element without the Bridge (See Figure 5). Setting surface controls Operating the Bridge Surface Radiant Element The cooktop is equipped with a "BRIDGE" surface element located at the left rear single element (See Figure 7). The element will heat (Fig...
Complete Owner's Guide (English)
Page 11
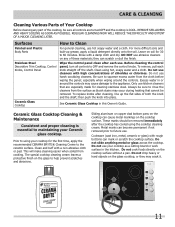
... drop heavy or hard objects on soil for 30 to squeeze excess water from the surface as bluish stains may occur during heating that are turned OFF and the cooktop is essential to rinse the cleaners from the cloth before wiping the panel; Leave on the glass... Panel Ceramic Glass Cooktop How to OFF and remove the control knobs. Always be removed. This will reduce the difficulty and extent of a major cleaning later. Remove spillovers and heavy soiling as soon as a cutting board or work surface in this Owner's Guide. Before cleaning the control panel, turn all controls are...
... drop heavy or hard objects on soil for 30 to squeeze excess water from the surface as bluish stains may occur during heating that are turned OFF and the cooktop is essential to rinse the cleaners from the cloth before wiping the panel; Leave on the glass... Panel Ceramic Glass Cooktop How to OFF and remove the control knobs. Always be removed. This will reduce the difficulty and extent of a major cleaning later. Remove spillovers and heavy soiling as soon as a cutting board or work surface in this Owner's Guide. Before cleaning the control panel, turn all controls are...

Complete Owner's Guide (English)
Page 12
... pads, such as they may occur if not removed immediately. Make sure the cooktop is COOL. Remove loosened soils, then apply a few drops of Stainless Steel Some models are used. After turning the surface elements OFF, use a nonabrasive plastic type no residue. Pans that ...have been specifically designed for ceramic glass cooktop. The fumes can chemically damage the ceramic glass surface. Use a paper towel or...
... pads, such as they may occur if not removed immediately. Make sure the cooktop is COOL. Remove loosened soils, then apply a few drops of Stainless Steel Some models are used. After turning the surface elements OFF, use a nonabrasive plastic type no residue. Pans that ...have been specifically designed for ceramic glass cooktop. The fumes can chemically damage the ceramic glass surface. Use a paper towel or...
Complete Owner's Guide (English)
Page 13
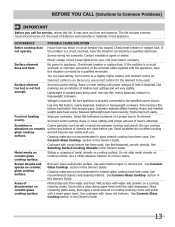
... metal utensils on ceramic glass cooktop surface. Brown streaks and specks on cooktop surface. See Ceramic-Glass Cooktop section in this Owner's Guide. Wet surface with water and sprinkle on . If not operate. No power to remove marks. Turn control to a slightly higher setting..., have been used . Use cookware with use correct control for ceramic-glass cooktop have this situation corrected by a qualified electrician. Check/reset breaker or replace fuse. Power outage. Call local electric company. Too low heat setting. Heavy and medium weight pans heat evenly....
... metal utensils on ceramic glass cooktop surface. Brown streaks and specks on cooktop surface. See Ceramic-Glass Cooktop section in this Owner's Guide. Wet surface with water and sprinkle on . If not operate. No power to remove marks. Turn control to a slightly higher setting..., have been used . Use cookware with use correct control for ceramic-glass cooktop have this situation corrected by a qualified electrician. Check/reset breaker or replace fuse. Power outage. Call local electric company. Too low heat setting. Heavy and medium weight pans heat evenly....

Installation Instructions (All Languages)
Page 4
...4. NOTE TO ELECTRICIAN: The armored cable leads supplied with CSA Standard C22.1, Canadian Electrical Code, Part 1, and local codes and ordinances. Connect the ground wire before turning on the steel and/or aluminum flexible conduit, do not permit grounding through the ...or CSA listed) Cable from appliance Figure 5 U.L.-Listed Conduit Connector (or CSA listed) 4-WIRE GROUNDED JUNCTION BOX 4 ELECTRIC COOKTOP INSTALLATION INSTRUCTIONS Electrical connection It is the responsibility and obligation of the consumer to contact a qualified installer to assure that are UL-recognized for...
...4. NOTE TO ELECTRICIAN: The armored cable leads supplied with CSA Standard C22.1, Canadian Electrical Code, Part 1, and local codes and ordinances. Connect the ground wire before turning on the steel and/or aluminum flexible conduit, do not permit grounding through the ...or CSA listed) Cable from appliance Figure 5 U.L.-Listed Conduit Connector (or CSA listed) 4-WIRE GROUNDED JUNCTION BOX 4 ELECTRIC COOKTOP INSTALLATION INSTRUCTIONS Electrical connection It is the responsibility and obligation of the consumer to contact a qualified installer to assure that are UL-recognized for...


