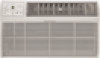
Frigidaire FRA08EHT1 Support and Manuals
Get Help and Manuals for this Frigidaire item
View All Support Options Below
Free Frigidaire FRA08EHT1 manuals!
Problems with Frigidaire FRA08EHT1?
Ask a Question
Free Frigidaire FRA08EHT1 manuals!
Problems with Frigidaire FRA08EHT1?
Ask a Question
Popular Frigidaire FRA08EHT1 Manual Pages
Complete Owner's Guide (English) - Page 4

...Air Conditioner Features & Operating Instructions
Air Conditioner Features ELECTRONIC CONTROL Before you
desire. w/DISPLAY & REMOTE SENSING
BUTTON
FOR HEAT MODELS
Operating Instructions
NOTE
The following instructions represent the Touch Pad, the same instructions... MODE
SETS FAN SPEED
SETS MODE
ACTIVATES TIMER
CHECK FILTER RESET BUTTON
REMOTE TEMP SENSING INDICATOR
(some models)
TURNS...
Complete Owner's Guide (English) - Page 10

... models) and remote control located in this list. Wait approximately 3 minutes and listen for service, review this appliance. Dirty air filter - Refer to restart when set to allow water drainage. Noise when unit is too warm -
To defrost the coil, set too high.
Close doors, windows and registers.
This is set to installation instructions or check with installer...
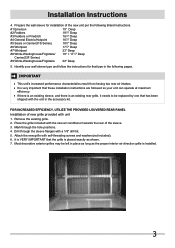
Installation Instructions (All Languages) - Page 1

... existing sleeve)
Note that may not need all parts in the kit. Discard unused parts. No. Hardware
Qty.
1 Tapered Spacer Blocks (17" Long)
2 10 Trim Frame (side legs)
2
2 Centering/Support Blocks ...Installation Instructions
READ BEFORE INSTALLING UNIT For Through-the-Wall Air Conditioners
To avoid risk of personal injury, property damage, or product damage due to the weight of this manual...
Installation Instructions (All Languages) - Page 2

... FRONT
Wall sleeve to Install
1.
Remove old Air Conditioner from the chart below. Wall sleeve must be in sound structural condition and have a rearward slope as shown in Fig.1.
2. Brand
Width
Wall Sleeve Dimensions Height
White-Westinghouse Frigidaire
Carrier (52F Series) General Electric/Hotpoint
251 2 251 2 251 2 26
151 4 151 4 151 4 155 8
Whirlpool Fedders/Emerson
Sears/Kenmore...
Installation Instructions (All Languages) - Page 3
...Ǝ + 171 2Ǝ Deep
#9 White-Westinghouse/Frigidaire
22Ǝ Deep
5. It is VERY IMPORTANT that type in the accessory kit. Place the grille included with the new air conditioner towards the rear of new grille provided with self-threading screws and washers(not included). 6. Installation Instructions
4. Prepare the wall sleeve for that the grille is placed exactly...
Installation Instructions (All Languages) - Page 4

... manual and replace with mounting the grill to match
80º
new rear grille
Rear Louvers 50º 50º
80º
Top View
2. NOTE: You may need to drill holes in picture. Before sliding all-the-way back, remove 2nd screw from the screw.
9. Remove existing rear grille as shown here. Installation Instructions
Wall Sleeve...
Installation Instructions (All Languages) - Page 5

... holes in center of side wall with the tapered end facing the back of the rib on base with the tapered end facing the opening.
3. Attach (2) 4 1 2 " x 3 1 2" x 11 2" centering/support blocks one on Page 3 of these instructions.
14. This helps induce a rearward slope on the last page of this manual and
replace with mounting the grill...
Installation Instructions (All Languages) - Page 6
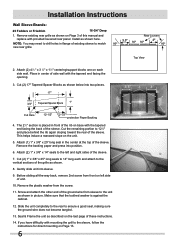
... slope on Page 3 of the sleeve.
7. Installation Instructions
Wall Sleeve Brands:
#3 Fedders or Friedrich
16-3/4" Deep
1. Gently slide unit into sleeve.
9. Seal & Frame the unit as shown on the unit.
5. Make sure that the toothed washer is placed in front of the rib on left and right sides of this manual and replace with mounting the grill to...
Installation Instructions (All Languages) - Page 7

Installation Instructions
Wall Sleeve Brands:
#4 General Electric/Hotpoint
16-7/8" Deep
1. Screw and attach the other end of the sleeve. Install as shown with the tapered end 1/2" from the back of the ground wire from sleeve to the vertical sections of unit.
9. Center unit & gently slide unit into two pieces. 17"
3/4" Tapered Spacer Block 13"
1" Cut Here
protection Paper...
Installation Instructions (All Languages) - Page 8

... center at the top of unit.
9. Remove the backing paper and press into sleeve.
8. Attach (2) 1" x 3/8" x 14" seals to ensure a good seal, making sure the ground wire does not become tangled.
12. Slide the unit completely to the rear to the left side of the sleeve. Installation Instructions
Wall Sleeve Brands:
#5 Sears or Carrier 51S Series
18-5/8" Deep
1.
Installation Instructions (All Languages) - Page 9

... the cabinet.
11. Installation Instructions
Wall Sleeve Brands:
#6 Whirlpool
17-1/8" Deep
1.
Remove the plastic washer from sleeve to the unit as ...Install to the sleeve, follow the instructions for direct mounting on the last page of unit.
9. Seal & Frame the unit as shown below into position.
5. Remove existing rear grille as shown on Page 3 of this manual and replace...
Installation Instructions (All Languages) - Page 10

....
13. Attach the tapered spacer blocks to the sleeve, follow the instructions for the other end of this manual and replace with provided louvered rear panel. Attach (2) 43 4"... the grille as shown in flange of existing sleeve to the vertical sections of the rear grille.
10. Use these instructions.
21. Installation Instructions
Wall Sleeve Brands:
#7 Whirlpool
23" Deep
1. Cut...
Installation Instructions (All Languages) - Page 11
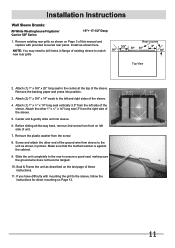
... the sleeve. Installation Instructions
Wall Sleeve Brands:
#8 White Westinghouse/Frigidaire/ Carrier 52F Series
16"+ 17-1/2" Deep
1. Remove existing rear grille as shown here.
Remove the backing paper and press into sleeve.
6. Install as shown on Page 13.
11 Before sliding all-the-way back, remove 2nd screw from the screw.
8. Attach the other end of this manual and replace with...
Installation Instructions (All Languages) - Page 12
... paper and press into the room.
8. Seal & Frame the unit as shown in and check if amount extending from sleeve to size.
11. If position is attached.
4. Proceed to step 14. Before sliding all seals are flush.
13.
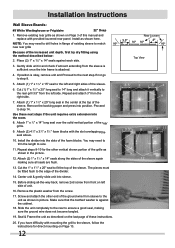
Installation Instructions
Wall Sleeve Brands:
#9 White Westinghouse or Frigidaire
22" Deep
1. Remove existing rear grille as shown here.
Product Specifications Sheet (English) - Page 2

.... Home Comfort
FRA08EHT1 Through-The-Wall Air Conditioner / Heater
A
C
D
Outside Closure Panel
B Sleeve Kit EA102T
Adjustable Mounting Brackets
Lock Clip
Sleeve-to change. Refer to Product Installation Guide for detailed installation instructions on the web at frigidaire.com. Depth D - Printed in the U.S.A. Always consult local and national electric codes. Height B - Wall Thickness
14...
Frigidaire FRA08EHT1 Reviews
We have not received any reviews for Frigidaire yet.