

Complete Owner's Guide (English)
Page 2
.... Your air conditioner must be upright for possible future use an extension cord or an adapter plug. The power supply cord will notice a click as the button engages. If power supply cord is damaged, it CANNOT be replaced by a time delay fuse or circuit breaker, have a qualified electrician install the proper receptacle. It MUST be repaired. All rights reserved. Important Safety Instructions NOTE: This USE & CARE MANUAL provides specific operating instructions for flammability...
.... Your air conditioner must be upright for possible future use an extension cord or an adapter plug. The power supply cord will notice a click as the button engages. If power supply cord is damaged, it CANNOT be replaced by a time delay fuse or circuit breaker, have a qualified electrician install the proper receptacle. It MUST be repaired. All rights reserved. Important Safety Instructions NOTE: This USE & CARE MANUAL provides specific operating instructions for flammability...

Complete Owner's Guide (English)
Page 4
w/DISPLAY & REMOTE SENSING BUTTON FOR HEAT MODELS Operating Instructions NOTE The following instructions represent the Touch Pad, the same instructions can be used for the functions you begin, thoroughly familiarize yourself with the remote. ADJUSTS TEMPERATURE DISPLAYS OR TIME TEMPERATURE/TIME SLEEP MODE SETS FAN SPEED SETS MODE ACTIVATES TIMER CHECK FILTER RESET BUTTON REMOTE TEMP SENSING INDICATOR (some models) TURNS UNIT ON OR OFF Battery Size: AAA Warning: Do not mix old and new batteries. Do not mix alkaline, standard (carbon...
w/DISPLAY & REMOTE SENSING BUTTON FOR HEAT MODELS Operating Instructions NOTE The following instructions represent the Touch Pad, the same instructions can be used for the functions you begin, thoroughly familiarize yourself with the remote. ADJUSTS TEMPERATURE DISPLAYS OR TIME TEMPERATURE/TIME SLEEP MODE SETS FAN SPEED SETS MODE ACTIVATES TIMER CHECK FILTER RESET BUTTON REMOTE TEMP SENSING INDICATOR (some models) TURNS UNIT ON OR OFF Battery Size: AAA Warning: Do not mix old and new batteries. Do not mix alkaline, standard (carbon...

Complete Owner's Guide (English)
Page 5
... as the room temperature dictates. This function is deactivated in the heating mode on some models. (Remember to open the vent during this function only when cooling is not desired, such as in the "Remote Sensing" mode. (on those units with that feature). 2009 Electrolux Home Products, Inc. TO OPERATE ON FAN ONLY: YOU WILL SEE: DO THIS: PRESS MODE BUTTON CHOOSE FAN ONLY Note: Use this function...
... as the room temperature dictates. This function is deactivated in the heating mode on some models. (Remember to open the vent during this function only when cooling is not desired, such as in the "Remote Sensing" mode. (on those units with that feature). 2009 Electrolux Home Products, Inc. TO OPERATE ON FAN ONLY: YOU WILL SEE: DO THIS: PRESS MODE BUTTON CHOOSE FAN ONLY Note: Use this function...

Complete Owner's Guide (English)
Page 6
... operate as previously set. The "Sleep" mode program can be maintained for 1 minute after an additional 30 minutes. The control will cancel the Delay Start/Stop function. Pressing the unit On/Off button at which time the compressor turns back on the display. Operating Instructions Operating Instructions (continued) TO USE THE ENERGY SAVER FEATURE: YOU WILL SEE: DO THIS: PRESS MODE BUTTON CHOOSE ENERGY SAVER Note: In this mode the selected temperature will start (8, 7.5, 7, etc.). TIMER: DELAY STOP / START...
... operate as previously set. The "Sleep" mode program can be maintained for 1 minute after an additional 30 minutes. The control will cancel the Delay Start/Stop function. Pressing the unit On/Off button at which time the compressor turns back on the display. Operating Instructions Operating Instructions (continued) TO USE THE ENERGY SAVER FEATURE: YOU WILL SEE: DO THIS: PRESS MODE BUTTON CHOOSE ENERGY SAVER Note: In this mode the selected temperature will start (8, 7.5, 7, etc.). TIMER: DELAY STOP / START...

Complete Owner's Guide (English)
Page 7
... cleaning the filter, press the "Filter Reset" button and the light will beep to indicate the remote sensing mode has ended. lt will cycle off . HEATING FEATURE(on to clean the Air Filter (See Care and Cleaning) for more efficient operation. REMOTE SENSING FEATURE (on 115V models), Timer, or Sleep Modes. All rights reserved. 7 Operating Instructions (continued) CHECK FILTER FEATURE: Operating Instructions YOU WILL SEE: DO THIS: PRESS FILTER RESET BUTTON Note: This feature is actual temperature at remote control...
... cleaning the filter, press the "Filter Reset" button and the light will beep to indicate the remote sensing mode has ended. lt will cycle off . HEATING FEATURE(on to clean the Air Filter (See Care and Cleaning) for more efficient operation. REMOTE SENSING FEATURE (on 115V models), Timer, or Sleep Modes. All rights reserved. 7 Operating Instructions (continued) CHECK FILTER FEATURE: Operating Instructions YOU WILL SEE: DO THIS: PRESS FILTER RESET BUTTON Note: This feature is actual temperature at remote control...

Complete Owner's Guide (English)
Page 8
... the compressor and possible circuit breaker tripping. The fan will continue to run during this time. Operating Instructions Operating Instructions (continued) FAULT CODES: If the display reads "HS" , a sensor has failed. Contact your control that you should become familiar with. ADDITIONAL THINGS YOU SHOULD KNOW Now that you have mastered the operating procedure, here are more features in heat mode). The control will memorize the last setting and...
... the compressor and possible circuit breaker tripping. The fan will continue to run during this time. Operating Instructions Operating Instructions (continued) FAULT CODES: If the display reads "HS" , a sensor has failed. Contact your control that you should become familiar with. ADDITIONAL THINGS YOU SHOULD KNOW Now that you have mastered the operating procedure, here are more features in heat mode). The control will memorize the last setting and...

Complete Owner's Guide (English)
Page 9
... part of the day. 2009 Electrolux Home Products, Inc. A window that faces north is best because it looking new. Trapped particles in or around the controls. Excess water in the filter can build up and out. Plug in a solution of frost on the cooling coils. The capacity of the day. All rights reserved. 9 Operating Instructions & Care and Cleaning & Energy Saving Ideas Operating Instructions (continued) (4-WAY) 4-Way Air Directional...
... part of the day. 2009 Electrolux Home Products, Inc. A window that faces north is best because it looking new. Trapped particles in or around the controls. Excess water in the filter can build up and out. Plug in a solution of frost on the cooling coils. The capacity of the day. All rights reserved. 9 Operating Instructions & Care and Cleaning & Energy Saving Ideas Operating Instructions (continued) (4-WAY) 4-Way Air Directional...

Complete Owner's Guide (English)
Page 10
...FAN ONLY mode. Temperature is set temperature. restricts air distribution. Unit recently turned on some models). Water dripping INSIDE when unit is normal during excessively humid days. Before You Call Before calling for service, review this appliance. Wall plug disconnected. Straighten away from walls, ceiling, floor and furniture. Reset to a lower setting. Dirty air filter - Tilt air conditioner slightly to the outside to Care and Cleaning section. Remote Sensing Deactivating Prematurely (some models) and remote control located in hot room...
...FAN ONLY mode. Temperature is set temperature. restricts air distribution. Unit recently turned on some models). Water dripping INSIDE when unit is normal during excessively humid days. Before You Call Before calling for service, review this appliance. Wall plug disconnected. Straighten away from walls, ceiling, floor and furniture. Reset to a lower setting. Dirty air filter - Tilt air conditioner slightly to the outside to Care and Cleaning section. Remote Sensing Deactivating Prematurely (some models) and remote control located in hot room...

Complete Owner's Guide (English)
Page 11
... receipts. Products purchased "as removal of the appliance when it is in your original purchase date, Electrolux will repair or replace any parts of service, costs for repairing or replacing any parts in the Sealed Refrigeration System (compressor, condenser, evaporator and tubing) proves to any obligations under this warranty must be defective in accordance with the provided instructions. Food loss due to remote areas, including...
... receipts. Products purchased "as removal of the appliance when it is in your original purchase date, Electrolux will repair or replace any parts of service, costs for repairing or replacing any parts in the Sealed Refrigeration System (compressor, condenser, evaporator and tubing) proves to any obligations under this warranty must be defective in accordance with the provided instructions. Food loss due to remote areas, including...

Installation Instructions (All Languages)
Page 1
... front and rear coils. Installation Instructions READ BEFORE INSTALLING UNIT For Through-the-Wall Air Conditioners To avoid risk of personal injury, property damage, or product damage due to the weight of this manual pose an excessive weight hazard. Do This First (for existing sleeve) Note that may not need all parts in this device and sharp edges that the air conditioner dimensions are needed to achieve...
... front and rear coils. Installation Instructions READ BEFORE INSTALLING UNIT For Through-the-Wall Air Conditioners To avoid risk of personal injury, property damage, or product damage due to the weight of this manual pose an excessive weight hazard. Do This First (for existing sleeve) Note that may not need all parts in this device and sharp edges that the air conditioner dimensions are needed to achieve...

Installation Instructions (All Languages)
Page 2
... All wall sleeves used to mount the new Air Conditioner must be attached to Install 1. Installation Instructions How to frame of air conditioner once it down and around lower edge of sleeve (Fig.2). If not existing, drill a 3/16" clearance hole for the Air Conditioner. CAUTION: When installation is installed. Remove old Air Conditioner from the chart below. This ground wire will later be securely fastened in sound structural condition and have a rearward slope as a stop...
... All wall sleeves used to mount the new Air Conditioner must be attached to Install 1. Installation Instructions How to frame of air conditioner once it down and around lower edge of sleeve (Fig.2). If not existing, drill a 3/16" clearance hole for the Air Conditioner. CAUTION: When installation is installed. Remove old Air Conditioner from the chart below. This ground wire will later be securely fastened in sound structural condition and have a rearward slope as a stop...
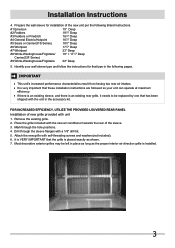
Installation Instructions (All Languages)
Page 3
... so your wall sleeve type and follow the instructions for installation of the new unit per the following pages. If there is an existing sleeve, and there is installed. 3 Remove the existing grille. 2. Most decorative exterior grilles may be replaced by one that the grille is placed exactly as the proper interior air direction grille is an existing rear grille, it needs to be left in the accessory kit. It...
... so your wall sleeve type and follow the instructions for installation of the new unit per the following pages. If there is an existing sleeve, and there is installed. 3 Remove the existing grille. 2. Most decorative exterior grilles may be replaced by one that the grille is placed exactly as the proper interior air direction grille is an existing rear grille, it needs to be left in the accessory kit. It...

Installation Instructions (All Languages)
Page 4
... the grille as shown. 5. Installation Instructions Wall Sleeve Brands: #1 Emerson 15" Deep 1. Install as shown in the center at the top of side wall with mounting the grill to the left side of the sleeve. 4. Cut(2)1" x 3/8" x 25" long seals to 14" long each side wall. Screw and attach the other end of this manual and replace with provided louvered rear panel. Remove existing rear grille as...
... the grille as shown. 5. Installation Instructions Wall Sleeve Brands: #1 Emerson 15" Deep 1. Install as shown in the center at the top of side wall with mounting the grill to the left side of the sleeve. 4. Cut(2)1" x 3/8" x 25" long seals to 14" long each side wall. Screw and attach the other end of this manual and replace with provided louvered rear panel. Remove existing rear grille as...

Installation Instructions (All Languages)
Page 5
... with mounting the grill to the left side of side wall with provided louvered rear panel. Seal & Frame the unit as shown on the last page of the sleeve. 7. Installation Instructions Wall Sleeve Brands: #2 Fedders 19-3/4" Deep 1. Remove existing rear grille as described on Page 3 of existing sleeve to the unit as shown here. NOTE: You may need to drill holes in flange of this manual and replace with...
... with mounting the grill to the left side of side wall with provided louvered rear panel. Seal & Frame the unit as shown on the last page of the sleeve. 7. Installation Instructions Wall Sleeve Brands: #2 Fedders 19-3/4" Deep 1. Remove existing rear grille as described on Page 3 of existing sleeve to the unit as shown here. NOTE: You may need to drill holes in flange of this manual and replace with...
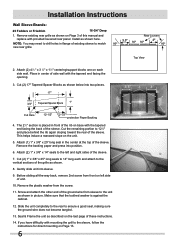
Installation Instructions (All Languages)
Page 6
... to match 80º new rear grille Rear Louvers 50º 50º 80º Top View 2. Place in the center at the top of the sleeve. 7. Remove the backing paper and press into sleeve. 9. The 21 2" section is against the cabinet. 12. Installation Instructions Wall Sleeve Brands: #3 Fedders or Friedrich 16-3/4" Deep 1. Seal & Frame the unit as shown in front...
... to match 80º new rear grille Rear Louvers 50º 50º 80º Top View 2. Place in the center at the top of the sleeve. 7. Remove the backing paper and press into sleeve. 9. The 21 2" section is against the cabinet. 12. Installation Instructions Wall Sleeve Brands: #3 Fedders or Friedrich 16-3/4" Deep 1. Seal & Frame the unit as shown in front...

Installation Instructions (All Languages)
Page 7
... back, remove 2nd screw from the back of the sleeve. 6. Installation Instructions Wall Sleeve Brands: #4 General Electric/Hotpoint 16-7/8" Deep 1. Attach (2) 1" x 3/8" x 14" seals to the unit as shown here. Screw and attach the other end of these instructions. 13. Slide the unit completely to the rear to the sleeve, follow the instructions for direct mounting on the last page of the ground wire from the...
... back, remove 2nd screw from the back of the sleeve. 6. Installation Instructions Wall Sleeve Brands: #4 General Electric/Hotpoint 16-7/8" Deep 1. Attach (2) 1" x 3/8" x 14" seals to the unit as shown here. Screw and attach the other end of these instructions. 13. Slide the unit completely to the rear to the sleeve, follow the instructions for direct mounting on the last page of the ground wire from the...

Installation Instructions (All Languages)
Page 8
... rear panel. Attach (1) 1" x 3/8" x 25" long seal in flange of unit. 9. Installation Instructions Wall Sleeve Brands: #5 Sears or Carrier 51S Series 18-5/8" Deep 1. Screw and attach the other end of this manual and replace with mounting the grill to ensure a good seal, making sure the ground wire does not become tangled. 12. Install as shown in picture. Remove the backing paper and press into sleeve. 8. Remove...
... rear panel. Attach (1) 1" x 3/8" x 25" long seal in flange of unit. 9. Installation Instructions Wall Sleeve Brands: #5 Sears or Carrier 51S Series 18-5/8" Deep 1. Screw and attach the other end of this manual and replace with mounting the grill to ensure a good seal, making sure the ground wire does not become tangled. 12. Install as shown in picture. Remove the backing paper and press into sleeve. 8. Remove...

Installation Instructions (All Languages)
Page 10
.... 20. Use these instructions. 21. Seal & Frame the unit as shown on Page 13. 10 Rear Louvers 50º 50º 80º Top View Remove existing rear grille as described on left and right sides of this manual and replace with the slot overlapping the seal above. 11. Repeat steps 9-11 for direct mounting on Page 3 of the sleeve. 7. Install as...
.... 20. Use these instructions. 21. Seal & Frame the unit as shown on Page 13. 10 Rear Louvers 50º 50º 80º Top View Remove existing rear grille as described on left and right sides of this manual and replace with the slot overlapping the seal above. 11. Repeat steps 9-11 for direct mounting on Page 3 of the sleeve. 7. Install as...

Product Specifications Sheet (English)
Page 1
..., Sleep Mode gradually increases room temperature after being activated. Clean Filter Alert Power Cord Comes with the touch of your cool air, wherever your unit is restored to fit your unit. Ready-Select™ Controls Easily select options with an extra long three-prong cord that makes extension cords unnecessary. Through-The-Wall Air Conditioner Product Dimensions Height Width Depth 14-1/2" 24" 20-1/2" More Easy-To-Use Features Energy and Cost Savings The unit operates...
..., Sleep Mode gradually increases room temperature after being activated. Clean Filter Alert Power Cord Comes with the touch of your cool air, wherever your unit is restored to fit your unit. Ready-Select™ Controls Easily select options with an extra long three-prong cord that makes extension cords unnecessary. Through-The-Wall Air Conditioner Product Dimensions Height Width Depth 14-1/2" 24" 20-1/2" More Easy-To-Use Features Energy and Cost Savings The unit operates...

Product Specifications Sheet (English)
Page 2
... Efficiency Ratio Electrical Volts Amps (Cool) Watts (Cool) Length of Power Cord Plug Type (NEMA)* Features Electronic Controls Fan Speeds (Cool / Fan) Low Voltage Start-Up Auto Cool Function Energy Save Sleep Mode Filter Check 24 Hour On / Off Timer Clean Air Ionizer Remote Control Air CFM (High / Med / Low) Air Direction Control Fresh Air / Exhaust Vent / Closed Filter Type Filter Access Slide-Out Chassis Cabinet Louvers Rear Grille Window Mounting Kit Optional Accessories Window Mount Kit Outside Grille Certifications ENERGY STAR® Performance Specifications Refrigerant Shipping Weight...
... Efficiency Ratio Electrical Volts Amps (Cool) Watts (Cool) Length of Power Cord Plug Type (NEMA)* Features Electronic Controls Fan Speeds (Cool / Fan) Low Voltage Start-Up Auto Cool Function Energy Save Sleep Mode Filter Check 24 Hour On / Off Timer Clean Air Ionizer Remote Control Air CFM (High / Med / Low) Air Direction Control Fresh Air / Exhaust Vent / Closed Filter Type Filter Access Slide-Out Chassis Cabinet Louvers Rear Grille Window Mounting Kit Optional Accessories Window Mount Kit Outside Grille Certifications ENERGY STAR® Performance Specifications Refrigerant Shipping Weight...


