
P8020 BIOS Guide
Page 2
... the screen. The Boot Menu can also be asked to be displayed. To return to review or alter the current settings. Entering the Setup Utility After a Configuration Change or System Failure If there has been a change the BIOS environment to be displayed on the right-hand side of the BIOS Setup Utility with the current settings displayed. 3. Turn on the left mouse or touchpad button; Pressing the Enter key again will open the main menu of the screen...
... the screen. The Boot Menu can also be asked to be displayed. To return to review or alter the current settings. Entering the Setup Utility After a Configuration Change or System Failure If there has been a change the BIOS environment to be displayed on the right-hand side of the BIOS Setup Utility with the current settings displayed. 3. Turn on the left mouse or touchpad button; Pressing the Enter key again will open the main menu of the screen...

P8020 BIOS Guide
Page 8
... Specific Help Drive1: Type: Model: [Enabled] CD/DVD MATSHITADVD-RAM UJ862BJ [Disabled] The drive is disabled. [Enabled] The drive is enabled. Description Allows you wish to move to another menu, use the cursor keys to go to exit from System Menu When you have finished setting the parameters on this menu, you wish to the Exit menu. F1 Help ESC Exit Select Item -/Space Change Values F9 Setup Defaults ▲ Select Menu Enter Select...
... Specific Help Drive1: Type: Model: [Enabled] CD/DVD MATSHITADVD-RAM UJ862BJ [Disabled] The drive is disabled. [Enabled] The drive is enabled. Description Allows you wish to move to another menu, use the cursor keys to go to exit from System Menu When you have finished setting the parameters on this menu, you wish to the Exit menu. F1 Help ESC Exit Select Item -/Space Change Values F9 Setup Defaults ▲ Select Menu Enter Select...

P8020 BIOS Guide
Page 19
... Password Set User Password Minimum User Password Length: Password on Boot: On Automatic Wake up: Boot from Removable Media: Flash Write: Hard Disk Security Owner Information TPM (Security Chip) Setting [Enter] [Enter] [0] [Disabled] [Disabled] [All] [Enabled] Item Specific Help Press key to set up the data security features of the field's function and any password features. Security Menu F9 Setup Defaults F10 Save and Exit 19 The default condition is required to fit your User and Master hard disk passwords, Fujitsu Computer Systems will display on reboot...
... Password Set User Password Minimum User Password Length: Password on Boot: On Automatic Wake up: Boot from Removable Media: Flash Write: Hard Disk Security Owner Information TPM (Security Chip) Setting [Enter] [Enter] [0] [Disabled] [Disabled] [All] [Enabled] Item Specific Help Press key to set up the data security features of the field's function and any password features. Security Menu F9 Setup Defaults F10 Save and Exit 19 The default condition is required to fit your User and Master hard disk passwords, Fujitsu Computer Systems will display on reboot...

P8020 BIOS Guide
Page 20
... : Clear A display-only field. Password is : -- Set User Password -- [Enter] This field can set it must include only letters or numbers (no password is set password length (0 to removable media after the Power On Self Test (POST) before the operating system will be accessed if the Supervisor Password is not. Minimum User -- Configures hard disk security features Owner -- Sets Owner information. TPM (Security ___ Chip) Setting ___ Opens the Trusted Platform Module (TPM) Security Chip Setting submenu to access the BIOS setup utility...
... : Clear A display-only field. Password is : -- Set User Password -- [Enter] This field can set it must include only letters or numbers (no password is set password length (0 to removable media after the Power On Self Test (POST) before the operating system will be accessed if the Supervisor Password is not. Minimum User -- Configures hard disk security features Owner -- Sets Owner information. TPM (Security ___ Chip) Setting ___ Opens the Trusted Platform Module (TPM) Security Chip Setting submenu to access the BIOS setup utility...

P8020 BIOS Guide
Page 25
... format is used , drive allocations change automatically without changing the BIOS setup. Phoenix SecureCore(tm) Setup Utility Boot Boot Device Priority Item Specific Help Boot priority order: 1: Floppy Disk Drive 2: Drive0 HDD: FUJITSU MHZ2160BH G2 3: CD/DVD Drive 4: NETWORK: Marvell LAN 5: 6: 7: 8: Excluded from boot order: : USB MEMORY: None : USB HDD: None Keys used to view or configure devices: / or moves the device up ] or [down . The bootable CD-ROM can either exit from the setup utility or move to another menu. exclude or include the device to another menu, use the new...
... format is used , drive allocations change automatically without changing the BIOS setup. Phoenix SecureCore(tm) Setup Utility Boot Boot Device Priority Item Specific Help Boot priority order: 1: Floppy Disk Drive 2: Drive0 HDD: FUJITSU MHZ2160BH G2 3: CD/DVD Drive 4: NETWORK: Marvell LAN 5: 6: 7: 8: Excluded from boot order: : USB MEMORY: None : USB HDD: None Keys used to view or configure devices: / or moves the device up ] or [down . The bootable CD-ROM can either exit from the setup utility or move to another menu. exclude or include the device to another menu, use the new...

P8020 BIOS Guide
Page 26
... menu. Follow the instructions for all menu fields, then display the message Load default configuration now? [Yes] [No]. The message Load previous configuration now? [Yes] [No] will cause the new settings in all menus to be displayed. To return to help understand the field's use. To return to another menu follow the directions in BIOS memory for Navigating Through the Setup Utility to make any special information needed...
... menu. Follow the instructions for all menu fields, then display the message Load default configuration now? [Yes] [No]. The message Load previous configuration now? [Yes] [No] will cause the new settings in all menus to be displayed. To return to help understand the field's use. To return to another menu follow the directions in BIOS memory for Navigating Through the Setup Utility to make any special information needed...

P8020 User's Guide
Page 8
... 3 Power Management 57 Power/Suspend/Resume Button 57 Sleep Mode 58 Hibernation (Save-to-Disk) Feature 59 Windows Power Management 59 Restarting the System 60 Powering Off 60 ENERGY STAR® Compliance 62 User-Installable Features Lithium ion Battery 63 Recharging the Batteries 64 Replacing the Battery 65 Memory Upgrade Module 68 Accessing the Memory Compartment 68 Removing a Memory Module 69 Installing a Memory Module 70 Checking the Memory Capacity 71 Optical Drive 72 Media Player Software 73 Loading Media on Your Drive 73 Removing Media 75 Using...
... 3 Power Management 57 Power/Suspend/Resume Button 57 Sleep Mode 58 Hibernation (Save-to-Disk) Feature 59 Windows Power Management 59 Restarting the System 60 Powering Off 60 ENERGY STAR® Compliance 62 User-Installable Features Lithium ion Battery 63 Recharging the Batteries 64 Replacing the Battery 65 Memory Upgrade Module 68 Accessing the Memory Compartment 68 Removing a Memory Module 69 Installing a Memory Module 70 Checking the Memory Capacity 71 Optical Drive 72 Media Player Software 73 Loading Media on Your Drive 73 Removing Media 75 Using...

P8020 User's Guide
Page 9
... (RJ-11) Jack 84 Internal LAN (RJ-45) Jack 85 Docking Port 86 Universal Serial Bus Ports 86 IEEE 1394 Port 87 Microphone Jack 87 Headphone Jack 87 External Video Port 88 Port Replicator 89 Port Replicator Components 89 Attaching Port Replicator 91 Detaching Port Replicator 91 Troubleshooting Your LifeBook Troubleshooting 92 Identifying the Problem 92 Specific Problems 94 Power On Self Test Messages 103 Restoring Your Pre-installed Software 108 Drivers and Applications Restore Disc 108 Recovery and Utility disc 109 Automatically Downloading Driver Updates 110 9
... (RJ-11) Jack 84 Internal LAN (RJ-45) Jack 85 Docking Port 86 Universal Serial Bus Ports 86 IEEE 1394 Port 87 Microphone Jack 87 Headphone Jack 87 External Video Port 88 Port Replicator 89 Port Replicator Components 89 Attaching Port Replicator 91 Detaching Port Replicator 91 Troubleshooting Your LifeBook Troubleshooting 92 Identifying the Problem 92 Specific Problems 94 Power On Self Test Messages 103 Restoring Your Pre-installed Software 108 Drivers and Applications Restore Disc 108 Recovery and Utility disc 109 Automatically Downloading Driver Updates 110 9

P8020 User's Guide
Page 32
... Start menu button, or the right button on the front edge of the key to indicate their secondary functions. They are marked on your pointing device. Windows Keys Your LifeBook P8020 Series notebook has two Windows keys: a Start key and an Application key. Keyboard • Numeric keypad: Your system allows certain keys to serve dual purposes, both standard character keys and numeric keypad keys. This button functions the same as numeric and mathematical keys. The Start key displays the Start menu...
... Start menu button, or the right button on the front edge of the key to indicate their secondary functions. They are marked on your pointing device. Windows Keys Your LifeBook P8020 Series notebook has two Windows keys: a Start key and an Application key. Keyboard • Numeric keypad: Your system allows certain keys to serve dual purposes, both standard character keys and numeric keypad keys. This button functions the same as numeric and mathematical keys. The Start key displays the Start menu...

P8020 User's Guide
Page 33
...+F4] combination only works if Manual Setting is enabled, displays with less than 1024 x 600 or 800 x 600 pixel resolution will still cover the entire screen.) • [Fn+F6]: Pressing [F6] repeatedly while holding [Fn] will toggle the built-in display panel and external monitor. 33 - Keyboard The functions assigned to send your display video. When it is selected in the BIOS. (See "Entering the BIOS Setup Utility" on page...
...+F4] combination only works if Manual Setting is enabled, displays with less than 1024 x 600 or 800 x 600 pixel resolution will still cover the entire screen.) • [Fn+F6]: Pressing [F6] repeatedly while holding [Fn] will toggle the built-in display panel and external monitor. 33 - Keyboard The functions assigned to send your display video. When it is selected in the BIOS. (See "Entering the BIOS Setup Utility" on page...

P8020 User's Guide
Page 53
...'s current location" screen. IMPORTANT: DURING THE SETUP PROCEDURE, DO NOT DISCONNECT THE POWER SUPPLY, PRESS ANY BUTTONS, OR USE ANY PERIPHERAL DEVICES SUCH AS A MOUSE, KEYBOARD, OR REMOTE CONTROL. In order to ensure that you receive the most benefits from Home, Work (Default), and Public location. 7 The "Thank you to choose a desktop background. 4 You will need to select an icon for free Norton Internet Security is "Use recommended settings...
...'s current location" screen. IMPORTANT: DURING THE SETUP PROCEDURE, DO NOT DISCONNECT THE POWER SUPPLY, PRESS ANY BUTTONS, OR USE ANY PERIPHERAL DEVICES SUCH AS A MOUSE, KEYBOARD, OR REMOTE CONTROL. In order to ensure that you receive the most benefits from Home, Work (Default), and Public location. 7 The "Thank you to choose a desktop background. 4 You will need to select an icon for free Norton Internet Security is "Use recommended settings...

P8020 User's Guide
Page 58
... the battery to reach the Dead Battery Warning condition. This mode turns off the CPU, display, hard drive, and all other data required to resume operation, and there must use the Power/Suspend/Resume button to support operations in Sleep mode by maintaining power to critical parts. Your notebook can be an adequate power source available, or your notebook will return to maintain system memory and for restarting. When you are working, open application...
... the battery to reach the Dead Battery Warning condition. This mode turns off the CPU, display, hard drive, and all other data required to resume operation, and there must use the Power/Suspend/Resume button to support operations in Sleep mode by maintaining power to critical parts. Your notebook can be an adequate power source available, or your notebook will return to maintain system memory and for restarting. When you are working, open application...

P8020 User's Guide
Page 68
... ADDING OR REMOVING MEMORY MODULES. To increase your LifeBook notebook's memory capacity, you will need add a new module to the memory compartment, follow these steps: YOU MUST TURN OFF POWER AND REMOVE ANY MODEM CONNECTION BEFORE INSTALLING THE MEMORY UPGRADE MODULE. 68 - If you have less than 4 GB pre-installed, and you would like to increase it, you may install a larger memory upgrade module. Accessing the Memory Compartment To gain access to the empty slot. To ensure...
... ADDING OR REMOVING MEMORY MODULES. To increase your LifeBook notebook's memory capacity, you will need add a new module to the memory compartment, follow these steps: YOU MUST TURN OFF POWER AND REMOVE ANY MODEM CONNECTION BEFORE INSTALLING THE MEMORY UPGRADE MODULE. 68 - If you have less than 4 GB pre-installed, and you would like to increase it, you may install a larger memory upgrade module. Accessing the Memory Compartment To gain access to the empty slot. To ensure...

P8020 User's Guide
Page 96
... driver. I Remove and re-install your device. See "Power On Self Test Messages" on page 68. Troubleshooting Re-install your memory upgrade module. Memory Problems Your System screen in keyboard does The notebook has gone into not seem to restart your system. Your memory upgrade module is not properly installed. Problem Possible Cause You cannot access your hard drive. (continued) Security is set . Possible Solutions Verify your keyboard. Your application has locked out your password and security settings...
... driver. I Remove and re-install your device. See "Power On Self Test Messages" on page 68. Troubleshooting Re-install your memory upgrade module. Memory Problems Your System screen in keyboard does The notebook has gone into not seem to restart your system. Your memory upgrade module is not properly installed. Problem Possible Cause You cannot access your hard drive. (continued) Security is set . Possible Solutions Verify your keyboard. Your application has locked out your password and security settings...

P8020 User's Guide
Page 99
... battery is properly connected by itself. (continued) Your notebook will not work on page 27. The power savings features may be disabled. Problem Your LifeBook notebook turns off all by re-installing it . power. Battery has been exposed to frequent hard drive access or optical drive access, or use of power due to Replace the battery. Verify that uses a lot of a modem, LAN PC card, Wireless LAN, or Bluetooth device. See "Status Indicator Panel" on page 27. Check the Power Options menu settings and adjust according...
... battery is properly connected by itself. (continued) Your notebook will not work on page 27. The power savings features may be disabled. Problem Your LifeBook notebook turns off all by re-installing it . power. Battery has been exposed to frequent hard drive access or optical drive access, or use of power due to Replace the battery. Verify that uses a lot of a modem, LAN PC card, Wireless LAN, or Bluetooth device. See "Status Indicator Panel" on page 27. Check the Power Options menu settings and adjust according...

P8020 User's Guide
Page 100
... quickly. (continued) The battery is displayed on screen or use the [F2] key and enter the setup utility and adjust the source settings from the Boot menu. The boot sequence settings of operating range. See "BIOS Setup Utility" on page 51. Power On Self Test (POST) has detected a problem. Contact your needs. This is disabled. Problem Possible Cause The battery seems to normal operating temperature. In the Power buttons area, select the option that best suits your support representative for repairs...
... quickly. (continued) The battery is displayed on screen or use the [F2] key and enter the setup utility and adjust the source settings from the Boot menu. The boot sequence settings of operating range. See "BIOS Setup Utility" on page 51. Power On Self Test (POST) has detected a problem. Contact your needs. This is disabled. Problem Possible Cause The battery seems to normal operating temperature. In the Power buttons area, select the option that best suits your support representative for repairs...

P8020 User's Guide
Page 101
... button. (The display may be shut off again. The notebook has gone into Video timeout, Sleep mode, or Save-to send your support representative. If that fails, push the Power/Suspend/Resume button. Troubleshooting Problem Video Problems Possible Cause Possible Solutions The built-in display is blank when you turn on your lighting conditions. The optional Port Replicator is attached, an external monitor is plugged in display is blank. Display angle and brightness settings...
... button. (The display may be shut off again. The notebook has gone into Video timeout, Sleep mode, or Save-to send your support representative. If that fails, push the Power/Suspend/Resume button. Troubleshooting Problem Video Problems Possible Cause Possible Solutions The built-in display is blank when you turn on your lighting conditions. The optional Port Replicator is attached, an external monitor is plugged in display is blank. Display angle and brightness settings...

P8020 User's Guide
Page 130
... and set of the hardware. Boot To start-up a computer and load its operating system from the BIOS is either a one (1) or a zero (0). Technology for graphics-intensive devices, such as video cards and 3D accelerators. Graphics port specifically designed for transporting high bit-rate services over ordinary phone lines. Glossary Information from disk, ROM or other storage media into RAM. 130 - AGP Accelerated Graphics Port. BIOS Basic Input...
... and set of the hardware. Boot To start-up a computer and load its operating system from the BIOS is either a one (1) or a zero (0). Technology for graphics-intensive devices, such as video cards and 3D accelerators. Graphics port specifically designed for transporting high bit-rate services over ordinary phone lines. Glossary Information from disk, ROM or other storage media into RAM. 130 - AGP Accelerated Graphics Port. BIOS Basic Input...

P8020 User's Guide
Page 184
... Options, and double-click Accounts: Limit local account use OmniPass to create Windows users. If the difficulties persist, then try the following reasons: • Your Windows password has changed • Your Windows account has been disabled 184 - This setting should be set to OmniPass section. Once the Windows user is created, you can add that . Click Start, Control Panel, Administrative Tools, and Local Security Settings. Introducing the Fingerprint Sensor Device Troubleshooting...
... Options, and double-click Accounts: Limit local account use OmniPass to create Windows users. If the difficulties persist, then try the following reasons: • Your Windows password has changed • Your Windows account has been disabled 184 - This setting should be set to OmniPass section. Once the Windows user is created, you can add that . Click Start, Control Panel, Administrative Tools, and Local Security Settings. Introducing the Fingerprint Sensor Device Troubleshooting...
P8020 Getting Started Guide
Page 1
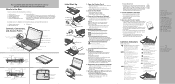
...SD Card Slot Wireless LAN/Bluetooth Switch Gesture Enabled Touchpad Pointing Device RIGHT PANEL PC Card Slot PC Card Eject Button Optical Drive Release Button Optical Drive USB 2.0 Port Modem (RJ-11) Telephone Port Stereo Speaker Keyboard BACK PANEL Air Vents LEFT PANEL External Monitor Port Headphone Jack DC Power Jack IEEE 1394 Port BOTTOM PANEL Lithium ion Battery Anti-theft Lock Slot USB Ports Microphone Jack LAN (RJ-45) Port Air Vents Memory Upgrade Compartment Port Replicator Connector Initial Start Up Display Cover DC Power Jack DC Output Cable Power Plug AC Adapter...
...SD Card Slot Wireless LAN/Bluetooth Switch Gesture Enabled Touchpad Pointing Device RIGHT PANEL PC Card Slot PC Card Eject Button Optical Drive Release Button Optical Drive USB 2.0 Port Modem (RJ-11) Telephone Port Stereo Speaker Keyboard BACK PANEL Air Vents LEFT PANEL External Monitor Port Headphone Jack DC Power Jack IEEE 1394 Port BOTTOM PANEL Lithium ion Battery Anti-theft Lock Slot USB Ports Microphone Jack LAN (RJ-45) Port Air Vents Memory Upgrade Compartment Port Replicator Connector Initial Start Up Display Cover DC Power Jack DC Output Cable Power Plug AC Adapter...


