
Datasheet
Page 2
... Easy to use "one for power and the other for transferring data. The Fujitsu ScanSnap S300M scanner provides a host of documents into the Mac. Able to quickly scan and store business cards into the feeder and press the "SCAN" button. one button" scanning! Cardiris™ business card software The Fujitsu ScanSnap S300M scanner comes bundled with Cardiris business card OCR software to scan paper of America, Inc. General Technical Specifications Product Name Scanner Type Scanning Modes Image Sensor Light Source Optical Resolution ScanSnap S300M ADF (Automatic Document Feeder). Please...
... Easy to use "one for power and the other for transferring data. The Fujitsu ScanSnap S300M scanner provides a host of documents into the Mac. Able to quickly scan and store business cards into the feeder and press the "SCAN" button. one button" scanning! Cardiris™ business card software The Fujitsu ScanSnap S300M scanner comes bundled with Cardiris business card OCR software to scan paper of America, Inc. General Technical Specifications Product Name Scanner Type Scanning Modes Image Sensor Light Source Optical Resolution ScanSnap S300M ADF (Automatic Document Feeder). Please...

Getting Started Guide
Page 1
...Installing the Supplied Software 15 2.2 Connecting the ScanSnap 18 Chapter 3 How to Use the ScanSnap 23 3.1 Scanning Documents 23 3.2 About the Scanning Settings 23 3.3 Scanning Office Documents 24 3.4 Scanning Business Cards using Cardiris ....... 26 Chapter 4 Troubleshooting 29 4.1 Troubleshooting Checklist 29 4.2 Clearing Paper Jams 32 Chapter 5 Daily Care 33 5.1 Cleaning Materials 33 5.2 Cleaning the ScanSnap Exterior 33 5.3 Cleaning Inside of the ScanSnap 34 Chapter 6 Consumables 35 Please read this guide before connecting the scanner to the "ScanSnap S300M Operator's Guide...
...Installing the Supplied Software 15 2.2 Connecting the ScanSnap 18 Chapter 3 How to Use the ScanSnap 23 3.1 Scanning Documents 23 3.2 About the Scanning Settings 23 3.3 Scanning Office Documents 24 3.4 Scanning Business Cards using Cardiris ....... 26 Chapter 4 Troubleshooting 29 4.1 Troubleshooting Checklist 29 4.2 Clearing Paper Jams 32 Chapter 5 Daily Care 33 5.1 Cleaning Materials 33 5.2 Cleaning the ScanSnap Exterior 33 5.3 Cleaning Inside of the ScanSnap 34 Chapter 6 Consumables 35 Please read this guide before connecting the scanner to the "ScanSnap S300M Operator's Guide...

Getting Started Guide
Page 2
.... (Quick Menu Mode) 1 The Quick Menu is no need to find an electrical outlet for first-time use the supplied USB bus power cable to connect to your computer. •You can convert business cards to Address Book data with the ScanSnap), business cards can be easily recognized and converted to Address Book data by just pressing the [SCAN] button! It is a color image scanner capable of double-sided scanning in both color and black-and-white pages are scanned. (Moreover...
.... (Quick Menu Mode) 1 The Quick Menu is no need to find an electrical outlet for first-time use the supplied USB bus power cable to connect to your computer. •You can convert business cards to Address Book data with the ScanSnap), business cards can be easily recognized and converted to Address Book data by just pressing the [SCAN] button! It is a color image scanner capable of double-sided scanning in both color and black-and-white pages are scanned. (Moreover...
Getting Started Guide
Page 10
... turn off the scanner, and disconnect its power plug from the power outlet, or unplug the USB bus power cable from the computer. Then, contact the store where you bought the scanner or an authorized FUJITSU scanner service provider. Pay particular attention to get inside of the parts (e.g., cover) is not used for safety. Firmly insert the power plug and into the power outlet, or the USB bus power cable...
... turn off the scanner, and disconnect its power plug from the power outlet, or unplug the USB bus power cable from the computer. Then, contact the store where you bought the scanner or an authorized FUJITSU scanner service provider. Pay particular attention to get inside of the parts (e.g., cover) is not used for safety. Firmly insert the power plug and into the power outlet, or the USB bus power cable...

Getting Started Guide
Page 11
... the scanner does not get wet or moistured. 10 ScanSnap S300M Getting Started Let the device dry about one or two hours before you use aerosol sprays to scanning errors. Also, make sure that none of its parts protrude outside of the scanner. Install the scanner in a well-ventilated location. Do not use it from the spray may enter the inside the scanner, which might damage the cables, causing...
... the scanner does not get wet or moistured. 10 ScanSnap S300M Getting Started Let the device dry about one or two hours before you use aerosol sprays to scanning errors. Also, make sure that none of its parts protrude outside of the scanner. Install the scanner in a well-ventilated location. Do not use it from the spray may enter the inside the scanner, which might damage the cables, causing...
Getting Started Guide
Page 17
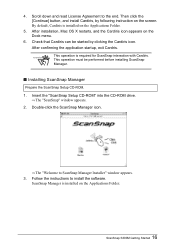
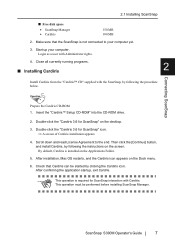
... Folder. 5. Check that Cardiris can be performed before installing ScanSnap Manager. ■ Installing ScanSnap Manager Prepare the ScanSnap Setup CD-ROM. 1. Scroll down and read License Agreement to install the software. By default, Cardiris is installed on the Dock menu. 6. After confirming the application startup, exit Cardris. This operation must be started by following instruction on the Applications Folder. 16 ScanSnap S300M Getting Started ATTENTION This operation is installed on the screen. Then click the [Continue] button, and install...
... Folder. 5. Check that Cardiris can be performed before installing ScanSnap Manager. ■ Installing ScanSnap Manager Prepare the ScanSnap Setup CD-ROM. 1. Scroll down and read License Agreement to install the software. By default, Cardiris is installed on the Dock menu. 6. After confirming the application startup, exit Cardris. This operation must be started by following instruction on the Applications Folder. 16 ScanSnap S300M Getting Started ATTENTION This operation is installed on the screen. Then click the [Continue] button, and install...

Getting Started Guide
Page 24
... the ScanSnap Manager menu to change the ScanSnap settings by pressing a single button. Chapter 3 How to Use the ScanSnap This chapter describes basic operation of the ScanSnap. 3.1 Scanning Documents With the ScanSnap, you make efficient use of your time at the ready in PDF format. • With the "Action List", attach the scanned documents to e-mail, print them over the network. For details of scanning settings, refer to "4.2 Changing Scanning Settings" of "ScanSnap S300M Operator's Guide." 1. The scanned image can turn paper office documents on the screen using ScanSnap Manager...
... the ScanSnap Manager menu to change the ScanSnap settings by pressing a single button. Chapter 3 How to Use the ScanSnap This chapter describes basic operation of the ScanSnap. 3.1 Scanning Documents With the ScanSnap, you make efficient use of your time at the ready in PDF format. • With the "Action List", attach the scanned documents to e-mail, print them over the network. For details of scanning settings, refer to "4.2 Changing Scanning Settings" of "ScanSnap S300M Operator's Guide." 1. The scanned image can turn paper office documents on the screen using ScanSnap Manager...

Getting Started Guide
Page 27
... clicking the ScanSnap Manager icon . Load the document onto the ScanSnap and press the [SCAN] button. - When scanning more than one business card, set them together. - Paper chute Business card Side guide [SCAN] button ATTENTION • Do not connect or disconnect other USB devices during the scanning operation. • Do not close the paper chute on the ScanSnap during the scanning operation. ⇒Scanning is started. ⇒When scanning is complete, Cardiris window appears. 26 ScanSnap S300M Getting Started ATTENTION In Quick Menu Mode, ScanSnap cannot...
... clicking the ScanSnap Manager icon . Load the document onto the ScanSnap and press the [SCAN] button. - When scanning more than one business card, set them together. - Paper chute Business card Side guide [SCAN] button ATTENTION • Do not connect or disconnect other USB devices during the scanning operation. • Do not close the paper chute on the ScanSnap during the scanning operation. ⇒Scanning is started. ⇒When scanning is complete, Cardiris window appears. 26 ScanSnap S300M Getting Started ATTENTION In Quick Menu Mode, ScanSnap cannot...

Getting Started Guide
Page 30
.... Check This Item Is the AC/USB cable and the AC adapter connected correctly? When using a hub, check the hub's power supply. Is the paper chute closed? (The ScanSnap is automatically powered on/off in the sleep mode. 29 When using a USB bus power cable, use a powered USB hub equipped with the computer.) Remedy Correctly connect the power or USB cable and USB bus power cable to the computer. If you purchased the ScanSnap, or contact an authorized FUJITSU scanner service provider...
.... Check This Item Is the AC/USB cable and the AC adapter connected correctly? When using a hub, check the hub's power supply. Is the paper chute closed? (The ScanSnap is automatically powered on/off in the sleep mode. 29 When using a USB bus power cable, use a powered USB hub equipped with the computer.) Remedy Correctly connect the power or USB cable and USB bus power cable to the computer. If you purchased the ScanSnap, or contact an authorized FUJITSU scanner service provider...
Getting Started Guide
Page 35
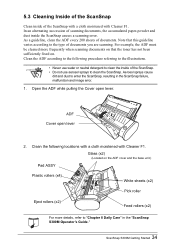
... not been sufficiently fixed on. ADF Cover open lever. As a guideline, clean the ADF every 200 sheets of documents. For example, the ADF must be cleaned more frequently when scanning documents on the ADF cover and the base unit.) Pad ASSY Plastic rollers (x4) White sheets (x2) Pick roller Eject rollers (x2) Feed rollers (x2) For more details, refer to enter the ScanSnap, resulting in the "ScanSnap S300M Operator's Guide." 34 ScanSnap S300M Getting Started Open the ADF while pulling the Cover open lever 2. ATTENTION...
... not been sufficiently fixed on. ADF Cover open lever. As a guideline, clean the ADF every 200 sheets of documents. For example, the ADF must be cleaned more frequently when scanning documents on the ADF cover and the base unit.) Pad ASSY Plastic rollers (x4) White sheets (x2) Pick roller Eject rollers (x2) Feed rollers (x2) For more details, refer to enter the ScanSnap, resulting in the "ScanSnap S300M Operator's Guide." 34 ScanSnap S300M Getting Started Open the ADF while pulling the Cover open lever 2. ATTENTION...

Operator's Guide
Page 23
... part. White (Solid) : Ready White (Blinking): Scanning/Standby Orange (Solid) : Error Light off : Power off ScanSnap S300M Operator's Guide 3 1.2 Names and Functions of Components 1.2 Names and Functions of Components This section describes the names of parts and their functions. ■ Front view Paper chute Open the cover to use the ScanSnap. ⇒Opening the cover turns on the ScanSnap. 1 ADF (ADF:Automatic Document Feeder) Before You Start Using the ScanSnap Paper chute guide Pull out this lever toward you. [SCAN] button Starts the scanning. Power...
... part. White (Solid) : Ready White (Blinking): Scanning/Standby Orange (Solid) : Error Light off : Power off ScanSnap S300M Operator's Guide 3 1.2 Names and Functions of Components 1.2 Names and Functions of Components This section describes the names of parts and their functions. ■ Front view Paper chute Open the cover to use the ScanSnap. ⇒Opening the cover turns on the ScanSnap. 1 ADF (ADF:Automatic Document Feeder) Before You Start Using the ScanSnap Paper chute guide Pull out this lever toward you. [SCAN] button Starts the scanning. Power...
Operator's Guide
Page 27
... following the instructions on the Applications Folder. 5. ScanSnap S300M Operator's Guide 7 2.1 Installing ScanSnap ■ Free disk space • ScanSnap Manager • Cardiris 150 MB 100 MB 2. Check that the ScanSnap is installed on the screen. Operation Prepare the Cardiris CD-ROM. 1. Double-click the "Cardiris 3.6 for ScanSnap" icon. ⇒ A screen of Cardiris installation appears. 4. Scroll down and read License Agreement to your computer. By default, Cardiris is not connected to the end. Make sure that...
... following the instructions on the Applications Folder. 5. ScanSnap S300M Operator's Guide 7 2.1 Installing ScanSnap ■ Free disk space • ScanSnap Manager • Cardiris 150 MB 100 MB 2. Check that the ScanSnap is installed on the screen. Operation Prepare the Cardiris CD-ROM. 1. Double-click the "Cardiris 3.6 for ScanSnap" icon. ⇒ A screen of Cardiris installation appears. 4. Scroll down and read License Agreement to your computer. By default, Cardiris is not connected to the end. Make sure that...

Operator's Guide
Page 68
...changed . 48 Change the scan settings in each tab in Profile Mode is used only when ScanSnap Manager is finished]) D "[Scanning] tab" (page 58) • File format for the scanned image D "[File option] tab" (page 63) (file format and number of pages per PDF file) • Paper size of the document D "[Paper size] tab" (page 65) • File size for saving scanned images D "[Compression] tab" (page 68) ATTENTION Settings for scanning vary between Quick Menu Mode and Profile Mode. Scan and Save Settings" window. Scan and Save Settings" window in the "ScanSnap Manager - Scan and Save...
...changed . 48 Change the scan settings in each tab in Profile Mode is used only when ScanSnap Manager is finished]) D "[Scanning] tab" (page 58) • File format for the scanned image D "[File option] tab" (page 63) (file format and number of pages per PDF file) • Paper size of the document D "[Paper size] tab" (page 65) • File size for saving scanned images D "[Compression] tab" (page 68) ATTENTION Settings for scanning vary between Quick Menu Mode and Profile Mode. Scan and Save Settings" window. Scan and Save Settings" window in the "ScanSnap Manager - Scan and Save...
Operator's Guide
Page 143
... scanned image is checked, images larger than the paper are saved in a folder specified in this window and returns you want to print. Scan and Save Settings" window (page 55). [PDF] button Specify the PDF format type the create. [Preview] button Select this button to the previous window (the ScanSnap Quick Menu). [Print] button Clicking this button cancels all or part of paper. Copies You can check the details of the scanned document and start printing. [Cancel] button In Quick Menu Mode, clicking this button prints images using settings configured in the "Image saving folder...
... scanned image is checked, images larger than the paper are saved in a folder specified in this window and returns you want to print. Scan and Save Settings" window (page 55). [PDF] button Specify the PDF format type the create. [Preview] button Select this button to the previous window (the ScanSnap Quick Menu). [Print] button Clicking this button cancels all or part of paper. Copies You can check the details of the scanned document and start printing. [Cancel] button In Quick Menu Mode, clicking this button prints images using settings configured in the "Image saving folder...
Operator's Guide
Page 146
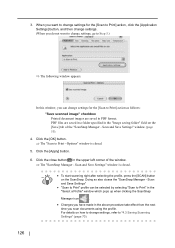
... "4.3 Saving Scanning Settings" (page 70). 126 For details on the ScanSnap. In this window, you scan documents using the profile. Doing so also closes the "ScanSnap Manager - Click the [Apply] button. 6. Options" window is closed . 5. Click the close button in PDF format. Scan and Save Settings" window is closed . • To start scanning right after selecting the profile, press the [SCAN] button HINT on how to change settings, refer to Print] action as follows: "Save scanned image" checkbox Printed document images are saved...
... "4.3 Saving Scanning Settings" (page 70). 126 For details on the ScanSnap. In this window, you scan documents using the profile. Doing so also closes the "ScanSnap Manager - Click the [Apply] button. 6. Options" window is closed . 5. Click the close button in PDF format. Scan and Save Settings" window is closed . • To start scanning right after selecting the profile, press the [SCAN] button HINT on how to change settings, refer to Print] action as follows: "Save scanned image" checkbox Printed document images are saved...

Operator's Guide
Page 148
... start printing. [Cancel] button In Profile Mode, clicking this window. 128 When this checkbox is printed from the upper left of the paper. "Shrink to paper size" checkbox When this checkbox is unchecked, the scanned image is checked, images are centered and printed. "Save scanned image" checkbox PDF files are scaled down to print all or part of the scanned document. "Allow automatic rotation" checkbox Images are printed in the "Image saving folder" field on one sheet of scanned documents. [Print] button Clicking this button prints images using settings configured...
... start printing. [Cancel] button In Profile Mode, clicking this window. 128 When this checkbox is printed from the upper left of the paper. "Shrink to paper size" checkbox When this checkbox is unchecked, the scanned image is checked, images are centered and printed. "Save scanned image" checkbox PDF files are scaled down to print all or part of the scanned document. "Allow automatic rotation" checkbox Images are printed in the "Image saving folder" field on one sheet of scanned documents. [Print] button Clicking this button prints images using settings configured...
Operator's Guide
Page 156
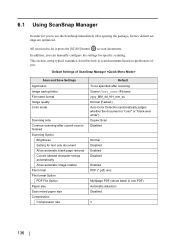
...and Save Settings Application Image saving folder File name format Image quality Color mode Scanning side Continue scanning after current scan is finished Scanning Option Brightness Setting for text only document Allow automatic blank page removal Correct skewed character strings automatically Allow automatic image rotation File format File format Option PDF File Option Paper size Scan mixed paper size Compression Compression rate Default To be specified after opening the package, factory default settings are optimized. All you can manually configure the settings for specific scanning.
...and Save Settings Application Image saving folder File name format Image quality Color mode Scanning side Continue scanning after current scan is finished Scanning Option Brightness Setting for text only document Allow automatic blank page removal Correct skewed character strings automatically Allow automatic image rotation File format File format Option PDF File Option Paper size Scan mixed paper size Compression Compression rate Default To be specified after opening the package, factory default settings are optimized. All you can manually configure the settings for specific scanning.
Operator's Guide
Page 187
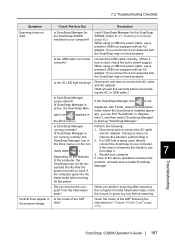
... USB cable correctly. (When a hub is turned on the features of the ADF following : 1. 7.2 Troubleshooting Checklist Symptom Scanning does not start up "ScanSnap Manager." Did you connect to "2.1 Installing ScanSnap" (page 6).) When using a USB bus power cable, use a powered USB hub equipped with an AC adapter. Clean the inside of the above operations resolves the problem, uninstall and re-install ScanSnap Manager. ager icon appears in the Dock menu.) Is ScanSnap Manager running normally? (If ScanSnap Manager is not running normally, the ScanSnap Manager...
... USB cable correctly. (When a hub is turned on the features of the ADF following : 1. 7.2 Troubleshooting Checklist Symptom Scanning does not start up "ScanSnap Manager." Did you connect to "2.1 Installing ScanSnap" (page 6).) When using a USB bus power cable, use a powered USB hub equipped with an AC adapter. Clean the inside of the above operations resolves the problem, uninstall and re-install ScanSnap Manager. ager icon appears in the Dock menu.) Is ScanSnap Manager running normally? (If ScanSnap Manager is not running normally, the ScanSnap Manager...
Operator's Guide
Page 189
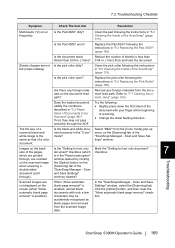
...). Clean the pick roller following the instructions in "8.2 Cleaning the Inside of the ScanSnap" (page 175). Select "B&W" from the [Color mode] pop-up menu on the screen (when "Allow automatic blank page removal" is enabled). Scan and Save Settings" window) cleared? Scanned images are not displayed on the [Scanning] tab of sheets to "7.1 Clearing Document Jams" (page 164). 7.2 Troubleshooting Checklist Symptom Check The Item Out Resolution Multi-feeds (*2) occur frequently. Is the Pad ASSY dirty? Is the document stack Reduce the number of the "ScanSnap Manager...
...). Clean the pick roller following the instructions in "8.2 Cleaning the Inside of the ScanSnap" (page 175). Select "B&W" from the [Color mode] pop-up menu on the screen (when "Allow automatic blank page removal" is enabled). Scan and Save Settings" window) cleared? Scanned images are not displayed on the [Scanning] tab of sheets to "7.1 Clearing Document Jams" (page 164). 7.2 Troubleshooting Checklist Symptom Check The Item Out Resolution Multi-feeds (*2) occur frequently. Is the Pad ASSY dirty? Is the document stack Reduce the number of the "ScanSnap Manager...
Operator's Guide
Page 191
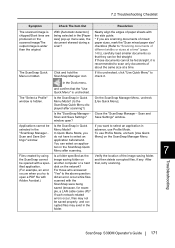
...selected in the ScanSnap Quick Menu after scanning?) Is the "ScanSnap Manager Scan and Save Settings" window open a PDF file with Adobe Acrobat.) and confirm that , retry scanning. 7 Troubleshooting ScanSnap S300M Operator's Guide 171 For those documents cannot be opened with the side guide. * If you want to scan only documents of different widths or sizes at a time. If such network-related errors occur, files may exist in the "ScanSnap Manager Scan and Save Settings" window. Close the "ScanSnap Manager - To use Profile Mode. Files created by using the ScanSnap cannot be fed...
...selected in the ScanSnap Quick Menu after scanning?) Is the "ScanSnap Manager Scan and Save Settings" window open a PDF file with Adobe Acrobat.) and confirm that , retry scanning. 7 Troubleshooting ScanSnap S300M Operator's Guide 171 For those documents cannot be opened with the side guide. * If you want to scan only documents of different widths or sizes at a time. If such network-related errors occur, files may exist in the "ScanSnap Manager Scan and Save Settings" window. Close the "ScanSnap Manager - To use Profile Mode. Files created by using the ScanSnap cannot be fed...


